这篇文章主要为大家展示了“idea如何新建聚合项目”,内容简而易懂,条理清晰,希望能够帮助大家解决疑惑,下面让小编带领大家一起研究并学习一下“idea如何新建聚合项目”这篇文章吧。
首先新建父工程
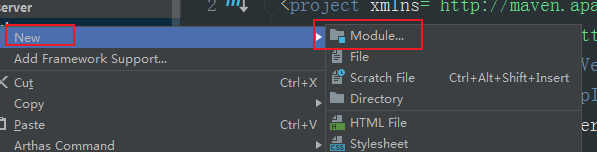
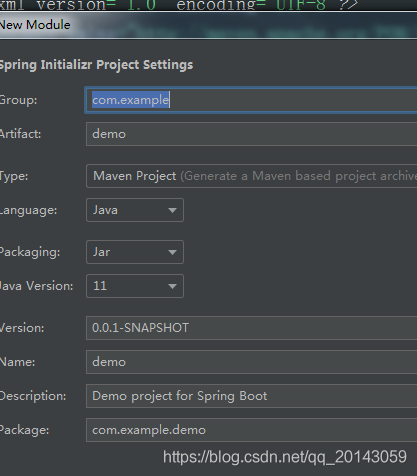
新建spring boot项目

填写项目信息
指定该子项目的路径

如果是组件类型的子项目 可以删除application.xml和启动类
父工程pom文件
<?xml version="1.0" encoding="UTF-8"?>
<project xmlns="http://maven.apache.org/POM/4.0.0" xmlns:xsi="http://www.w3.org/2001/XMLSchema-instance"
         xsi:schemaLocation="http://maven.apache.org/POM/4.0.0 http://maven.apache.org/xsd/maven-4.0.0.xsd">
    <modelVersion>4.0.0</modelVersion>
    <groupId>com.demo</groupId>
    <artifactId>project</artifactId>
    <version>1.0.0-SNAPSHOT</version>

    <properties>
        <spring-boot.version>2.3.5.RELEASE</spring-boot.version>
    </properties>

    <modules>
        <module>common-mail</module>
    </modules>

    <packaging>pom</packaging>

    <dependencyManagement>
        <dependencies>
            <dependency>
                <groupId>com.xx</groupId>
                <artifactId>common-assembly</artifactId>
                <version>${vanpeng.version}</version>
            </dependency>
        </dependencies>
    </dependencyManagement>

    <dependencies>
        <!-- swagger -->
        <dependency>
            <groupId>io.swagger</groupId>
            <artifactId>swagger-annotations</artifactId>
            <version>1.5.10</version>
        </dependency>
    </dependencies>

    <build>
        <plugins>
            <plugin>
                <groupId>org.apache.maven.plugins</groupId>
                <artifactId>maven-compiler-plugin</artifactId>
                <configuration>
                    <source>${java.version}</source>
                    <target>${java.version}</target>
                    <encoding>${project.build.sourceEncoding}</encoding>
                </configuration>
            </plugin>
        </plugins>
    </build>

</project><modules>:为包含的子工程artifactId名
<properties>:指常量 一般为版本号 方便统一修改
<dependencyManagement>:指定子工程有相同jar包时,使用父工程的版本号,而子工程不用在额外指定
<dependencies>:为父子工程可以同时引入的jar包
子工程pom文件
<?xml version="1.0" encoding="UTF-8"?>
<project xmlns="http://maven.apache.org/POM/4.0.0" xmlns:xsi="http://www.w3.org/2001/XMLSchema-instance"
         xsi:schemaLocation="http://maven.apache.org/POM/4.0.0 https://maven.apache.org/xsd/maven-4.0.0.xsd">
    <modelVersion>4.0.0</modelVersion>
    <parent>
        <groupId>com.demo</groupId>
        <artifactId>project</artifactId>
        <version>1.0.0-SNAPSHOT</version>
    </parent>

    <groupId>com.demo</groupId>
    <artifactId>common-assembly</artifactId>
    <version>1.0.0-SNAPSHOT</version>

    <properties>
        <java.version>1.8</java.version>
        <spring-cloud.version>Hoxton.SR8</spring-cloud.version>
    </properties>

    <dependencies>
        <!-- 此处可以引入其他子工程包 -->
	    <dependency>
            <groupId>com.demo</groupId>
            <artifactId>common-resource</artifactId>
        </dependency>
    </dependencies>

    <dependencyManagement>
        <dependencies>
            <dependency>
                <groupId>org.springframework.cloud</groupId>
                <artifactId>spring-cloud-dependencies</artifactId>
                <version>${spring-cloud.version}</version>
                <type>pom</type>
                <scope>import</scope>
            </dependency>
        </dependencies>
    </dependencyManagement>

    <build>
        <finalName>common-assembly-1.0.0-SNAPSHOT</finalName>
        <plugins>
            <plugin>
                <groupId>org.springframework.boot</groupId>
                <artifactId>spring-boot-maven-plugin</artifactId>
                <configuration>
                    <includeSystemScope>true</includeSystemScope>
                    <mainClass>com.demo.assembly.BusinessApplication</mainClass>
                </configuration>
                <executions>
                    <execution>
                        <goals>
                            <goal>repackage</goal>
                        </goals>
                    </execution>
                </executions>
            </plugin>
        </plugins>
    </build>

</project><parent>:为父工程的信息 也就是父工程pom中的groupId,artifactId 必填 <build>:为打包时的配置
注意com.vanpeng.assembly.BusinessApplication一定要配置 否则jar包启动会找不到主函数 pom也必须配置 这是在父子工程中必须配置的 意思是 需要以方式引入 而不是打成jar
以上是“idea如何新建聚合项目”这篇文章的所有内容,感谢各位的阅读!相信大家都有了一定的了解,希望分享的内容对大家有所帮助,如果还想学习更多知识,欢迎关注亿速云行业资讯频道!
亿速云「云服务器」,即开即用、新一代英特尔至强铂金CPU、三副本存储NVMe SSD云盘,价格低至29元/月。点击查看>>
免责声明:本站发布的内容(图片、视频和文字)以原创、转载和分享为主,文章观点不代表本网站立场,如果涉及侵权请联系站长邮箱:is@yisu.com进行举报,并提供相关证据,一经查实,将立刻删除涉嫌侵权内容。


 计算
计算 安全
安全 数据库
数据库 网络和加速
网络和加速 企业服务
企业服务


