这篇文章主要介绍“Redis如何实现延迟队列”的相关知识,小编通过实际案例向大家展示操作过程,操作方法简单快捷,实用性强,希望这篇“Redis如何实现延迟队列”文章能帮助大家解决问题。
<?xml version="1.0" encoding="UTF-8"?>
<project xmlns="http://maven.apache.org/POM/4.0.0" xmlns:xsi="http://www.w3.org/2001/XMLSchema-instance"
         xsi:schemaLocation="http://maven.apache.org/POM/4.0.0 https://maven.apache.org/xsd/maven-4.0.0.xsd">
    <modelVersion>4.0.0</modelVersion>
    <parent>
        <groupId>org.springframework.boot</groupId>
        <artifactId>spring-boot-starter-parent</artifactId>
        <version>2.3.12.RELEASE</version>
        <relativePath/> <!-- lookup parent from repository -->
    </parent>
    <groupId>com.homeey</groupId>
    <artifactId>redis-delay-queue</artifactId>
    <version>0.0.1-SNAPSHOT</version>
    <name>redis-delay-queue</name>
    <description>redis-delay-queue</description>
    <properties>
        <java.version>1.8</java.version>
    </properties>
    <dependencies>
        <dependency>
            <groupId>org.springframework.boot</groupId>
            <artifactId>spring-boot-starter-data-redis</artifactId>
        </dependency>
        <dependency>
            <groupId>org.springframework.boot</groupId>
            <artifactId>spring-boot-starter-web</artifactId>
        </dependency>
        <!-- https://mvnrepository.com/artifact/org.redisson/redisson -->
        <dependency>
            <groupId>org.redisson</groupId>
            <artifactId>redisson-spring-boot-starter</artifactId>
            <version>3.19.3</version>
        </dependency>
        <dependency>
            <groupId>org.redisson</groupId>
            <artifactId>redisson-spring-data-23</artifactId>
            <version>3.19.3</version>
        </dependency>
    </dependencies>

    <build>
        <plugins>
            <plugin>
                <groupId>org.springframework.boot</groupId>
                <artifactId>spring-boot-maven-plugin</artifactId>
                <configuration>
                    <excludes>
                        <exclude>
                            <groupId>org.projectlombok</groupId>
                            <artifactId>lombok</artifactId>
                        </exclude>
                    </excludes>
                </configuration>
            </plugin>
        </plugins>
    </build>
</project>
备注:处理redisson和springboot兼容性问题
springboot整合redisson有三种方式
第一种:通用的redis配置+redisson的自动配置[最简单]
第二种:使用单独的redisson配置文件
第三种:使用spring.redis.redisson这个配置key下进行配置
详细的整合查看 springboot整合redisson配置
spring:
  redis:
    database: 0
    host: localhost
    port: 6379
    timeout: 10000
    lettuce:
      pool:
        max-active: 8
        max-wait: -1
        min-idle: 0
        max-idle: 8
package com.homeey.redisdelayqueue.delay;

import lombok.RequiredArgsConstructor;
import lombok.extern.slf4j.Slf4j;
import org.redisson.api.RBlockingQueue;
import org.redisson.api.RDelayedQueue;
import org.redisson.api.RedissonClient;
import org.springframework.context.annotation.Bean;
import org.springframework.context.annotation.Configuration;
import org.springframework.stereotype.Component;

import javax.annotation.PostConstruct;
import java.util.concurrent.ExecutorService;
import java.util.concurrent.Executors;
import java.util.concurrent.TimeUnit;

/**
 * 明天的你会因今天到的努力而幸运
 *
 * @author jt4mrg@qq.com
 * 23:11 2023-02-19 2023
 **/
@Slf4j
@Component
@RequiredArgsConstructor
public class RedissonDelayQueue {

    private final RDelayedQueue<String> delayedQueue;
    private final RBlockingQueue<String> blockingQueue;


    @PostConstruct
    public void init() {
        ExecutorService executorService = Executors.newFixedThreadPool(1);
        executorService.submit(() -> {
            while (true) {
                try {
                    String task = blockingQueue.take();
                    log.info("rev delay task:{}", task);
                } catch (Exception e) {
                    log.error("occur error", e);
                }
            }
        });
    }

    public void offerTask(String task, long seconds) {
        log.info("add delay task:{},delay time:{}s", task, seconds);
        delayedQueue.offer(task, seconds, TimeUnit.SECONDS);
    }


    @Configuration
    static class RedissonDelayQueueConfigure {

        @Bean
        public RBlockingQueue<String> blockingQueue(RedissonClient redissonClient) {
            return redissonClient.getBlockingQueue("TOKEN-RENEWAL");
        }

        @Bean
        public RDelayedQueue<String> delayedQueue(RBlockingQueue<String> blockingQueue,
                                                  RedissonClient redissonClient) {
            return redissonClient.getDelayedQueue(blockingQueue);
        }
    }
}
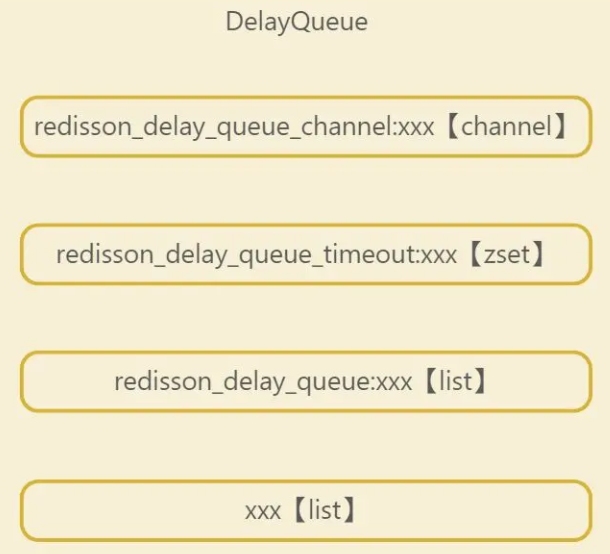
从RedissonDelayedQueue实现中我们看到有四个角色

redisson_delay_queue_timeout:xxx,sorted set数据类型,存放所有延迟任务,按照延迟任务的到期时间戳(提交任务时的时间戳 + 延迟时间)来排序的,所以列表的最前面的第一个元素就是整个延迟队列中最早要被执行的任务,这个概念很重要
redisson_delay_queue:xxx,list数据类型,暂时没发现什么用,只是在提交任务时会写入这里面,队列转移时又会删除里面的元素
xxx:list数据类型,被称为目标队列,这个里面存放的任务都是已经到了延迟时间的,可以被消费者获取的任务,所以上面demo中的RBlockingQueue的take方法是从这个目标队列中获取到任务的
redisson_delay_queue_channel:xxx,是一个channel,用来通知客户端开启一个延迟任务
RedissonDelayedQueue延迟队列创建时,指定了队列转移服务,以及实现延迟队列的四个重要校色的key。核心代码是指定队列转移任务
 QueueTransferTask task = new QueueTransferTask(commandExecutor.getConnectionManager()) {

            @Override
            protected RFuture<Long> pushTaskAsync() {
                return commandExecutor.evalWriteAsync(getRawName(), LongCodec.INSTANCE, RedisCommands.EVAL_LONG,
                        "local expiredValues = redis.call('zrangebyscore', KEYS[2], 0, ARGV[1], 'limit', 0, ARGV[2]); "//拿到zset中过期的值列表
                      + "if #expiredValues > 0 then " //如果有
                          + "for i, v in ipairs(expiredValues) do "
                              + "local randomId, value = struct.unpack('dLc0', v);"//解构消息,在提交任务时打包的消息
                              + "redis.call('rpush', KEYS[1], value);" //放入无前缀的list 队头
                              + "redis.call('lrem', KEYS[3], 1, v);"//移除带前缀list 队尾元素
                          + "end; "
                          + "redis.call('zrem', KEYS[2], unpack(expiredValues));" //移除zset中本次读取的过期元素
                      + "end; "
                        // get startTime from scheduler queue head task
                      + "local v = redis.call('zrange', KEYS[2], 0, 0, 'WITHSCORES'); "//取zset最小分值的元素
                      + "if v[1] ~= nil then "
                         + "return v[2]; " //返回分值,即过期时间
                      + "end "
                      + "return nil;",
                      Arrays.asList(getRawName(), timeoutSetName, queueName),
                      System.currentTimeMillis(), 100);
            }

            @Override
            protected RTopic getTopic() {
                return RedissonTopic.createRaw(LongCodec.INSTANCE, commandExecutor, channelName);
            }
        };
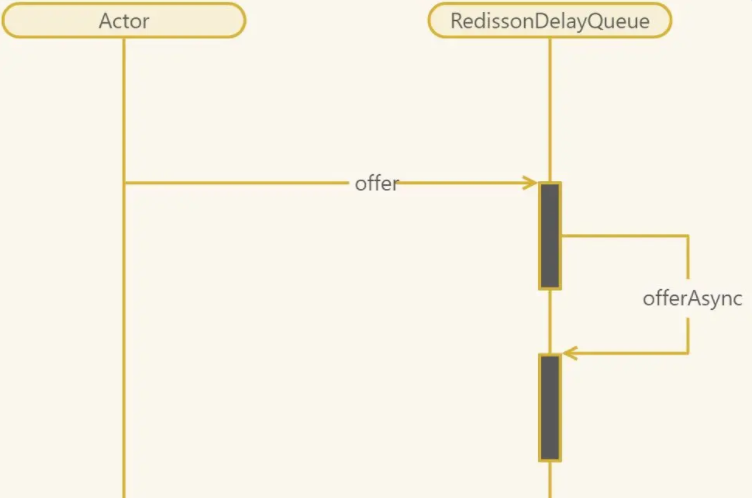
核心代码RedissonDelayedQueue#offerAsync
 return commandExecutor.evalWriteNoRetryAsync(getRawName(), codec, RedisCommands.EVAL_VOID,
                "local value = struct.pack('dLc0', tonumber(ARGV[2]), string.len(ARGV[3]), ARGV[3]);" //打包消息体:消息id,消息长度,消息值
              + "redis.call('zadd', KEYS[2], ARGV[1], value);"//zset中加入消息及其超时分值
              + "redis.call('rpush', KEYS[3], value);" //向带前缀的list中添加消息
              // if new object added to queue head when publish its startTime
              // to all scheduler workers
              + "local v = redis.call('zrange', KEYS[2], 0, 0); "//取出zset中第一个元素
              + "if v[1] == value then " //如果最快过期的元素就是这次发送的消息
                 + "redis.call('publish', KEYS[4], ARGV[1]); " //channel中发布一下超时时间
              + "end;",
              Arrays.asList(getRawName(), timeoutSetName, queueName, channelName),
timeout, randomId, encode(e));消费者最简单,直接从不带前缀的list中BLPOP读取就可以
关于“Redis如何实现延迟队列”的内容就介绍到这里了,感谢大家的阅读。如果想了解更多行业相关的知识,可以关注亿速云行业资讯频道,小编每天都会为大家更新不同的知识点。
免责声明:本站发布的内容(图片、视频和文字)以原创、转载和分享为主,文章观点不代表本网站立场,如果涉及侵权请联系站长邮箱:is@yisu.com进行举报,并提供相关证据,一经查实,将立刻删除涉嫌侵权内容。