上一篇文章我们讲述了页面初始加载数据的一些东西,本篇我们来讲一下查询按钮和分页按钮。在很久以前我写过一篇ASP.NET MVC4切近实战的文章,有关于分页的代码,本篇我们不采用微软的AJAX框架。
先看一下查询效果,在点击Get按钮之后,会进行AJAX请求。

js代码如下
jQuery(document).ready(function () {
    setRowBackColor();
    $("#btnsearch").click(function () {
        $("#selsamelist").empty();
        $("#seldifflist").empty();

        searchByCondition(1);
    });
})

function searchByCondition(pageIndex) {
    $.ajax({
        url: "/Home/GetSearchResult?pam=" + new Date().toTimeString(),
        type: "POST",
        datatype: "Html",
        data: {
            param: JSON.stringify({
                IsMarried: $("#ddlMarried").val(),
                StartDate: $("#txtdatestart").val(),
                EndDate: $("#txtdateend").val(),
                UserName: $.trim($("#txtusername").val()),
                PageIndex: pageIndex,
                PageSize: $("#hfdPageSize").val()
            })
        },
        beforeSend: function () {
            $("#divloding").show();
        },
        complete: function () {
            $("#divloding").hide();
        },
        success: function (data) {
            $("#divresult").html(data);
            setRowBackColor();
        },
        error: function () {
            alert("查询失败!");
        }
    });
}
在页面加载完成后,我们给Get按钮注册了一个click事件,请求action获取数据。在请求之前,我们展示一个正在获取数据的div,请求结束以后我们隐藏这个div。当查询成功完成以后,我们将服务端返回的页面加载到divresult。我们来看一下这个action。
[HttpPost]
        public PartialViewResult GetSearchResult()
        {
            string requestJson = Request["param"];
            JObject jObj = (JObject)JsonConvert.DeserializeObject(requestJson);
            string isMarried = jObj.Value<string>("IsMarried");
            string userName = jObj.Value<string>("UserName");
            string strStartDate = jObj.Value<string>("StartDate");
            string strEndDate = jObj.Value<string>("EndDate");
            int pageIndex = jObj.Value<int>("PageIndex");
            int pageSize = jObj.Value<int>("PageSize");
            int startPageIndex = jObj.Value<int>("StartPageIndex");

            DateTime startDate = DateTime.MinValue;
            DateTime endDate = DateTime.MinValue;
            DateTime.TryParse(strStartDate, out startDate);
            DateTime.TryParse(strEndDate, out endDate);

            UserInfoRequest request = new UserInfoRequest()
            {
                IsMarried = isMarried == "-1" ? string.Empty : isMarried,
                UserName = userName,
                StartDate = startDate == DateTime.MinValue ? null : (DateTime?)startDate,
                EndDate = endDate == DateTime.MinValue ? null : (DateTime?)endDate,
                PageIndex = pageIndex,
                PageSize = pageSize
            };

            DataResponse<UserDBEntity> dataResponse = GRLCBiz.GetInstance().GetUserInfoEntityList(request);
            UserInfoViewModel userInfoViewModel = new UserInfoViewModel();
            userInfoViewModel.DataResponse = dataResponse;
            userInfoViewModel.DataResponse.PageSize = ConstValues.CONN_DefaultPageSize;
            userInfoViewModel.DataResponse.StartPageIndex = startPageIndex;
            return PartialView("~/Views/Partial/UserInfoPartial.cshtml", userInfoViewModel);
        }
首先在action中,获取客户端传递过来的json格式的请求参数,我们利用Newtonsoft.Json.dll来解析客户端传递过来的json对象。然后构造request,最后调用GetUserInfoEntityList获取数据。在上节中我们在讲到DAL层获取数据的时候,有一个DBScriptManager类,这个类就是专门用来读取DBScriptXML工程下的xml文件中的sql脚本的。
public class DBScriptManager
    {
        public static string GetScript(Type remotingClassType, string key)
        {
            string folder = ConstValues.CON_DbScriptXmlFolder;
            string xmlFile = Path.Combine(AppDomain.CurrentDomain.BaseDirectory, folder);
            xmlFile = Path.Combine(xmlFile, remotingClassType.FullName + ".xml");

            string xPathExpression = "/Scripts/Script[@Key='" + key.Trim() + "']/text()";
            return ExecuteXPath(xmlFile, xPathExpression);
        }
        .......
     }
这个类其实就是根据web.config配置的xml文件的文件夹路径加上文件路径(class fullname+.xml)找到xml文件后,进行解析得到sql script。所以大家看到xml文件的命名是DAL层下面的类的fullName。

这样的定义便于一一对应,对于维护来说也比较方便。另外使用xml文件的优势在于它易于修改,如果脚本写在SP中或者代码中,就不是那么容易去修改。因为大多数情况下sql服务器是不允许乱动的,代码也是需要重新编译才能上线的。当然了,复杂的业务处理还是要放到SP中,因为SP内部的一些执行优化机制是其他方式所不具备的。
OK,查询讲完了,我们看一下分页,首先我在webConfig中定义了一个节点,用于调整显示页码的数量。
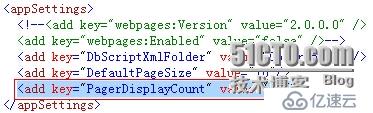
OK,我们定义的值为6。看一下分页partial view的代码
@using Bruce.GRLC.Model.Response;
@using Bruce.GRLC.Utility;
@using Bruce.GRLC.Model.Entity;
@model DataResponse<UserDBEntity>
<ul class="pagination pagination-lg">
@if (Model != null)
{
@Html.HiddenFor(m => m.PageSize, new { id = "hfdPageSize" })
<li><a href="#">«</a></li>
if (Model.StartPageIndex > ConstValues.CONN_PagerDisplayCount)
{
<li><a href="#" id="linkPaginationprev" onclick="linkPaginationClick(@Model.StartPageIndex,@Model.PageSize,@Model.TotalCount,0)">expand</a></li>
}
for (int i = Model.StartPageIndex; i <= Model.TotalPages; i++)
{
<li id="li_@i"><a href="#" id="link_@i" onclick="searchByCondition(@i,@Model.StartPageIndex)">@i</a></li>
if (i > 0 && i % ConstValues.CONN_PagerDisplayCount == 0)
{
break;
}
}
if (Model.StartPageIndex < Model.TotalPages - ConstValues.CONN_PagerDisplayCount)
{
<li><a href="#" id="linkPaginationnext" onclick="linkPaginationClick(@Model.StartPageIndex,@Model.PageSize,@Model.TotalCount,1)">expand</a></li>
}
<li><a href="#">»</a></li>
}
</ul>还是使用BootStrap提供的样式,目前只有两页的数据,其实上面的这段代码是想实现如果配置的页码数是6,当我在1-6页时,显示展示下一批页码的链接,当我在7-12页时,我就显示前一批和下一批的链接。

现在的页码有点少,稍等,我给数据库插入一批数据。
DECLARE @Index INT = 1
WHILE(@Index<=100)
BEGIN
	INSERT INTO dbo.[User]
	(
		UseNo,
		pwd,
		IsAdmin
	)
	SELECT
		'Bruce' + CAST(@Index AS CHAR(3)),
		pwd,
		'0'
	FROM dbo.[User] WITH(NOLOCK)
	WHERE UseNo = 'lilei'

	SET @Index = @Index + 1
END
插入完成,我们看一下效果
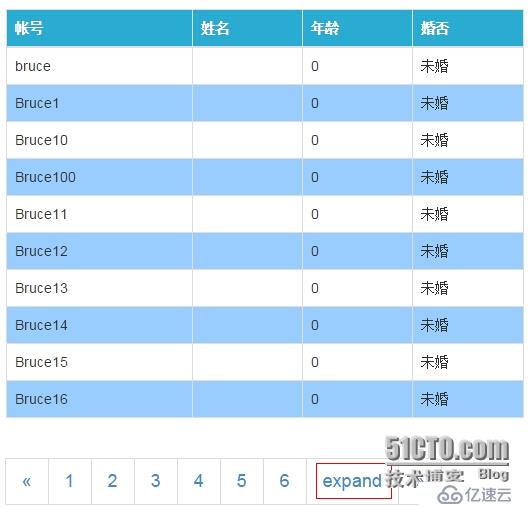
我们看到expand按钮出来了,我点击它,应该出来7-12页。

ok,很好,因为目前只有12页的数据,所以我们还无法看到12页以后的expand链接,不要紧,我们再插入一批数据,刷新,效果如下

看到了吧,前后都有一个expand链接。OK,页面代码实现的话,比较简单,大家仔细看就明白了。接下来我们看一下这个页码expand的js方法。
function linkPaginationClick(pageindex, pagesize, totalcount, type) {
    var urlParam = pageindex + "_" + pagesize + "_" + totalcount + "_" + type;
    $.ajax({
        url: "/Home/GetNewPaginationView/" + urlParam + "?pam=" + new Date().toTimeString(),
        type: "GET",
        datatype: "Html",
        success: function (data) {
            $("#divpagination").html(data);
        }
    });
}
将pageIndex,pagesize,totalcount和type(标示是向前expand,还是向后expand)传递到服务端,在服务端计算好之后返回一个partial页码给客户端。
好了,我们看一下action的代码。
[HttpGet]
        public PartialViewResult GetNewPaginationView(string id)
        {
            string[] paramArray = id.Split(new char[] { '_' }, StringSplitOptions.RemoveEmptyEntries);
            DataResponse<UserDBEntity> dataResponse = new DataResponse<UserDBEntity>();
            dataResponse.TotalCount = int.Parse(paramArray[2]);
            dataResponse.PageSize = int.Parse(paramArray[1]);

            string type = paramArray[3];
            if (type == "0")
            {
                dataResponse.StartPageIndex = int.Parse(paramArray[0]) - ConstValues.CONN_PagerDisplayCount;
            }
            else
            {
                dataResponse.StartPageIndex = int.Parse(paramArray[0]) + ConstValues.CONN_PagerDisplayCount;
            }

            return PartialView("~/Views/Partial/PaginationPartial.cshtml", dataResponse);
        }
当我们判断是向前expand的时候,我们就把起始页码减去配置的需要显示的页数。反之,则加上。在这里,其实可以在客户端实现这个东西,在服务端实现是一种浪费,稍后我会将其改成客户端实现。
OK,最后我们看一下点击页码的ajax请求。
function searchByCondition(pageIndex, startPageIndex) {
$.ajax({
url: "/Home/GetSearchResult?pam=" + new Date().toTimeString(),
type: "POST",
datatype: "Html",
data: {
param: JSON.stringify({
IsMarried: $("#ddlMarried").val(),
StartDate: $("#txtdatestart").val(),
EndDate: $("#txtdateend").val(),
UserName: $.trim($("#txtusername").val()),
PageIndex: pageIndex,
PageSize: $("#hfdPageSize").val(),
StartPageIndex: startPageIndex
})
},
beforeSend: function () {
$("#divloding").show();
},
complete: function () {
$("#divloding").hide();
},
success: function (data) {
$("#divresult").html(data);
$("#li_" + pageIndex).addClass("active");
setRowBackColor();
},
error: function () {
alert("查询失败!");
}
});
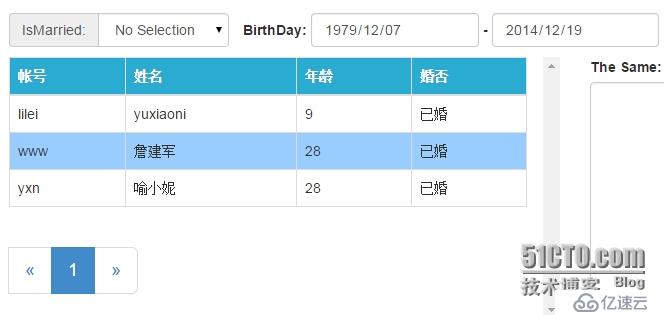
}将页码传进来就行了,和查询调用同一个action。有时候用户想知道我在哪一页,我们就需要给链接加上样式。
$("#li_" + pageIndex).addClass("active");给当前的页码加上蓝色背景。

OK了,我们看见第10页的背景变成蓝色了。最后我们看一下输入查询条件查询,就按照出生日期查询吧
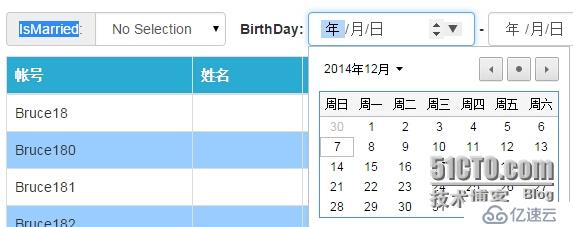
日期选择使用的是Html5的新标签<Input type="date">。
OK,本节到此结束,下节我们来讲Compare功能。
免责声明:本站发布的内容(图片、视频和文字)以原创、转载和分享为主,文章观点不代表本网站立场,如果涉及侵权请联系站长邮箱:is@yisu.com进行举报,并提供相关证据,一经查实,将立刻删除涉嫌侵权内容。


