这篇文章主要为大家展示了“ImageLoader中如何实现磁盘命名和图片缓存算法”,内容简而易懂,条理清晰,希望能够帮助大家解决疑惑,下面让小编带领大家一起研究并学习一下“ImageLoader中如何实现磁盘命名和图片缓存算法”这篇文章吧。
ImageLoader的图片缓存分成磁盘和内存两种,这里分析一下磁盘缓存以及图片文件名算法的实现
默认是不存储在磁盘上的,需要手动打开开关
如下
DisplayImageOptions options = new DisplayImageOptions.Builder()
                .cacheInMemory(true) // default false
                .cacheOnDisk(true) // default false

imageLoader.displayImage("", imageView, options, null, null);/**
* Generates names for files at disk cache
*
* @author Sergey Tarasevich (nostra13[at]gmail[dot]com)
* @since 1.3.1
*/
public interface FileNameGenerator {
/** Generates unique file name for image defined by URI */
String generate(String imageUri);
}接口是FileNameGenerator,此接口非常简单明了,只有一个根据图片uri产生一个图片文件名称的方法。
它包含两个实现类
HashCodeFileNameGenerator
Md5FileNameGenerator
接下来,分别看这两个类的实现
/**
 * Names image file as image URI {@linkplain String#hashCode() hashcode}
 *
 * @author Sergey Tarasevich (nostra13[at]gmail[dot]com)
 * @since 1.3.1
 */
public class HashCodeFileNameGenerator implements FileNameGenerator {
   @Override
   public String generate(String imageUri) {
      return String.valueOf(imageUri.hashCode());
   }
}
实现比较简单,根据uri的hashcode转化成String即可,默认就是Hashcode命名。
/**
 * Names image file as MD5 hash of image URI
 *
 * @author Sergey Tarasevich (nostra13[at]gmail[dot]com)
 * @since 1.4.0
 */
public class Md5FileNameGenerator implements FileNameGenerator {

   private static final String HASH_ALGORITHM = "MD5";
   private static final int RADIX = 10 + 26; // 10 digits + 26 letters

   @Override
   public String generate(String imageUri) {
      byte[] md5 = getMD5(imageUri.getBytes());
      BigInteger bi = new BigInteger(md5).abs();
      return bi.toString(RADIX);
   }

   private byte[] getMD5(byte[] data) {
      byte[] hash = null;
      try {
         MessageDigest digest = MessageDigest.getInstance(HASH_ALGORITHM);
         digest.update(data);
         hash = digest.digest();
      } catch (NoSuchAlgorithmException e) {
         L.e(e);
      }
      return hash;
   }
}
通过imageUri得到byte数组,然后通过MD5算法得到文件名
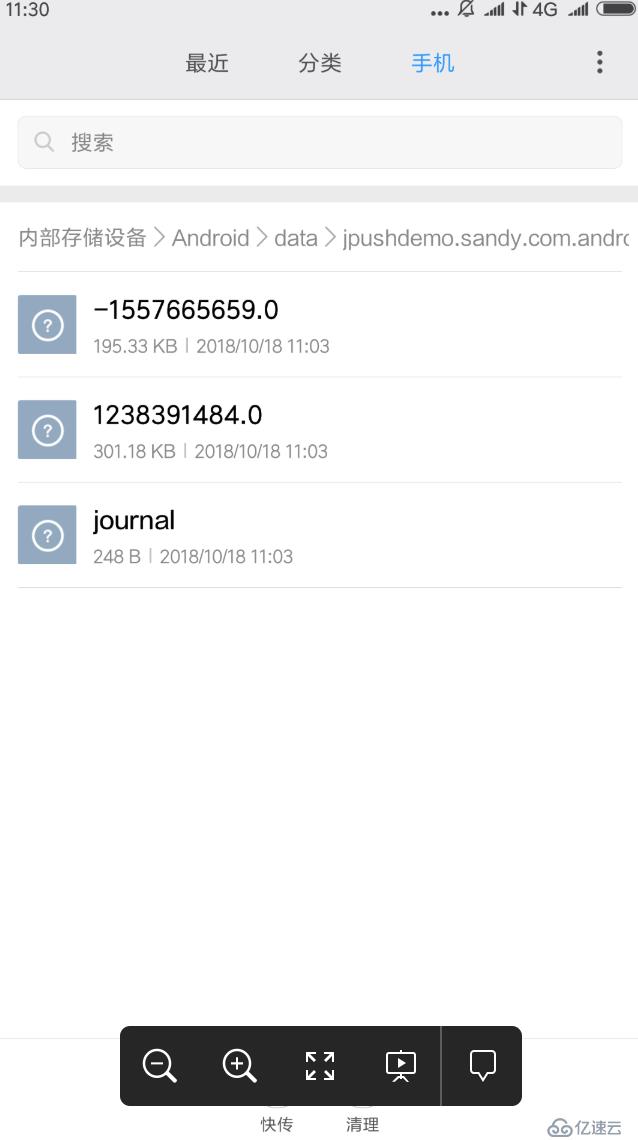
一般默认优先选择sdk/android/data/packageName/cache/uil-images卡,如果sdk目录创建失败,那么会选择/data/data/packageName目录
其中-1557665659.0和1238391484.0两个就是图片存储文件
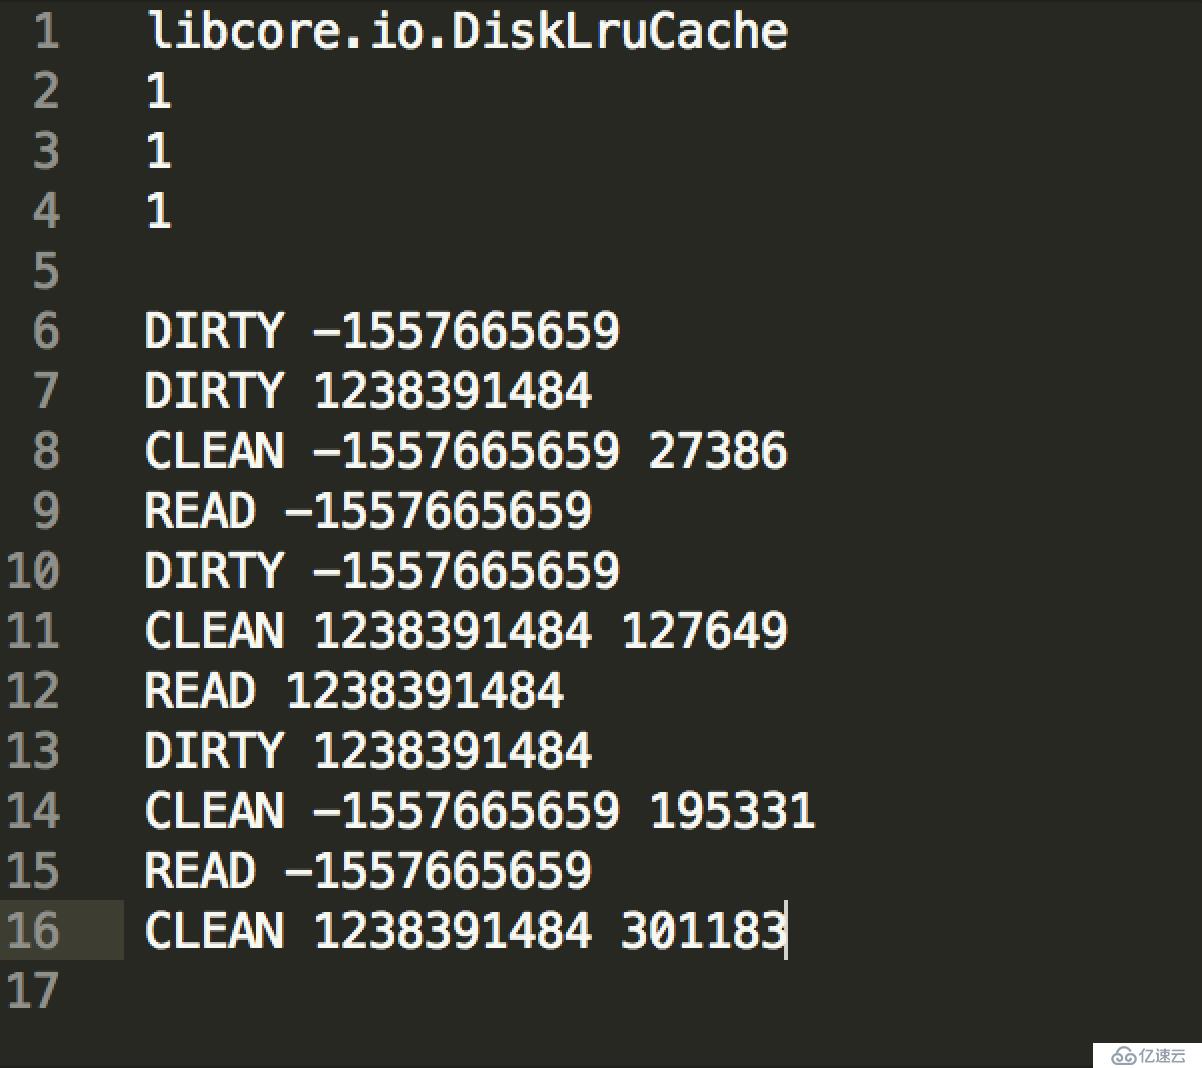
journal是操作记录描述性文件,内容如下

DIRTY: 操作记录创建,如果DIRTY后面没有CLEAN或者REMOVE,那么这个图片会被删除。
CLEAN: 记录成功创建和访问
READ: 记录成功访问
REMOVE: 记录删除
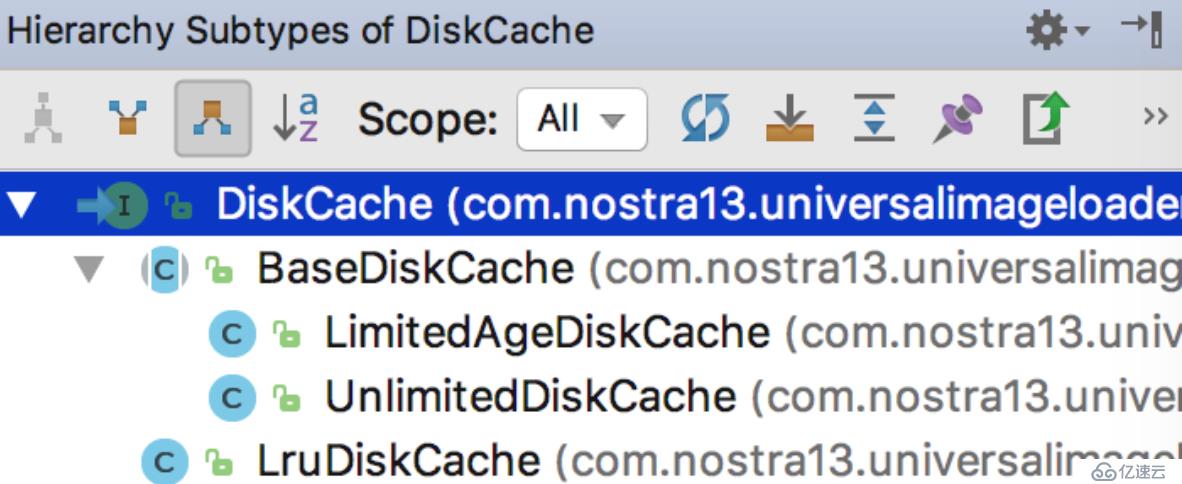
磁盘缓存算法的接口是DiskCache,接口很简单明了。
public interface DiskCache {

   File getDirectory();

   File get(String imageUri);

   boolean save(String imageUri, InputStream imageStream, IoUtils.CopyListener listener) throws IOException;

   boolean save(String imageUri, Bitmap bitmap) throws IOException;

   boolean remove(String imageUri);

   void close();

   void clear();
}| 方法名 | 解释 |
|---|---|
| getDirectory() | 获取存储目录 |
| get(String imageUri) | 根据imageUri获取图片文件 |
| save(String imageUri, InputStream imageStream, IoUtils.CopyListener listener) | 保存图片 |
| remove(String imageUri) | 删除图片缓存 |
| close() | 关闭磁盘缓存,释放资源 |
| clear() | 清理所有的磁盘缓存 |

下面详细看每个类的实现
public class LruDiskCache implements DiskCache {
    protected DiskLruCache cache;
    ...
    protected final FileNameGenerator fileNameGenerator;
    ...

    public LruDiskCache(File cacheDir, File reserveCacheDir, FileNameGenerator fileNameGenerator, long cacheMaxSize,
            int cacheMaxFileCount) throws IOException {
        ...
        initCache(cacheDir, reserveCacheDir, cacheMaxSize, cacheMaxFileCount);
    }

    private void initCache(File cacheDir, File reserveCacheDir, long cacheMaxSize, int cacheMaxFileCount)
            throws IOException {
        try {
            cache = DiskLruCache.open(cacheDir, 1, 1, cacheMaxSize, cacheMaxFileCount);
        } catch (IOException e) {
            ...
        }
    }

    @Override
    public File getDirectory() {
        return cache.getDirectory();
    }

    @Override
    public File get(String imageUri) {
        DiskLruCache.Snapshot snapshot = null;
        try {
            snapshot = cache.get(getKey(imageUri));
            return snapshot == null ? null : snapshot.getFile(0);
        } catch (IOException e) {
            L.e(e);
            return null;
        } finally {
            if (snapshot != null) {
                snapshot.close();
            }
        }
    }

    @Override
    public boolean save(String imageUri, InputStream imageStream, IoUtils.CopyListener listener) throws IOException {
        DiskLruCache.Editor editor = cache.edit(getKey(imageUri));
        if (editor == null) {
            return false;
        }

        OutputStream os = new BufferedOutputStream(editor.newOutputStream(0), bufferSize);
        boolean copied = false;
        try {
            copied = IoUtils.copyStream(imageStream, os, listener, bufferSize);
        } finally {
            IoUtils.closeSilently(os);
            if (copied) {
                editor.commit();
            } else {
                editor.abort();
            }
        }
        return copied;
    }
    ...

    @Override
    public boolean remove(String imageUri) {
        try {
            return cache.remove(getKey(imageUri));
        } catch (IOException e) {
            L.e(e);
            return false;
        }
    }

    @Override
    public void close() {
        try {
            cache.close();
        } catch (IOException e) {
            L.e(e);
        }
        cache = null;
    }

    @Override
    public void clear() {
        try {
            cache.delete();
        } catch (IOException e) {
            L.e(e);
        }
        try {
            initCache(cache.getDirectory(), reserveCacheDir, cache.getMaxSize(), cache.getMaxFileCount());
        } catch (IOException e) {
            L.e(e);
        }
    }

    private String getKey(String imageUri) {
        return fileNameGenerator.generate(imageUri);
    }
}
LruDiskCache有几个比较重要的属性,
protected DiskLruCache cache;
protected final FileNameGenerator fileNameGenerator;
FileNameGenerator就是上面说的文件命名生成器,包括hashcode和md5算法。我们思考下,为什么需要FileNameGenerator?
个人以为网络上面的uri可能是千奇百怪的,甚至包括特殊字符,那作为文件名显然不合适。所以,这个时候来一次hashcode,或者md5转换,获取文件名是最好的。
DiskLruCache,窃以为这个命名不是很好,因为跟LruDiskCache很类似(我第一眼就看成一个东西了!)
这个DiskLruCache很重要,它维护了磁盘图片文件缓存的操作记录,缓存和文件对应关系等。
而且如果你仔细看LruDiskCache的各个方法时会发现,基本都是调用cache的对应方法。
所以,我们主要接下来看DiskLruCache代码
final class DiskLruCache implements Closeable {
   ...
   private final File directory;
   private final File journalFile;
   ...
   private Writer journalWriter;
   private final LinkedHashMap<String, Entry> lruEntries =
         new LinkedHashMap<String, Entry>(0, 0.75f, true);

   ...
}
DiskLruCache包含了journalFile,文件里面具体的含义可以第四点的样例。包含了
LinkedHashMap<String, Entry> lruEntries
表示每个图片的缓存记录,String表示key, Entry表示图片的描述信息
private final class Entry {
   private final String key;

   /** Lengths of this entry's files. */
   private final long[] lengths;

   /** True if this entry has ever been published. */
   private boolean readable;

   /** The ongoing edit or null if this entry is not being edited. */
   private Editor currentEditor;

   /** The sequence number of the most recently committed edit to this entry. */
   private long sequenceNumber;

   public File getCleanFile(int i) {
      return new File(directory, key + "." + i);
   }

   public File getDirtyFile(int i) {
      return new File(directory, key + "." + i + ".tmp");
   }
}
我们以保存图片缓存为例,分析下LruDiskCache的工作流程,首先看LruDiskCache的save方法
public boolean save(String imageUri, InputStream imageStream, IoUtils.CopyListener listener) throws IOException {
   DiskLruCache.Editor editor = cache.edit(getKey(imageUri));
   if (editor == null) {
      return false;
   }

   OutputStream os = new BufferedOutputStream(editor.newOutputStream(0), bufferSize);
   boolean copied = false;
   try {
      copied = IoUtils.copyStream(imageStream, os, listener, bufferSize);
   } finally {
      IoUtils.closeSilently(os);
      if (copied) {
         editor.commit();
      } else {
         editor.abort();
      }
   }
   return copied;
}首先根据imageUri生成文件名,也就是key,目前我们用的是hashCode
private String getKey(String imageUri) {
   return fileNameGenerator.generate(imageUri);
}private synchronized Editor edit(String key, long expectedSequenceNumber) throws IOException {
checkNotClosed();
validateKey(key);
Entry entry = lruEntries.get(key);
if (expectedSequenceNumber != ANY_SEQUENCE_NUMBER && (entry == null
|| entry.sequenceNumber != expectedSequenceNumber)) {
return null; // Snapshot is stale.
}
if (entry == null) {
entry = new Entry(key);
lruEntries.put(key, entry);
} else if (entry.currentEditor != null) {
return null; // Another edit is in progress.
}
Editor editor = new Editor(entry);
entry.currentEditor = editor;
// Flush the journal before creating files to prevent file leaks.
journalWriter.write(DIRTY + ' ' + key + '\n');
journalWriter.flush();
return editor;
}从lruEntries里面根据key获取到对应的图片Entry对象,如果没有就新建一个。
然后利用journalWriter写入一条DIRTY记录。
public OutputStream newOutputStream(int index) throws IOException {
   synchronized (DiskLruCache.this) {
      if (entry.currentEditor != this) {
         throw new IllegalStateException();
      }
      if (!entry.readable) {
         written[index] = true;
      }
      File dirtyFile = entry.getDirtyFile(index);
      FileOutputStream outputStream;
      try {
         outputStream = new FileOutputStream(dirtyFile);
      } catch (FileNotFoundException e) {
         // Attempt to recreate the cache directory.
         directory.mkdirs();
         try {
            outputStream = new FileOutputStream(dirtyFile);
         } catch (FileNotFoundException e2) {
            // We are unable to recover. Silently eat the writes.
            return NULL_OUTPUT_STREAM;
         }
      }
      return new FaultHidingOutputStream(outputStream);
   }
}
public File getDirtyFile(int i) {
return new File(directory, key + "." + i + ".tmp");
}注意这里打开的是drity文件,就是正常的文件后面加上一个.tmp后缀。
public static boolean copyStream(InputStream is, OutputStream os, CopyListener listener, int bufferSize)
      throws IOException {
   int current = 0;
   int total = is.available();
   if (total <= 0) {
      total = DEFAULT_IMAGE_TOTAL_SIZE;
   }

   final byte[] bytes = new byte[bufferSize];
   int count;
   if (shouldStopLoading(listener, current, total)) return false;
   while ((count = is.read(bytes, 0, bufferSize)) != -1) {
      os.write(bytes, 0, count);
      current += count;
      if (shouldStopLoading(listener, current, total)) return false;
   }
   os.flush();
   return true;
}
private static boolean shouldStopLoading(CopyListener listener, int current, int total) {
if (listener != null) {
boolean shouldContinue = listener.onBytesCopied(current, total);
if (!shouldContinue) {
if (100 * current / total < CONTINUE_LOADING_PERCENTAGE) {
return true; // if loaded more than 75% then continue loading anyway
}
}
}
return false;
}很普通的文件流读写,有意思的是shouldStopLoading,它给了我们一个使用listener终止copy的时机。
public static interface CopyListener {
   /**
    * @param current Loaded bytes
    * @param total   Total bytes for loading
    * @return <b>true</b> - if copying should be continued; <b>false</b> - if copying should be interrupted
    */
   boolean onBytesCopied(int current, int total);
}IoUtils.closeSilently(os);
假设没有出错,completeEdit里面,会把dirty文件正式名称成图片缓存文件
dirty.renameTo(clean);
然后写入一条CLEAN或者REMOVE操作日志到journal文件中。
具体可以看代码
editor.commit();
public void commit() throws IOException {
   if (hasErrors) {
      completeEdit(this, false);
      remove(entry.key); // The previous entry is stale.
   } else {
      completeEdit(this, true);
   }
   committed = true;
}
private synchronized void completeEdit(Editor editor, boolean success) throws IOException {
...
for (int i = 0; i < valueCount; i++) {
File dirty = entry.getDirtyFile(i);
if (success) {
if (dirty.exists()) {
File clean = entry.getCleanFile(i);
dirty.renameTo(clean); //保存dirty到正式图片文件
long oldLength = entry.lengths[i];
long newLength = clean.length();
entry.lengths[i] = newLength;
size = size - oldLength + newLength;
fileCount++;
}
} else {
deleteIfExists(dirty);
}
}
redundantOpCount++;
entry.currentEditor = null;
if (entry.readable | success) {// 写入CLEAN操作日志
entry.readable = true;
journalWriter.write(CLEAN + ' ' + entry.key + entry.getLengths() + '\n');
if (success) {
entry.sequenceNumber = nextSequenceNumber++;
}
} else {
lruEntries.remove(entry.key); //操作失败,写入REMOVE操作日志
journalWriter.write(REMOVE + ' ' + entry.key + '\n');
}
journalWriter.flush();
if (size > maxSize || fileCount > maxFileCount || journalRebuildRequired()) {
executorService.submit(cleanupCallable);
}
}这样一次文件保存操作就完成了。
BaseDiskCache是抽象类,实现了基本的图片文件存储,获取,删除等操作,并没有做什么限制。
如save和get, remove等操作
public abstract class BaseDiskCache implements DiskCache {
   ...

   protected final FileNameGenerator fileNameGenerator;
   ...

   @Override
   public File getDirectory() {
      return cacheDir;
   }

   @Override
   public File get(String imageUri) {
      return getFile(imageUri);
   }

   @Override
   public boolean save(String imageUri, InputStream imageStream, IoUtils.CopyListener listener) throws IOException {
      File imageFile = getFile(imageUri);
      File tmpFile = new File(imageFile.getAbsolutePath() + TEMP_IMAGE_POSTFIX);
      boolean loaded = false;
      try {
         OutputStream os = new BufferedOutputStream(new FileOutputStream(tmpFile), bufferSize);
         try {
            loaded = IoUtils.copyStream(imageStream, os, listener, bufferSize);
         } finally {
            IoUtils.closeSilently(os);
         }
      } finally {
         if (loaded && !tmpFile.renameTo(imageFile)) {
            loaded = false;
         }
         if (!loaded) {
            tmpFile.delete();
         }
      }
      return loaded;
   }

   @Override
   public boolean remove(String imageUri) {
      return getFile(imageUri).delete();
   }

   @Override
   public void close() {
      // Nothing to do
   }

   @Override
   public void clear() {
      File[] files = cacheDir.listFiles();
      if (files != null) {
         for (File f : files) {
            f.delete();
         }
      }
   }

   protected File getFile(String imageUri) {
      String fileName = fileNameGenerator.generate(imageUri);
      File dir = cacheDir;
      if (!cacheDir.exists() && !cacheDir.mkdirs()) {
         if (reserveCacheDir != null && (reserveCacheDir.exists() || reserveCacheDir.mkdirs())) {
            dir = reserveCacheDir;
         }
      }
      return new File(dir, fileName);
   }
 }
以save为例,首先会生成一个tmp文件,然后把网络图片文件流写入tmp文件。
OutputStream os = new BufferedOutputStream(new FileOutputStream(tmpFile),
loaded = IoUtils.copyStream(imageStream, os, listener, bufferSize);
然后把tmp文件重新名称成正式的文件
tmpFile.renameTo(imageFile)
和BaseDiskCache完全一样,并没有新的逻辑
限制存储时间的文件存储管理,当我们尝试获取缓存文件的时候会去删除时间过长的文件,存储的空间没有限制。
我们以save和get为例
private final Map<File, Long> loadingDates = Collections.synchronizedMap(new HashMap<File, Long>());
@Override
public boolean save(String imageUri, Bitmap bitmap) throws IOException {
   boolean saved = super.save(imageUri, bitmap);
   rememberUsage(imageUri);
   return saved;
}
private void rememberUsage(String imageUri) {
File file = getFile(imageUri);
long currentTime = System.currentTimeMillis();
file.setLastModified(currentTime);
loadingDates.put(file, currentTime);
}save的时候,会调用rememberUsage方法,使用一个HashMap来存储缓存时间。
get
@Override
public File get(String imageUri) {
   File file = super.get(imageUri);
   if (file != null && file.exists()) {
      boolean cached;
      Long loadingDate = loadingDates.get(file);
      if (loadingDate == null) {
         cached = false;
         loadingDate = file.lastModified();
      } else {
         cached = true;
      }

      if (System.currentTimeMillis() - loadingDate > maxFileAge) {
         file.delete();
         loadingDates.remove(file);
      } else if (!cached) {
         loadingDates.put(file, loadingDate);
      }
   }
   return file;
}
get的时候会根据当前时间和缓存时间比较,如果大于maxFileAge,那么就删除它,从而实现了限制时间文件存储。
以上是“ImageLoader中如何实现磁盘命名和图片缓存算法”这篇文章的所有内容,感谢各位的阅读!相信大家都有了一定的了解,希望分享的内容对大家有所帮助,如果还想学习更多知识,欢迎关注亿速云行业资讯频道!
免责声明:本站发布的内容(图片、视频和文字)以原创、转载和分享为主,文章观点不代表本网站立场,如果涉及侵权请联系站长邮箱:is@yisu.com进行举报,并提供相关证据,一经查实,将立刻删除涉嫌侵权内容。