жӮЁеҘҪпјҢзҷ»еҪ•еҗҺжүҚиғҪдёӢи®ўеҚ•е“ҰпјҒ
жӮЁеҘҪпјҢзҷ»еҪ•еҗҺжүҚиғҪдёӢи®ўеҚ•е“ҰпјҒ
еҺҹжң¬д»ҘдёәпјҢSpring йҖҡиҝҮи§Јжһҗ bean зҡ„й…ҚзҪ®пјҢз”ҹжҲҗ并注еҶҢ bean defintions зҡ„иҝҮзЁӢдёҚеӨӘеӨҚжқӮпјҢжҜ”иҫғз®ҖеҚ•пјҢдёҚз”ЁеҚ•зӢ¬ејҖиҫҹдёҖзҜҮеҚҡж–ҮжқҘи®Іиҝ°пјӣдҪҶжҳҜеҪ“еңЁеҲҶжһҗеүҚйқўдёӨдёӘз« иҠӮжңүе…і @AutowiredгҖҒ@ComponentгҖҒ@Service жіЁи§Јзҡ„жіЁе…ҘжңәеҲ¶зҡ„ж—¶еҖҷпјҢеҸ‘зҺ°пјҢеҰӮжһңжІЎжңүеҜ№жңүе…і bean defintions зҡ„и§Јжһҗе’ҢжіЁеҶҢжңәеҲ¶еҪ»еә•еј„жҳҺзҷҪпјҢеҲҷеҫҲйҡҫеј„жё…жҘҡ annotation еңЁ Spring е®№еҷЁдёӯзҡ„еә•еұӮиҝҗиЎҢжңәеҲ¶пјӣжүҖд»ҘпјҢжң¬зҜҮеҚҡж–ҮдҪңиҖ…е°ҶиҜ•еӣҫеҺ»еј„жё…жҘҡ Spring е®№еҷЁеҶ…йғЁжҳҜеҰӮдҪ•еҺ»и§Јжһҗ bean й…ҚзҪ®е№¶з”ҹжҲҗе’ҢжіЁеҶҢ bean definitions зҡ„зӣёе…ідё»жөҒзЁӢпјӣ
еӨҮжіЁпјҢжң¬ж–ҮжҳҜдҪңиҖ…зҡ„еҺҹеҲӣдҪңе“ҒпјҢиҪ¬иҪҪиҜ·жіЁжҳҺеҮәеӨ„гҖӮ
вһҘ bean definitions жҳҜд»Җд№Ҳпјҹ
е…¶е®һеҫҲз®ҖеҚ•пјҢе°ұжҳҜ Java дёӯзҡ„ POJOпјҢз”ЁжқҘжҸҸиҝ° bean й…ҚзҪ®дёӯзҡ„ element е…ғзҙ зҡ„пјҢжҜ”еҰӮпјҢжҲ‘们жңүеҰӮдёӢзҡ„дёҖдёӘз®ҖеҚ•зҡ„й…ҚзҪ®
beans.xml
<beans xmlns="http://www.springframework.org/schema/beans"
    xmlns:xsi="http://www.w3.org/2001/XMLSchema-instance"
    xmlns:p="http://www.springframework.org/schema/p"
    xmlns:context="http://www.springframework.org/schema/context"
    xsi:schemaLocation="http://www.springframework.org/schema/beans
        http://www.springframework.org/schema/beans/spring-beans.xsd
        http://www.springframework.org/schema/context
        http://www.springframework.org/schema/context/spring-context.xsd">

   <context:component-scan base-package="org.shangyang" />

   <bean name="jane" class="org.shangyang.spring.container.Person">
       <property name="name" value="Jane Doe"/>
   </bean>

</beans> еҸҜд»ҘзңӢеҲ°пјҢдёҠйқўжңүдёүдёӘ element
еңЁй…ҚзҪ®ж–Ү件 beans.xml иў« Spring и§Јжһҗзҡ„иҝҮзЁӢдёӯпјҢжҜҸдёҖдёӘ element е°Ҷдјҡиў«и§ЈжһҗдёәдёҖдёӘ bean definition еҜ№иұЎзј“еӯҳеңЁ Spring е®№еҷЁдёӯпјӣ
вһҘ йңҖиҰҒиў«жҸҸиҝ°дёә bean definitions зҡ„й…ҚзҪ®еҜ№иұЎдё»иҰҒеҲҶдёәеҰӮдёӢеҮ еӨ§зұ»пјҢ
вһҘ жңҖејҖе§ӢжҲ‘зҡ„зЎ®жҳҜиҝҷд№Ҳи®ӨиҜҶ bean definitions зҡ„пјҢдҪҶжҳҜеҪ“жҲ‘еҲҶжһҗе®Ңжңүе…і bean definitions зҡ„зӣёе…ійҖ»иҫ‘е’Ңжәҗз Ғд»ҘеҗҺпјҢеҜ№е…¶и®ӨиҜҶжңүдәҶеҚҮеҚҺпјҢеҸӮиҖғеҶҷеңЁжңҖеҗҺпјӣ
жңҖеҘҪзҡ„еҲҶжһҗжәҗз Ғзҡ„ж–№ејҸпјҢе°ұжҳҜйҖҡиҝҮй«ҳеұӢе»әз“ҙпјҢйҖҗдёӘеҮ»з ҙзҡ„ж–№ејҸпјӣйҰ–е…ҲйҖҡиҝҮжөҒзЁӢеӣҫиҺ·еҫ—е®ғзҡ„и“қеӣҫ(йЎ¶еұӮи®ҫи®Ўеӣҫ)пјҢ然еҗҺеҶҚж №жҚ®и“қеӣҫдёҠзҡ„зӮ№йҖҗдёӘеҮ»з ҙпјӣжңҖеҗҺжүҚиғҪиҫҫеҲ°иһҚдјҡиҙҜйҖҡпјҢиғёжңүжҲҗз«№зҡ„еўғз•ҢпјӣжүҖд»ҘпјҢиҝҷйҮҢдҪңиҖ…з”Ёиҝҷж ·зҡ„ж–№ејҸеёҰдҪ ж·ұе…Ҙеү–жһҗ Spring е®№еҷЁйҮҢйқўзҡ„ж ёеҝғзӮ№пјҢд»ҘеҸҠзӣёе…ідё»жөҒзЁӢеҲ°еә•жҳҜеҰӮдҪ•иҝҗдҪңзҡ„гҖӮ
дёәдәҶдёҖж¬ЎжҖ§жҠҠдёҠиҝ°жәҗз ҒеҲҶжһҗжүҖжҸҸиҝ°жңүзҡ„жғ…еҶөйҳҗиҝ°жё…жҘҡпјҢжҲ‘们继з»ӯдҪҝз”Ё Spring Core Container жәҗз ҒеҲҶжһҗе…ӯпјҡ@Service дёӯдҪҝз”Ёзҡ„жөӢиҜ•з”ЁдҫӢпјӣе”ҜдёҖеҒҡзҡ„дҝ®ж”№жҳҜпјҢеҶҚдҪҝз”ЁдёҖдёӘзү№ж®Ҡзҡ„ element xmlns:p жқҘй…ҚзҪ® johnпјҢиҝҷж ·еҸҜд»ҘиҝӣдёҖжӯҘеҺ»и°ғиҜ•иҮӘе®ҡд№ү Spring й…ҚзҪ®ж ҮзӯҫжҳҜеҰӮдҪ•е®һзҺ°зҡ„пјӣ
beans.xml
<beans xmlns="http://www.springframework.org/schema/beans"
    xmlns:xsi="http://www.w3.org/2001/XMLSchema-instance"
    xmlns:p="http://www.springframework.org/schema/p"
    xmlns:context="http://www.springframework.org/schema/context"
    xsi:schemaLocation="http://www.springframework.org/schema/beans
        http://www.springframework.org/schema/beans/spring-beans.xsd
        http://www.springframework.org/schema/context
        http://www.springframework.org/schema/context/spring-context.xsd">

   <context:component-scan base-package="org.shangyang" />

    <bean name="john"
          class="org.shangyang.spring.container.Person"
          p:name="John Doe"
          p:spouse-ref="jane"/>

    <bean name="jane" class="org.shangyang.spring.container.Person">
        <property name="name" value="Jane Doe"/>
    </bean>

   <bean name="niba" class="org.shangyang.spring.container.Dog">
      <property name="name" value="Niba" />
   </bean>

</beans>ж•ҙдёӘжөҒзЁӢжҳҜд»Һи§Јжһҗ bean definitions жөҒзЁӢејҖе§Ӣзҡ„пјҢеҜ№еә”зҡ„е…ҘеҸЈжҳҜдё»жөҒзЁӢзҡ„ step 1.1.1.2 obtainFreshBeanFactoryпјӣ
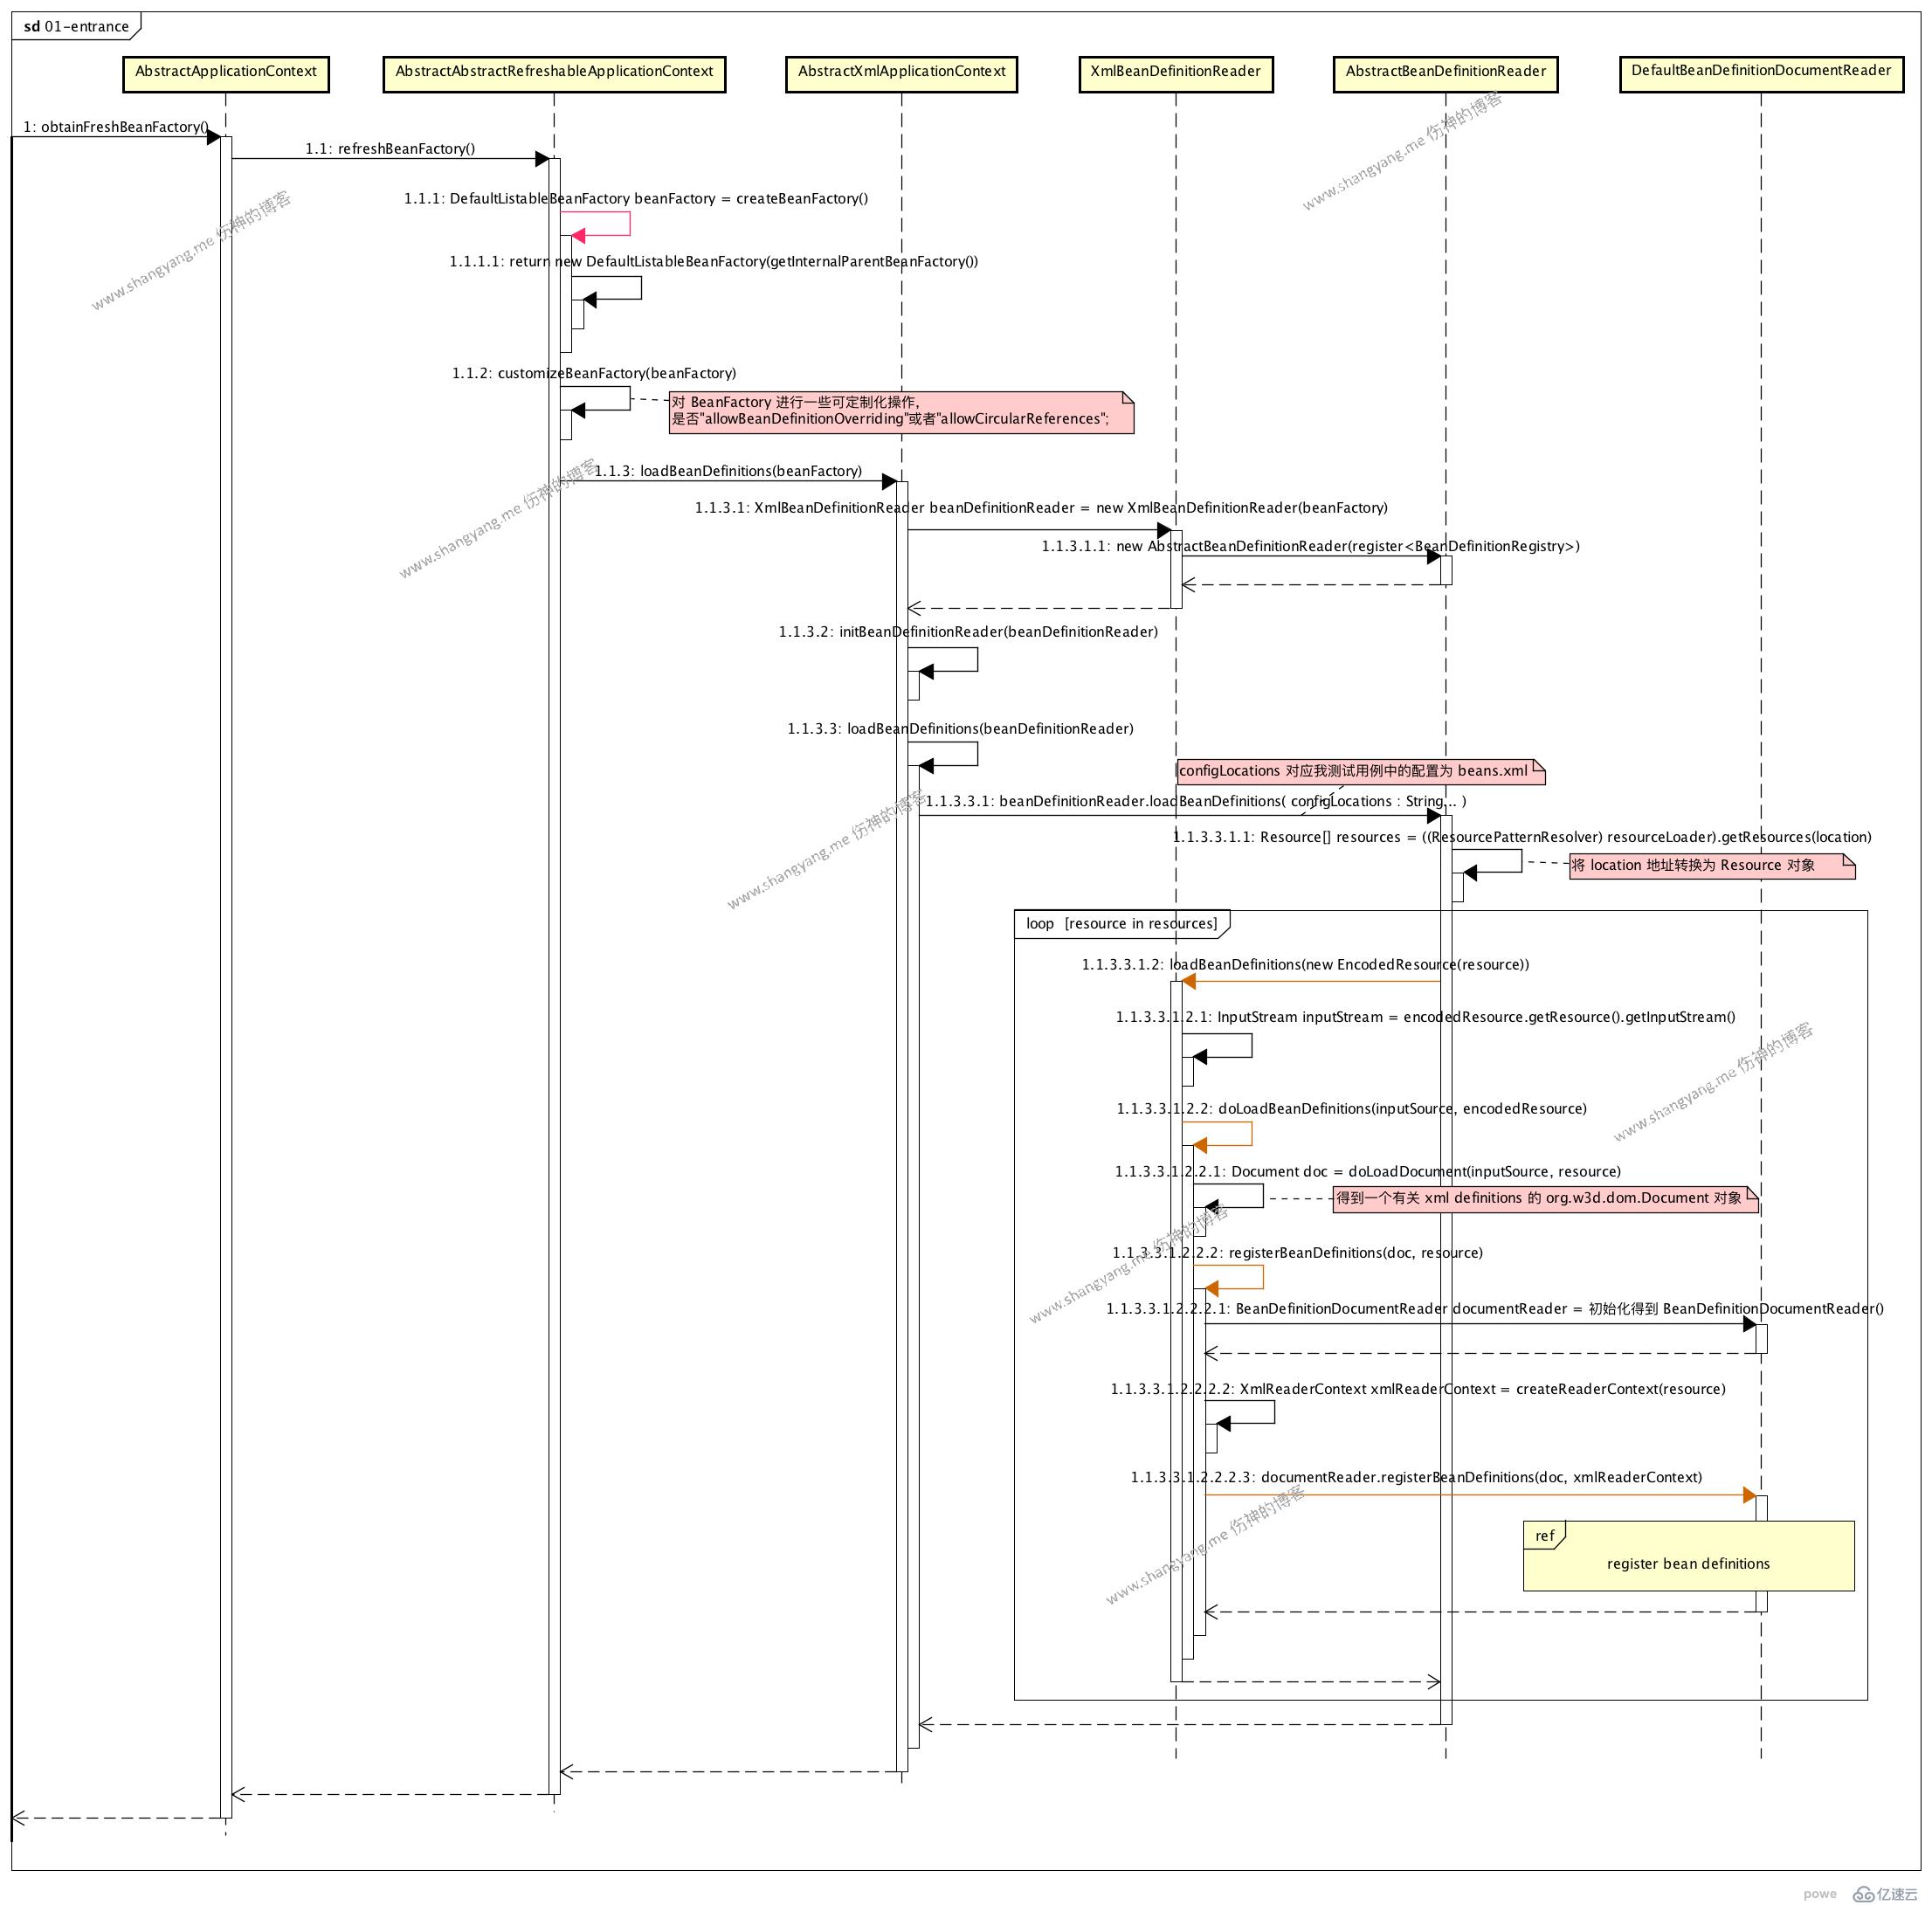
йҰ–йҖүеҲқе§ӢеҢ–еҫ—еҲ° BeanFactory е®һдҫӢ DefaultListableBeanFactoryпјҢз”ЁжқҘжіЁеҶҢи§Јжһҗй…ҚзҪ®еҗҺз”ҹжҲҗзҡ„ bean definitionsпјӣ
然еҗҺйҖҡиҝҮ XmlBeanDefinitionReader и§Јжһҗ Spring XML й…ҚзҪ®ж–Ү件
ж №жҚ®з”ЁжҲ·жҢҮе®ҡзҡ„ XML ж–Ү件и·Ҝеҫ„ locationпјҢиҝӣиЎҢи§Јжһҗ并且еҫ—еҲ° Resource[] еҜ№иұЎпјҢе…·дҪ“еҸӮиҖғ step 1.1.3.3.1.1 getResource(location) жӯҘйӘӨпјӣиҝҷйҮҢпјҢеҜ№е…¶еҰӮдҪ•йҖҡиҝҮ location еҫ—еҲ° Resource[] еҜ№иұЎеҒҡиҝӣдёҖжӯҘеҲҶжһҗпјҢзңӢжәҗз ҒпјҢ
PathMatchingResourcePatternResolver.java
public Resource[] getResources(String locationPattern) throws IOException {
  Assert.notNull(locationPattern, "Location pattern must not be null");
  if (locationPattern.startsWith(CLASSPATH_ALL_URL_PREFIX)) {
     // a class path resource (multiple resources for same name possible)
     if (getPathMatcher().isPattern(locationPattern.substring(CLASSPATH_ALL_URL_PREFIX.length()))) {
        // a class path resource pattern
        return findPathMatchingResources(locationPattern);
     }
     else {
        // all class path resources with the given name
        return findAllClassPathResources(locationPattern.substring(CLASSPATH_ALL_URL_PREFIX.length()));
     }
  }
  else {
     // Only look for a pattern after a prefix here
     // (to not get fooled by a pattern symbol in a strange prefix).
     int prefixEnd = locationPattern.indexOf(":") + 1;
     if (getPathMatcher().isPattern(locationPattern.substring(prefixEnd))) {
        // a file pattern
        return findPathMatchingResources(locationPattern);
     }
     else {
        // a single resource with the given name
        return new Resource[] {getResourceLoader().getResource(locationPattern)};
     }
  }
} иҝҷйҮҢзҡ„и§ЈжһҗиҝҮзЁӢдё»иҰҒеҲҶдёәдёӨз§Қжғ…еҶөиҝӣиЎҢи§ЈжһҗпјҢдёҖз§ҚжҳҜеүҚзјҖжҳҜ classpath: зҡ„жғ…еҶөпјҢдёҖз§ҚжҳҜжҷ®йҖҡзҡ„жғ…еҶөпјҢжӯЈеҰӮжҲ‘们еҪ“еүҚжүҖдҪҝз”Ёзҡ„жөӢиҜ•з”ЁдҫӢзҡ„жғ…еҶөпјҢж—ўжҳҜ new ClassPathXmlApplicationContext("beans.xml") зҡ„жғ…еҶөпјҢиҝҷйҮҢдёҚжү“з®—еңЁиҝҷйҮҢ继з»ӯж·ұжҢ–пјӣ
еҪ“е®ҢжҲҗдёҠиҝ°дёүдёӘжӯҘйӘӨд»ҘеҗҺпјҢе°Ҷиҝӣе…Ҙ register bean definitions process жөҒзЁӢ
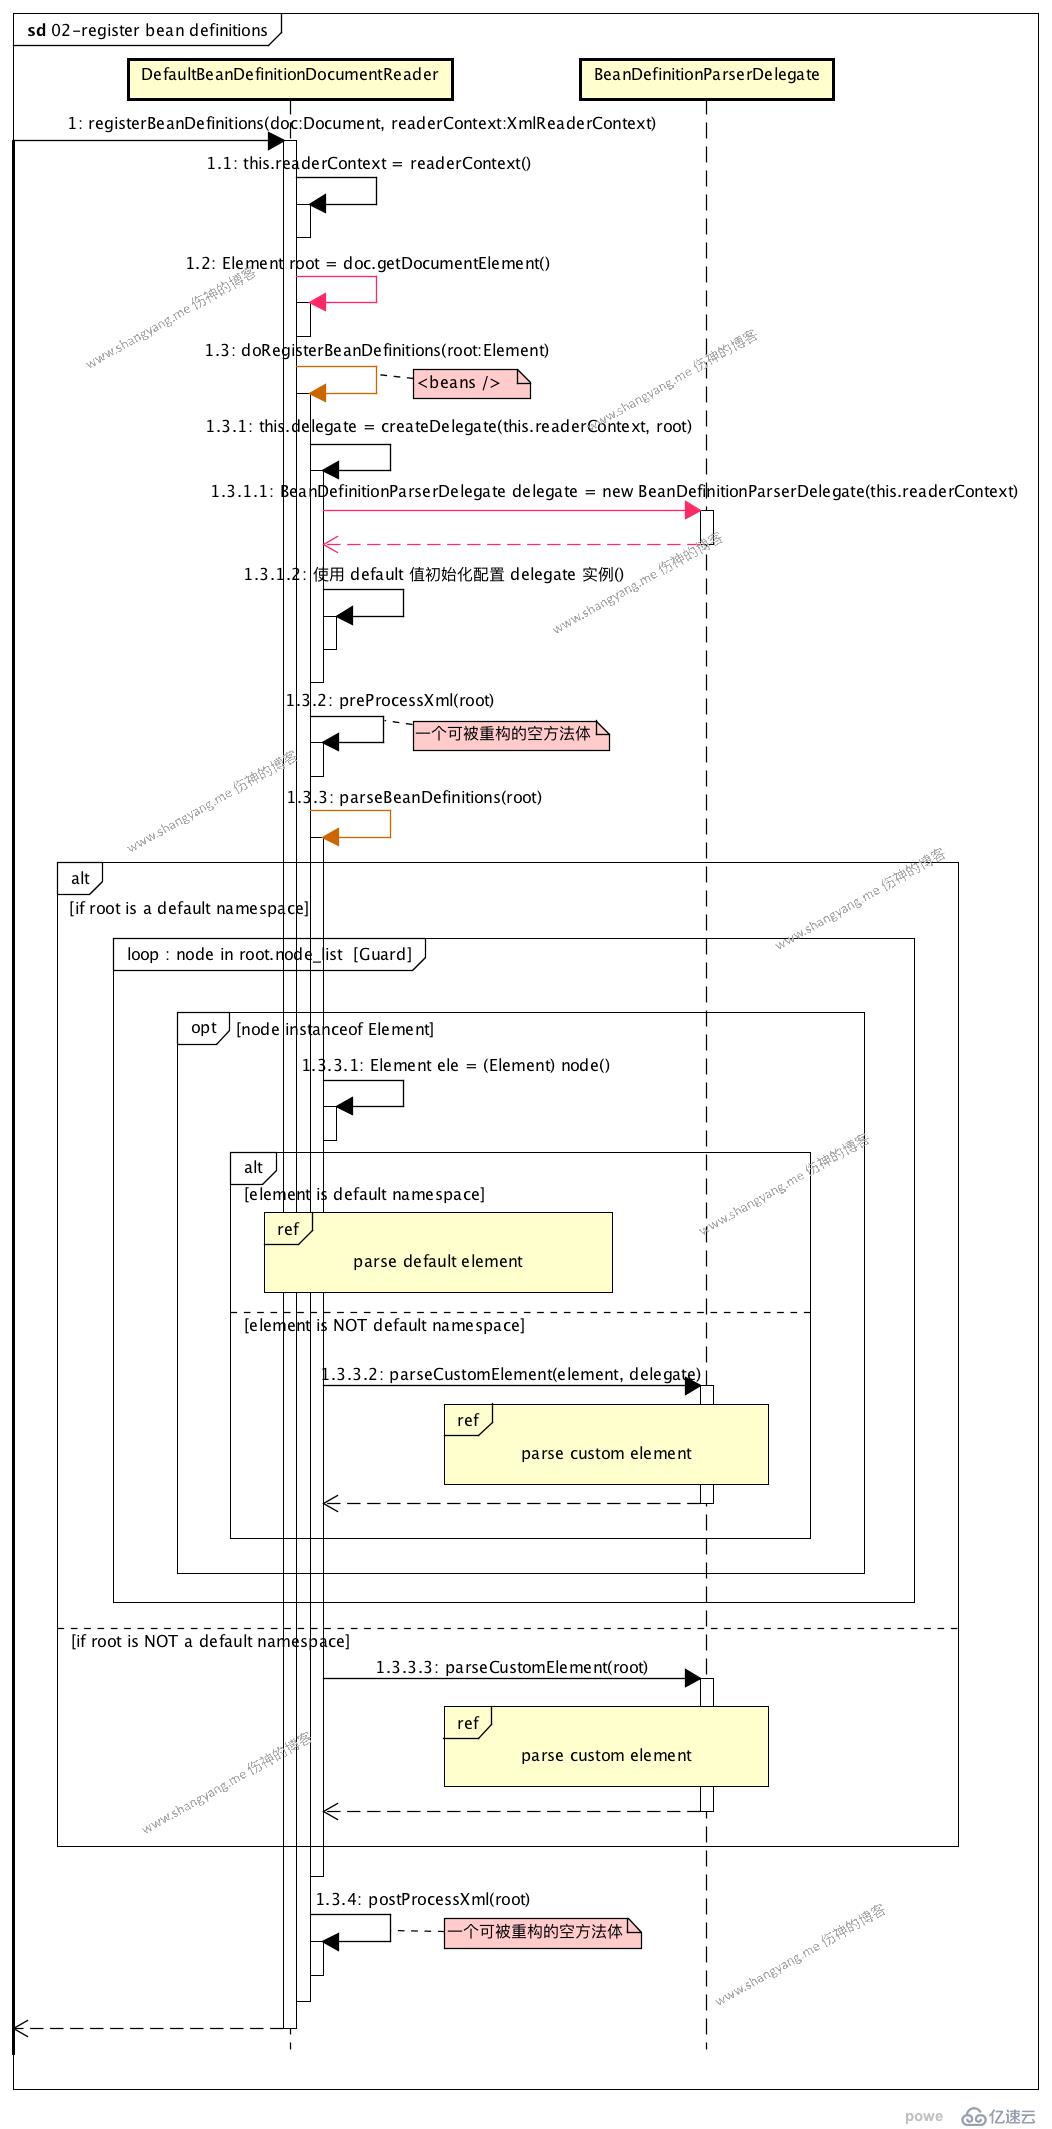
вһҘ йҰ–е…ҲпјҢйҮҚиҰҒзҡ„дёӨ件дәӢжғ…жҳҜпјҢ
<beans xmlns="http://www.springframework.org/schema/beans"
   xmlns:xsi="http://www.w3.org/2001/XMLSchema-instance"
   xmlns:p="http://www.springframework.org/schema/p"
   xmlns:context="http://www.springframework.org/schema/context"
   xsi:schemaLocation="http://www.springframework.org/schema/beans
       http://www.springframework.org/schema/beans/spring-beans.xsd
       http://www.springframework.org/schema/context
       http://www.springframework.org/schema/context/spring-context.xsd">
</beans>е°ұжҳҜдёҖдёӘ xml й…ҚзҪ®ж–Ү件дёӯзҡ„жңҖйЎ¶еұӮе…ғзҙ <beans/>
вһҘ еҗҺз»ӯпјҢеҪ“еүҚйқўзҡ„е·ҘдҪңеҮҶеӨҮеҘҪдәҶд»ҘеҗҺпјҢжқҘзңӢзңӢжҳҜеҰӮдҪ•и§Јжһҗ element зҡ„пјҹ
йҰ–е…ҲпјҢеҲӨж–ӯ root е…ғзҙ зҡ„ namespace еҜ№еә”зҡ„жҳҜдёҚжҳҜ default namespaceпјҢиӢҘдёҚжҳҜпјҢе°Ҷиҝӣе…Ҙ step 1.3.3.3: parse custom elementпјӣиҝҷйҮҢжҲ‘们关注常规жөҒзЁӢпјҢж—ўжҳҜеҪ“ root е…ғзҙ зҡ„ namespace жҳҜ default namespace зҡ„жөҒзЁӢпјӣ
йҒҚеҺҶ root е…ғзҙ дёӢзҡ„жүҖжңү elementпјҢ
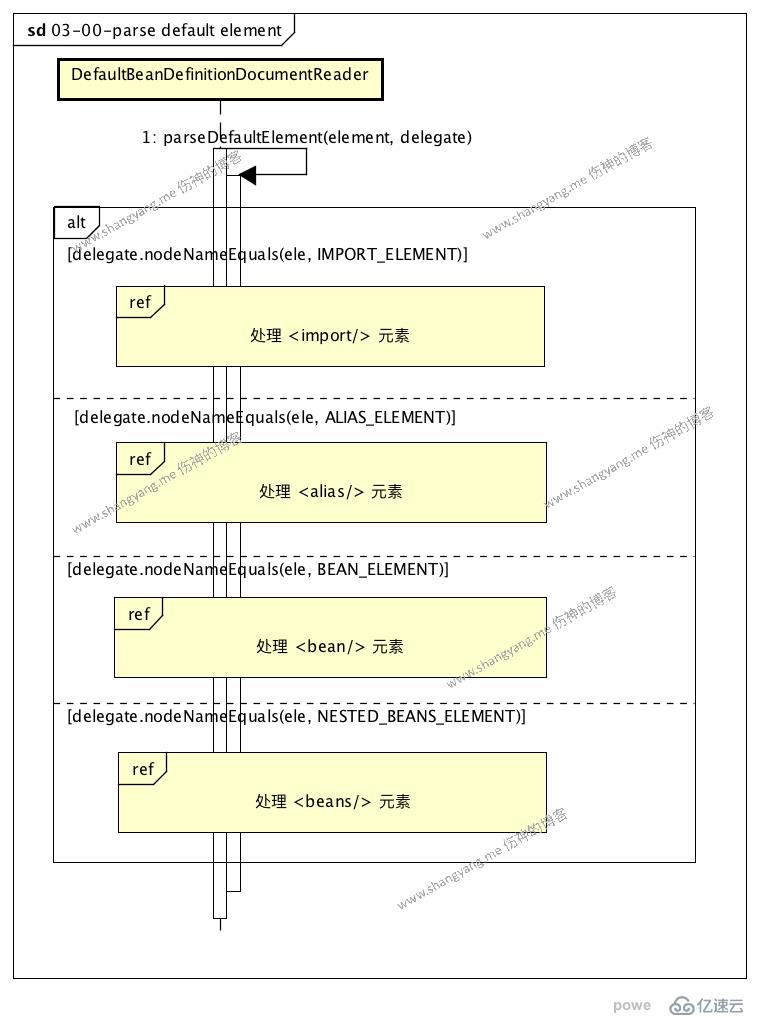
еҸҜд»ҘзңӢеҲ°пјҢиҜҘжөҒзЁӢдёӯеҢ…еҗ«еӣӣдёӘеӯҗжөҒзЁӢпјҢдҫқж¬ЎеӨ„зҗҶдёҚеҗҢзҡ„ element е…ғзҙ зҡ„жғ…еҶөпјҢе…¶е®ғдёүз§ҚйғҪжҳҜжҜ”иҫғзү№ж®Ҡзҡ„жғ…еҶөпјҢжҲ‘们иҝҷйҮҢпјҢдё»иҰҒе…іжіЁвҖңи§Јжһҗ <bean/>" е…ғзҙ зҡ„жөҒзЁӢвҖқ
иҝҷйҮҢпјҢдёәдәҶиғҪеӨҹе°ҪйҮҸзҡ„еұ•зӨәеҮәи§Јжһҗ <bean/> е…ғзҙ зҡ„жөҒзЁӢдёӯзҡ„йҖ»иҫ‘пјҢжҲ‘е°ҶдҪҝз”ЁдёҖдёӘжҜ”иҫғзү№ж®Ҡзҡ„ <bean/> жқҘжўізҗҶжӯӨйғЁеҲҶзҡ„жөҒзЁӢпјӣ
    <bean name="john"
          class="com.example.Person"
          p:name="John Doe"
p:spouse-ref="jane"/>иҜҘ <bean/> е…ғзҙ дҪҝз”ЁдәҶ namespace xmlns:p="http://www.springframework.org/schema/p"
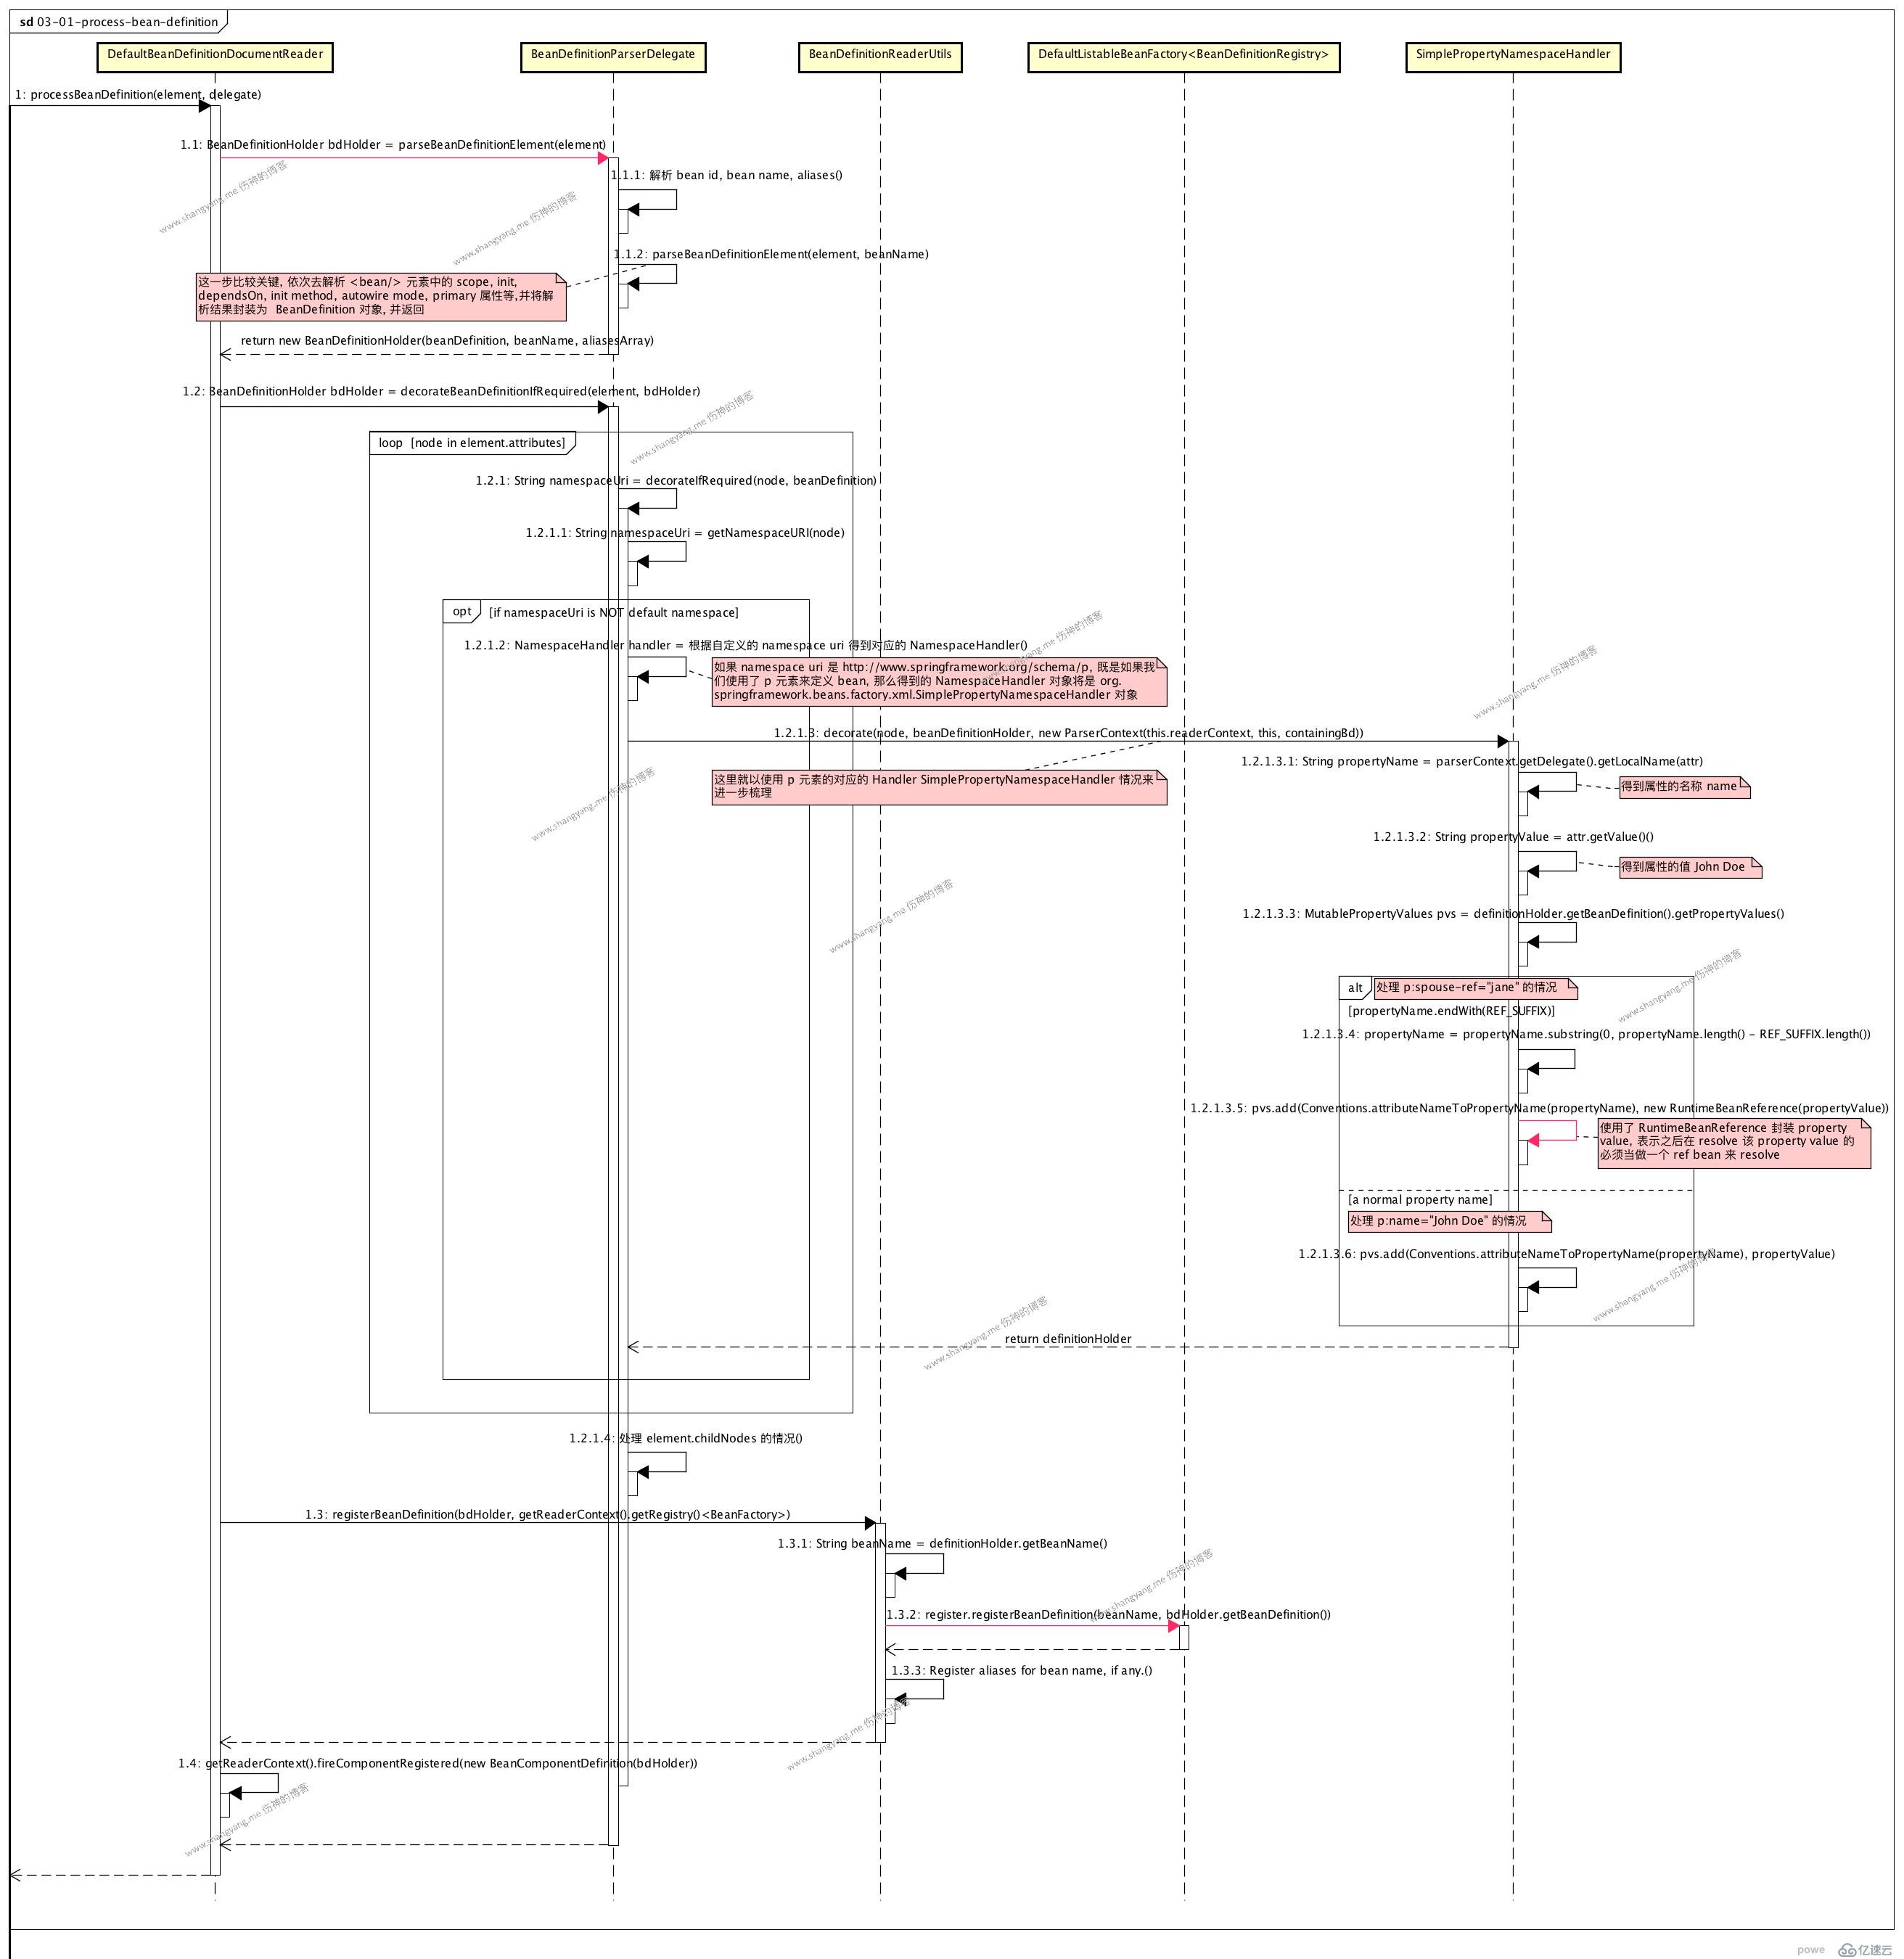
вһҘ йҰ–е…ҲпјҢйҖҡиҝҮ BeanDefintionParserDelegate еҜ№иұЎи§ЈжһҗиҜҘ elementпјҢеҫ—еҲ°дёҖдёӘ BeanDefinitionHolder еҜ№иұЎ bdHolder е®һдҫӢпјӣиҜҘи§ЈжһҗиҝҮзЁӢдёӯдјҡдҫқж¬ЎеҺ»и§Јжһҗ bean id, bean name, д»ҘеҸҠзӣёе…ізҡ„ scope, init, autowired model зӯүзӯүеұһжҖ§пјӣи§Ғ step 1.1
вһҘ е…¶ж¬ЎпјҢеҜ№ bean definition иҝӣиЎҢзӣёе…ізҡ„дҝ®йҘ°ж“ҚдҪңпјҢи§Ғ step 1.2
常规жӯҘйӘӨ
attribute node зҡ„дҝ®йҘ°иҝҮзЁӢ
еҒҮи®ҫпјҢжҲ‘们еҪ“еүҚзҡ„ attribute node дёә p:spouse-ref="jane"пјҢзңӢзңӢиҜҘеұһжҖ§жҳҜеҰӮдҪ•иў«и§Јжһҗзҡ„пјҢ
йҰ–е…ҲпјҢйҖҡиҝҮ node namespace еҫ—еҲ°еҜ№еә”зҡ„ NamespaceHandler е®һдҫӢ handler
йҖҡиҝҮ xmlns:p="http://www.springframework.org/schema/p" еҫ—еҲ°зҡ„ NamespaceHandler дёә SimplePropertyNamespaceHandler еҜ№иұЎпјӣ
е…¶ж¬ЎпјҢи°ғз”Ё SimplePropertyNamespaceHandler еҜ№иұЎеҜ№еҪ“еүҚзҡ„е…ғзҙ иҝӣиЎҢи§Јжһҗпјӣ
еҸҜд»ҘзңӢеҲ°пјҢеүҚйқўзҡ„и§Јжһҗ并没жңүд»Җд№Ҳзү№ж®Ҡзҡ„пјҢд»Һе…ғзҙ p:spouse-ref="jane" дёӯи§Јжһҗеҫ—еҲ° propery name: spouse-refпјҢproperty value: janeпјӣдҪҶжҳҜеҗҺз»ӯи§ЈжһҗпјҢжҜ”иҫғзү№ж®ҠпјҢйңҖиҰҒеӨ„зҗҶ REF_SUFFIX зҡ„жғ…еҶөдәҶпјҢд№ҹе°ұжҳҜеҪ“ property name зҡ„еҗҺзјҖдёә -ref зҡ„жғ…еҶөпјҢиЎЁзӨәиҜҘ attribute жҳҜдёҖдёӘ ref-bean еұһжҖ§пјҢе…¶еұһжҖ§еҖјеј•з”Ёзҡ„жҳҜе…¶е®ғзҡ„ bean е®һдҫӢпјҢжүҖд»Ҙе‘ўпјҢиҝҷйҮҢе°Ҷе…¶ property value е°ҒиЈ…дёәдәҶдёҖдёӘ RuntimeBeanReference еҜ№иұЎе®һдҫӢпјҢиЎЁзӨәе°ҶжқҘеңЁи§ЈжһҗиҜҘ property value дёә Java Object зҡ„ж—¶еҖҷпјҢйңҖиҰҒеҺ»еҲқе§ӢеҢ–е…¶еј•з”Ёзҡ„ bean е®һдҫӢ janeпјҢ然еҗҺжіЁе…ҘеҲ°еҪ“еүҚзҡ„ property value дёӯпјӣ
вһҘ жңҖеҗҺпјҢжіЁеҶҢ bean definitionпјӣ
и§Ғ step 1.3.2 register.registerBeanDefinition(beanName, beanDefinition)пјҢregister е°ұжҳҜеҪ“еүҚзҡ„ bean factory е®һдҫӢпјҢйҖҡиҝҮе°Ҷ bean name е’Ң bean definition д»Ҙй”®еҖјеҜ№зҡ„ж–№ејҸеңЁеҪ“еүҚзҡ„ bean factory дёӯиҝӣиЎҢжіЁеҶҢпјӣиҝҷж ·пјҢжҲ‘们е°ұеҸҜд»ҘйҖҡиҝҮ bean зҡ„еҗҚеӯ—пјҢеҫ—еҲ°е…¶еҜ№еә”зҡ„ bean definition еҜ№иұЎдәҶпјӣ
вһҘ еҶҷеңЁиҜҘе°ҸиҠӮжңҖеҗҺпјҢ
жҲ‘们д№ҹеҸҜд»ҘиҮӘе®ҡд№үжҹҗдёӘ element жҲ–иҖ… element attributeпјҢ并且е®ҡд№үдёҺд№Ӣзӣёе…ізҡ„ namespace е’Ң namespace handlerпјҢиҝҷж ·пјҢе°ұеҸҜд»ҘдҪҝеҫ— Spring е®№еҷЁи§ЈжһҗиҮӘе®ҡд№үзҡ„е…ғзҙ пјӣзұ»дјјдәҺ dubbo й…ҚзҪ®дёӯжүҖдҪҝз”Ёзҡ„ <dubbo /> иҮӘе®ҡд№үе…ғзҙ йӮЈж ·пјӣ
жӯӨжӯҘйӘӨеҜ№еә” register bean definitions process жӯҘйӘӨдёӯзҡ„ step 1.3.3.2
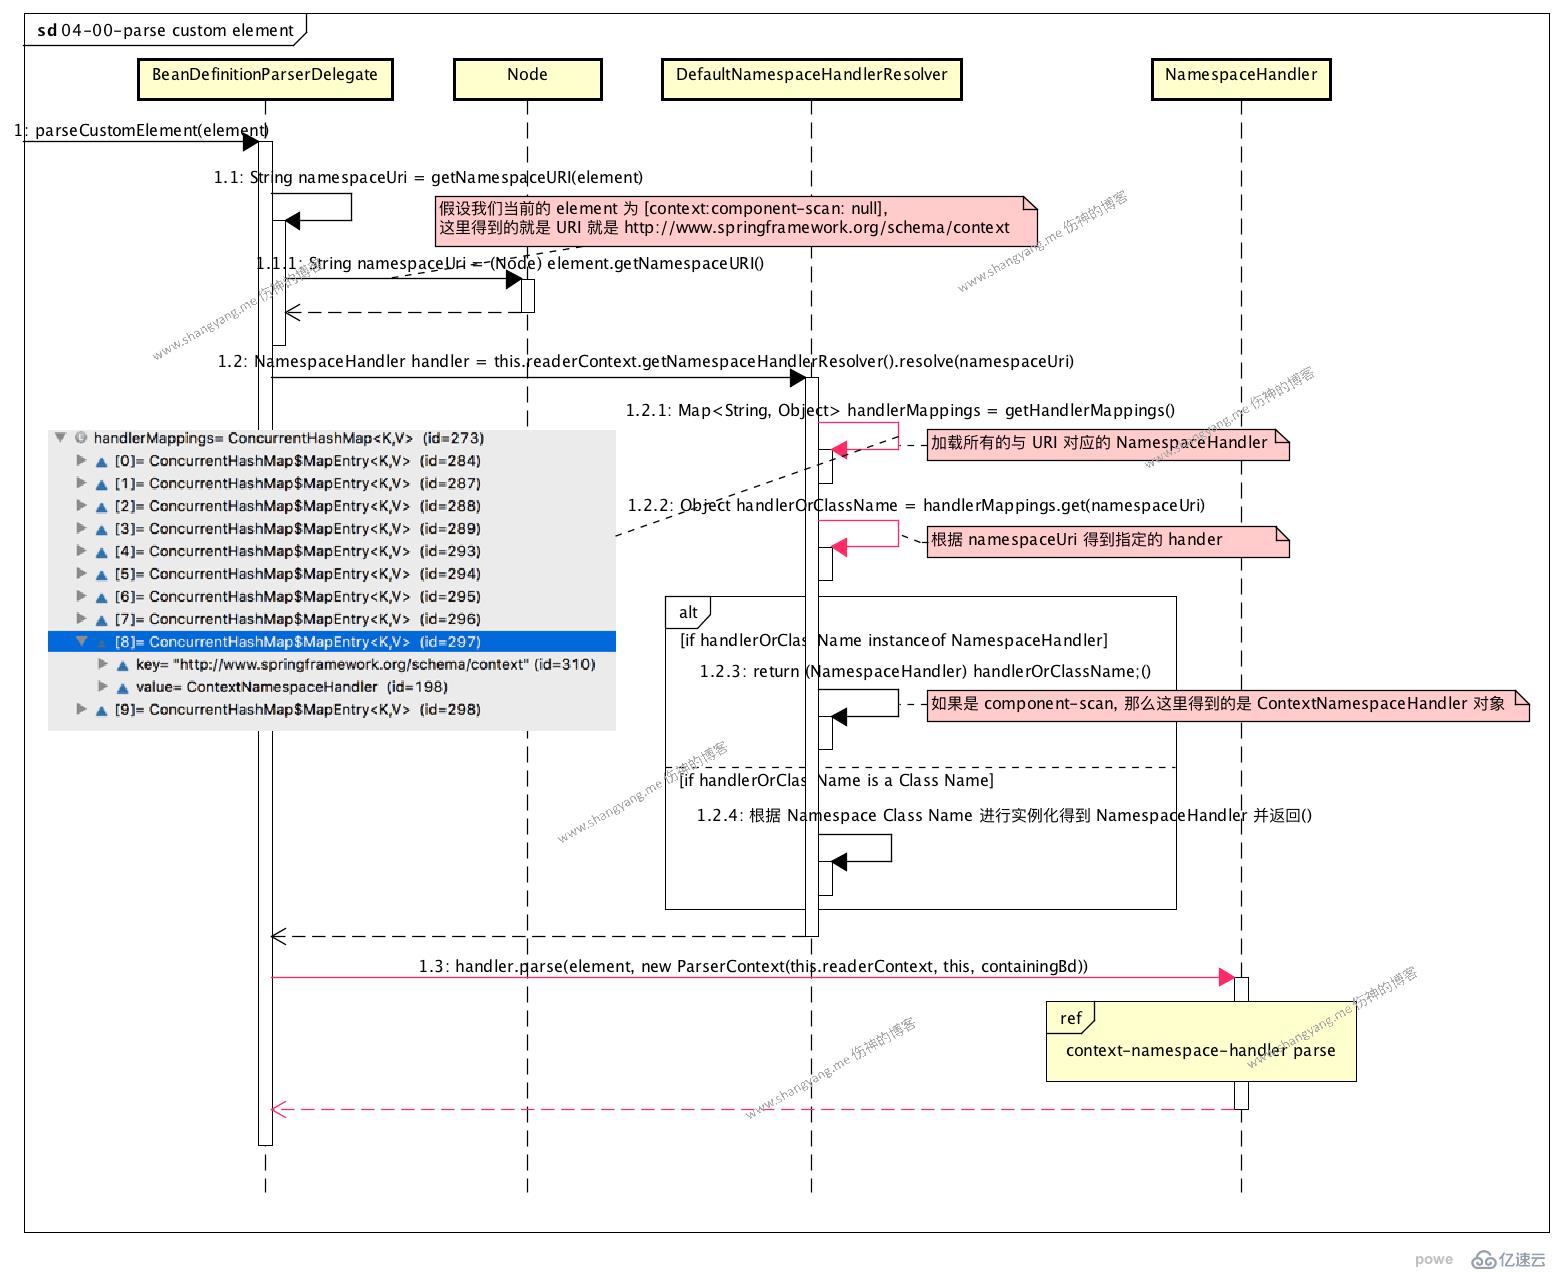
иҜҘе°ҸиҠӮжҲ‘е°ҶиҜ•еӣҫдҪҝз”ЁдёҖдёӘеёёз”Ёзҡ„ custom element: <context:component-scan/> жқҘжўізҗҶж•ҙдёӘжөҒзЁӢпјӣ
继з»ӯ parse custom element process з« иҠӮдёӯжүҖдҪҝз”ЁеҲ°зҡ„дҫӢеӯҗпјҢ<context:component-scan/> жқҘеҲҶжһҗиҜҘжөҒзЁӢпјҢ

вһҘ еңЁејҖе§ӢеҲҶжһҗд№ӢеүҚпјҢзңӢзңӢ component-scan е…ғзҙ й•ҝд»Җд№Ҳж ·пјҢ
жіЁж„ҸпјҢcomponent-scan element жң¬иә«еҢ…еҗ« annotation-config attributeпјӣ
вһҘ жөҒзЁӢеҲҶжһҗ
йҰ–е…ҲпјҢж №жҚ® element name: component-scan жүҫеҲ°еҜ№еә”зҡ„ BeanDefinitionParserпјҢеңЁ ContextNamespaceHandler еҲқе§ӢеҢ–зҡ„ж—¶еҖҷпјҢдҫҝеҲқе§ӢеҢ–и®ҫзҪ®еҘҪ 8 еҜ№еҶ…зҪ®зҡ„ element name дёҺ parsers зҡ„й”®еҖјеҜ№пјӣиҝҷйҮҢпјҢж №жҚ®еҗҚеӯ— component-scan жүҫеҲ°еҜ№еә”зҡ„ parser ComponentScanBeanDefinitionParser еҜ№иұЎпјӣ
е…¶ж¬ЎпјҢдҪҝз”Ё ComponentScanBeanDefinitionParser еҜ№иұЎејҖе§Ӣи§Јжһҗе·ҘдҪңпјҢ
йҰ–е…ҲпјҢи§Јжһҗ <context:component-scan base-package="org.shangyang"/> еҫ—еҲ° basePcakges String[] еҜ№иұЎпјӣ
е…¶ж¬ЎпјҢеҲқе§ӢеҢ–еҫ—еҲ° ClassPathBeanDefinitiionScanner еҜ№иұЎе®һдҫӢ scannerпјҢ然еҗҺи°ғз”Ё scanner.doScan ж–№жі•иҝӣе…Ҙ [do scan жөҒзЁӢ](#do-scan жөҒзЁӢ)пјҢиҜҘжөҒзЁӢдёӯе°ҶдјҡйҒҚеҺҶ base package дёӯжүҖеҢ…еҗ«зҡ„жүҖжңү .class ж–Ү件пјҢи§Јжһҗд№ӢпјҢ并з”ҹжҲҗзӣёеә”зҡ„ bean definitionsпјӣеҸҰеӨ–еңЁиҝҷдёӘжөҒзЁӢдёӯпјҢиҝҳиҰҒжіЁж„Ҹзҡ„жҳҜпјҢжңҖеҗҺдјҡе°Ҷ bean definitions еңЁеҪ“еүҚзҡ„ bean factory еҜ№иұЎдёӯиҝӣиЎҢжіЁеҶҢпјӣ
иҝҷйҮҢдё»иҰҒд»Ӣз»ҚдёҠдёҖдёӘе°ҸиҠӮдёӯ #2 жӯҘйӘӨдёӯжүҖжҸҗеҲ°зҡ„ do scan жөҒзЁӢжӯҘйӘӨпјҢеҜ№еә” parse element by ContextNamespaceHandler жөҒзЁӢеӣҫдёӯзҡ„ step 1.2.3 scanner.doScanпјӣ
вһҘ е…ҲжқҘзңӢзңӢ step 1.2.3.1 findCandidateComponent(basePackage)
ClassPathScanningCandidateComponentProvider.java (е·ІеҲ йҷӨеӨ§йҮҸдёҚзӣёе№Ід»Јз Ғ)
public Set<BeanDefinition> findCandidateComponents(String basePackage) {
Set<BeanDefinition> candidates = new LinkedHashSet<BeanDefinition>();
try {
String packageSearchPath = ResourcePatternResolver.CLASSPATH_ALL_URL_PREFIX +
resolveBasePackage(basePackage) + '/' + this.resourcePattern;
//1. д»ҺеҪ“еүҚз”ЁжҲ·иҮӘе®ҡзҡ„ classpath еӯҗи·Ҝеҫ„дёӯпјҢйҖҡиҝҮ regex жҹҘиҜўеҲ°жүҖжңүзҡ„жүҖеҢ№й…Қзҡ„ resourcesпјӣиҰҒзү№еҲ«жіЁж„Ҹзҡ„жҳҜпјҢ
// иҝҷйҮҢдёәд»Җд№ҲдёҚзӣҙжҺҘйҖҡиҝҮ Class Loader еҺ»иҺ·еҸ– classes жқҘиҝӣиЎҢеҲӨж–ӯ? еӣ дёәиҝҷж ·зҡ„иҜқе°ұзӣёеҪ“дәҺжҳҜеҠ иҪҪдәҶ Class TypeпјҢиҖҢ Class Type зҡ„еҠ иҪҪиҝҮзЁӢжҳҜйҖҡиҝҮ Spring е®№еҷЁдёҘж јжҺ§еҲ¶зҡ„пјҢжҳҜдёҚе…Ғи®ёйҡҸйҡҸдҫҝдҫҝеҠ иҪҪзҡ„
// жүҖд»ҘпјҢеҸ–иҖҢд»Јд№ӢпјҢдҪҝз”ЁдёҖдёӘ File Resource еҺ»иҜ»еҸ–зӣёе…ізҡ„еӯ—иҠӮз ҒпјҢд»Һеӯ—иҠӮз ҒдёӯеҺ»и§Јжһҗ........
Resource[] resources = this.resourcePatternResolver.getResources(packageSearchPath);
boolean traceEnabled = logger.isTraceEnabled();
boolean debugEnabled = logger.isDebugEnabled();
//2. дҫқж¬ЎйҒҚеҺҶз”ЁжҲ·е®ҡд№үзҡ„ bean Class еҜ№иұЎ
for (Resource resource : resources) {
if (traceEnabled) {
logger.trace("Scanning " + resource);
}
if (resource.isReadable()) {
try {
// е°Ҷд»Һеӯ—иҠӮз ҒдёӯиҺ·еҸ–еҲ°зҡ„зӣёе…і annotation(@Service) д»ҘеҸҠ FileSystemResource еҜ№иұЎдҝқеӯҳеңЁ metadataReader еҪ“дёӯпјӣ
MetadataReader metadataReader = this.metadataReaderFactory.getMetadataReader(resource);
if (isCandidateComponent(metadataReader)) {
  ScannedGenericBeanDefinition sbd = new ScannedGenericBeanDefinition(metadataReader);
  sbd.setResource(resource);
  sbd.setSource(resource);
  if (isCandidateComponent(sbd)) {
     candidates.add(sbd);
  }
  ...
}
...
}
...
}
}
}
catch (IOException ex) {
throw new BeanDefinitionStoreException("I/O failure during classpath scanning", ex);
}
return candidates;
}
д»Јз Ғ第 10 иЎҢ
Resource[] resources = this.resourcePatternResolver.getResources(packageSearchPath); иҝҷдёҖжӯҘйҖҡиҝҮйҖ’еҪ’жҗңзҙў base package зӣ®еҪ•дёӢзҡ„жүҖжңү .class ж–Ү件пјҢ并е°Ҷе…¶еӯ—иҠӮз Ғе°ҒиЈ…жҲҗ Resource[] еҜ№иұЎпјӣдёҠйқўзҡ„жіЁйҮҠи§ЈйҮҠеҫ—йқһеёёжё…жҘҡдәҶпјҢиҝҷйҮҢе°ҒиЈ…зҡ„жҳҜ .class ж–Ү件зҡ„еӯ—иҠӮз ҒпјҢиҖҢйқһ class typeпјӣйҷӨдәҶжіЁи§ЈдёӯжүҖжҸҸиҝ°зҡ„пјҢиҝҷйҮҢеҶҚеј•з”іиҜҙжҳҺдёӢпјҢиҝҷйҮҢдёәд»Җд№ҲдёҚзӣҙжҺҘеҠ иҪҪе…¶ Class Type иҝҳжңүдёҖдёӘеҺҹеӣ е°ұжҳҜеҪ“ Spring еңЁеҠ иҪҪ Class Type зҡ„ж—¶еҖҷпјҢеҫҲжңүеҸҜиғҪеңЁиҜҘ Class Type дёҠй…ҚзҪ®дәҶ AOPпјҢйҖҡиҝҮ ASM еӯ—иҠӮз ҒжҠҖжңҜеҺ»дҝ®ж”№еҺҹжңүзҡ„еӯ—иҠӮз Ғд»ҘеҗҺпјҢеҶҚеҠ е…Ҙ Class Loader дёӯпјӣжүҖд»ҘпјҢд№Ӣзұ»дёҚиғҪзӣҙжҺҘеҺ»и§Јжһҗ Class TypeпјҢиҖҢеҸӘиғҪйҖҡиҝҮеӯ—иҠӮз Ғзҡ„ж–№ејҸеҺ»и§Јжһҗпјӣ
иҝҷдёҖжӯҘеҗҢж ·е‘ҠиҜ«жҲ‘们пјҢеңЁдҪҝз”Ё Spring е®№еҷЁжқҘејҖеҸ‘еә”з”Ёзҡ„ж—¶еҖҷпјҢејҖеҸ‘иҖ…дёҚиҰҒйҡҸйҡҸдҫҝдҫҝзҡ„иҮӘиЎҢеҠ иҪҪ Class Type еҲ°е®№еҷЁдёӯпјҢеӣ дёәжңүеҸҜиғҪеңЁеҠ иҪҪ Class Type д№ӢеүҚйңҖиҰҒйҖҡиҝҮ Spring е®№еҷЁзҡ„ ASM AOP иҝӣиЎҢеӯ—иҠӮз Ғзҡ„дҝ®ж”№д»ҘеҗҺеҶҚеҠ иҪҪпјӣ
д»Јз Ғ第 23 иЎҢ
MetadataReader metadataReader = this.metadataReaderFactory.getMetadataReader(resource);и§ЈжһҗеҪ“еүҚзҡ„ .class еӯ—иҠӮз ҒпјҢи§ЈжһҗеҮәеҜ№еә”зҡ„ annotationпјҢжҜ”еҰӮ @ServiceпјҢ并е°Ҷе…¶еҚҸеҗҢ FileSystemResource еҜ№иұЎдёҖеҗҢдҝқеӯҳеҲ° metadataReader еҜ№иұЎдёӯпјӣ
д»Јз Ғ第 24 иЎҢ
protected boolean isCandidateComponent(MetadataReader metadataReader) throws IOException {
for (TypeFilter tf : this.excludeFilters) {
if (tf.match(metadataReader, this.metadataReaderFactory)) {
return false;
}
}
for (TypeFilter tf : this.includeFilters) { // includedFilters еҢ…еҗ«дёүзұ» annotationпјҢ1. @Component 2. @ManagedBean 3. @Named
if (tf.match(metadataReader, this.metadataReaderFactory)) {
return isConditionMatch(metadataReader);
}
}
return false;
} ж—ўжҳҜд»ҺеҪ“еүҚзҡ„ metadataReader дёӯеҺ»еҲӨж–ӯжҳҜеҗҰеӯҳеңЁ 1. @Component 2. @ManagedBean 3. @Named дёүз§ҚжіЁи§Јдёӯзҡ„дёҖз§ҚпјҢеҰӮжһңжҳҜпјҢеҲҷиҝӣе…ҘдёӢйқўзҡ„жөҒзЁӢ
if (isCandidateComponent(metadataReader)) {
ScannedGenericBeanDefinition sbd = new ScannedGenericBeanDefinition(metadataReader);
sbd.setResource(resource);
sbd.setSource(resource);
if (isCandidateComponent(sbd)) {
candidates.add(sbd);
}
...
}вһҘ дҫқж¬ЎеӨ„зҗҶ并注еҶҢиҝ”еӣһзҡ„ candidates
иҜҘжӯҘйӘӨд»ҺжөҒзЁӢеӣҫ parse element by ContextNamespaceHandler дёӯзҡ„ step 1.2.3.2 ејҖе§ӢпјҢдё»иҰҒеҒҡдәҶеҰӮдёӢеҮ 件дәӢжғ…пјҢ
/**
* еӣ дёәйҖҡиҝҮ @ComponentгҖҒ@Serivce зӯүжіЁи§Јзҡ„ж–№ејҸдёҚдјҡеғҸ xml-based й…ҚзҪ®йӮЈж ·жҸҗдҫӣдәҶдёҖдёӘ name зҡ„ж ҮзӯҫпјҢеҸҜд»ҘжҢҮе®ҡ bean nameпјӣжүҖд»ҘпјҢиҝҷйҮҢйңҖиҰҒеҺ»еҚ•зӢ¬дёәе…¶з”ҹжҲҗдёҖдёӘпјӣ
*/
@Override
public String generateBeanName(BeanDefinition definition, BeanDefinitionRegistry registry) {
if (definition instanceof AnnotatedBeanDefinition) {
String beanName = determineBeanNameFromAnnotation((AnnotatedBeanDefinition) definition); // еӨ„зҗҶиҜёеҰӮ @Service("dogService") зҡ„жғ…еҶө
if (StringUtils.hasText(beanName)) {
// Explicit bean name found.
return beanName;
}
}
// Fallback: generate a unique default bean name. йҮҢйқўзҡ„е®һзҺ°йҖ»иҫ‘е°ұжҳҜйҖҡиҝҮе°Ҷ Class Name зҡ„йҰ–еӯ—жҜҚеӨ§еҶҷзј–зЁӢе°ҸеҶҷпјҢ然еҗҺиҝ”еӣһпјӣ
return buildDefaultBeanName(definition, registry);
} йҖҡеёёжғ…еҶөдёӢпјҢжҳҜе°Ҷзұ»еҗҚзҡ„йҰ–еӯ—жҜҚиҝӣиЎҢе°ҸеҶҷ并иҝ”еӣһпјӣеҜ№еә” step 1.2.2.3.3
иҜҘжӯҘйӘӨд»ҺжөҒзЁӢеӣҫ parse element by ContextNamespaceHandler зҡ„ step 1.2.4.2 registerAnnotationConfigProcessors ејҖе§ӢпјҢе°Ҷдјҡдҫқж¬ЎжіЁеҶҢз”ұеҰӮдёӢ post-processor class еҜ№иұЎжүҖеҜ№еә”зҡ„ post-processor-bean-definitionsпјҢ
жіЁж„ҸпјҢиҝҷйҮҢйғҪжҳҜйҖҡиҝҮ Class еҜ№иұЎжіЁеҶҢзҡ„пјҢ并йқһжіЁеҶҢзҡ„е®һдҫӢеҢ–еҜ№иұЎпјҢдёӢйқўпјҢжҲ‘们жқҘз®ҖеҚ•еҲҶжһҗдёҖдёӢжіЁеҶҢзӣёе…ізҡ„жәҗз ҒпјҢд»ҘжіЁеҶҢ AutowiredAnnotationBeanPostProcessor post-processor-bean-definition дёәдҫӢеӯҗпјҢ
AnnotationConfigUtils#registerAnnotationConfigProcessors
if (!registry.containsBeanDefinition(AUTOWIRED_ANNOTATION_PROCESSOR_BEAN_NAME)) {
// е°Ҷ AutowiredAnnotationBeanPostProcessor.class е°ҒиЈ…дёә bean definition
RootBeanDefinition def = new RootBeanDefinition(AutowiredAnnotationBeanPostProcessor.class);
def.setSource(source);
beanDefs.add(registerPostProcessor(registry, def, AUTOWIRED_ANNOTATION_PROCESSOR_BEAN_NAME));
}дёҠйқўзҡ„жӯҘйӘӨе°Ҷ AutowiredAnnotationBeanPostProcessor.class е°ҒиЈ…дёә bean definitionпјӣ
AnnotationConfigUtils.registerPostProcessor
private static BeanDefinitionHolder registerPostProcessor(
BeanDefinitionRegistry registry, RootBeanDefinition definition, String beanName) {
definition.setRole(BeanDefinition.ROLE_INFRASTRUCTURE);
registry.registerBeanDefinition(beanName, definition); // жіЁеҶҢ bean definition
return new BeanDefinitionHolder(definition, beanName);
}иҝҷдёҖжӯҘе°Ҷ AutowiredAnnotationBeanPostProcessor жүҖеҜ№еә”зҡ„ bean definition жіЁе…ҘдәҶеҪ“еүҚзҡ„ bean factory еҪ“дёӯпјӣ
AutowiredAnnotationBeanPostProcessor жҸҗдҫӣдәҶ @Autowired жіЁи§ЈжіЁе…ҘжңәеҲ¶зҡ„е®һзҺ°пјҢиҜҰжғ…еҸӮиҖғ AutowiredAnnotationBeanPostProcessor з« иҠӮпјӣ
йҖҡиҝҮдёҠиҝ°зҡ„еҲҶжһҗпјҢеҸҜд»Ҙжё…жҷ°зҡ„зңӢеҲ°пјҢbean definition зҡ„дҪңз”ЁжҳҜд»Җд№ҲпјҢе°ұжҳҜйҖҡиҝҮ bean definition дёӯзҡ„жҸҸиҝ°еҺ»йҷҗе®ҡйҖҡиҝҮ Class Type е®һдҫӢеҢ–еҫ—еҲ° instance зҡ„дёҡеҠЎи§„еҲҷпјҢжҲ‘们зңӢзңӢз”ұ do scan жөҒзЁӢ жүҖз”ҹжҲҗзҡ„ annotation-bean-definition<ScannedGenericBeanDefinition> еҜ№иұЎпјҢ
{% asset_img debug-scanned-generic-bean-definition.png %}
еҸҜд»ҘзңӢеҲ°пјҢеҪ“жҲ‘们еңЁеҗҺз»ӯиҰҒж №жҚ®иҜҘ annotation-bean-definition еҫ—еҲ°дёҖдёӘ DogService е®һдҫӢзҡ„ж—¶еҖҷпјҢжүҖиҰҒйҒөеҫӘзҡ„дёҡеҠЎи§„еҲҷпјҢеҰӮдёӢжүҖзӨәпјҢ
Generic bean: class [org.shangyang.spring.container.DogService];
scope=;
abstract=false;
lazyInit=false;
autowireMode=0;
dependencyCheck=0;
autowireCandidate=true;
primary=false;
factoryBeanName=null;
factoryMethodName=null;
initMethodName=null;
destroyMethodName=null;
defined in file [/Users/mac/workspace/spring/framework/sourcecode-analysis/spring-core-container/spring-sourcecode-test/target/classes/org/shangyang/spring/container/DogService.class]дёҚиҝҮпјҢиҰҒжіЁж„ҸпјҢиҝҷйҮҢжүҖеҫ—еҲ°зҡ„ ScannedGenericBeanDefinition е®һдҫӢпјҢеҗҢж ·жІЎжңүзңҹжӯЈеҺ»еҠ иҪҪ org.shangyang.spring.container.DogService Class Type еҲ°е®№еҷЁдёӯпјҢиҖҢеҸӘжҳҜе°Ҷ class name еӯ—з¬ҰдёІиөӢеҖјз»ҷдәҶ ScannedGenericBeanDefinition.beanClassпјҢиЁҖеӨ–д№Ӣж„ҸпјҢе°ҶжқҘеңЁеҠ иҪҪ Class Type еҲ°е®№еҷЁдёӯзҡ„ж—¶еҖҷпјҢжҲ–и®ёдёҺе®һдҫӢеҢ– instance дёҖж ·д№ҹиҰҒж №жҚ® bean definitions дёӯзҡ„规еҲҷжқҘйҷҗе®ҡе…¶еҠ иҪҪиЎҢдёәпјҢзӣ®еүҚжҲ‘жүҖиғҪеӨҹжғіеҲ°зҡ„дёҺе…¶зӣёе…ізҡ„е°ұжҳҜ ASM еӯ—иҠӮз ҒжҠҖжңҜпјҢеҸҜд»ҘеңЁ bean definition дёӯе®ҡд№ү ASM еӯ—иҠӮз Ғдҝ®ж”№и§„еҲҷпјҢжқҘжҺ§еҲ¶зӣёе…і Class Type зҡ„еҠ иҪҪиЎҢдёәпјӣ
жң¬ж–ҮиҪ¬иҪҪиҮӘжң¬дәәзҡ„з§ҒдәәеҚҡе®ўпјҢдјӨзҘһзҡ„еҚҡе®ў http://www.shangyang.me/2017/04/07/spring-core-container-sourcecode-analysis-register-bean-definitions/
е…ҚиҙЈеЈ°жҳҺпјҡжң¬з«ҷеҸ‘еёғзҡ„еҶ…е®№пјҲеӣҫзүҮгҖҒи§Ҷйў‘е’Ңж–Үеӯ—пјүд»ҘеҺҹеҲӣгҖҒиҪ¬иҪҪе’ҢеҲҶдә«дёәдё»пјҢж–Үз« и§ӮзӮ№дёҚд»ЈиЎЁжң¬зҪ‘з«ҷз«ӢеңәпјҢеҰӮжһңж¶үеҸҠдҫөжқғиҜ·иҒ”зі»з«ҷй•ҝйӮ®з®ұпјҡis@yisu.comиҝӣиЎҢдёҫжҠҘпјҢ并жҸҗдҫӣзӣёе…іиҜҒжҚ®пјҢдёҖз»ҸжҹҘе®һпјҢе°Ҷз«ӢеҲ»еҲ йҷӨж¶үе«ҢдҫөжқғеҶ…е®№гҖӮ