本文以SpringSecurity安全框架为例,为大家分析SpringSecurity安全框架的作用和使用方法,阅读完整文相信大家对SpringSecurity安全框架有了一定的认识。
spring security 的核心功能主要包括:
防护 (防止伪造身份)
其核心就是一组过滤器链,项目启动后将会自动配置。最核心的就是 Basic Authentication Filter 用来认证用户的身份,一个在spring security中一种过滤器处理一种认证方式。
比如,对于username password认证过滤器来说, 会检查是否是一个登录请求;是否包含username 和 password (也就是该过滤器需要的一些认证信息) ;如果不满足则放行给下一个。
下一个按照自身职责判定是否是自身需要的信息,basic的特征就是在请求头中有 Authorization:Basic eHh5Onh5 的信息。中间可能还有更多的认证过滤器。最后一环是 FilterSecurityInterceptor,这里会判定该请求是否能进行访问rest服务,判断的依据是 BrowserSecurityConfig中的配置,如果被拒绝了就会抛出不同的异常(根据具体的原因)。Exception Translation Filter 会捕获抛出的错误,然后根据不同的认证方式进行信息的返回提示。
注意:绿色的过滤器可以配置是否生效,其他的都不能控制。
在 src/main/resources中加入如下文件
spring-security.xml
<?xml version="1.0" encoding="UTF-8"?>
<beans:beans xmlns="http://www.springframework.org/schema/security"
xmlns:beans="http://www.springframework.org/schema/beans" xmlns:xsi="http://www.w3.org/2001/XMLSchema-instance"
xsi:schemaLocation="http://www.springframework.org/schema/beans http://www.springframework.org/schema/beans/spring-beans.xsd
                    http://www.springframework.org/schema/security http://www.springframework.org/schema/security/spring-security.xsd">

    <!-- 设置页面不登录也可以访问 -->
    <http pattern="/login.html" security="none"></http>
    <http pattern="/login_error.html" security="none"></http>

    <!-- 配置页面的拦截规则  use-expressions="false"是否启用SPEL表达式-->
    <http use-expressions="false">
    <!-- 当前应乎必须属于ROLE_USER这个角色,才可以访问根目录以及所属子目录的资源 -->
        <intercept-url pattern="/**" access="ROLE_USER" />
        <!-- 开启表单登录的功能 -->
        <form-login login-page="/login.html" default-target-url="/index.html" authentication-failure-url="/login_error.html"/>
        <csrf disabled="true"/>
    </http>

    <!-- 认证管理器 -->
    <authentication-manager>
        <authentication-provider>
            <user-service>
               <!--表示配置用户属于ROLE_USER并且配置用户登陆的密码和账号-->
                <user name="admin" password="123456" authorities="ROLE_USER"/>
            </user-service>
        </authentication-provider>
</authentication-manager></beans:beans>
这里的很多东西都有注解了,说一下没有注解的标签,form-login标签表示配置一个登陆的功能,login-page="/login.html"表示配置我们自己登陆的页面路径,若是没有配置form-login这个标签,SpringSecurity会自动帮我们生成一个登陆的页面,但是都不会用SpringSecurity给我们生成的登录页面,authentication-failure-url标示密码或者账号错误跳转的页面,default-target-url表示密码或者账号正确登陆后跳转的页面,<csrf disabled="true"/>表示关闭csrf

3. 配置web.xml<?xml version="1.0" encoding="UTF-8"?>
<web-app xmlns:xsi="http://www.w3.org/2001/XMLSchema-instance"
xmlns="http://java.sun.com/xml/ns/javaee"
xsi:schemaLocation="http://java.sun.com/xml/ns/javaee http://java.sun.com/xml/ns/javaee/web-app_2_5.xsd"
version="2.5">
 <context-param>
    <param-name>contextConfigLocation</param-name>
    <param-value>classpath:spring-security.xml</param-value>
 </context-param>
 <listener>
    <listener-class>
        org.springframework.web.context.ContextLoaderListener
    </listener-class>
 </listener>

 <filter>
    <filter-name>springSecurityFilterChain</filter-name>
    <filter-class>org.springframework.web.filter.DelegatingFilterProxy</filter-class>
 </filter>
 <filter-mapping>
    <filter-name>springSecurityFilterChain</filter-name>
    <url-pattern>/*</url-pattern>
</filter-mapping></web-app>
这个就是个Spring的配置文件而已,相信很多人都能看懂
 4. 创建html页面

index.html<!DOCTYPE html>
<html>
<head>
<meta charset="UTF-8">
<title>首页</title>
</head>
<body>
<h2>欢迎进入进入神奇的Spring-Security世界</h2>
</body>
</html>
login_error.html
<!DOCTYPE html>
<html>
<head>
<meta charset="UTF-8">
<title>Insert title here</title>
</head>
<body>
<h2>用户名密码错误</h2>
</body>
</html>
login.html
<!DOCTYPE html>
<html>
<head>
<meta charset="UTF-8">
<title>登录</title>
</head>
<body>
--欢迎登录我的系统--
<form action="/login" method="post">
用户名:<input name="username"><br>
密码:<input name="password"><br>
<button>登录</button>
</form>
</body>
</html>
注意:特别说明一下login.html中东西,里面的form表单的提交,其中name="username"和name="password"是必须的,因为SpringSecurity中默认就是以username和password来接受的,当然这个名字也可以改,但是一般沿用它的就行了,没必要改,然后就是form表单的提交必须是method="post",提交的动作必须是action="/login",一般不做修改。
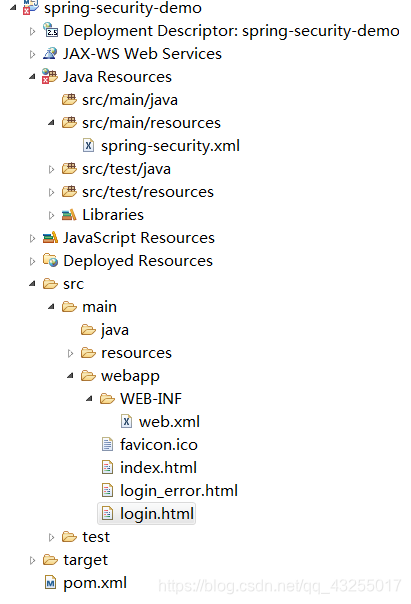
##### 项目的目录结构为

### 三、测试
启动项目,因为是war项目,所以要配置tomcat来启动,启动的命令直接就是tomcat7:run就行了,如图表示启动成功,然后直接粘贴这个url到浏览器进行访问

登陆页面如图所示,我们直接输入localhost:9090/index.html是不允许的,会被重定向到login.html页面中,如
图所示

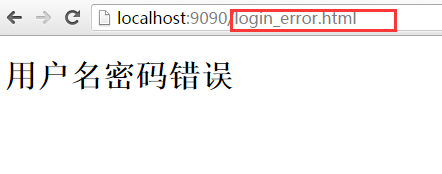
然后输入错误的密码或者账号,如图所示,就会被重定向到错误的页面,这个使我们自己配置的

最后输入正确的密码和账号,如图所示,就会直接t跳转到index.html页面中
看完上述内容,你们对SpringSecurity安全框架有进一步的了解吗?如果还想学到更多技能或想了解更多相关内容,欢迎关注亿速云行业资讯频道,感谢各位的阅读。
亿速云「云服务器」,即开即用、新一代英特尔至强铂金CPU、三副本存储NVMe SSD云盘,价格低至29元/月。点击查看>>
免责声明:本站发布的内容(图片、视频和文字)以原创、转载和分享为主,文章观点不代表本网站立场,如果涉及侵权请联系站长邮箱:is@yisu.com进行举报,并提供相关证据,一经查实,将立刻删除涉嫌侵权内容。