这篇文章将为大家详细讲解有关linux如何安装cloud-init,小编觉得挺实用的,因此分享给大家做个参考,希望大家阅读完这篇文章后可以有所收获。
安装 cloud-init
如果您需要使用已有镜像创建ECS实例,可以通过导入镜像功能完成配置。在导入Linux类型镜像时,为了保证导入的镜像hostname、NTP和Yum源配置成功,建议您预先在源服务器、虚拟机或者云主机上安装cloud-init。
注意事项
目前,支持安装cloud-init的Linux发行版包括CentOS、Debian、Fedora、FreeBSD、Gentoo、RHEL(Red Hat Enterprise Linux)、SLES(SUSE Linux Enterprise Server)和Ubuntu。
若您的源服务器、虚拟机或者云主机已经安装了cloud-init,您需要确认cloud-init版本号高于0.7.9,包含低版本cloud-init的镜像会引起相关实例配置失败,例如NTP、HostName 和Yum等。
登录源服务器、虚拟机或者云主机。
运行 cloud-init --version 查询cloud-init版本。
如果您的cloud-init版本号高于0.7.9,表示该版本可用。否则您需要 安装cloud-init。
前提条件
安装cloud-init之前,您的源服务器、虚拟机或者云主机必须安装以下软件。
git:下载cloud-init源码包
yum安装方式:yum install git
Python2.7:cloud-init运行和安装的基础
yum安装方式:yum install python
pip:安装cloud-init依赖的Python库
yum安装方式:yum install python-pip
此处列举了 yum 安装方式。zypper 或者 apt-get 的包管理器安装方式与 yum 安装方式类似。
安装cloud-init
您可以按以下步骤安装cloud-init:
登录待导入镜像的源服务器、虚拟机或者云主机。
运行 git clone https://git.launchpad.net/cloud-init 从cloud-init官网下载cloud-init源码包。
运行 cd cloud-init 进入cloud-init目录。
运行 python setup.py install 安装cloud-init的安装文件setup.py。
运行 vi /etc/cloud/cloud.cfg 修改配置文件cloud.cfg。
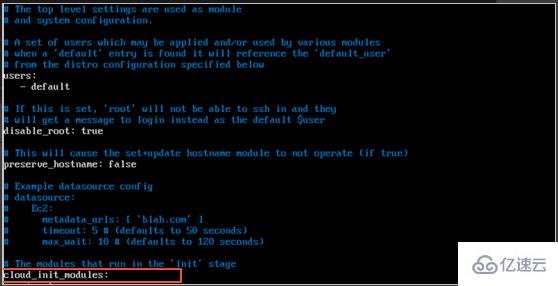
将 cloud_init_modules 之前的配置修改成如下:
# Example datasource config
 # The top level settings are used as module
 # and system configuration.
 # A set of users which may be applied and/or used by various modules
 # when a 'default' entry is found it will reference the 'default_user'
 # from the distro configuration specified below
 users:
    - default
 user:
     name: root
     lock_passwd: False
 # If this is set, 'root' will not be able to ssh in and they
 # will get a message to login instead as the above $user
 disable_root: false
 # This will cause the set+update hostname module to not operate (if true)
 preserve_hostname: false
 syslog_fix_perms: root:root
 datasource_list: [ AliYun ]
 # Example datasource config
 datasource:
     AliYun:
         support_xen: false
         timeout: 5 # (defaults to 50 seconds)
         max_wait: 60 # (defaults to 120 seconds)
 #      metadata_urls: [ 'blah.com' ]
 # The modules that run in the 'init' stage
cloud_init_modules:排查故障
不同镜像缺少的库可能不同,您都可以通过pip安装,安装完之后再次重复以上步骤 4。
缺少six和oauthlib库
安装过程中,如果出现以下信息,表示Python缺少six库。您可以使用pip安装six库:pip install six。
File "/root/cloud-init/cloudinit/log.py", line 19, in <module>
      import six
ImportError: No module named s )安装过程中,如果出现以下信息,表示Python缺少oauthlib库。您可以使用pip安装oauthlib库:pip install oauthlib。
File "/root/cloud-init/cloudinit/url_helper.py", line 20, in <module>
      import oauthlib.oauth2 as oauth2
ImportError: No module named oauthlib.oaut )提示错误时没有明确缺少的依赖库
如果安装报错时,没有明确提示缺少哪些依赖库时,您可以根据cloud-init的requirements.txt文件里显示的库,并运行 pip install -r requirements.txt 安装所有依赖库。
关于linux如何安装cloud-init就分享到这里了,希望以上内容可以对大家有一定的帮助,可以学到更多知识。如果觉得文章不错,可以把它分享出去让更多的人看到。
亿速云「云服务器」,即开即用、新一代英特尔至强铂金CPU、三副本存储NVMe SSD云盘,价格低至29元/月。点击查看>>
免责声明:本站发布的内容(图片、视频和文字)以原创、转载和分享为主,文章观点不代表本网站立场,如果涉及侵权请联系站长邮箱:is@yisu.com进行举报,并提供相关证据,一经查实,将立刻删除涉嫌侵权内容。


 计算
计算 安全
安全 数据库
数据库 网络和加速
网络和加速 企业服务
企业服务


