这篇文章主要介绍PyQt5中信号与槽机制、自定义信号的示例分析,文中介绍的非常详细,具有一定的参考价值,感兴趣的小伙伴们一定要看完!
信号和槽机制是 QT 的核心机制,要精通 QT 编程就必须对信号和槽有所了解。信号和槽是一种高级接口,应用于对象之间的通信,它是 QT 的核心特性,也是 QT 区别于其它工具包的重要地方。
在linux、windows等 GUI 工具包中,GUI组件都会注册回调函数用于处理组件所触发的动作,通常是注册对应的函数的函数指针。在之前关于Button的文章中提到了信号与槽的机制的使用,通过该机制可以很好的将组件的信号(如button的clocked、toggled、pressed等)和处理该信号的槽关联起来。通过 信号与槽机制,能够让我们很简洁和快速的来完成相关的功能。
信号和槽是用来在对象间传递数据的方法:当一个特定事件发生的时候,signal会被emit出来,slot调用是用来响应相应的signal的。Qt中对象已经包含了许多预定义的 signal(基本组件都有各自特有的预定义的信号),根据使用的场景我们可以添加新的signal。Qt的对象中已经包含了许多预定义的槽函数,但我们也根据使用的场景添加新的槽函数。
当对象的状态发生改变的时候,信号就由该对象发射 (emit) 出去。当一个信号被发射(emit)时候,与其关联的槽函数被立刻执行。其中该对象只负责发送信号,发射该信号的对象并不知道是那个对象在接收这个信号。这样保证了对象与对象之间的低耦合。
如果存在信号和多个槽函数相关联的时候,当信号被发射时,这些槽的执行顺序将会是随机的、不确定的。
用于接受信号,而且槽只是普通的对象成员函数。当和槽连接的信号被发射时,槽会被调用。一个槽并不知道是否有任何信号与自己相连接。
通过调用 QObject 对象的 connect 函数来将某个对象的信号与另外一个对象的槽函数相关联,这样当发射者发射信号时,接收者的槽函数将被调用。该函数的定义如下::
connect(slot[, type=PyQt5.QtCore.Qt.AutoConnection[, no_receiver_check=False]])
Parameters:
slot – the slot to connect to, either a Python callable or another bound signal.
type – the type of the connection to make.
no_receiver_check – suppress the check that the underlying C++ receiver instance still exists and deliver the signal anyway.
当信号与槽没有必要继续保持关联时,我们可以使用 disconnect 函数来断开连接。其定义如下:
disconnect([slot])
Parameters: slot – the optional slot to disconnect from, either a Python callable or another bound signal. If it is omitted then all slots connected to the signal are disconnected.
当信号发出后,槽函数都会被调用,但是调用的顺序是随机的,不确定的。
self.slider.valueChanged.connect(self.pBar.setValue)
self.slider.valueChanged.connect(self.lcdNumber.display)
QSlider数据的变化同时绑定在setValue()和display()两个槽上。
其中任何一个信号发出,槽函数都会被执行。
self.buttonOn.clicked.connect(self.showMessage)
self.buttonOff.clicked.connect(self.showMessage)
showMessage()同时绑定在两个button的clicked信号上
如list,dict等python独有的类型。自定义信号的时候举例说明。
比如断开某个特定信号的关联。
self.buttonOn.clicked.connect(self.showMessage)
第一个信号发出后,第二个信号也同时发送。比如关闭系统的信号发出之后,同时会发出保存数据的信号。
代码示例:
关于信号和槽的式样代码如下:
#-*- coding:utf-8 -*-
'''
Signal & Slot
'''
__author__ = 'Tony Zhu'

import sys
from PyQt5.QtCore import Qt
from PyQt5.QtWidgets import (QWidget, QLCDNumber, QSlider,QGridLayout,QLabel,QHBoxLayout, QGroupBox,
  QVBoxLayout, QApplication,QProgressBar,QPushButton,QMessageBox)


class SignalSlot(QWidget):

  def __init__(self):
    super(SignalSlot,self).__init__()
    self.initUI()


  def initUI(self):

    self.controlsGroup = QGroupBox("运行样本")
    self.lcdNumber = QLCDNumber(self)
    self.slider = QSlider(Qt.Horizontal, self)
    self.pBar = QProgressBar(self)
    vbox = QVBoxLayout()
    vbox.addWidget(self.pBar)
    vbox.addWidget(self.lcdNumber)
    vbox.addWidget(self.slider)
    self.controlsGroup.setLayout(vbox)

    controlsLayout = QGridLayout()
    self.label1 = QLabel("保存状态:")
    self.saveLabel = QLabel()
    self.label2 = QLabel("运行状态:")
    self.runLabel = QLabel()
    self.buttonSave = QPushButton("保存")
    self.buttonRun = QPushButton("运行")
    self.buttonStop = QPushButton("停止")
    self.buttonDisconnect = QPushButton("解除关联")
    self.buttonConnect = QPushButton("绑定关联")

    controlsLayout.addWidget(self.label1,0,0)
    controlsLayout.addWidget(self.saveLabel,0,1)
    controlsLayout.addWidget(self.label2,1,0)
    controlsLayout.addWidget(self.runLabel,1,1)
    controlsLayout.addWidget(self.buttonSave,2,0)
    controlsLayout.addWidget(self.buttonRun,2,1)
    controlsLayout.addWidget(self.buttonStop,2,2)
    controlsLayout.addWidget(self.buttonDisconnect,3,0)
    controlsLayout.addWidget(self.buttonConnect,3,1)

    layout = QHBoxLayout()
    layout.addWidget(self.controlsGroup)
    layout.addLayout(controlsLayout)
    self.setLayout(layout)

    self.buttonRun.clicked.connect(self.buttonSave.clicked)
    self.slider.valueChanged.connect(self.pBar.setValue)
    self.slider.valueChanged.connect(self.lcdNumber.display)
    self.buttonSave.clicked.connect(self.showMessage)
    self.buttonRun.clicked.connect(self.showMessage)
    self.buttonDisconnect.clicked.connect(self.unbindConnection)
    self.buttonConnect.clicked.connect(self.bindConnection)
    self.buttonStop.clicked.connect(self.stop)

    self.setGeometry(300, 500, 500, 180)
    self.setWindowTitle('信号和槽')

  def showMessage(self):
    if self.sender().text() == "保存":
      self.saveLabel.setText("Saved")
    elif self.sender().text() == "运行":
      self.saveLabel.setText("Saved")
      self.runLabel.setText("Running")

  def unbindConnection(self):
    self.slider.valueChanged.disconnect()
  def bindConnection(self):
    self.slider.valueChanged.connect(self.pBar.setValue)
    self.slider.valueChanged.connect(self.lcdNumber.display)
  def stop(self):
    self.saveLabel.setText("")
    self.runLabel.setText("")

if __name__ == '__main__':

  app = QApplication(sys.argv)
  ex = SignalSlot()
  ex.show()
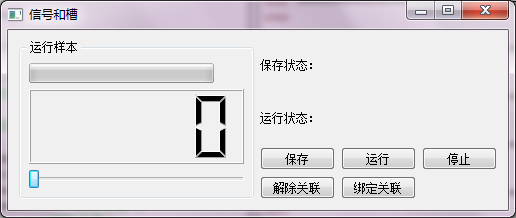
sys.exit(app.exec_())程序运行的结果:

控件说明:
| 控件类型 | 控件名称 | 作用 |
|---|---|---|
| QLCDNumber | lcdNumber | 显示slider滑动之后的数据 |
| QProgressBar | pBar | 显示slider滑动之后的数据(百分比数据) |
| QSlider | slider | 滑动块调整数据 |
| QPushButton | buttonSave | 在saveLabel显示保存的状态”Saved” |
| QPushButton | buttonRun | 在runLabel显示运行的状态”Running” |
| QPushButton | buttonDisconnect | 解除slider.valueChanged信号的绑定 |
| QPushButton | buttonConnect | 连接slider.valueChanged信号的绑定 |
| QPushButton | buttonStop | 清除saveLabel和runLabel的信息 |
示例说明:
程序样本运行的界面逻辑,先设定运行的程序样本数量,然后先保存后运行的逻辑状态。通过slider的滑动来改变progressBar和LCD的显示数据;“保存”按钮保存运行的样本;“运行”按钮运行程序样本;“解除关联”解除slider.valueChanged信号的绑定,此时slider的滑动,不会改变progressBar和LCD的显示
示例说明:
L22~30:
self.controlsGroup = QGroupBox("运行样本")
self.lcdNumber = QLCDNumber(self)
self.slider = QSlider(Qt.Horizontal, self)
self.pBar = QProgressBar(self)
vbox = QVBoxLayout()
vbox.addWidget(self.pBar)
vbox.addWidget(self.lcdNumber)
vbox.addWidget(self.slider)
self.controlsGroup.setLayout(vbox)实例化一个QGroupBox,在其中添加QSlider,QProgressBar,QLCDNumber控件。
L32~41:
controlsLayout = QGridLayout()
self.label1 = QLabel("保存状态:")

.....

self.buttonDisconnect = QPushButton("解除关联")
self.buttonConnect = QPushButton("绑定关联")实例化,界面中右半部分的控件。
L58~65:
self.buttonRun.clicked.connect(self.buttonSave.clicked)
self.slider.valueChanged.connect(self.pBar.setValue)
self.slider.valueChanged.connect(self.lcdNumber.display)
self.buttonSave.clicked.connect(self.showMessage)
self.buttonRun.clicked.connect(self.showMessage)
self.buttonDisconnect.clicked.connect(self.unbindConnection)
self.buttonConnect.clicked.connect(self.bindConnection)
self.buttonStop.clicked.connect(self.stop)
self.slider.valueChanged.connect(self.pBar.setValue)
self.slider.valueChanged.connect(self.lcdNumber.display)
slider控件的valueChanged信号,同时与QProgressBar的setValue(),QLCDNumber的display()槽函数绑定,当valueChanged信号触发的时候,这两个槽函数均会被调用。
self.buttonSave.clicked.connect(self.showMessage)
self.buttonRun.clicked.connect(self.showMessage)
buttonSave和buttonRun这两个对象的clicked信号,同时绑定到showMessage()这个槽函数。无论哪一个信号被触发,showMessage()这个槽函数均会被调用。
self.buttonDisconnect.clicked.connect(self.unbindConnection)
当buttonDisconnect信号触发之后,与其关联的槽函数unbindConnection()中就会执行disconnect()方法,如下:
def unbindConnection(self):
self.slider.valueChanged.disconnect()其中执行disconnect()的时候可以指定解除与某个特定的slot槽的关联,比如self.slider.valueChanged.disconnect(self.pBar.setValue),此时解除和QProgressBar的setValue()的关联;或者不指定,在不指定slot的场景下这样将解除和这个信号所有关联的槽。
self.buttonRun.clicked.connect(self.buttonSave.clicked)
在示例说明中提到,在运行之前要对样本进行保存,所以为了保证运行的时候执行了保存的操作,所以将buttonRun.clicked信号和buttonSave.clicked信号关联起来。
示例中在没有执行“保存”(buttonSave)的时候,执行“运行”(buttonRun),此时由于两个对象的clicked信号已经关联,所以buttonSave的clicked同样会执行。
PyQt5已经自动定义了很多QT内建的信号。但是在实际的使用中为了灵活使用信号与槽机制,我们可以根据需要自定义signal。可以使用pyqtSignal()方法定义新的信号,新的信号作为类的属性。
pyqtSignal()方法原型(PyQt官网的定义):
PyQt5.QtCore.pyqtSignal(types[, name[, revision=0[, arguments=[]]]])
Create one or more overloaded unbound signals as a class attribute.
Parameters:
types – the types that define the C++ signature of the signal. Each type may be a Python type object or a string that is the name of a C++ type. Alternatively each may be a sequence of type arguments. In this case each sequence defines the signature of a different signal overload. The first overload will be the default.
name – the name of the signal. If it is omitted then the name of the class attribute is used. This may only be given as a keyword argument.
revision – the revision of the signal that is exported to QML. This may only be given as a keyword argument.
arguments – the sequence of the names of the signal's arguments that is exported to QML. This may only be given as a keyword argument.
Return type: an unbound signal
新的信号应该定义在QObject的子类中。新的信号必须作为定义类的一部分,不允许将信号作为类的属性在类定义之后通过动态的方式进行添加。通过这种方式新的信号才能自动的添加到QMetaObject类中。这就意味这新定义的信号将会出现在Qt Designer,并且可以通过QMetaObject API实现内省。
通过下面的例子,了解一下关于signal的定义:
from PyQt5.QtCore import QObject, pyqtSignal

class NewSignal(QObject):

  # 定义了一个“closed”信号,该信号没有参数据
  closed= pyqtSignal()

  # 定义了一个"range_changed"信号,该信号有两个int类型的参数
range_changed = pyqtSignal(int, int, name='rangeChanged')自定义信号的发射,通过emit()方法类实现,具体参见该函数的原型:
emit(*args)
Parameters: args – the optional sequence of arguments to pass to any connected slots.
通过下面的例子,了解一下关于emit()的使用:
from PyQt5.QtCore import QObject, pyqtSignal

class NewSignal(QObject):

  # 一个valueChanged的信号,该信号没有参数.
  valueChanged = pyqtSignal()

  def connect_and_emit_valueChanged(self):
    # 绑定信号和槽函数
    self.valueChanged.connect(self.handle_valueChanged)

    # 发射信号.
    self.trigger.emit()

  def handle_valueChanged(self):
print("trigger signal received")示例说明:
自定义信号的一般流程如下:
定义信号
定义槽函数
绑定信号和槽
发射信号
通过代码示例来了解一下信号的自定义过程:
#-*- coding:utf-8 -*-
'''
defined Signal
'''
__author__ = 'Tony Zhu'
import sys
from PyQt5.QtCore import pyqtSignal, QObject, Qt, pyqtSlot
from PyQt5.QtWidgets import QWidget, QApplication, QGroupBox, QPushButton, QLabel, QCheckBox, QSpinBox, QHBoxLayout, QComboBox, QGridLayout


class SignalEmit(QWidget):
  helpSignal = pyqtSignal(str)
  printSignal = pyqtSignal(list)
  #声明一个多重载版本的信号,包括了一个带int和str类型参数的信号,以及带str参数的信号
  previewSignal = pyqtSignal([int,str],[str])
  def __init__(self):
    super().__init__()
    self.initUI()


  def initUI(self):

    self.creatContorls("打印控制:")
    self.creatResult("操作结果:")

    layout = QHBoxLayout()
    layout.addWidget(self.controlsGroup)
    layout.addWidget(self.resultGroup)
    self.setLayout(layout)

    self.helpSignal.connect(self.showHelpMessage)
    self.printSignal.connect(self.printPaper)
    self.previewSignal[str].connect(self.previewPaper)
    self.previewSignal[int,str].connect(self.previewPaperWithArgs)
    self.printButton.clicked.connect(self.emitPrintSignal)
    self.previewButton.clicked.connect(self.emitPreviewSignal)

    self.setGeometry(300, 300, 290, 150)
    self.setWindowTitle('defined signal')
    self.show()

  def creatContorls(self,title):
    self.controlsGroup = QGroupBox(title)
    self.printButton = QPushButton("打印")
    self.previewButton = QPushButton("预览")
    numberLabel = QLabel("打印份数:")
    pageLabel = QLabel("纸张类型:")
    self.previewStatus = QCheckBox("全屏预览")
    self.numberSpinBox = QSpinBox()
    self.numberSpinBox.setRange(1, 100)
    self.styleCombo = QComboBox(self)
    self.styleCombo.addItem("A4")
    self.styleCombo.addItem("A5")

    controlsLayout = QGridLayout()
    controlsLayout.addWidget(numberLabel, 0, 0)
    controlsLayout.addWidget(self.numberSpinBox, 0, 1)
    controlsLayout.addWidget(pageLabel, 0, 2)
    controlsLayout.addWidget(self.styleCombo, 0, 3)
    controlsLayout.addWidget(self.printButton, 0, 4)
    controlsLayout.addWidget(self.previewStatus, 3, 0)
    controlsLayout.addWidget(self.previewButton, 3, 1)
    self.controlsGroup.setLayout(controlsLayout)

  def creatResult(self,title):
    self.resultGroup = QGroupBox(title)
    self.resultLabel = QLabel("")
    layout = QHBoxLayout()
    layout.addWidget(self.resultLabel)
    self.resultGroup.setLayout(layout)

  def emitPreviewSignal(self):
    if self.previewStatus.isChecked() == True:
      self.previewSignal[int,str].emit(1080," Full Screen")
    elif self.previewStatus.isChecked() == False:
      self.previewSignal[str].emit("Preview")

  def emitPrintSignal(self):
    pList = []
    pList.append(self.numberSpinBox.value ())
    pList.append(self.styleCombo.currentText())
    self.printSignal.emit(pList)

  def printPaper(self,list):
    self.resultLabel.setText("Print: "+"份数:"+ str(list[0]) +" 纸张:"+str(list[1]))

  def previewPaperWithArgs(self,style,text):
    self.resultLabel.setText(str(style)+text)

  def previewPaper(self,text):
    self.resultLabel.setText(text)

  def keyPressEvent(self, event):

    if event.key() == Qt.Key_F1:
      self.helpSignal.emit("help message")

  def showHelpMessage(self,message):
    self.resultLabel.setText(message)
    #self.statusBar().showMessage(message)


if __name__ == '__main__':

  app = QApplication(sys.argv)
  dispatch = SignalEmit()
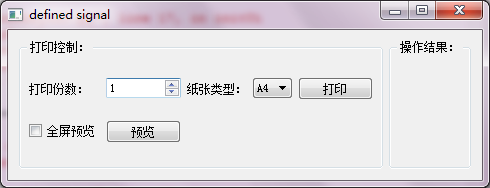
sys.exit(app.exec_())运行该函数之后的效果如下:

示例说明:
通过一个模拟打印的界面来详细说明一下关于信号的自定义,在打印的时候可以设定打印的分数,纸张类型,触发“打印”按钮之后,将执行结果显示到右侧;通过全屏预览QCheckBox来选择是否通过全屏模式进行预览,将执行结果显示到右侧。
通过点击F1快捷键,可以显示helpMessage信息。
代码分析:
L12~15:
helpSignal = pyqtSignal(str)
printSignal = pyqtSignal(list)
#声明一个多重载版本的信号,包括了一个带int和str类型参数的信号,以及带str参数的信号
previewSignal = pyqtSignal([int,str],[str])通过pyqtSignal()定义了三个信号,helpSignal ,printSignal ,previewSignal 。其中:
helpSignal 为str参数类型的信号;
printSignal 为list参数类型的信号;
previewSignal为一个多重载版本的信号,包括了一个带int和str类型参数的信号,以及str类行的参数。
L31~36:
self.helpSignal.connect(self.showHelpMessage)
self.printSignal.connect(self.printPaper)
self.previewSignal[str].connect(self.previewPaper)
self.previewSignal[int,str].connect(self.previewPaperWithArgs)
self.printButton.clicked.connect(self.emitPrintSignal)
self.previewButton.clicked.connect(self.emitPreviewSignal)
绑定信号和槽;着重说明一下多重载版本的信号的绑定,previewSignal有两个版本previewSignal(str),previewSignal(int,str)。由于存在两个版本,从因此在绑定的时候需要显式的指定信号和槽的绑定关系。
具体如下:
self.previewSignal[str].connect(self.previewPaper)
self.previewSignal[int,str].connect(self.previewPaperWithArgs)
其中[str]参数的previewSignal信号绑定previewPaper();[int,str]的previewSignal信号绑定previewPaperWithArgs()
L72~76:
  def emitPreviewSignal(self):
    if self.previewStatus.isChecked() == True:
      self.previewSignal[int,str].emit(1080," Full Screen")
    elif self.previewStatus.isChecked() == False:
self.previewSignal[str].emit("Preview")多重载版本的信号的发射也需要制定对应发射的版本,类似同信号的版定。
L78~82:
  def emitPrintSignal(self):
    pList = []
    pList.append(self.numberSpinBox.value ())
    pList.append(self.styleCombo.currentText())
self.printSignal.emit(pList)如代码中所示,在信号发射的时候可以传递python数据类型的参数,在本例中传递list类型的参数pList.
L93~96:
  def keyPressEvent(self, event):
    if event.key() == Qt.Key_F1:
self.helpSignal.emit("help message")通过复写keyPressEvent()方法,将F1快捷键进行功能的拓展。在windows的大部分应用,我们都会使用一些快捷键来快速的完成某些特定的功能。比如F1键,会快速调出帮助界面。那我们就可以复写keyPressEvent()方法来模拟发送所需的信号,来完成我们的对应任务.
注意事项:
自定义的信号在init()函数之前定义;
自定义型号可以传递,str、int、list、object、float、tuple、dict等很多类型的参数;
注意signal和slot的调用逻辑,避免signal和slot之间出现死循环。如在slot方法中继续发射该信号;
以上是“PyQt5中信号与槽机制、自定义信号的示例分析”这篇文章的所有内容,感谢各位的阅读!希望分享的内容对大家有帮助,更多相关知识,欢迎关注亿速云行业资讯频道!
亿速云「云服务器」,即开即用、新一代英特尔至强铂金CPU、三副本存储NVMe SSD云盘,价格低至29元/月。点击查看>>
免责声明:本站发布的内容(图片、视频和文字)以原创、转载和分享为主,文章观点不代表本网站立场,如果涉及侵权请联系站长邮箱:is@yisu.com进行举报,并提供相关证据,一经查实,将立刻删除涉嫌侵权内容。