这篇文章给大家分享的是有关小程序中如何设计click-scroll组件的内容。小编觉得挺实用的,因此分享给大家做个参考,一起跟随小编过来看看吧。
一. 背景
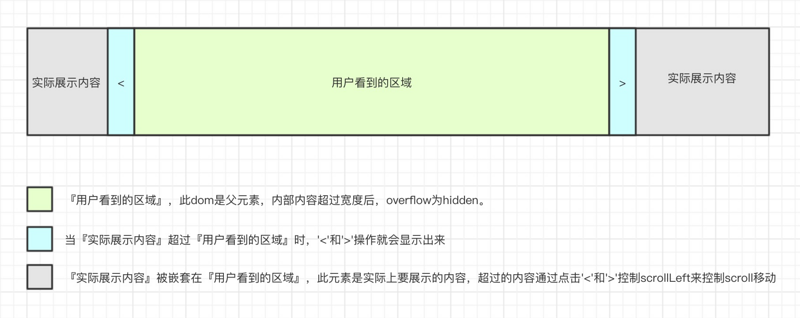
有些业务需求,要求前端展示的内容多时可以通过scroll的形式拖拉查看,但是太多的滚动条又造成页面太乱,于是封装了这个click-scroll 组件。在组件上设定好展示的位置和空间大小,在组件内部放置实际要展示的内容,实际展示的内容宽度或长或短都由此组件来控制。
二. 功能
组件内的内容宽度超过组件宽度时,组件两侧会自动出现『左右移动』交互。
当内部展示的内容超过组件的可见区域时,可以在组件的可见区域单击拖动查看内容
三. 背景知识,元素大小的测量
1.偏移量(offset dimension):
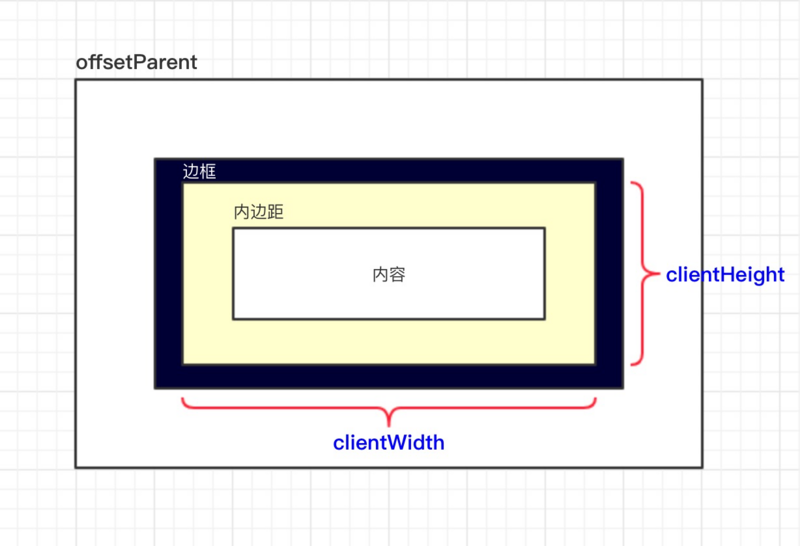
元素在屏幕上占用的可见的所有空间,元素的可见大小由其高度、宽度决定,包括所有内边距、滚动条和边框大小。由四个值决定:offsetHeight、offsetWidth、offsetLeft和offsetRight。
offsetHeight:元素在垂直方向上占用的空间大小,以像素计。包括元素的高度、(可见)水平滚动条的高度、上边框高度和下边框高度。
offsetWidth:元素在水平方向上占用的空间大小,以像素计。包括元素的宽度、(可见)垂直滚动条的宽度、左边框宽度和右边框宽度。
offsetLeft:元素的左外边框至包含元素的左内边框之间的像素距离。 d.
offsetTop:元素的上外边框至包含元素的上内边框之间的像素距离。

2.客户区大小(client dimension)
元素内容及其内边距所占据空间的大小,滚动条占用的空间不计算在内。
clientWidth:元素内容区宽度加上左右内边距的宽度
clientHeight: 元素内容区高度加上上下内边距的高度

3.滚动大小(scroll dimension)
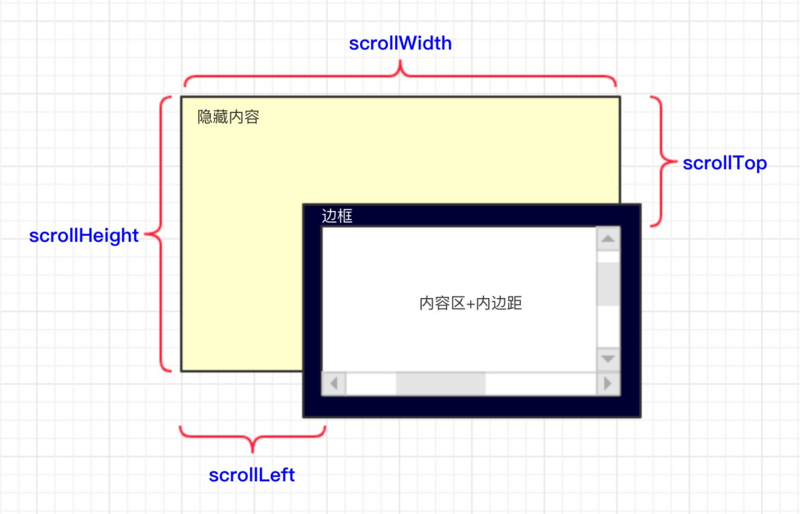
包含滚动内容的元素的大小。
scrollHeight:在没有滚动条的情况下,元素内容的实际总高度。
scrollWidth:在没有滚动条的情况下,元素内容的实际总宽度。
scrollLeft:被隐藏在内容区域左侧的像素数。通过设置这个属性可以改变元素的滚动位置。
scrollTop:被隐藏在内容区域上方的像素数。通过设置这个属性可以改变元素的滚动位置。

四. 组件设计思路

五. 使用文档
slot:
| 参数 | 说明 | 类型 |
|---|---|---|
| content | 组件实际要展示的内容 | dom |
<click-scroll>
  <template slot="content">
    <div>
      我是实际要展示的内容啊啊啊啊啊……
    </div>
  </template>
</click-scroll>
六. 组件源码
<template>
 <div class="hui-hui" :id="domId.compID">
  <!--向左滑动-->
  <div class="hui-drag-left"
     :class="{'hui-drag-action': drag.isLeft}"
     v-if="drag.isShow"
     @click="onClickLeft">
  </div>

  <!--展示的内容-->
  <div :id="domId.containerID"
     class="hui-container"
     v-show="hasContent"
     ref='container'
     @mousedown="onMouseDown">
   <slot name="content"></slot>
  </div>
  <div v-show="!hasContent" class="hui-no-data">暂无数据</div>

  <!--向右滑动-->
  <div class="hui-drag-right"
     :class="{'hui-drag-action': drag.isRight}"
     v-if="drag.isShow"
     @click="onClickRight">
  </div>
 </div>
</template>

<script>
import store from '@/store'
export default {
 name: 'cards-container',
 data () {
  return {
   hasContent: false,
   domId: {
    compID: `hui-comp-${+new Date()}`,
    containerID: `hui-container-${+new Date()}`
   },
   drag: {
    isShow: false,
    isLeft: false,
    isRight: false
   }
  }
 },
 methods: {
  judgeHasContent () {
   this.hasContent = this.$slots.hasOwnProperty('content')
  },

  judgeDragIsShow () {
   const compWidth = this.getCompWidth()
   const contextMaxWidth = this.getContextMaxWidth()

   if (compWidth >= contextMaxWidth) {
    this.drag.isShow = false
   } else {
    this.drag.isShow = true
   }
   return this.drag.isShow
  },
  judgeIsLeft () {
   const containerDom = this.getContainerDom()
   const contentWidth = this.getContextMaxWidth()

   if (!containerDom && !contentWidth) this.drag.isLeft = false
   if (containerDom.offsetWidth + containerDom.scrollLeft >= contentWidth) {
    this.drag.isLeft = false
   } else {
    this.drag.isLeft = true
   }
  },
  judgeIsRight () {
   const containerDom = this.getContainerDom()

   if (!containerDom) this.drag.isRight = false
   if (containerDom.scrollLeft === 0) {
    this.drag.isRight = false
   } else {
    this.drag.isRight = true
   }
  },

  getCompDom () {
   return document.getElementById(this.domId.compID) || null
  },
  getCompWidth () {
   const compDom = this.getCompDom()
   if (!compDom) {
    return 0
   } else {
    return compDom.offsetWidth
   }
  },
  getContainerDom () {
   return document.getElementById(this.domId.containerID) || null
  },
  getContextMaxWidth () {
   if (!this.$refs.hasOwnProperty('container')) {
    return 0
   } else {
    const widthArr = []
    for(let e of this.$refs['container'].childNodes) {
     widthArr.push(e.offsetWidth)
    }
    return Math.max(...widthArr)
   }
  },

  onMouseDown (e) { // 手动滑动
   const containerDom = this.getContainerDom()
   if (!containerDom) return

   let scrollLeft = containerDom.scrollLeft
   const containerLeft = containerDom.offsetLeft
   let ev = e || window.event
   let offsetLeft = ev.clientX - containerLeft

   document.onmousemove = (e) => {
    let ev = e || window.event
    let nowOffsetLeft = ev.clientX - containerLeft
    containerDom.scrollLeft = scrollLeft + (offsetLeft - nowOffsetLeft)

    this.judgeIsLeft()
    this.judgeIsRight()
   }

   document.onmouseup = () => {
    document.onmousemove = null
    document.onmouseup = null
   }
  },

  onClickLeft () { // 向左滑动
   if (!this.hasContent && !this.drag.isLeft) return

   const containerDom = this.getContainerDom()
   if (!containerDom) return

   const scrollWidth = containerDom.offsetWidth
   containerDom.scrollLeft += scrollWidth

   this.judgeIsLeft()
   this.judgeIsRight()
  },

  onClickRight () { // 向右滑动
   if (!this.hasContent && !this.drag.isRight) return

   const containerDom = this.getContainerDom()
   if (!containerDom) return

   const scrollWidth = containerDom.offsetWidth
   containerDom.scrollLeft -= scrollWidth

   this.judgeIsLeft()
   this.judgeIsRight()
  }
 },
 updated () {
  this.$nextTick(() => {
   this.judgeHasContent()
   const isShow = this.judgeDragIsShow()
   if (isShow) {
    this.judgeIsLeft()
    this.judgeIsRight()
   }
  })
 },
 mounted () {
  this.judgeHasContent()
  const isShow = this.judgeDragIsShow()
  if (isShow) {
   this.judgeIsLeft()
   this.judgeIsRight()
  }
 }
}
</script>
感谢各位的阅读!关于“小程序中如何设计click-scroll组件”这篇文章就分享到这里了,希望以上内容可以对大家有一定的帮助,让大家可以学到更多知识,如果觉得文章不错,可以把它分享出去让更多的人看到吧!
免责声明:本站发布的内容(图片、视频和文字)以原创、转载和分享为主,文章观点不代表本网站立场,如果涉及侵权请联系站长邮箱:is@yisu.com进行举报,并提供相关证据,一经查实,将立刻删除涉嫌侵权内容。