小编给大家分享一下微信小程序日历弹窗选择器的示例分析,相信大部分人都还不怎么了解,因此分享这篇文章给大家参考一下,希望大家阅读完这篇文章后大有收获,下面让我们一起去了解一下吧!
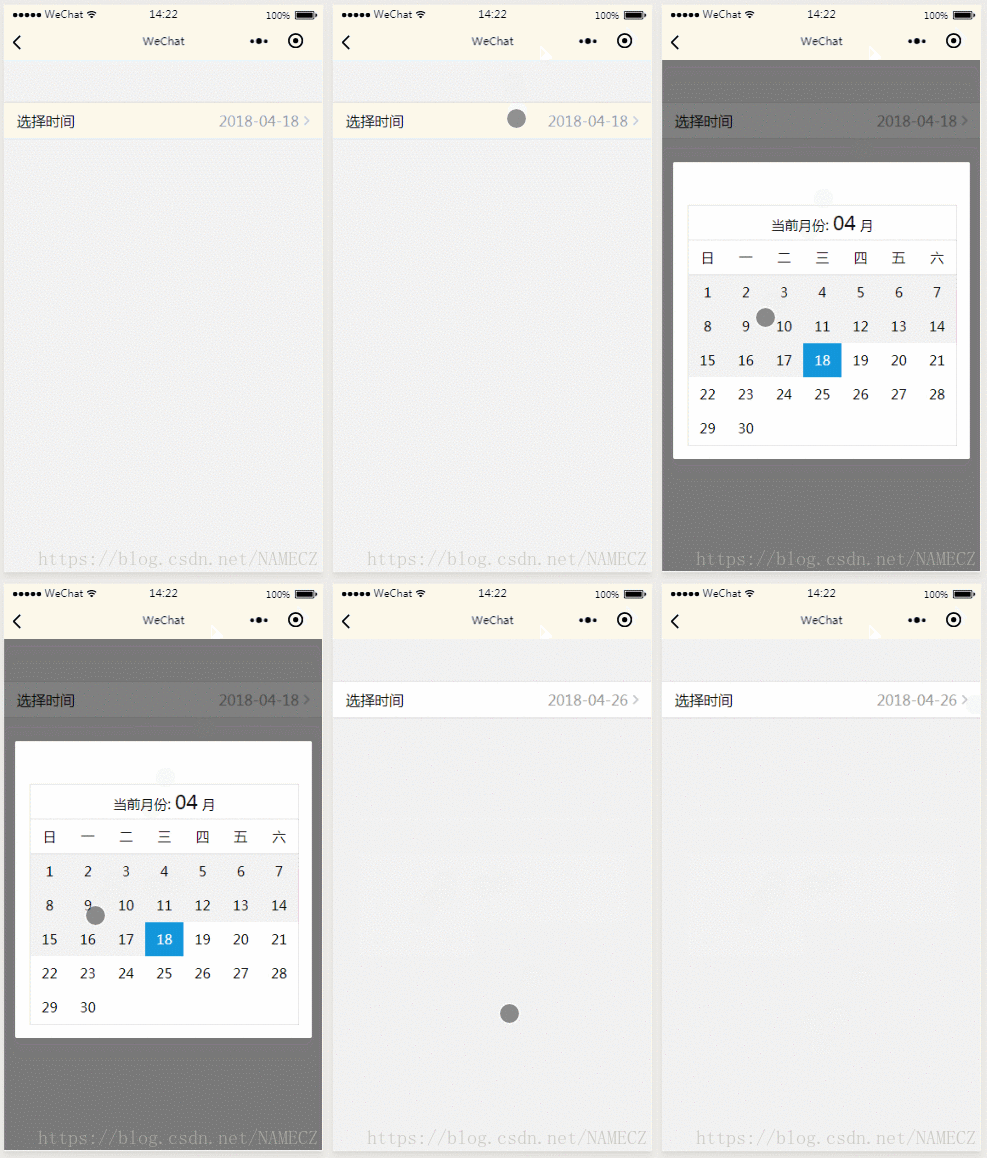
先上一个效果图:

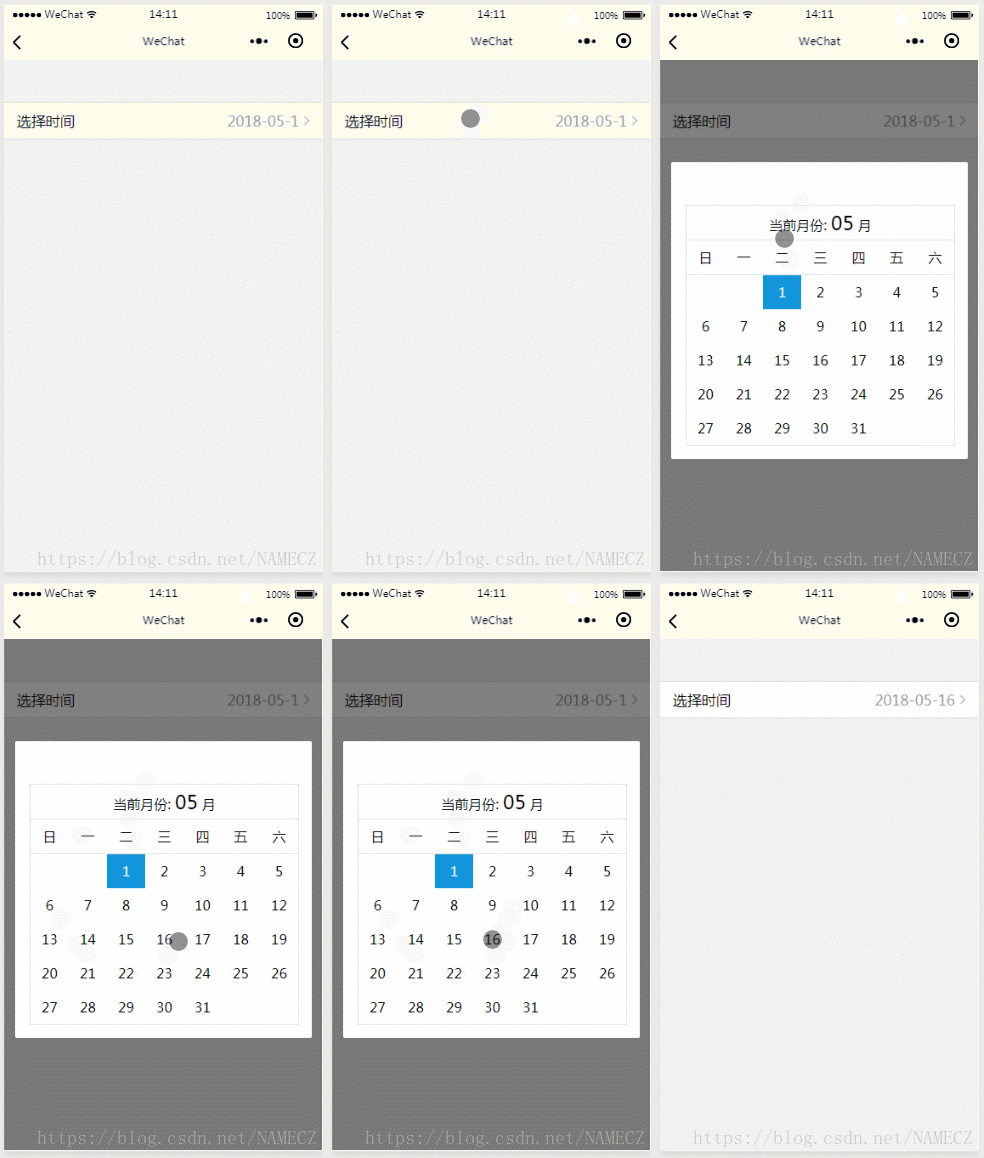
时间改为5月份的效果图:

直接上代码:
wxml:
<view class="weui-cells weui-cells_after-title" style='margin-top:100rpx;'>
 <view class="weui-cell weui-cell_access" hover-class="weui-cell_active" catchtap='showModalBtn'>
  <view class="weui-cell__bd">选择时间</view>
  <view class="weui-cell__ft weui-cell__ft_in-access">{{chooseDate}}</view>
 </view>
</view>

<view class="modal-mask" bindtap="hideModal" catchtouchmove="preventTouchMove" hidden="{{showModal}}"></view>
<view class="modal-dialog" hidden="{{showModal}}">
 <view class='modalBox'>
  <view class='box'>
   <view class='calendarBox'>
    <view class='calendarTitle'>
     当前月份:
     <text style='font-size:46rpx;'>{{thisMonth}}</text> 月
    </view>
    <block wx:for="{{week}}" wx:key="item">
     <view class="week">{{week[index]}}</view>
    </block>
    <block wx:for="{{weekNum}}" wx:key="item">
     <view class="week" >0</view>
    </block>
    <block wx:for="{{dayList}}" wx:key="item">
     <view class='week'  catchtap="chooseDate" data-index="{{index}}" data-value="{{item}}">{{item}}</view>
    </block>
   </view>
  </view>
 </view>
</view>wxss:
.modalBox{
 width: 100%;
 font-size: 32rpx;
}
.box{
 margin: 0 auto;
 width: 630rpx;
}
.calendarTitle{
 /* margin: 0 auto;
 width: 630rpx; */
 width: 100%;
 height: 80rpx;
 line-height: 80rpx;
 text-align: center;
 border-bottom: 1rpx solid #ddd;
}
.calendarBox{
 /* width: 630rpx; */
 width:100%;
 margin: 0 auto;
 border:1rpx solid #ddd;
}
.week{
 display: inline-block;
 width:90rpx;
 height: 80rpx;
 text-align: center;
 line-height: 80rpx;
 border-bottom: 1rpx solid #ddd;
}
.dateBtn{
 width:100%;
 height: 80rpx;
 display: flex;
 justify-content: space-between;
 margin-top: 20rpx;

}
 .dateBtn>button{
 width: 45%;
 height: 100%;
 display:flex;
 justify-content: center;
 align-items: center;
 margin: 0;
 font-size: 36rpx;
}
/* 模态框 */

.modal-mask {
 width: 100%;
 height: 100%;
 position: fixed;
 top: 0;
 left: 0;
 background: #000;
 opacity: 0.5;
 overflow: hidden;
 z-index: 9000;
}

.modal-dialog {
 width: 85%;
 padding: 100rpx 30rpx 30rpx 30rpx;
 overflow: hidden;
 position: fixed;
 top: 20%;
 left: 0;
 right: 0;
 margin: 0 auto;
 z-index: 9999;
 background: rgba(255, 255, 255, 1);
 border-radius: 5rpx;
}js:
Page({

 /**
  * 页面的初始数据
  */
 data: {
  showModal:true,
  weekLength:7,
  week:["日","一","二","三","四","五","六"],
  dayList:[],
  weekNum:0,
  tapThis:0,
  thisMonth:0,
  thisYear:0,
  dayIndex:0,
  chooseDate:"",
 },
 getWeek(year,month,day){
  var that = this;
  var d = new Date();
  d.setFullYear(year);
  d.setMonth(month-1);
  d.setDate(1);
  var n = d.getDay();
  var arr =[];
  var Index=0;
  var dayN=1;
  for(var i = 0; i<day; i++){
   arr.push(dayN++);
  }
  var now = new Date();
  var nowYear = now.getFullYear();
  var nowMonth = now.getMonth()+1;
  var nowDay = now.getDate();
  var val = 1;
  if(year==nowYear){
   if(month==nowMonth){
     Index=arr.indexOf(nowDay);
     console.log(Index);
     val = nowDay;
   }
  }
  that.setData({
   weekNum:n,
   dayList:arr,
   dayIndex:Index,
   tapThis:Index,
   thisMonth:month,
   thisYear:year,
   chooseDate:year+"-"+month+"-"+val,
  })
 },
 chooseDate(e){
  var that = this;
   var n = e.currentTarget.dataset.index;
   var val = e.currentTarget.dataset.value;
   console.log(n);
   if(n>=that.data.dayIndex){
    that.setData({
     tapThis:n,
     chooseDate:that.data.thisYear+"-"+that.data.thisMonth+"-"+val,
     showModal:true,
    })
   }
 },
 /**
 * 弹出框蒙层截断touchmove事件
 */
 preventTouchMove: function () {
 },
 /**
  * 隐藏模态对话框
  */
 hideModal() {
  var that = this;
  that.setData({
   showModal: true,
  })
 },
 showModalBtn(){
  var that = this;
  that.setData({
   showModal:false
  })
 },

 /**
  * 生命周期函数--监听页面加载
  */
 onLoad: function (e) {
  var that = this;
  that.getWeek("2018","04","31"); //使用方法: 在此函数内传入年、月、日(此月的天数)即可。
 }
})代码设计思路:
1、此代码是符合我们公司实际情况定制的,选择哪个月份,需要传递哪个月份的参数,比如我要2018-04的日历选择器,那么我需要在 getWeek() 中传递年,月,日(此月的总天数)作为参数,代码会自动计算出当月的一号是星期几并且排版好!
如果不知道此月的天数 ,这里还提供如下代码方便各位码友计算出各个月份的天数
getDayNum(year,month){ //传入参数年份 和 要计算的月份, 可以为字符串,也可以为数字。
  var that = this;
  var d = new Date();
  d.setFullYear(year);
  d.setMonth(month);
  d.setDate(0);
  console.log(d.getDate()); //d.getDate() 即为此月的总天数!
},2、具体思路就是:根据传递的参数计算出当月的第一天为星期几,然后从星期几开始排列,通过循环{{总天数}}次,让日期循环出来。然后再获取当前日期,判断日历弹窗与当前月份是否吻合,如果吻合,就要将在当前日期之前的日期都设置为不可点击状态。然后就是点击获取值,整个日历流程完毕。
以上是“微信小程序日历弹窗选择器的示例分析”这篇文章的所有内容,感谢各位的阅读!相信大家都有了一定的了解,希望分享的内容对大家有所帮助,如果还想学习更多知识,欢迎关注亿速云行业资讯频道!
亿速云「云服务器」,即开即用、新一代英特尔至强铂金CPU、三副本存储NVMe SSD云盘,价格低至29元/月。点击查看>>
免责声明:本站发布的内容(图片、视频和文字)以原创、转载和分享为主,文章观点不代表本网站立场,如果涉及侵权请联系站长邮箱:is@yisu.com进行举报,并提供相关证据,一经查实,将立刻删除涉嫌侵权内容。