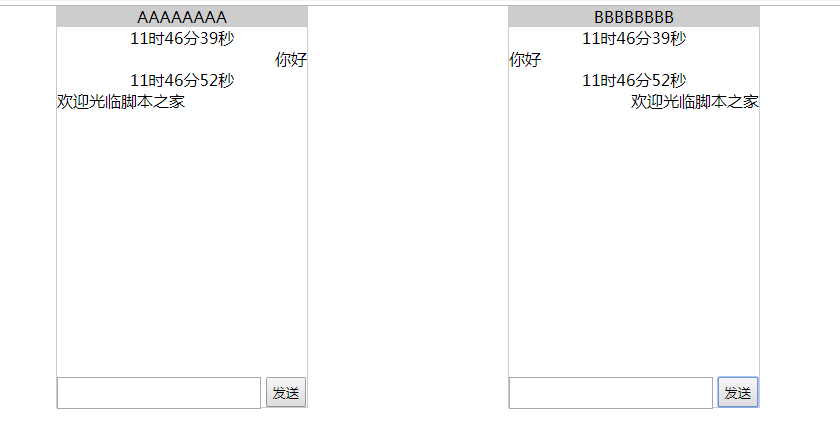
本文实例讲述了JS实现的类似微信聊天效果。分享给大家供大家参考,具体如下:
<!DOCTYPE html>
<html lang="en">
<head>
  <meta charset="UTF-8">
  <title>www.jb51.net JS仿微信聊天效果</title>
  <style>
    *{
      margin:0;
      padding:0;
    }
    .box{
      width: 250px;
      height: 400px;
      border: 1px solid #cccccc;
      float: left;
      margin-left: 200px;
      position: relative;
    }
    .fox{
      width: 250px;
      height: 400px;
      border: 1px solid #cccccc;
      float: left;
      margin-left: 200px;
      position: relative;
    }
    .box1{
      width: 250px;
      height: 20px;
      background: #cdcdcd;
      line-height: 20px ;
      text-align: center;
    }
    .fox1{
      width: 250px;
      height: 20px;
      background: #cdcdcd;
      line-height: 20px ;
      text-align: center;
    }
    .box3{
      width: 250px;
      height: 30px;
      bottom: 0px ;
      position: absolute;
    }
    .fox3{
      width: 250px;
      height: 30px;
      bottom: 0px ;
      position: absolute;
    }
    .input1{
      width: 200px;
      height: 28px;
    }
    .input2{
      width: 40px;
      height: 30px;
    }
    .input3{
      width: 200px;
      height: 28px;
    }
    .input4{
      width: 40px;
      height: 30px;
    }
    .text1{
      overflow: scroll;
      overflow-x: hidden;
      overflow-y: visible;
      height: 350px;
    }
    .text2{
      overflow: scroll;
      overflow-x: hidden;
      overflow-y: visible;
      height: 350px;
    }
  </style>
</head>
<body>
  <div class="box">
    <div class="box1">AAAAAAAA</div>
    <div class="text1"></div>
    <div class="box3">
      <input class="input1" type="text">
      <input class="input2" type="button" value="发送">
    </div>
  </div>
  <div class="fox">
    <div class="fox1">BBBBBBBB</div>
    <div class="text2"></div>
    <div class="fox3">
      <input class="input3" type="text">
      <input class="input4" type="button" value="发送">
    </div>
  </div>
  <script>
    var oIpt1=document.getElementsByClassName("input1")[0];
    var oIpt3=document.getElementsByClassName("input3")[0];
    var oIpt2=document.getElementsByClassName("input2")[0];
    var oIpt4=document.getElementsByClassName("input4")[0];
    var oText1=document.getElementsByClassName("text1")[0];
    var oText2=document.getElementsByClassName("text2")[0];
    oIpt2.onclick=function () {
      var newDate=new Date();
      var oHouer=newDate.getHours();
      var oMinutes=newDate.getMinutes();
      var oSecond=newDate.getSeconds();
      var oDiv1=document.createElement("div")
      var oDiv2=document.createElement("div")
      var oDiv3=document.createElement("div")
      var oDiv4=document.createElement("div")
      oDiv1.style.textAlign="right"
      oDiv2.style.textAlign="left"
      oDiv3.style.textAlign="center"
      oDiv4.style.textAlign="center"
      oText1.appendChild(oDiv3);
      oText1.appendChild(oDiv1);
      oText2.appendChild(oDiv4)
      oText2.appendChild(oDiv2);
      oDiv3.innerHTML=oHouer+"时"+oMinutes+"分"+oSecond+"秒"
      oDiv4.innerHTML=oHouer+"时"+oMinutes+"分"+oSecond+"秒"
      oDiv1.innerHTML=oIpt1.value;
      oDiv2.innerHTML=oIpt1.value;
      oIpt1.value=""
    }
    oIpt4.onclick=function () {
      var newDate=new Date();
      var oHouer=newDate.getHours();
      var oMinutes=newDate.getMinutes();
      var oSecond=newDate.getSeconds();
      var oDiv1=document.createElement("div")
      var oDiv2=document.createElement("div")
      var oDiv3=document.createElement("div")
      var oDiv4=document.createElement("div")
      oDiv1.style.textAlign="center"
      oDiv2.style.textAlign="center"
      oDiv3.style.textAlign="right"
      oDiv4.style.textAlign="left"
      oText2.appendChild(oDiv1);
      oText1.appendChild(oDiv2);
      oText2.appendChild(oDiv3);
      oText1.appendChild(oDiv4);
      oDiv1.innerHTML=oHouer+"时"+oMinutes+"分"+oSecond+"秒"
      oDiv2.innerHTML=oHouer+"时"+oMinutes+"分"+oSecond+"秒"
      oDiv3.innerHTML=oIpt3.value;
      oDiv4.innerHTML=oIpt3.value;
      oIpt3.value=""
    }
  </script>
</body>
</html>
运行效果如下:

感兴趣的朋友可以使用在线HTML/CSS/JavaScript代码运行工具:http://tools.jb51.net/code/HtmlJsRun测试一下运行效果。
更多关于JavaScript相关内容感兴趣的读者可查看本站专题:《JavaScript页面元素操作技巧总结》、《JavaScript操作DOM技巧总结》、《JavaScript切换特效与技巧总结》、《JavaScript动画特效与技巧汇总》、《JavaScript错误与调试技巧总结》、《JavaScript数据结构与算法技巧总结》及《JavaScript数学运算用法总结》
希望本文所述对大家JavaScript程序设计有所帮助。
免责声明:本站发布的内容(图片、视频和文字)以原创、转载和分享为主,文章观点不代表本网站立场,如果涉及侵权请联系站长邮箱:is@yisu.com进行举报,并提供相关证据,一经查实,将立刻删除涉嫌侵权内容。