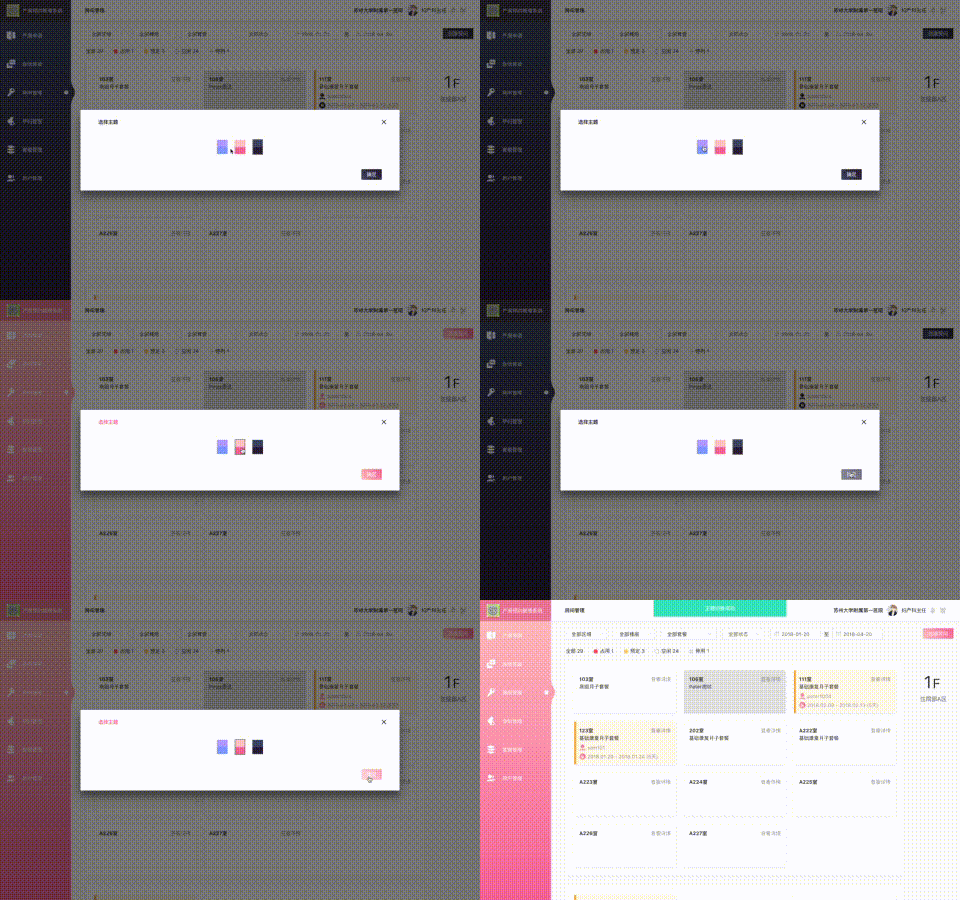
这篇文章主要介绍了Vue如何换肤,具有一定借鉴价值,感兴趣的朋友可以参考下,希望大家阅读完这篇文章之后大有收获,下面让小编带着大家一起了解一下。
先看下效果吧。

本文主要分三部分:CSS 切换,图标切换和图片切换。
CSS切换
关于 CSS 颜色的切换,我通过搜索,参考了ElementUI 的方案,总的来说分为四步
在 static 目录下新建一个 theme.css 文件,将需要替换的 CSS 声明在此文件中
.side-bar {
 background: linear-gradient(#B7A3FF, #879FFF) !important;
}

.side-bar .account-info {
 background: #8981D8 !important;
}声明所有可选的主题,每种颜色都对应于一个关键词,方便区分
colors: [{
 themeId: 1,
 familyPrimary: '#B7A3FF',
 familySecondary: '#879FFF',
 sideBarTop: '#8981D8'
}, {
 themeId: 2,
 familyPrimary: '#FDC5C5',
 familySecondary: '#F070A0',
 sideBarTop: '#E7829F'
}, {
 themeId: 3,
 familyPrimary: '#414D6C',
 familySecondary: '#2D1E3C',
 sideBarTop: '#423C50'
}]通过 AJAX 获取 theme.css ,将颜色值替换为关键词。
 getFile(`/static/theme.css`)
  .then(({data}) => {
   let style = getStyleTemplate(data)
  })

function getStyleTemplate (data) {
 const colorMap = {
  '#B7A3FF': 'familyPrimary',
  '#879FFF': 'familySecondary',
  '#8981D8': 'sideBarTop'
 }
 Object.keys(colorMap).forEach(key => {
  const value = colorMap[key]
  data = data.replace(new RegExp(key, 'ig'), value)
 })
 return data
}把关键词再换回刚刚生成的相应的颜色值,并在页面上添加 style 标签
 getFile(`/static/theme.css`)
  .then(({data}) => {
   let style = getStyleTemplate(data)
   writeNewStyle(style, this.color)
  })

function writeNewStyle (originalStyle, colors) {
 let oldEl = document.getElementById('temp-style')
 let cssText = originalStyle
 Object.keys(colors).forEach(key => {
  cssText = cssText.replace(new RegExp(key, 'ig'), colors[key])
 })
 const style = document.createElement('style')
 style.innerText = cssText
 style.id = 'temp-style'
 oldEl ? document.head.replaceChild(style, oldEl) : document.head.appendChild(style)
}图标切换
由于项目刚开始做的时候并没有考虑到换肤的需求,于是所有图标都是采用 img 标签的方式引用的,
<img src="../../assets/icon_edit.svg">这样就导致无法给 icon 动态切换颜色了,所以,我决定改为 font 文件的方式来使用图标。这里推荐一个网站 icomoon ,这个网站可以轻松地将图片转换成 font 文件。图标也非常适合通过 font 的方式来使用,我们可以更加方便的修改图标的大小和颜色。
通过在线转换,我们将下载下来的 font 文件放入项目中,并新建一个 CSS 文件来声明所有图标。
@font-face {
 font-family: 'icomoon';
 src: url('../assets/fonts/icomoon.eot?vpkwno');
 src: url('../assets/fonts/icomoon.eot?vpkwno#iefix') format('embedded-opentype'),
 url('../assets/fonts/icomoon.ttf?vpkwno') format('truetype'),
 url('../assets/fonts/icomoon.woff?vpkwno') format('woff'),
 url('../assets/fonts/icomoon.svg?vpkwno#icomoon') format('svg');
 font-weight: normal;
 font-style: normal;
}

[class^="icon-"], [class*=" icon-"] {
 /* use !important to prevent issues with browser extensions that change fonts */
 font-family: 'icomoon' !important;
 speak: none;
 font-style: normal;
 font-weight: normal;
 font-variant: normal;
 text-transform: none;
 line-height: 1;
 vertical-align: sub;

 /* Better Font Rendering =========== */
 -webkit-font-smoothing: antialiased;
 -moz-osx-font-smoothing: grayscale;
}

.icon-edit:before {
 content: "\e900";
}之后就能通过 CSS 类名的方式来引用图标了。
<span class="icon-edit"></span>为了使主题生效,我们也需要把图标的 CSS 写入 theme.css 文件中
.icon_edit:before {
 background-image: linear-gradient(-135deg, #879FFF 0%, #B7A3FF 100%);
}图片切换
项目中还存在很多占位图或者其他图片会随着主题的变化而变化。通过引入所有图片,并用文件名来区分不同主题所对应的图片。在点击切换主题时,切换到主题所对应的文件,就能实现图片切换了。为此,我写了一个 mixin,并在组件中引入 mixin。
<img :src="userImg || placeholderWoman">placeholderMixin
let callback
const placeholderMixin = {
 data () {
  return {
   placeholderWoman: '',
   placeHolderNoReply: '',
   placeHolderNothing: ''
  }
 },
 created () {
  let themeId = localStorage.getItem('themeId')
  let theme = themeId2Name(themeId)
  this.setThemeValue(theme)
  callback = (theme) => {
   this.setThemeValue(theme)
  }
  bus.$on('changeTheme', callback)
 },
 destroyed () {
  bus.$off('changeTheme', callback)
 },
 methods: {
  setThemeValue (theme) {
   this.placeholderWoman = require(`@/assets/placeholder_woman_${theme}.svg`)
   this.placeHolderNoReply = require(`@/assets/icon_noreply_${theme}.svg`)
   this.placeHolderNothing = require(`@/assets/icon_nothing_${theme}.svg`)
  }
 }
}在点击切换主题时,会发射一个 changeTheme 事件,各组件接收到 changeTheme 事件,就会为图片重新赋值,也就达到了切换图片的效果。
let theme = themeId2Name(this.themeId)
bus.$emit('changeTheme', theme)这样也就达到了切换主题的效果,但是这种方法需要在几乎所有业务组件中引入 mixin,如果有更好的方法,欢迎与我交流。
感谢你能够认真阅读完这篇文章,希望小编分享的“Vue如何换肤”这篇文章对大家有帮助,同时也希望大家多多支持亿速云,关注亿速云行业资讯频道,更多相关知识等着你来学习!
亿速云「云服务器」,即开即用、新一代英特尔至强铂金CPU、三副本存储NVMe SSD云盘,价格低至29元/月。点击查看>>
免责声明:本站发布的内容(图片、视频和文字)以原创、转载和分享为主,文章观点不代表本网站立场,如果涉及侵权请联系站长邮箱:is@yisu.com进行举报,并提供相关证据,一经查实,将立刻删除涉嫌侵权内容。