Kong是一个clould-native、快速的、可扩展的、分布式的微服务抽象层(也称为API网关、API中间件或在某些情况下称为服务网格)框架。更确切地说,Kong是一个在Nginx中运行的Lua应用程序,并且可以通过lua-nginx模块实现。Kong不是用这个模块编译Nginx,而是与OpenResty一起发布,OpenResty已经包含了lua-nginx-module。OpenResty 不是 Nginx的分支,而是一组扩展其功能的模块。
这为可插拔架构奠定了基础,可以在运行时启用和执行Lua脚本(称为“插件”)。因此,我们认为Kong是微服务架构的典范:它的核心是实现数据库抽象,路由和插件管理。插件可以存在于单独的代码库中,并且可以在几行代码中注入到请求生命周期的任何位置。Kong作为开源项目在2015年推出,它的核心价值是高性能和可扩展性。
Kong被广泛用于从初创企业到全球5000家公司以及政府组织的生产环境中。
如果构建Web、移动或IoT(物联网)应用,可能最终需要使用通用的功能来实现这些应用。Kong充当微服务请求的网关(或侧车),通过插件能够提供负载平衡、日志记录、身份验证、速率限制、转换等能力。
一个service可以创建多个routes,routes就相当于前端配置,可以隐藏业务真正的接口地址,service指定后端真实的转发接口地址,在kong上进行认证/鉴权/日志/分析/监控等控制。
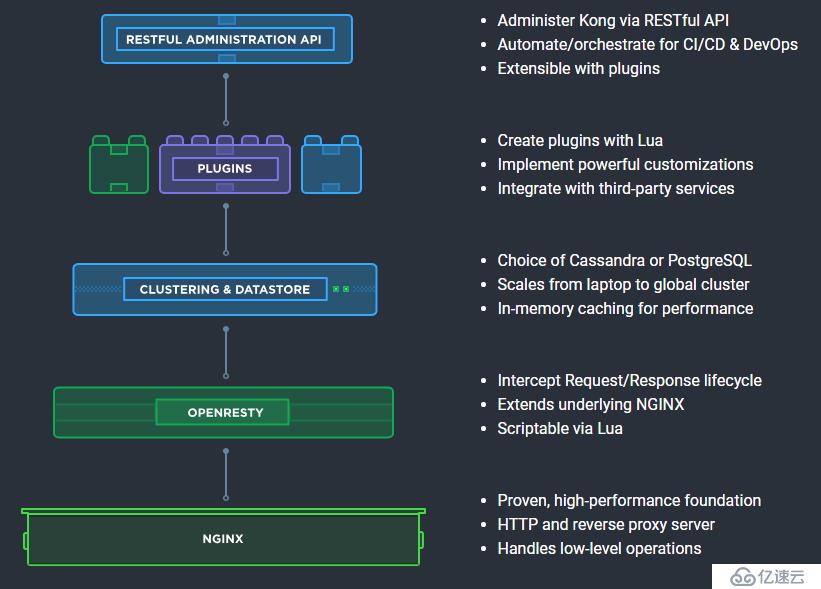
Kong部署在Nginx和Apache Cassandra或PostgreSQL等可靠技术之上,并提供了易于使用的RESTful API来操作和配置系统。下面是Kong的技术逻辑图。基于这些技术,Kong提供相关的特性支持:
sudo yum update -y
sudo yum install -y wget
wget https://bintray.com/kong/kong-rpm/rpm -O bintray-kong-kong-rpm.repo
export major_version=`grep -oE '[0-9]+\.[0-9]+' /etc/redhat-release | cut -d "." -f1`
sed -i -e 's/baseurl.*/&\/centos\/'$major_version''/ bintray-kong-kong-rpm.repo
sudo mv bintray-kong-kong-rpm.repo /etc/yum.repos.d/
sudo yum update -y
sudo yum install -y kongKong支持PostgreSQL v9.5+和Cassandra 3.x.x作为数据存储。
按照文档安装PostgreSQL v11: https://www.postgresql.org/download/linux/redhat/
# 安装PostgreSQL v11
yum install -y https://download.postgresql.org/pub/repos/yum/11/redhat/rhel-7-x86_64/pgdg-centos11-11-2.noarch.rpm

yum install -y postgresql11 postgresql11-server

# 自启
/usr/pgsql-11/bin/postgresql-11-setup initdb
systemctl enable postgresql-11
systemctl start postgresql-11
# 登录psql
sudo su postgres
psql
# 创建数据库,官方默认无密码,此处我使用密码
# CREATE USER kong; CREATE DATABASE kong OWNER kong;
CREATE USER kong with password 'kong';
CREATE DATABASE kong OWNER kong;
grant all privileges on database kong to kong;
# 这里可能会报连接错误
# psql: 致命错误: 对用户"kong"的对等认证失败
sudo find / -name pg_hba.conf
/var/lib/pgsql/11/data/pg_hba.conf
# 修改安全配置
vim /var/lib/pgsql/11/data/pg_hba.conf
# METHOD指定如何处理客户端的认证。常用的有ident,md5,password,trust,reject
# ident是Linux下PostgreSQL默认的local认证方式,凡是能正确登录服务器的操作系统用户(注:不是数据库用户)就能使用本用户映射的数据库用户不需密码登录数据库。
# md5是常用的密码认证方式,如果你不使用ident,最好使用md5。密码是以md5形式传送给数据库,较安全,且不需建立同名的操作系统用户。
# password是以明文密码传送给数据库,建议不要在生产环境中使用。
# trust是只要知道数据库用户名就不需要密码或ident就能登录,建议不要在生产环境中使用。
# reject是拒绝认证。
# "local" is for Unix domain socket connections only
local all all md5
# IPv4 local connections:
host all all 127.0.0.1/32 md5
# IPv6 local connections:
host all all ::1/128 md5
# 将peer改为md5()
# "local" is for Unix domain socket connections only
local all all md5
# IPv4 local connections:
host all all 127.0.0.1/32 ident
# IPv6 local connections:
host all all ::1/128 ident
# 重启psql
systemctl restart postgresql-11
# 登录postgre
psql -U kong
# 输入密码
# 查看帮助
\h
# 退出
\q
# 这里需要提前配置kong配置文件,默认/etc/kong/kong.conf.default
cp /etc/kong/kong.conf.default /etc/kong/kong.conf

# 修改里面的数据库配置,写入用户、密码、数据库、端口等信息
vim /etc/kong/kong.conf

[root@kong-server software]# egrep -v "^#|^$|^[[:space:]]+#" /etc/kong/kong.conf
database = postgres             # Determines which of PostgreSQL or Cassandra
pg_host = 127.0.0.1             # Host of the Postgres server.
pg_port = 5432                  # Port of the Postgres server.
pg_timeout = 5000               # Defines the timeout (in ms), for connecting,
pg_user = kong                  # Postgres user.
pg_password = kong                # Postgres user's password.
pg_database = kong              # The database name to connect to.

# Kong migrations
kong migrations bootstrap [-c /path/to/kong.conf]

[root@kong-server software]# kong migrations bootstrap -c /etc/kong/kong.conf
Bootstrapping database...
migrating core on database 'kong'...
core migrated up to: 000_base (executed)
core migrated up to: 001_14_to_15 (executed)
core migrated up to: 002_15_to_1 (executed)
core migrated up to: 003_100_to_110 (executed)
core migrated up to: 004_110_to_120 (executed)
core migrated up to: 005_120_to_130 (executed)
migrating hmac-auth on database 'kong'...
hmac-auth migrated up to: 000_base_hmac_auth (executed)
hmac-auth migrated up to: 001_14_to_15 (executed)
migrating oauth3 on database 'kong'...
oauth3 migrated up to: 000_base_oauth3 (executed)
oauth3 migrated up to: 001_14_to_15 (executed)
oauth3 migrated up to: 002_15_to_10 (executed)
migrating jwt on database 'kong'...
jwt migrated up to: 000_base_jwt (executed)
jwt migrated up to: 001_14_to_15 (executed)
migrating basic-auth on database 'kong'...
basic-auth migrated up to: 000_base_basic_auth (executed)
basic-auth migrated up to: 001_14_to_15 (executed)
migrating key-auth on database 'kong'...
key-auth migrated up to: 000_base_key_auth (executed)
key-auth migrated up to: 001_14_to_15 (executed)
migrating rate-limiting on database 'kong'...
rate-limiting migrated up to: 000_base_rate_limiting (executed)
rate-limiting migrated up to: 001_14_to_15 (executed)
rate-limiting migrated up to: 002_15_to_10 (executed)
rate-limiting migrated up to: 003_10_to_112 (executed)
migrating acl on database 'kong'...
acl migrated up to: 000_base_acl (executed)
acl migrated up to: 001_14_to_15 (executed)
migrating response-ratelimiting on database 'kong'...
response-ratelimiting migrated up to: 000_base_response_rate_limiting (executed)
response-ratelimiting migrated up to: 001_14_to_15 (executed)
response-ratelimiting migrated up to: 002_15_to_10 (executed)
migrating session on database 'kong'...
session migrated up to: 000_base_session (executed)
27 migrations processed
27 executed
Database is up-to-date在无数据库模式配置Kong,一旦Kong启动,访问Admin API的/根端点已验证它是否在没有数据库的情况下运行。
# Setting Up Kong in DB-less mode

要在无数据库模式下使用Kong,有两种方式:

修改配置文件kong.conf

vim /etc/kong/kong.conf

# database = postgres
database=off

# 或
export KONG_DATABASE=off

# 检查配置,此命令将考虑您当前设置的环境变量,并在设置无效时报错。此外,您还可以在调试模式下使用CLI,以便更深入地了解Kong的启动属性
kong start -c <kong.conf> --vv

# 启动kong
kong start -c /etc/kong/kong.conf
kong start [-c /path/to/kong.conf]
[root@kong-server software]# kong start -c /etc/kong/kong.conf
Kong started
[root@kong-server software]# kong health
nginx.......running
Kong is healthy at /usr/local/kong
[root@kong-server software]# netstat -lntup
Active Internet connections (only servers)
Proto Recv-Q Send-Q Local Address Foreign Address State PID/Program name
tcp 0 0 127.0.0.1:8444 0.0.0.0:* LISTEN 31050/nginx: master
tcp 0 0 0.0.0.0:8000 0.0.0.0:* LISTEN 31050/nginx: master
tcp 0 0 127.0.0.1:8001 0.0.0.0:* LISTEN 31050/nginx: master
tcp 0 0 0.0.0.0:22 0.0.0.0:* LISTEN 1453/sshd
tcp 0 0 127.0.0.1:5432 0.0.0.0:* LISTEN 30638/postmaster
tcp 0 0 0.0.0.0:8443 0.0.0.0:* LISTEN 31050/nginx: master
tcp6 0 0 ::1:5432 :::* LISTEN 30638/postmaster
udp 0 0 0.0.0.0:68 0.0.0.0:* 780/dhclient
udp 0 0 172.16.16.16:123 0.0.0.0:* 3006/ntpd
udp 0 0 127.0.0.1:123 0.0.0.0:* 3006/ntpd
udp6 0 0 fe80::5054:ff:fe94::123 :::* 3006/ntpd
udp6 0 0 ::1:123 :::* 3006/ntpd
[root@kong-server software]# curl http://localhost:8001
停止:
kong stop
重新加载:
kong reloadkonga为目前最先版本的kong的dashboard,由于kong-dashboard目前为更新适应新版本的kong,推荐使用konga
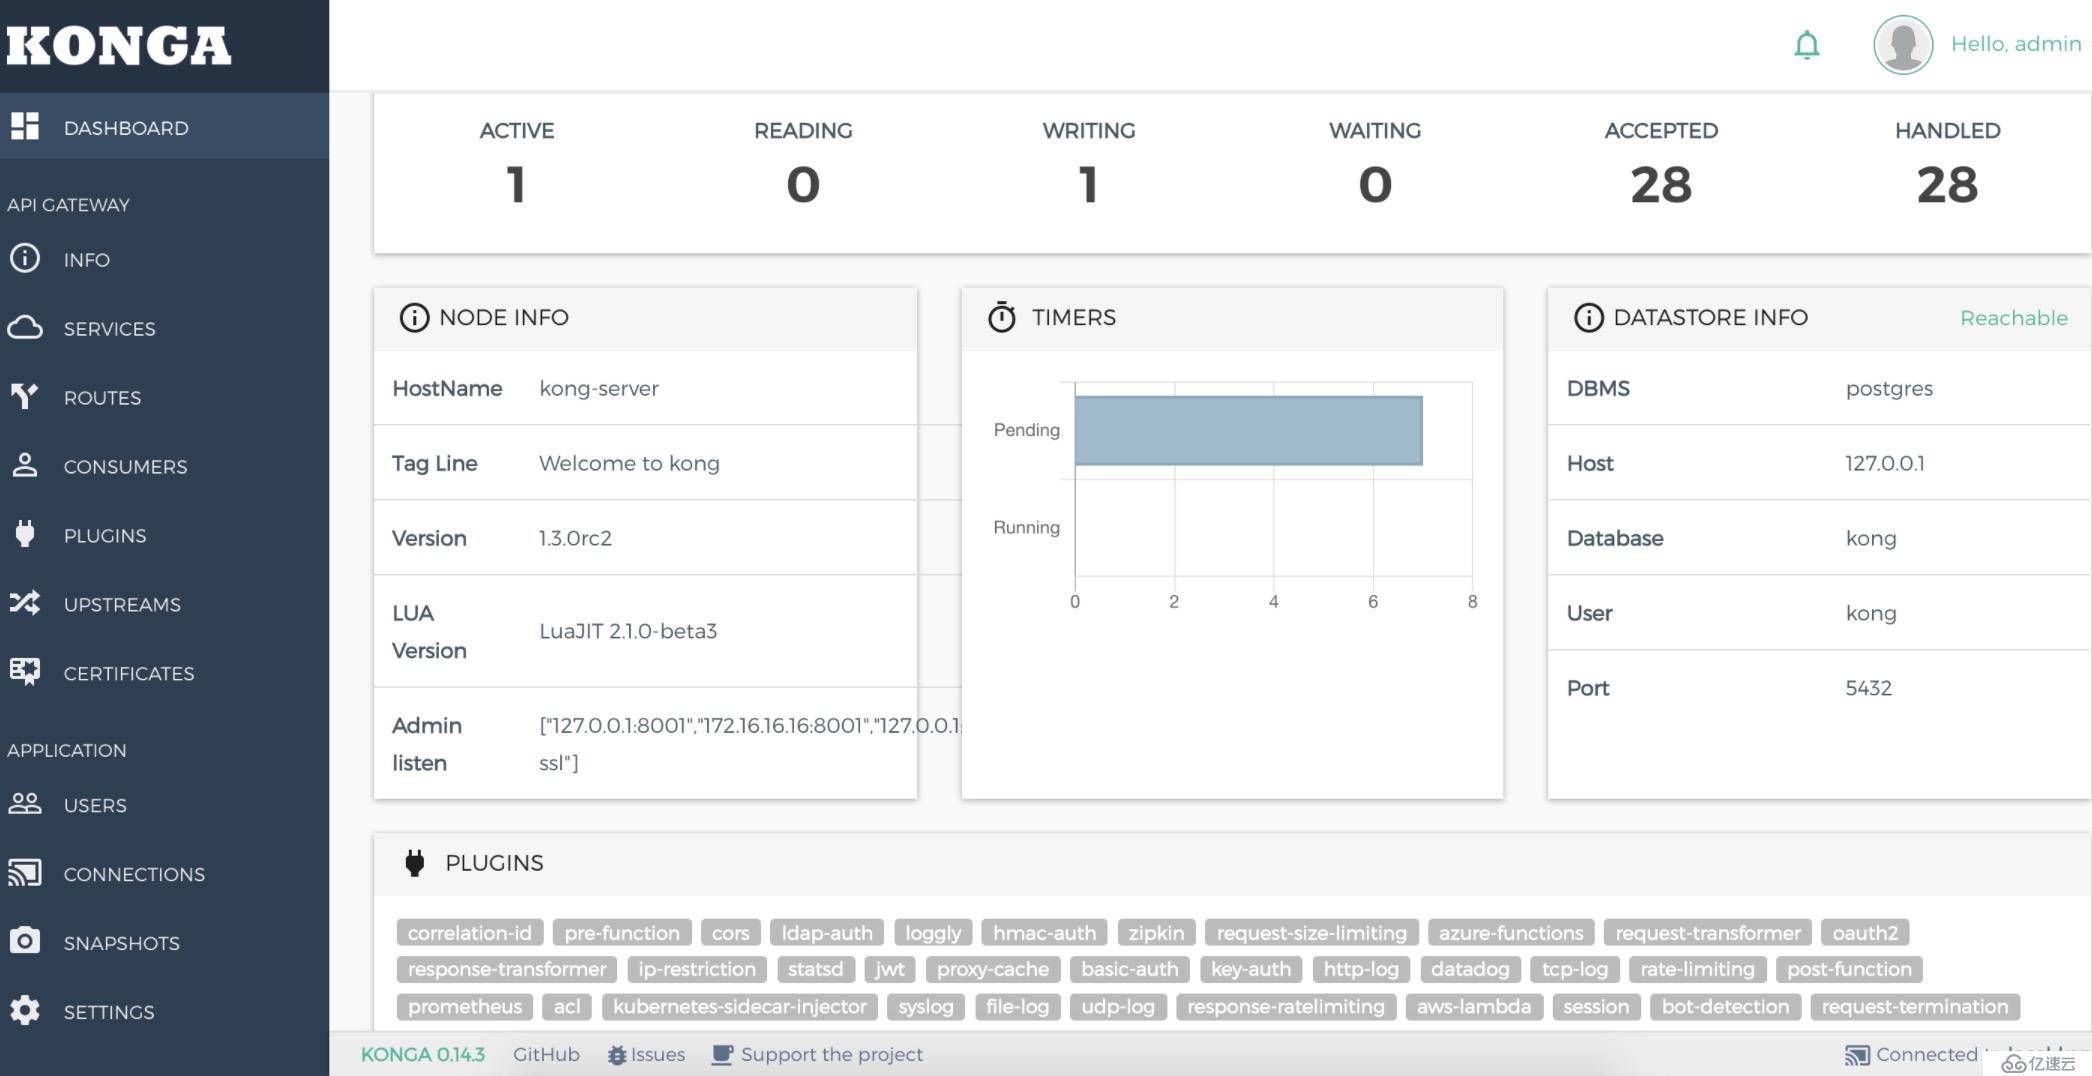
konga带来的一个最大的便利就是可以很好地通过UI观察到现在kong的所有的配置,并且可以对于管理kong节点情况进行查看、监控和预警,konga主要特性如下:
yum -y install git
cd /data/software && wget https://npm.taobao.org/mirrors/node/v10.16.2/node-v10.16.2-linux-x64.tar.xz
tar -xf node-v10.16.2-linux-x64.tar.xz
mv node-v10.16.2-linux-x64 node
# 修改为root的权限
chown root.root node -R
cat > /etc/profile.d/node.sh << EOF
export PATH=\$PATH:/data/software/node/bin
EOF
source /etc/profile.d/node.sh

node -v

# 安装插件
npm install -g glup
npm install -g bower
npm install -g sails
npm install -g node-gyp
npm install -g grunt-sass
npm install -g node-sass
npm run bower-deps
npm install sails-postgresqlgit clone https://github.com/pantsel/konga.git
cd konga
npm install konga
#使用postgresql
CREATE USER konga with password 'konga';
CREATE DATABASE konga OWNER konga;
grant all privileges on database konga to konga;cp config/local_example.js config/local.js
# 配置默认数据库
vi ./local.js
models: {
connection: process.env.DB_ADAPTER || 'localDiskDb',
},
# 改成
models: {
connection: process.env.DB_ADAPTER || 'postgres', // 这里可以用‘mysql’,‘mongo’,‘sqlserver’,‘postgres’
},
# 保存
# 修改数据库默认配置
vi connections.js
postgres: {
adapter: 'sails-postgresql',
url: process.env.DB_URI,
host: process.env.DB_HOST || 'localhost',
user: process.env.DB_USER || 'konga',
password: process.env.DB_PASSWORD || 'konga',
port: process.env.DB_PORT || 5432,
database: process.env.DB_DATABASE ||'konga',
// schema: process.env.DB_PG_SCHEMA ||'public',
poolSize: process.env.DB_POOLSIZE || 10,
ssl: process.env.DB_SSL ? true : false // If set, assume it's true
},
# 保存
# 启动
cd ../
npm start
# pm2 管理
npm install -g pm2
cd konga
pm2 start app.js --name konga
pm2 logs
0|konga | info: Sails <| .-..-.
0|konga | info: v0.12.14 |\
0|konga | info: /|.\
0|konga | info: / || \
0|konga | info: ,' |' \
0|konga | info: .-'.-==|/_--'
0|konga | info: `--'-------'
0|konga | info: __---___--___---___--___---___--___
0|konga | info: ____---___--___---___--___---___--___-__
0|konga | info:
0|konga | info: Server lifted in `/data/software/konga`
0|konga | info: To see your app, visit http://localhost:1338
0|konga | info: To shut down Sails, press <CTRL> + C at any time.
0|konga |
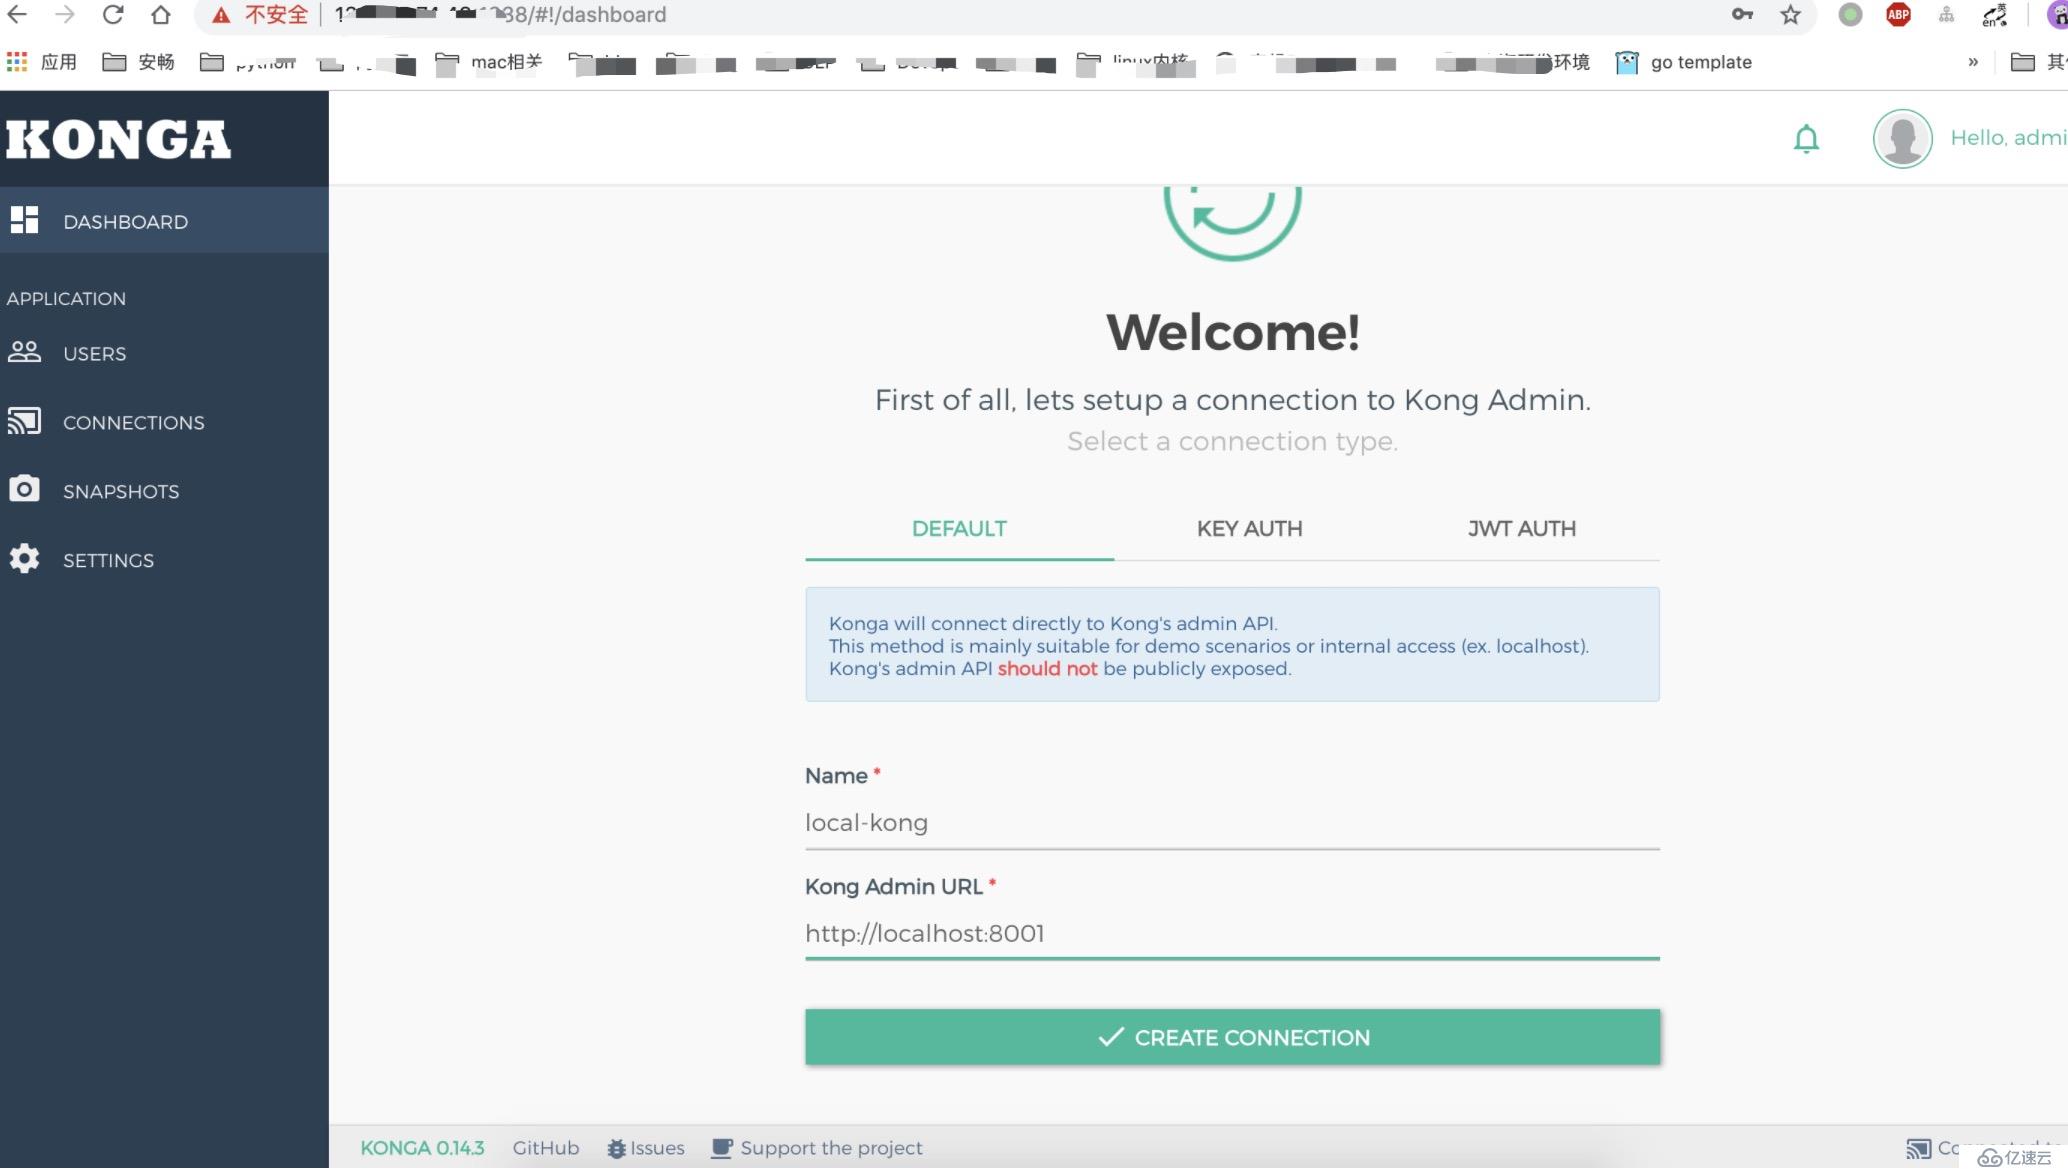
0|konga |IP:1338,默认用户:admin,密码:adminadminadmin
配置链接kong, http://localhost:8001
1.您需要创建一个自定义网络,以允许容器相互发现和通信。在此示例中kong-net是网络名称,您可以使用任何名称。

docker network create kong-net

2.启动数据库PostgreSQL
docker run -d --name kong-database --network=kong-net -p 5432:5432 -e "POSTGRES_USER=kong" -e "POSTGRES_DB=kong" -e "POSTGRES_PASSWORD=kong" postgres
3.准备数据库
docker run --rm --network=kong-net -e "KONG_DATABASE=postgres" -e "KONG_PG_HOST=kong-database" -e "KONG_CASSANDRA_CONTACT_POINTS=kong-database" -e "KONG_PG_PASSWORD=kong" kong kong migrations bootstrap
4.启动kong
docker run -d --name kong --network=kong-net -e "KONG_DATABASE=postgres" -e "KONG_PG_HOST=kong-database" -e "KONG_PG_PASSWORD=kong" -e "KONG_CASSANDRA_CONTACT_POINTS=kong-database" -e "KONG_PROXY_ACCESS_LOG=/dev/stdout" -e "KONG_ADMIN_ACCESS_LOG=/dev/stdout" -e "KONG_PROXY_ERROR_LOG=/dev/stderr" -e "KONG_ADMIN_ERROR_LOG=/dev/stderr" -e "KONG_ADMIN_LISTEN=0.0.0.0:8001, 0.0.0.0:8444 ssl" -p 8000:8000 -p 8443:8443 -p 8001:8001 -p 8444:8444 kong
5.运行konga
注意DB_HOST为自己的ip地址
docker run -d -p 1337:1337 --network kong-net -e "TOKEN_SECRET=mark666" -e "DB_ADAPTER=postgres" -e "DB_HOST=10.234.2.204" -e "DB_PORT=5432:5432" -e "DB_USER=kong" -e "DB_PASSWORD=kong" -e "DB_DATABASE=kong_database" --name konga pantsel/kongadocker network create kong-net后续的应用及数据库都使用这个虚拟网络。
version: "3.7"
services:
  kong:
    # 镜像版本,目前最新
    image: kong:1.1.2
    environment:
    # 数据持久化方式,使用postgres数据库
     - "KONG_DATABASE=postgres"
    # 数据库容器名称,Kong连接数据时使用些名称
     - "KONG_PG_HOST=kong-database"
    # 数据库名称
     - "KONG_CASSANDRA_CONTACT_POINTS=kong-database"
    # 日志记录目录
     - "KONG_PROXY_ACCESS_LOG=/dev/stdout"
     - "KONG_ADMIN_ACCESS_LOG=/dev/stdout"
     - "KONG_PROXY_ERROR_LOG=/dev/stderr"
     - "KONG_ADMIN_ERROR_LOG=/dev/stderr"
    # 暴露的端口
     - "KONG_ADMIN_LISTEN=0.0.0.0:8001, 0.0.0.0:8444 ssl"
    ports:
     - 8000:8000
     - 8443:8443
     - 8001:8001
     - 8444:8444
    # 使用docker网络
    networks:
     - kong-net

    # 依赖数据库服务
    depends_on:
      - kong-database
# kong 管理界面
  konga:
    image: pantsel/konga
    environment:
     - "TOKEN_SECRET=51liveup.cn"
     - "NODE_ENV=production"
    ports:
     - 8080:1337
    networks:
     - kong-net

    depends_on:
      - kong-database
      -
# 数据库服务
  kong-database:
    image: postgres:9.6
    ports:
      - "5432:5432"
    environment:
    # 访问数据库的用户
      - POSTGRES_USER=kong
      - POSTGRES_DB=kong
    networks:
      - kong-net
    volumes:
    # 同步时间
      - /etc/localtime:/etc/localtime:ro
    # 数据库持久化目录
      - /data/data/postgresql:/var/lib/postgresql/data

networks:
  kong-net:
    external: true
使用docker-compose up 命令启动服务。会发现启动时报数据库错误,这是因为kong 使用的postgres 数据还需要进行初始化才能使用。
docker run --rm \
     --network=kong-net \
     -e "KONG_DATABASE=postgres" \
     -e "KONG_PG_HOST=kong-database" \
     -e "KONG_CASSANDRA_CONTACT_POINTS=kong-database" \
     kong:latest kong migrations bootstrap
一定要在创建数据库容器之后,并且保持数据库的Docker容器在运行状态,再执行初始化数据库,数据库初始化成功后,再次使用docker-compose up -d 启动服务就可以了。
curl -i http://localhost:8001/另外,也可以安装一个Kong的客户端来验证。在安装有Docker引擎的操作系统上执行如下的命令:
1.0之后的kong-dashboard就已经不兼容了,建议使用konga
# 下载镜像pgbi/kong-dashboard
[root@master data]# docker run --rm -p 8080:8080 pgbi/kong-dashboard start --kong-url http://10.234.2.204:30493 --basic-auth admin=kong@anchnet.com
Connecting to Kong on http://10.234.2.204:30493 ...
What's on http://10.234.2.204:30493 isn't Kong
[root@master data]# kubectl get svc |grep kong
kong-kong-admin                     NodePort    10.104.75.151    <none>        8444:30493/TCP                                          52m
kong-kong-proxy                     NodePort    10.99.141.23     <none>        80:30877/TCP,443:31201/TCP                              52m
kong-postgresql                     ClusterIP   10.109.249.105   <none>        5432/TCP                                                52m
kong-postgresql-headless            ClusterIP   None             <none>        5432/TCP                                                52m
通过docker安装一个Kong-Dashboard,安装完成后,通过浏览器访问:
下表列示了Kong chart的配置参数和默认值:
| 参数 | 说明 | 默认值 |
|---|---|---|
| image.repository | Kong image | kong |
| image.tag | Kong image version | 0.14.1 |
| image.pullPolicy | Image pull policy | IfNotPresent |
| image.pullSecrets | Image pull secrets | null |
| replicaCount | Kong instance count | 1 |
| admin.useTLS | Secure Admin traffic | true |
| admin.servicePort | TCP port on which the Kong admin service is exposed | 8444 |
| admin.containerPort | TCP port on which Kong app listens for admin traffic | 8444 |
| admin.nodePort | Node port when service type is NodePort |
|
| admin.type | k8s service type, Options: NodePort, ClusterIP, LoadBalancer | NodePort |
| admin.loadBalancerIP | Will reuse an existing ingress static IP for the admin service | null |
| admin.loadBalancerSourceRanges | Limit admin access to CIDRs if set and service type is LoadBalancer |
[] |
| admin.ingress.enabled | Enable ingress resource creation (works with proxy.type=ClusterIP) | false |
| admin.ingress.tls | Name of secret resource, containing TLS secret | |
| admin.ingress.hosts | List of ingress hosts. | [] |
| admin.ingress.path | Ingress path. | / |
| admin.ingress.annotations | Ingress annotations. See documentation for your ingress controller for details | {} |
| proxy.useTLS | Secure Proxy traffic | true |
| proxy.servicePort | TCP port on which the Kong Proxy Service is exposed | 8443 |
| proxy.containerPort | TCP port on which the Kong app listens for Proxy traffic | 8443 |
| proxy.nodePort | Node port when service type is NodePort |
|
| proxy.type | k8s service type. Options: NodePort, ClusterIP, LoadBalancer | NodePort |
| proxy.loadBalancerSourceRanges | Limit proxy access to CIDRs if set and service type is LoadBalancer |
[] |
| proxy.loadBalancerIP | To reuse an existing ingress static IP for the admin service | |
| proxy.ingress.enabled | Enable ingress resource creation (works with proxy.type=ClusterIP) | false |
| proxy.ingress.tls | Name of secret resource, containing TLS secret | |
| proxy.ingress.hosts | List of ingress hosts. | [] |
| proxy.ingress.path | Ingress path. | / |
| proxy.ingress.annotations | Ingress annotations. See documentation for your ingress controller for details | {} |
| env | Additional Kong configurations | |
| runMigrations | Run Kong migrations job | true |
| readinessProbe | Kong readiness probe | |
| livenessProbe | Kong liveness probe | |
| affinity | Node/pod affinities | |
| nodeSelector | Node labels for pod assignment | {} |
| podAnnotations | Annotations to add to each pod | {} |
| resources | Pod resource requests & limits | {} |
| tolerations | List of node taints to tolerate | [] |
启用数据库需要先安装pvc
---
kind: PersistentVolumeClaim
apiVersion: v1
metadata:
  name: data-kong-postgresql-0
spec:
  storageClassName: ceph-rdb
  accessModes:
  - ReadWriteOnce
  resources:
    requests:
      storage: 4Gi

# 部署pvc
[root@master data]# kubectl get pvc |grep api-gateway
data-api-gateway-postgresql-0           Bound    pvc-d280166c-c03d-11e9-a45a-facf8ddba000   8Gi        RWO            ceph-rdb       11s
helm fetch stable/kong --version 0.13.0
[root@master kong-deploy]# helm install -n api-gateway kong/
NAME: api-gateway
LAST DEPLOYED: Fri Aug 16 23:53:37 2019
NAMESPACE: default
STATUS: DEPLOYED
RESOURCES:
==> v1/Job
NAME COMPLETIONS DURATION AGE
api-gateway-kong-init-migrations 0/1 0s 0s
==> v1/Pod(related)
NAME READY STATUS RESTARTS AGE
api-gateway-kong-79f697ff7c-bcr7m 0/1 Init:0/1 0 0s
api-gateway-kong-init-migrations-hxgd6 0/1 Init:0/1 0 0s
api-gateway-postgresql-0 0/1 Init:0/1 0 0s
==> v1/Secret
NAME TYPE DATA AGE
api-gateway-postgresql Opaque 1 0s
==> v1/Service
NAME TYPE CLUSTER-IP EXTERNAL-IP PORT(S) AGE
api-gateway-kong-admin NodePort 10.100.226.67 <none> 8444:31466/TCP 0s
api-gateway-kong-proxy NodePort 10.109.4.127 <none> 80:32287/TCP,443:32742/TCP 0s
api-gateway-postgresql ClusterIP 10.102.197.253 <none> 5432/TCP 0s
api-gateway-postgresql-headless ClusterIP None <none> 5432/TCP 0s
==> v1beta2/Deployment
NAME READY UP-TO-DATE AVAILABLE AGE
api-gateway-kong 0/1 1 0 0s
==> v1beta2/StatefulSet
NAME READY AGE
api-gateway-postgresql 0/1 0s
NOTES:
1. Kong Admin can be accessed inside the cluster using:
DNS=api-gateway-kong-admin.default.svc.cluster.local
PORT=8444
To connect from outside the K8s cluster:
HOST=$(kubectl get nodes --namespace default -o jsonpath='{.items[0].status.addresses[0].address}')
PORT=$(kubectl get svc --namespace default api-gateway-kong-admin -o jsonpath='{.spec.ports[0].nodePort}')
2. Kong Proxy can be accessed inside the cluster using:
DNS=api-gateway-kong-proxy.default.svc.cluster.localPORT=443To connect from outside the K8s cluster:
HOST=$(kubectl get nodes --namespace default -o jsonpath='{.items[0].status.addresses[0].address}')
PORT=$(kubectl get svc --namespace default api-gateway-kong-proxy -o jsonpath='{.spec.ports[0].nodePort}')
通过执行下面的命令,进入Kong的容器:
[root@master kong-deploy]# kubectl exec -it api-gateway-kong-79f697ff7c-bcr7m /bin/sh

/ # netstat -lntup
Active Internet connections (only servers)
Proto Recv-Q Send-Q Local Address           Foreign Address         State       PID/Program name
tcp        0      0 0.0.0.0:8443            0.0.0.0:*               LISTEN      -
tcp        0      0 0.0.0.0:8444            0.0.0.0:*               LISTEN      -
tcp        0      0 0.0.0.0:8000            0.0.0.0:*               LISTEN      -
/ # curl -k https://localhost:8444
并在kong中执行如下的命令:
curl -k http://localhost:8444如果kong正常运行的话,应该会返回一些内容。
[root@master ~]# kubectl get all |grep api-gateway

pod/api-gateway-kong-8cf4ddcbf-qb87c                          1/1     Running     0          15h
pod/api-gateway-kong-init-migrations-fsfqb                    0/1     Completed   0          15h
pod/api-gateway-postgresql-0                                  1/1     Running     0          15h
service/api-gateway-kong-admin              NodePort    10.103.90.21     <none>        8444:30840/TCP                                          15h
service/api-gateway-kong-proxy              NodePort    10.96.32.21      <none>        80:32582/TCP,443:31941/TCP                              15h
service/api-gateway-postgresql              ClusterIP   10.109.28.2      <none>        5432/TCP                                                15h
service/api-gateway-postgresql-headless     ClusterIP   None             <none>        5432/TCP                                                15h

deployment.apps/api-gateway-kong                         1/1     1            1           15h
replicaset.apps/api-gateway-kong-8cf4ddcbf                          1         1         1       15h
statefulset.apps/api-gateway-postgresql           1/1     15h

job.batch/api-gateway-kong-init-migrations     1/1           51s        15h
通过浏览器查看

{
    "plugins": {
        "enabled_in_cluster": [],
        "available_on_server": {
            "correlation-id": true,
            "pre-function": true,
            "cors": true,
            "ldap-auth": true,
            "loggly": true,
            "hmac-auth": true,
            "zipkin": true,
            "request-size-limiting": true,
            "azure-functions": true,
            "request-transformer": true,
            "oauth3": true,
            "response-transformer": true,
            "ip-restriction": true,
            "statsd": true,
            "jwt": true,
            "proxy-cache": true,
            "basic-auth": true,
            "key-auth": true,
            "http-log": true,
            "datadog": true,
            "tcp-log": true,
            "post-function": true,
            "prometheus": true,
            "acl": true,
            "kubernetes-sidecar-injector": true,
            "syslog": true,
            "file-log": true,
            "udp-log": true,
            "response-ratelimiting": true,
            "aws-lambda": true,
            "bot-detection": true,
            "rate-limiting": true,
            "request-termination": true
        }
    },
    "tagline": "Welcome to kong",
    "configuration": {
        "error_default_type": "text/plain",
        "admin_listen": [
            "0.0.0.0:8444 ssl"
        ],
        "proxy_access_log": "/dev/stdout",
        "trusted_ips": {},
        "prefix": "/usr/local/kong",
        "loaded_plugins": {
            "correlation-id": true,
            "pre-function": true,
            "cors": true,
            "rate-limiting": true,
            "loggly": true,
            "hmac-auth": true,
            "zipkin": true,
            "bot-detection": true,
            "azure-functions": true,
            "request-transformer": true,
            "oauth3": true,
            "response-transformer": true,
            "syslog": true,
            "statsd": true,
            "jwt": true,
            "proxy-cache": true,
            "basic-auth": true,
            "key-auth": true,
            "http-log": true,
            "datadog": true,
            "tcp-log": true,
            "post-function": true,
            "ldap-auth": true,
            "acl": true,
            "kubernetes-sidecar-injector": true,
            "ip-restriction": true,
            "file-log": true,
            "udp-log": true,
            "response-ratelimiting": true,
            "aws-lambda": true,
            "prometheus": true,
            "request-size-limiting": true,
            "request-termination": true
        },
        "cassandra_username": "kong",
        "ssl_cert_key": "/usr/local/kong/ssl/kong-default.key",
        "admin_ssl_cert_key": "/usr/local/kong/ssl/admin-kong-default.key",
        "dns_resolver": {},
        "pg_user": "kong",
        "pg_password": "******",
        "cassandra_data_centers": [
            "dc1:2",
            "dc2:3"
        ],
        "nginx_admin_directives": {},
        "nginx_http_directives": [
            {
                "value": "prometheus_metrics 5m",
                "name": "lua_shared_dict"
            }
        ],
        "pg_host": "api-gateway-postgresql",
        "nginx_acc_logs": "/usr/local/kong/logs/access.log",
        "pg_semaphore_timeout": 60000,
        "proxy_listen": [
            "0.0.0.0:8000",
            "0.0.0.0:8443 ssl"
        ],
        "client_ssl_cert_default": "/usr/local/kong/ssl/kong-default.crt",
        "cassandra_ssl": false,
        "db_update_frequency": 5,
        "db_update_propagation": 0,
        "stream_listen": [
            "off"
        ],
        "nginx_err_logs": "/usr/local/kong/logs/error.log",
        "cassandra_port": 9042,
        "dns_order": [
            "LAST",
            "SRV",
            "A",
            "CNAME"
        ],
        "dns_error_ttl": 1,
        "headers": [
            "server_tokens",
            "latency_tokens"
        ],
        "cassandra_lb_policy": "RequestRoundRobin",
        "nginx_optimizations": true,
        "pg_timeout": 5000,
        "database": "postgres",
        "pg_database": "kong",
        "nginx_worker_processes": "auto",
        "lua_package_cpath": "",
        "admin_ssl_cert": "/usr/local/kong/ssl/admin-kong-default.crt",
        "admin_acc_logs": "/usr/local/kong/logs/admin_access.log",
        "real_ip_header": "X-Real-IP",
        "ssl_cert_key_default": "/usr/local/kong/ssl/kong-default.key",
        "lua_package_path": "./?.lua;./?/init.lua;",
        "nginx_pid": "/usr/local/kong/pids/nginx.pid",
        "upstream_keepalive": 60,
        "nginx_conf": "/usr/local/kong/nginx.conf",
        "router_consistency": "strict",
        "dns_no_sync": false,
        "origins": {},
        "admin_access_log": "/dev/stdout",
        "admin_ssl_cert_default": "/usr/local/kong/ssl/admin-kong-default.crt",
        "client_ssl": false,
        "proxy_listeners": [
            {
                "transparent": false,
                "ssl": false,
                "ip": "0.0.0.0",
                "proxy_protocol": false,
                "port": 8000,
                "http2": false,
                "listener": "0.0.0.0:8000"
            },
            {
                "transparent": false,
                "ssl": true,
                "ip": "0.0.0.0",
                "proxy_protocol": false,
                "port": 8443,
                "http2": false,
                "listener": "0.0.0.0:8443 ssl"
            }
        ],
        "proxy_ssl_enabled": true,
        "stream_listeners": {},
        "db_cache_warmup_entities": [
            "services",
            "plugins"
        ],
        "enabled_headers": {
            "latency_tokens": true,
            "X-Kong-Proxy-Latency": true,
            "Via": true,
            "server_tokens": true,
            "Server": true,
            "X-Kong-Upstream-Latency": true,
            "X-Kong-Upstream-Status": false
        },
        "plugins": [
            "bundled"
        ],
        "ssl_ciphers": "ECDHE-ECDSA-AES256-GCM-SHA384:ECDHE-RSA-AES256-GCM-SHA384:ECDHE-ECDSA-CHACHA20-POLY1305:ECDHE-RSA-CHACHA20-POLY1305:ECDHE-ECDSA-AES128-GCM-SHA256:ECDHE-RSA-AES128-GCM-SHA256:ECDHE-ECDSA-AES256-SHA384:ECDHE-RSA-AES256-SHA384:ECDHE-ECDSA-AES128-SHA256:ECDHE-RSA-AES128-SHA256",
        "db_resurrect_ttl": 30,
        "nginx_proxy_directives": {},
        "cassandra_consistency": "ONE",
        "client_max_body_size": "0",
        "admin_error_log": "/dev/stderr",
        "pg_ssl_verify": false,
        "dns_not_found_ttl": 30,
        "pg_ssl": false,
        "lua_ssl_verify_depth": 1,
        "ssl_cipher_suite": "modern",
        "cassandra_repl_strategy": "SimpleStrategy",
        "proxy_error_log": "/dev/stderr",
        "kong_env": "/usr/local/kong/.kong_env",
        "db_cache_ttl": 0,
        "pg_max_concurrent_queries": 0,
        "nginx_kong_conf": "/usr/local/kong/nginx-kong.conf",
        "cassandra_schema_consensus_timeout": 10000,
        "dns_hostsfile": "/etc/hosts",
        "admin_listeners": [
            {
                "transparent": false,
                "ssl": true,
                "ip": "0.0.0.0",
                "proxy_protocol": false,
                "port": 8444,
                "http2": false,
                "listener": "0.0.0.0:8444 ssl"
            }
        ],
        "dns_stale_ttl": 4,
        "ssl_cert": "/usr/local/kong/ssl/kong-default.crt",
        "cassandra_timeout": 5000,
        "admin_ssl_cert_key_default": "/usr/local/kong/ssl/admin-kong-default.key",
        "cassandra_ssl_verify": false,
        "mem_cache_size": "128m",
        "log_level": "notice",
        "real_ip_recursive": "off",
        "cassandra_repl_factor": 1,
        "client_ssl_cert_key_default": "/usr/local/kong/ssl/kong-default.key",
        "nginx_daemon": "off",
        "anonymous_reports": true,
        "nginx_sproxy_directives": {},
        "nginx_stream_directives": {},
        "pg_port": 5432,
        "nginx_kong_stream_conf": "/usr/local/kong/nginx-kong-stream.conf",
        "client_body_buffer_size": "8k",
        "ssl_preread_enabled": true,
        "ssl_cert_csr_default": "/usr/local/kong/ssl/kong-default.csr",
        "cassandra_contact_points": [
            "127.0.0.1"
        ],
        "cassandra_keyspace": "kong",
        "ssl_cert_default": "/usr/local/kong/ssl/kong-default.crt",
        "lua_socket_pool_size": 30,
        "admin_ssl_enabled": true
    },
    "version": "1.2.2",
    "node_id": "cc0f6fa7-3c2c-44f8-a523-8f9e53d7e41e",
    "lua_version": "LuaJIT 2.1.0-beta3",
    "prng_seeds": {
        "pid: 36": 195221171165,
        "pid: 35": 148625059221,
        "pid: 39": 191125165965,
        "pid: 1": 173981549072,
        "pid: 34": 137193103112,
        "pid: 38": 175366916141,
        "pid: 37": 192138146579,
        "pid: 32": 214162161921,
        "pid: 33": 152108231211
    },
    "timers": {
        "pending": 6,
        "running": 0
    },
    "hostname": "api-gateway-kong-79f697ff7c-bcr7m"
}
curl -i -k -X POST \
--url https://10.234.2.204:30840/services/ \
--data 'name=baidu-service' \
--data 'url=https://www.baidu.com/'curl -ik -X POST \
--url https://10.234.2.204:30840/services/baidu-service/routes \
--data 'hosts[]=baidu.com' \
--data 'paths[]=/api/baidu'#访问proxy
curl -k http://10.234.2.204:32582/api/baidu --header 'Host: baidu.com'
提供的CLI(命令行界面Command Line Interface)允许启动,停止和管理Kong实例。CLI可以管理本地节点(如在当前计算机上)。
--help:打印此命令的帮助信息
--v:启用详细模式
--vv:启用调试模式(很多输出)kong check <conf> #检查给定Kong配置文件的有效性。
kong health [OPTIONS] #验证Kong 的服务组件是否正常运行kong migrations COMMAND [OPTIONS]
可用的命令如下:
bootstrap 引导数据库并运行全部迁移(初始化)。
up 运行新迁移。
finish 完成正在等待中的迁移命令,在执行`up`后。
list 列出已执行的迁移。
reset 重置数据库。
Options(可选):
-y,--yes 假设提示“yes”,并运行非交互模式
-q,--quiet 忽略所有输出
-f,--force 依旧执行迁移,即使数据库报告已经执行过了。
--db-timeout (default 60) 超时时间,以秒为单位,所有数据库操作通用(包括Cassandra的schema consensus)。
--lock-timeout (default 60) 超时时间,以秒为单位, 节点等待领导节点迁移完成。
-c,--conf (optional string) 配置文件。kong quit [OPTIONS] #优雅地退出一个正在运行的Kong节点(Nginx和其他节点)在给定的前缀目录中配置的服务。
kong reload [OPTIONS] #重新加载Kong节点(并启动其他已配置的服务)在给定的前缀目录中。
kong restart [OPTIONS] #重新启动Kong节点(以及其他配置的服务,如Serf)在给定的前缀目录中。更详细的CLI参数可参考:CLI Reference
配置一个访问 www.baidu.com/ 的接口API,实际使用时会对接后端的业务数据接口地址。
路由定义了匹配客户端请求的规则,每一个路由关联一个 Service,每一个 Service 有可能被多个路由关联,每一个匹配到指定的路由请求将被代理到它关联的 Service 上,参见Kong Admin Api Route Object。
kong admin接口
GET /routers/                                #列出所有路由
GET /services/                               #列出所有服务
GET /consumers/                              #列出所有用户
GET /services/{service name or id}/routes    #列出服务关联的路由
GET /plugins/                                #列出所有的插件配置
GET /plugins/enabled                         #列出所有可以使用的插件
GET /plugins/schema/{plugin name}            #获得插件的配置模版
GET /certificates/                           #列出所有的证书
GET /snis/                                   #列出所有域名与证书的对应
GET /upstreams/                              #列出所有的upstream
GET /upstreams/{name or id}/health/          #查看upstream的健康状态
GET /upstreams/{name or id}/targets/all #列出upstream中所有的target服务是上游服务的抽象,可以是一个应用,或者具体某个接口。
curl -i -X POST \
--url http://134.175.74.48:8001/services/ \
--data 'name=baidu-service' \
--data 'url=https://www.baidu.com/'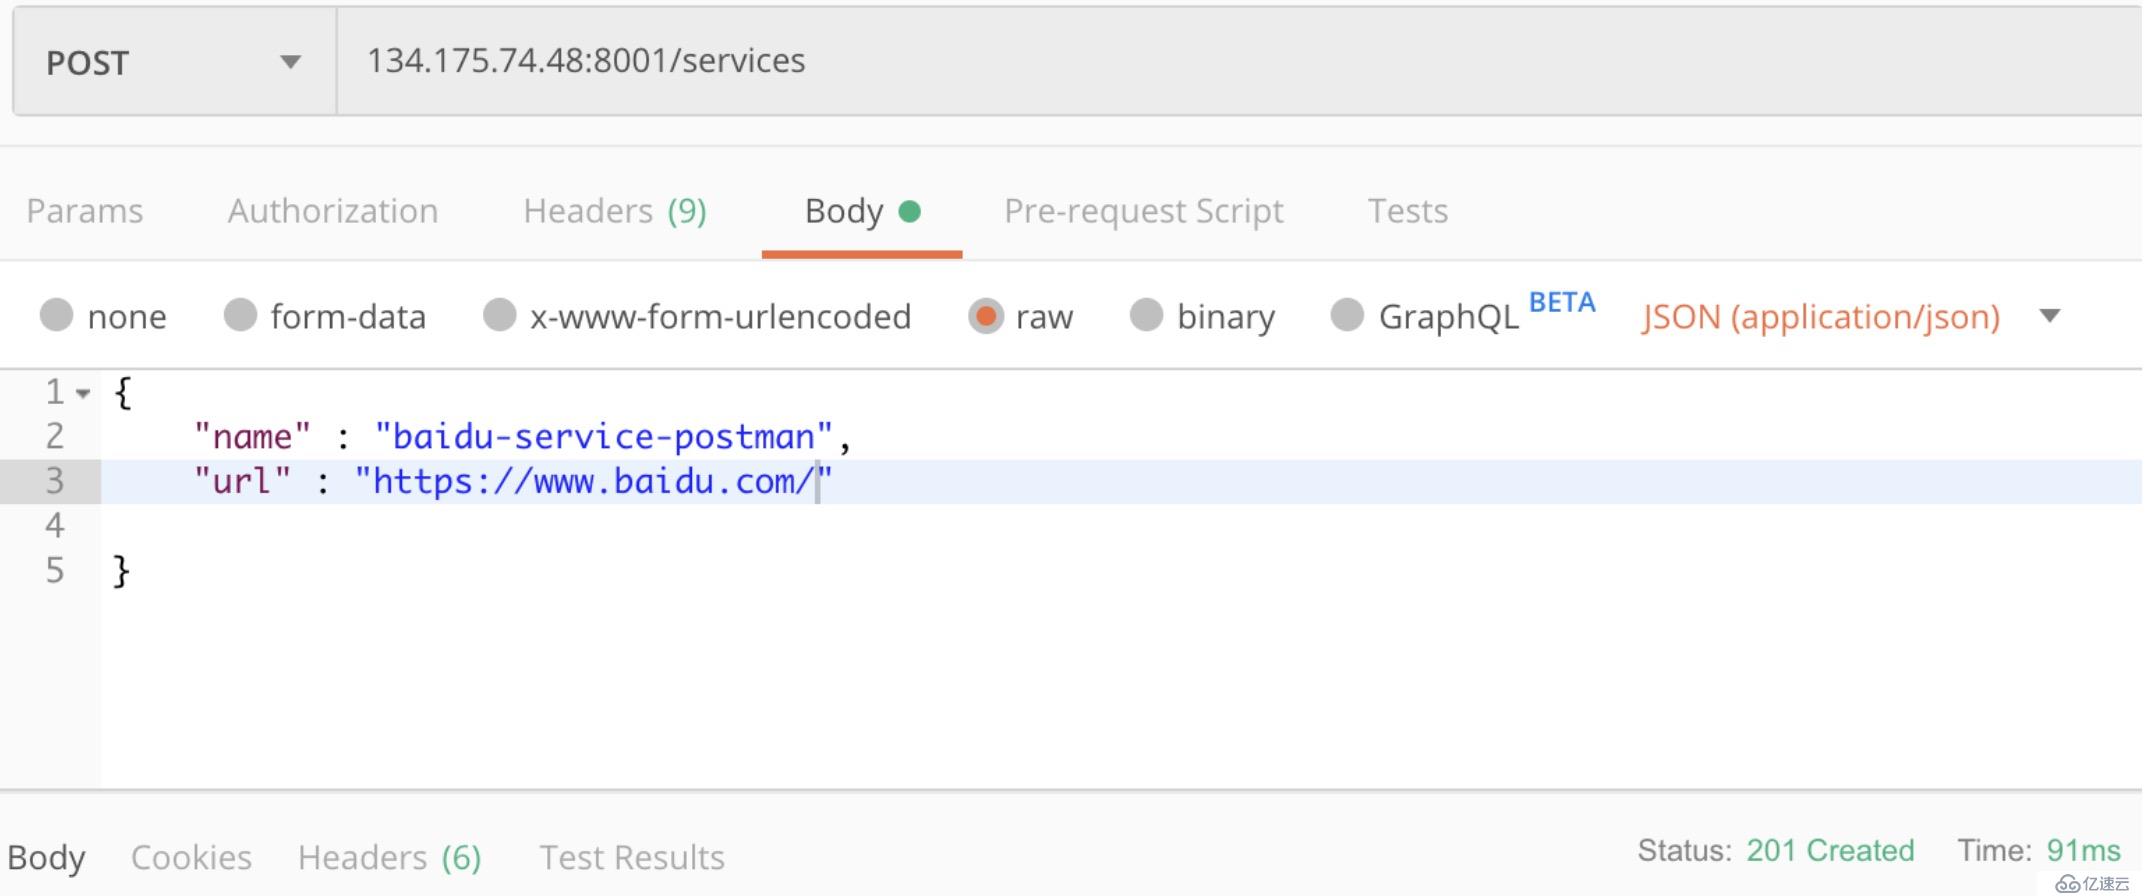


在刚才创建的baidu-service的服务上创建路由
curl -i -X POST \
--url http://134.175.74.48:8001/services/baidu-service/routes \
--data 'hosts[]=baidu.com' \
--data 'paths[]=/api/baidu'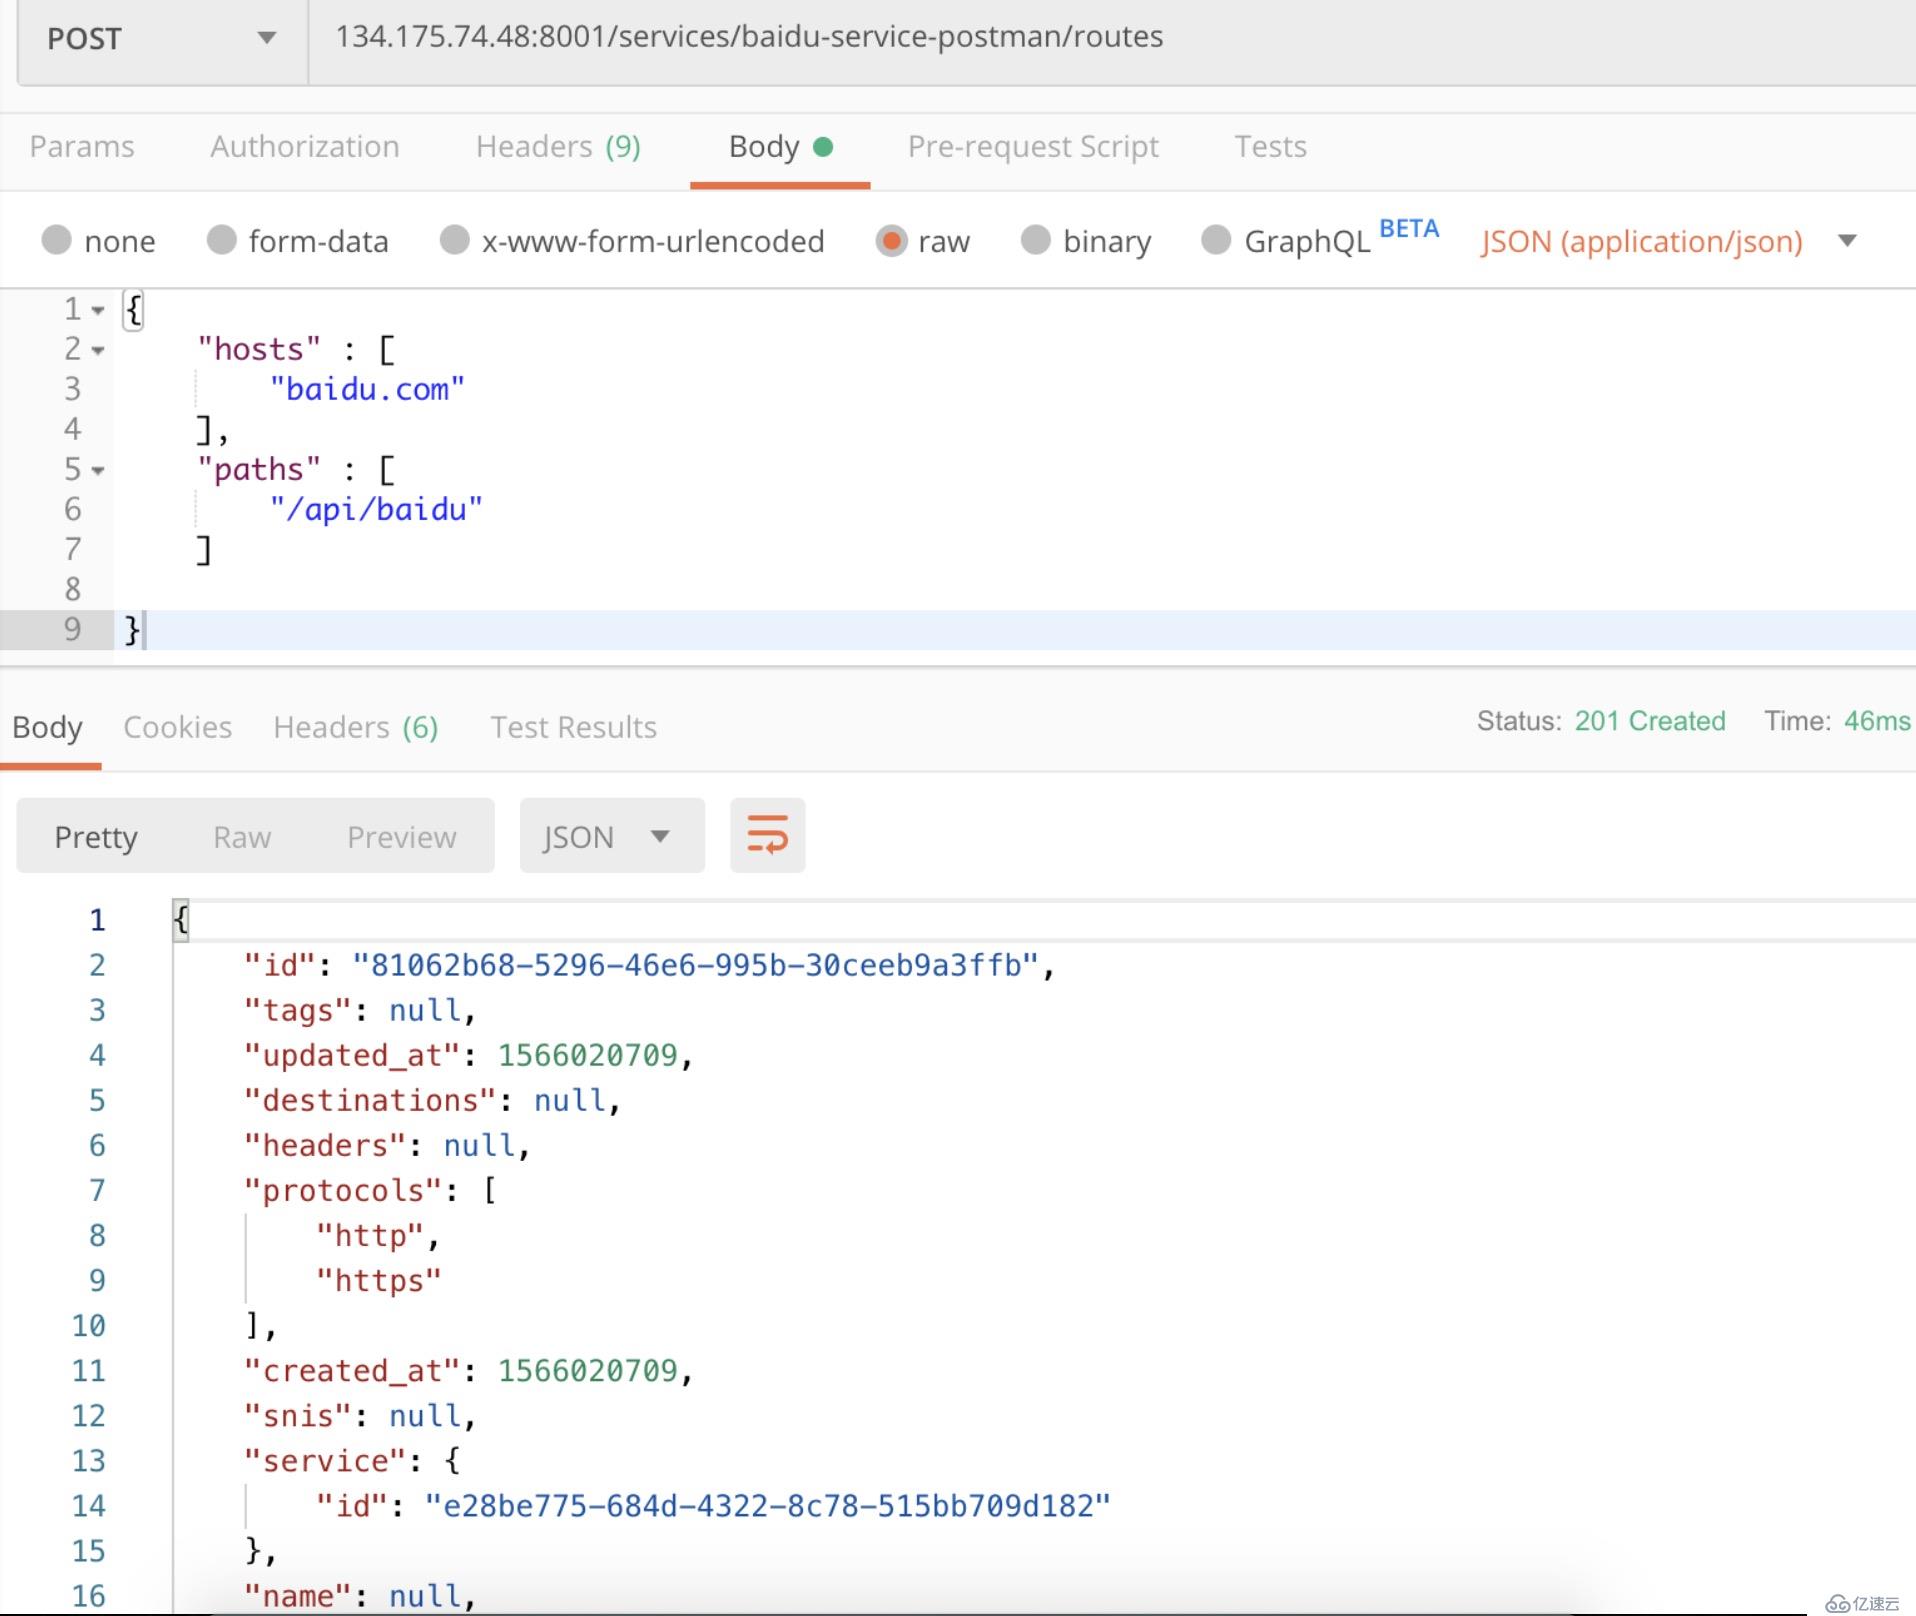
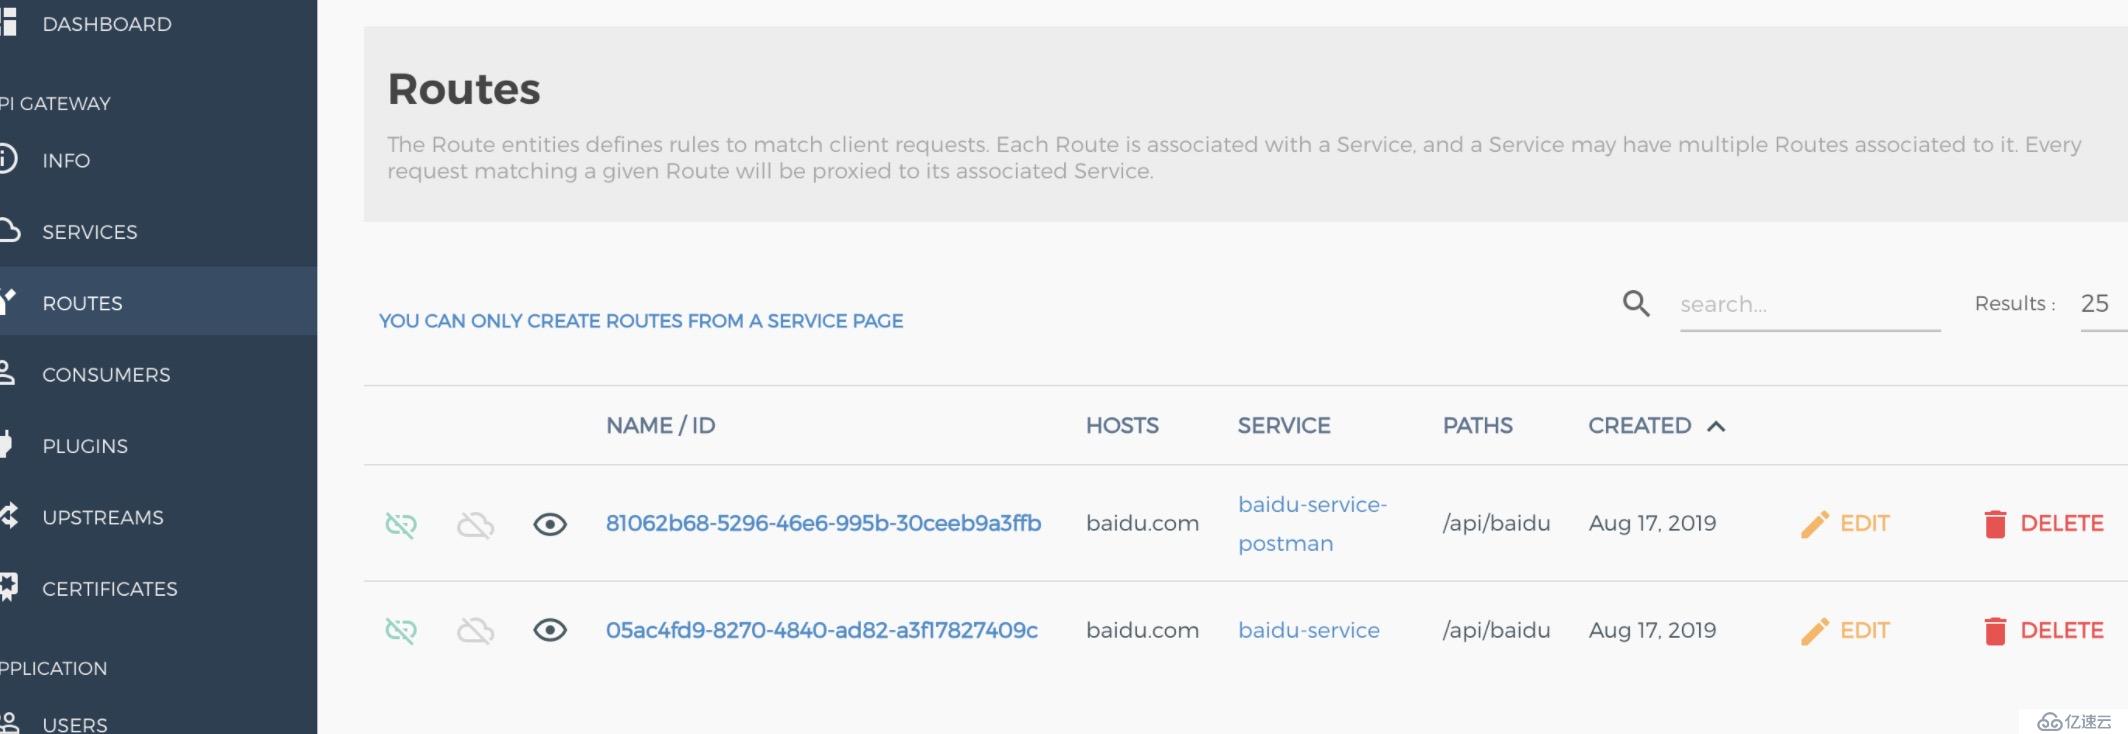
这时候访问kong的proxy地址时,如果host为baidu.com,请求被转发到http://baidu.com
curl http://134.175.74.48:8000/api/baidu --header 'Host: baidu.com'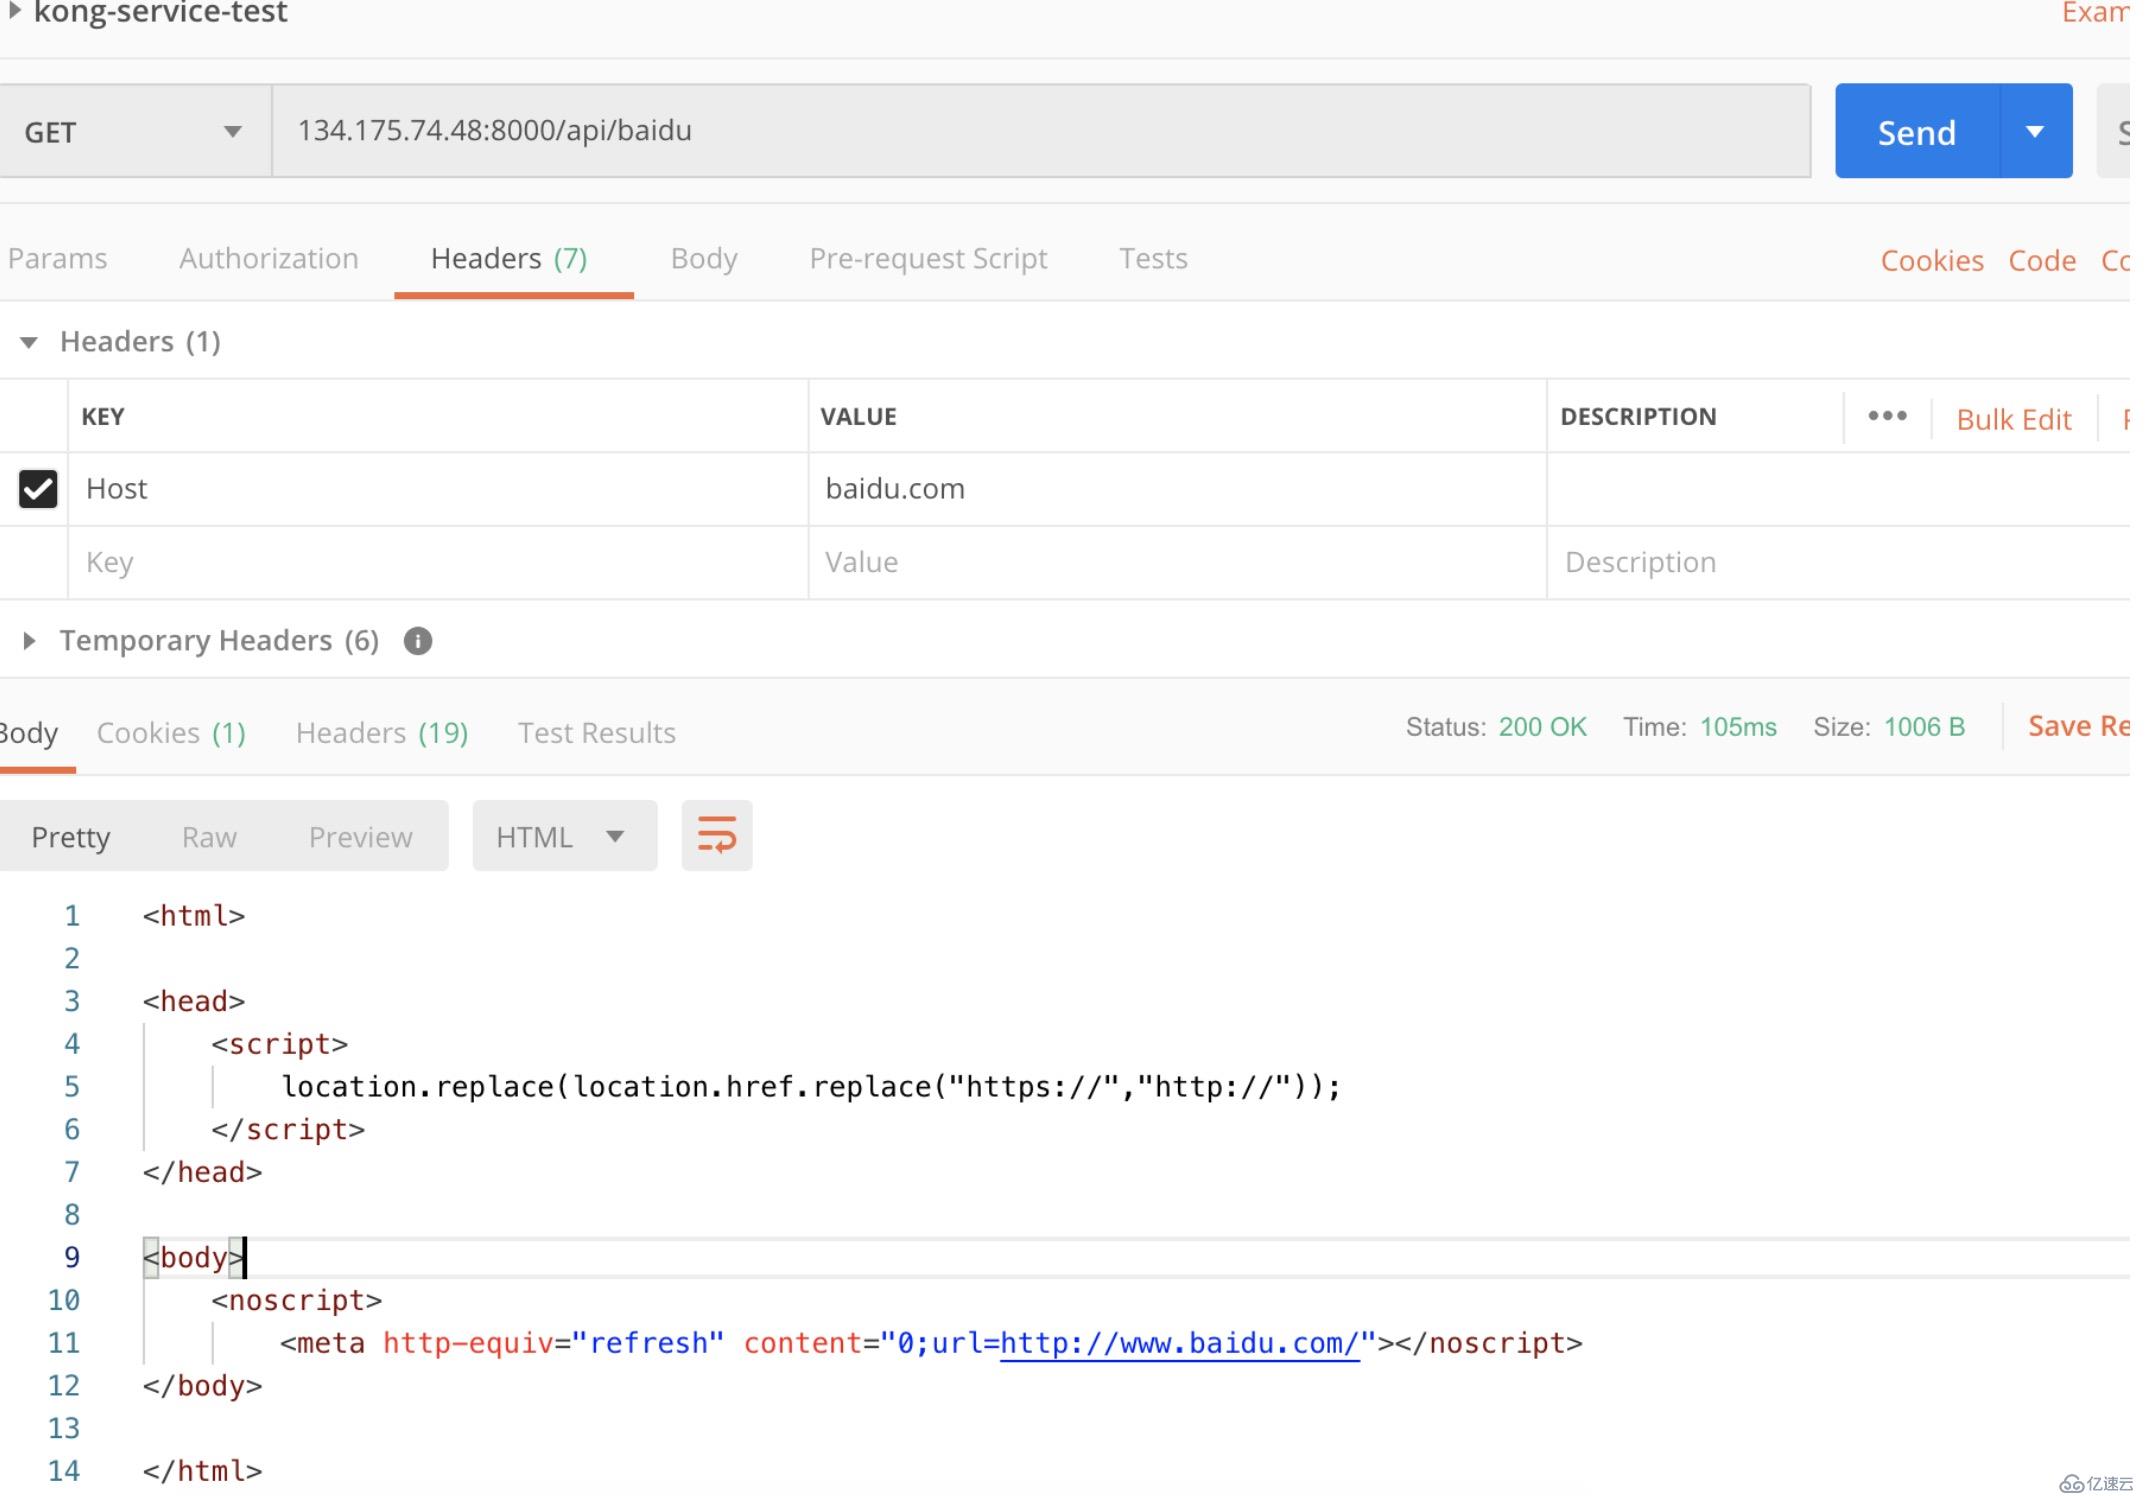
测试post
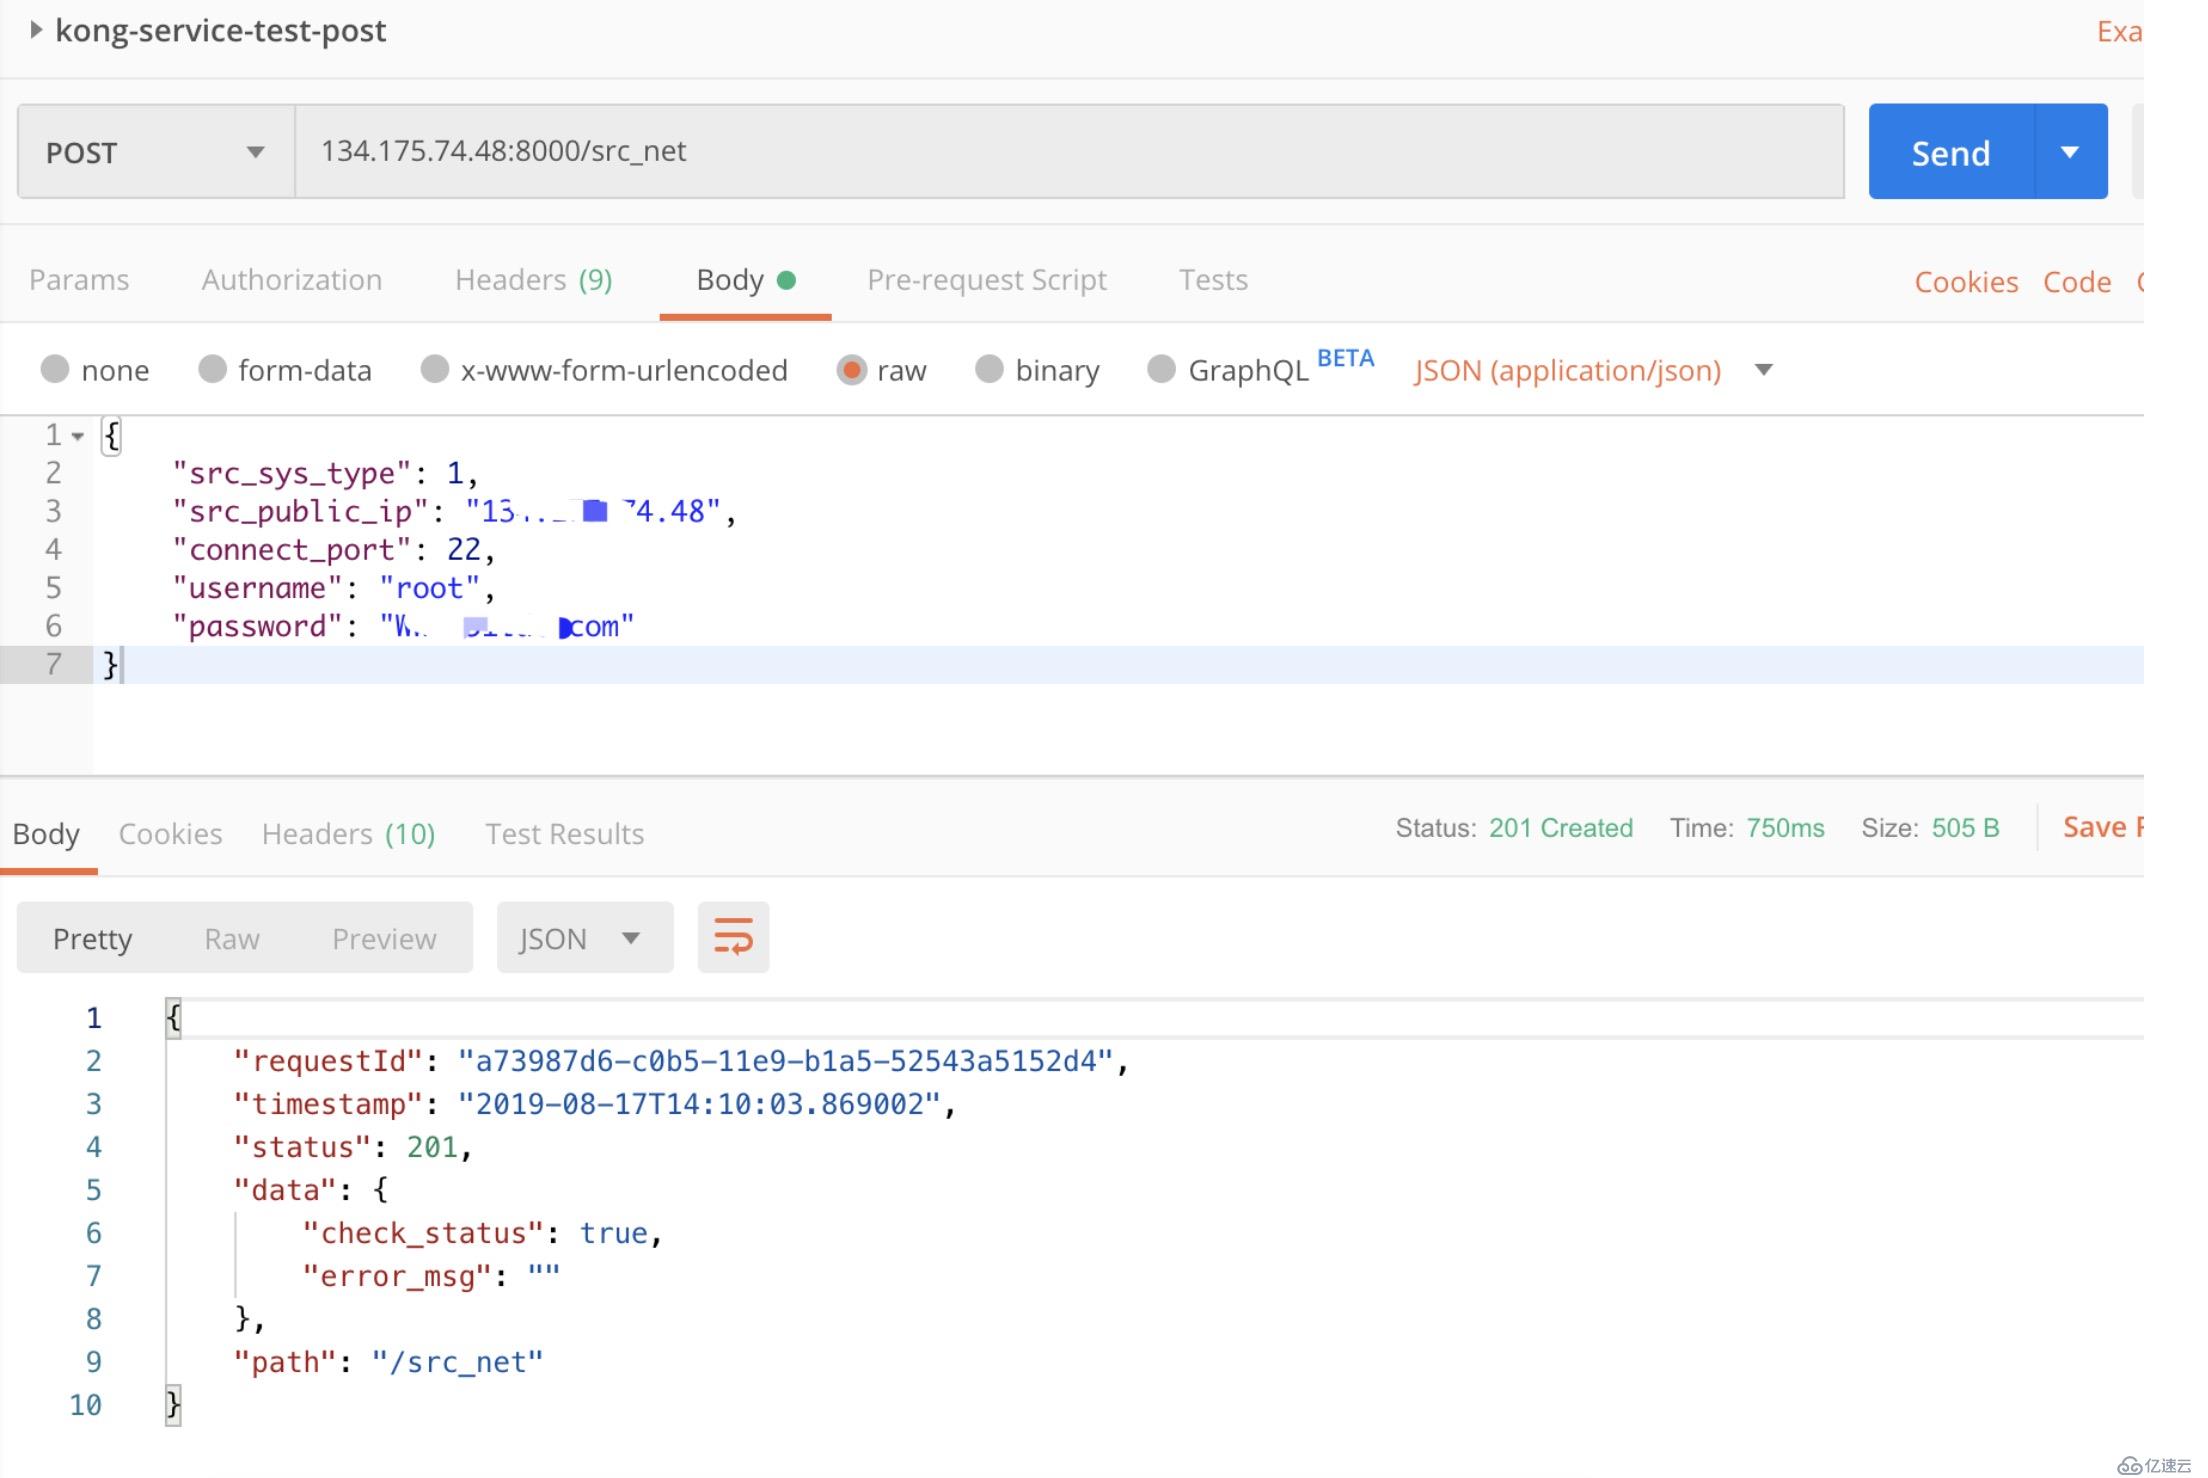
利用konga web界面操作更为方便。
插件是用来扩展API的,例如为API添加认证、设置ACL、限制速率等、集成oauth、ldap等。
上面的配置,只要知道Router的地址,就可以访问获取数据,我们要把API加入身份认证。如果API面对不是具体用户,而是其他的系统,可以使用JWT来进行系统间身份认证,使用Kong JWT插件就可能完成这功能。JWT 插件要在对应的Router上进行启用。
curl -X POST http://134.175.74.48:8001/routes/8e6a1982-5dee-492c-8fe0-c046ebae573c/plugins \
    --data "name=jwt"
fee36521-e549-410f-8986-9fbba02219c1 是创建的service的ID。
这时再通过Postman 访问上面的接口就会提示:
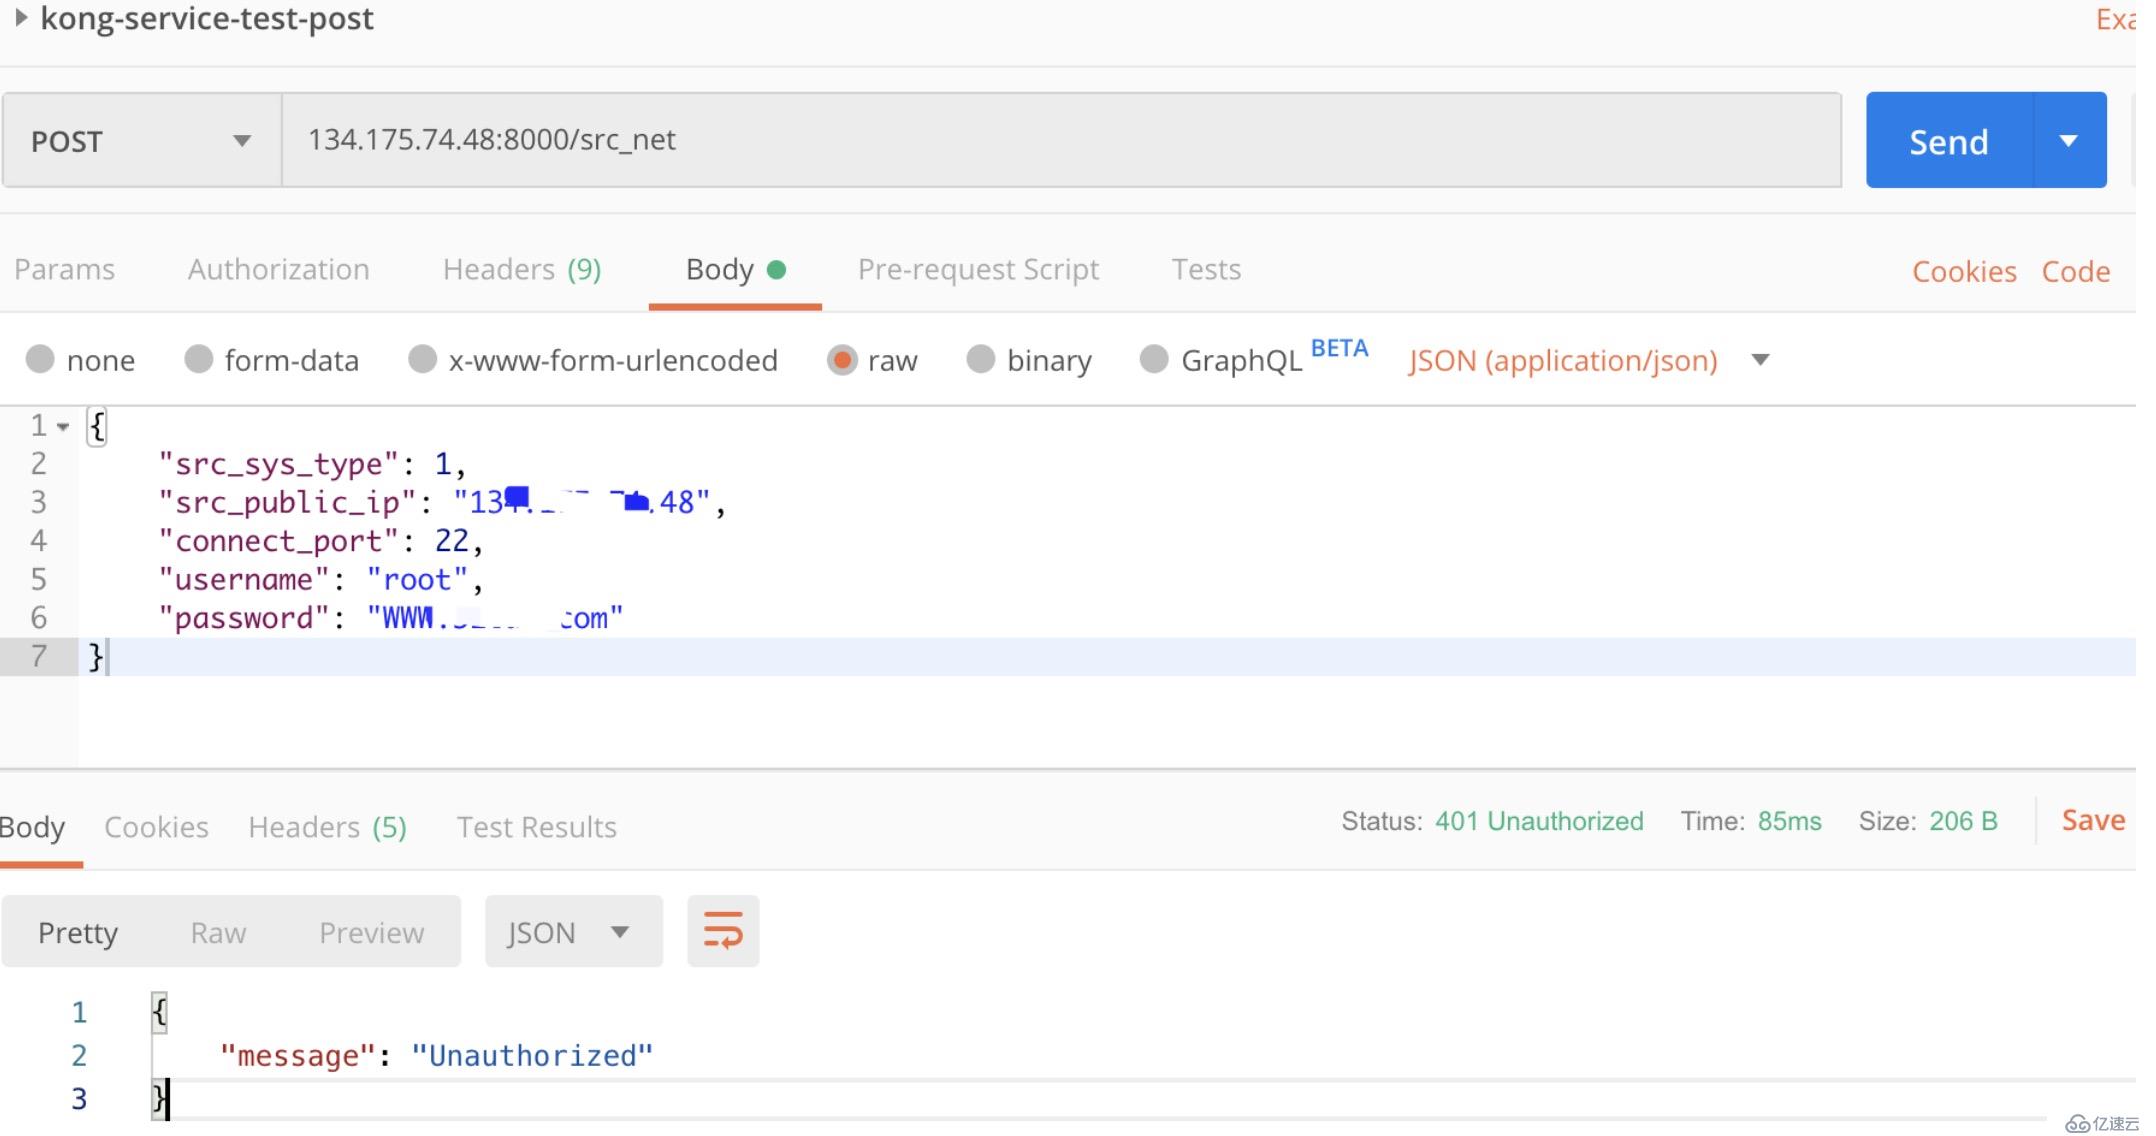
{
    "message": "Unauthorized"
}curl -i -X POST \
--url http://134.175.74.48:8001/consumers/ \
--data "username=kongauser1"curl -i -X POST \
--url http://134.175.74.48:8001/consumers/kongauser1/jwt \
--header "Content-Type: application/x-www-form-urlencoded"
返回凭证信息,也可以通过 get 方法查询凭证信息
{
    "rsa_public_key": null,
    "created_at": 1560723665,
    "consumer": {
        "id": "8bb94f49-22a6-4d77-9a64-21f13adc0342"
    },
    "id": "a110d234-6dc1-4443-9da2-21acddc66e09",
    "algorithm": "HS256",
    "secret": "lCe8Lbb7F0KtLccaBcBnOvYg76V7wmQx",
    "key": "7yQoUdF0aFUC9N593uLQLbqL7RSPj2qM"
}

使用key和secret在 jwt.io/ 可以生成jwt 凭证信息.
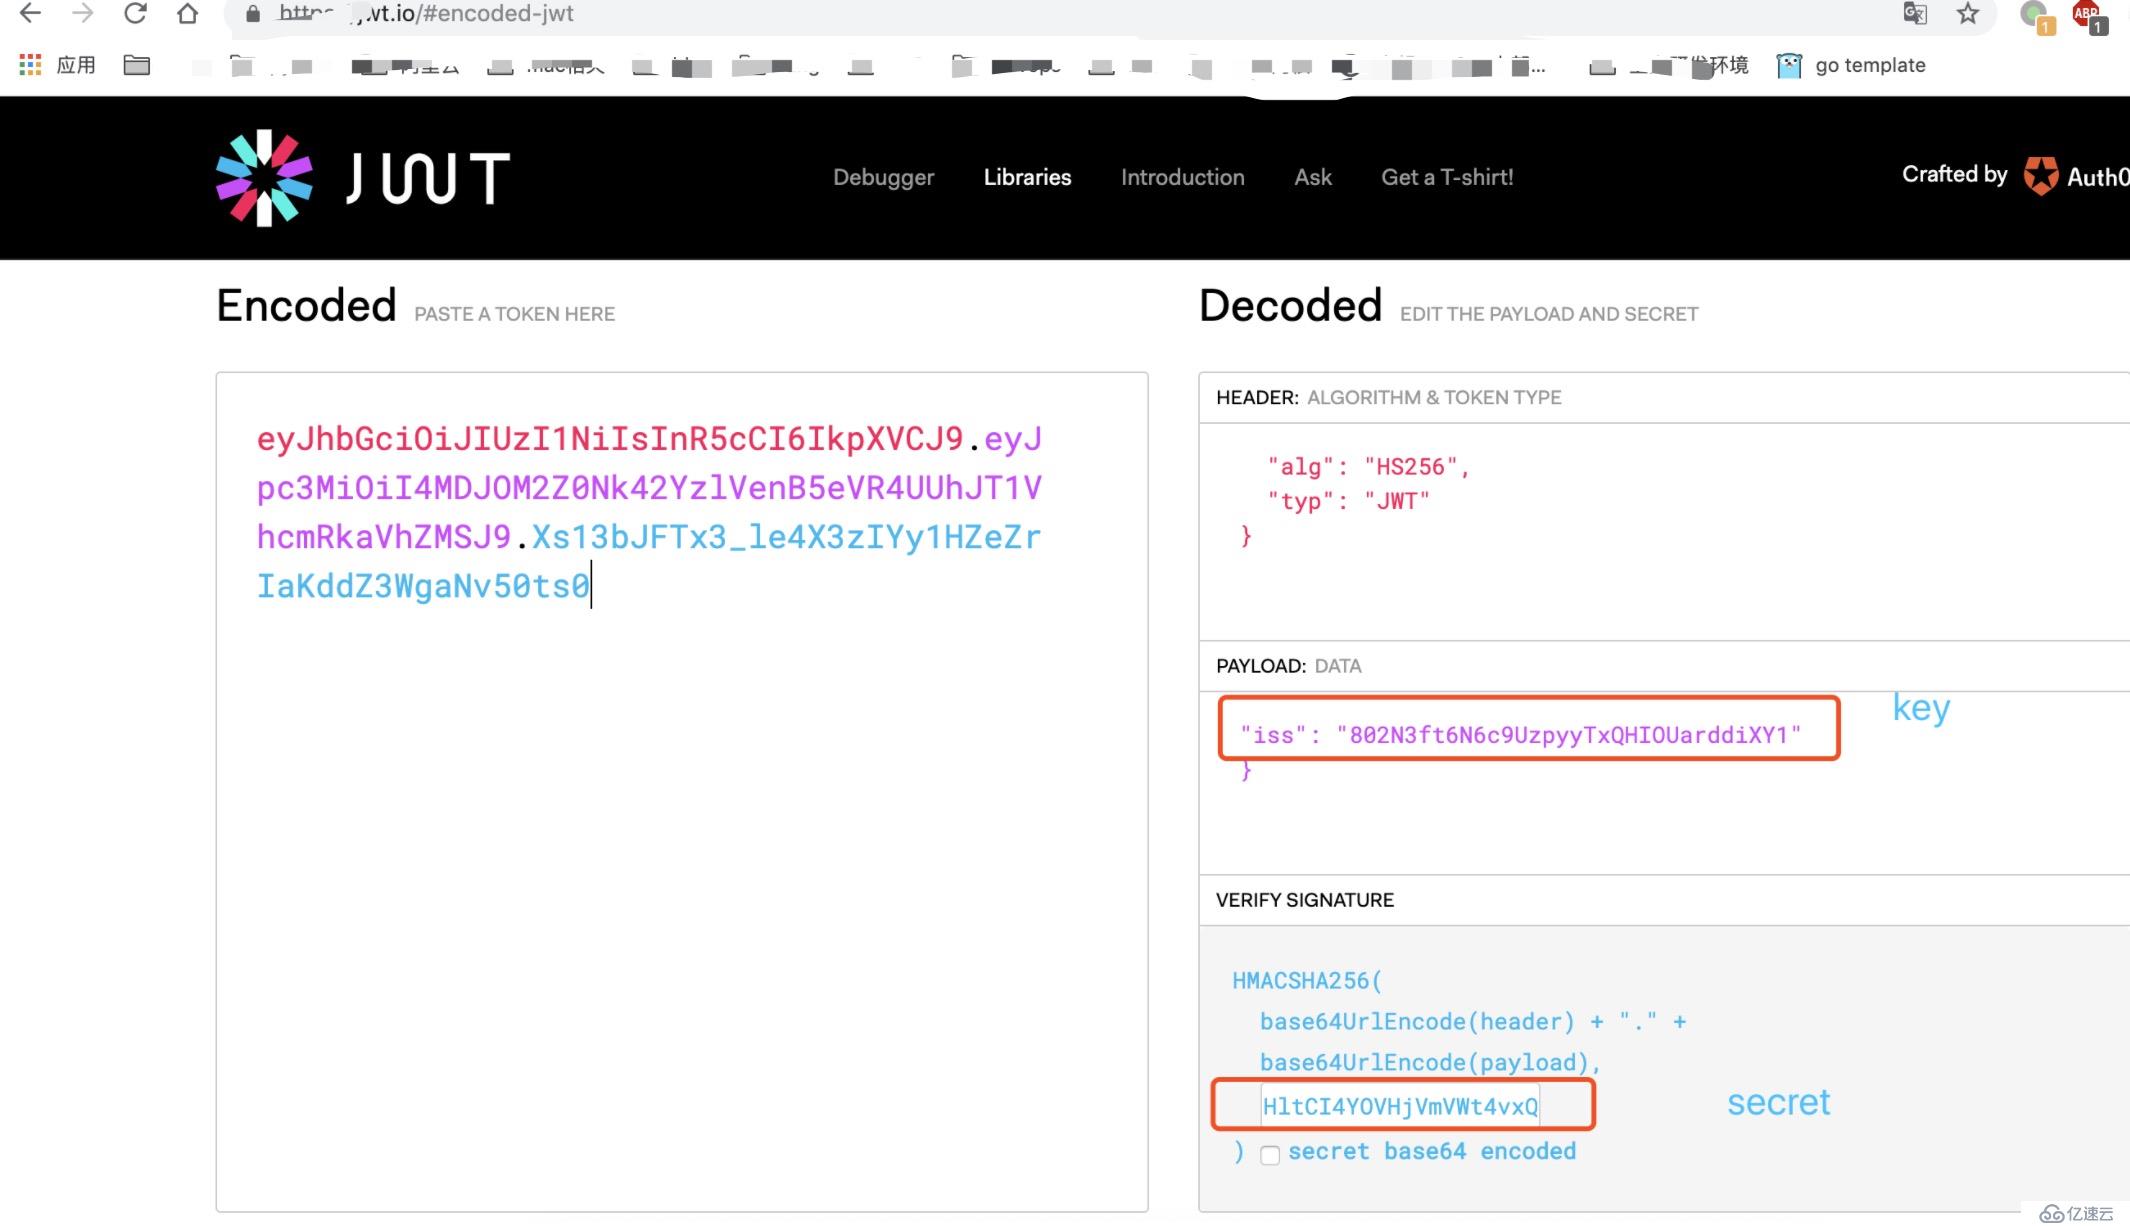
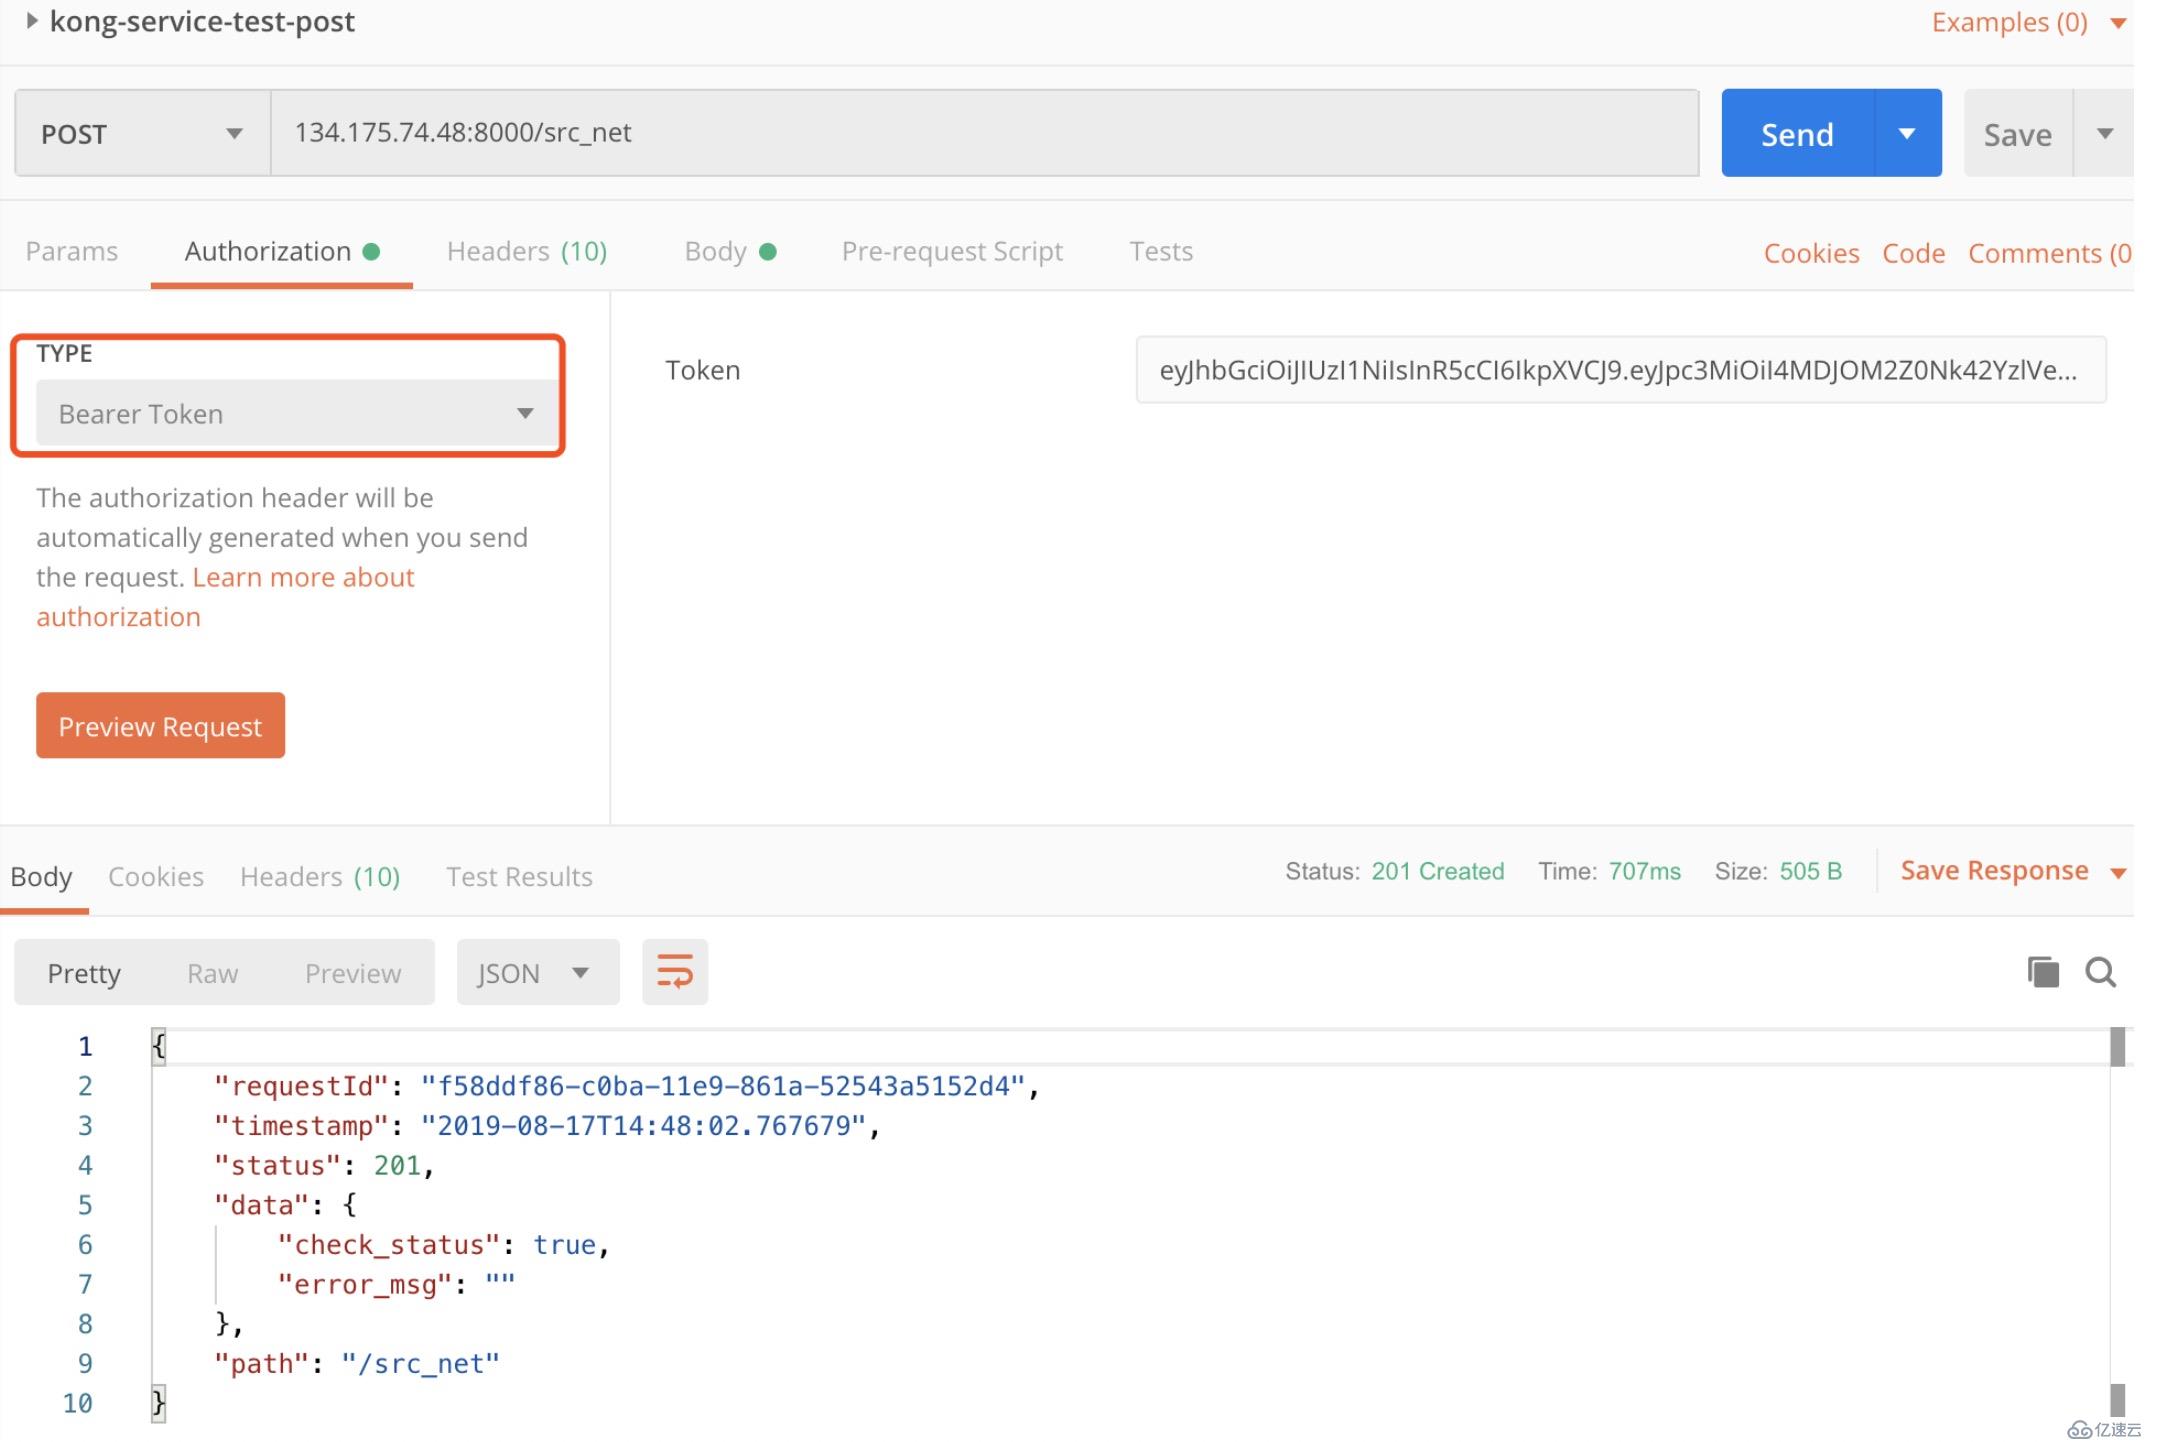
再通过postman 访问,就可以看到数据了。
JWT插件可以保护API能够被受信用户访问,但不能区别哪个用户能够访问哪个API,即接口权限问题,我们使用ACL 插件解决这个问题.
在上面定义好的路由上启用acl 插件,指定白名单,
curl -i -X POST \
--url http://134.175.74.48:8001/routes/afb8bfbd-977e-464f-8c94-05d6c5c98429/plugins \
--data "name=acl"  \
--data "config.whitelist=go2cloud-api-group"
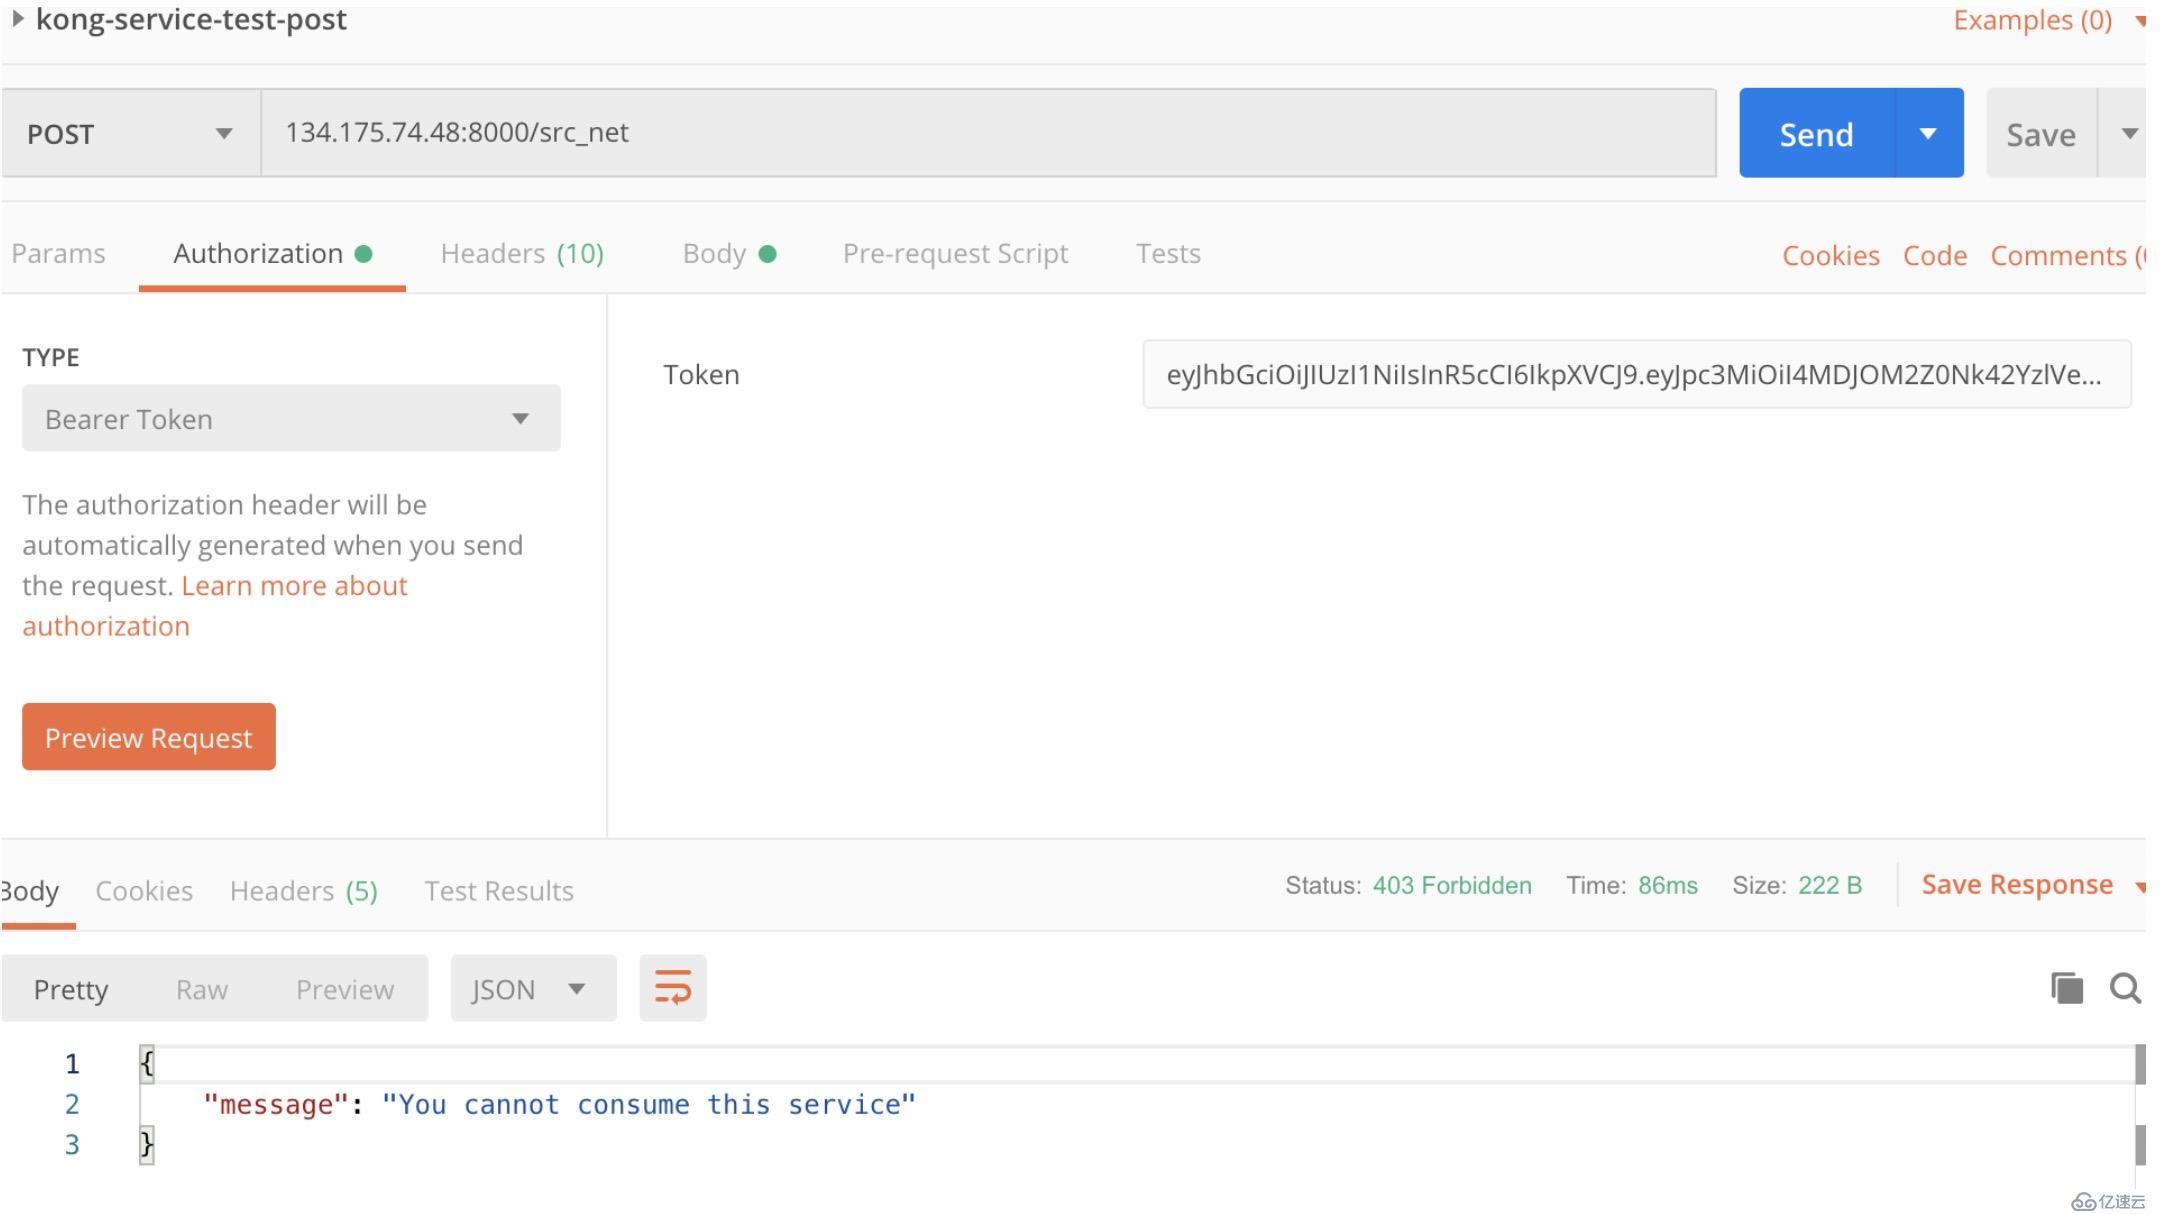
此时再访问api,会提示不能访问这个服务。
{
    "message": "You cannot consume this service"
}
只需将kongauser1这个用户关联到白名单内的go2cloud-api-group组里即可。
curl -i -X POST \
--url http://134.175.74.48:8001/consumers/tianqiuser/acls \
--data "group=tianqi"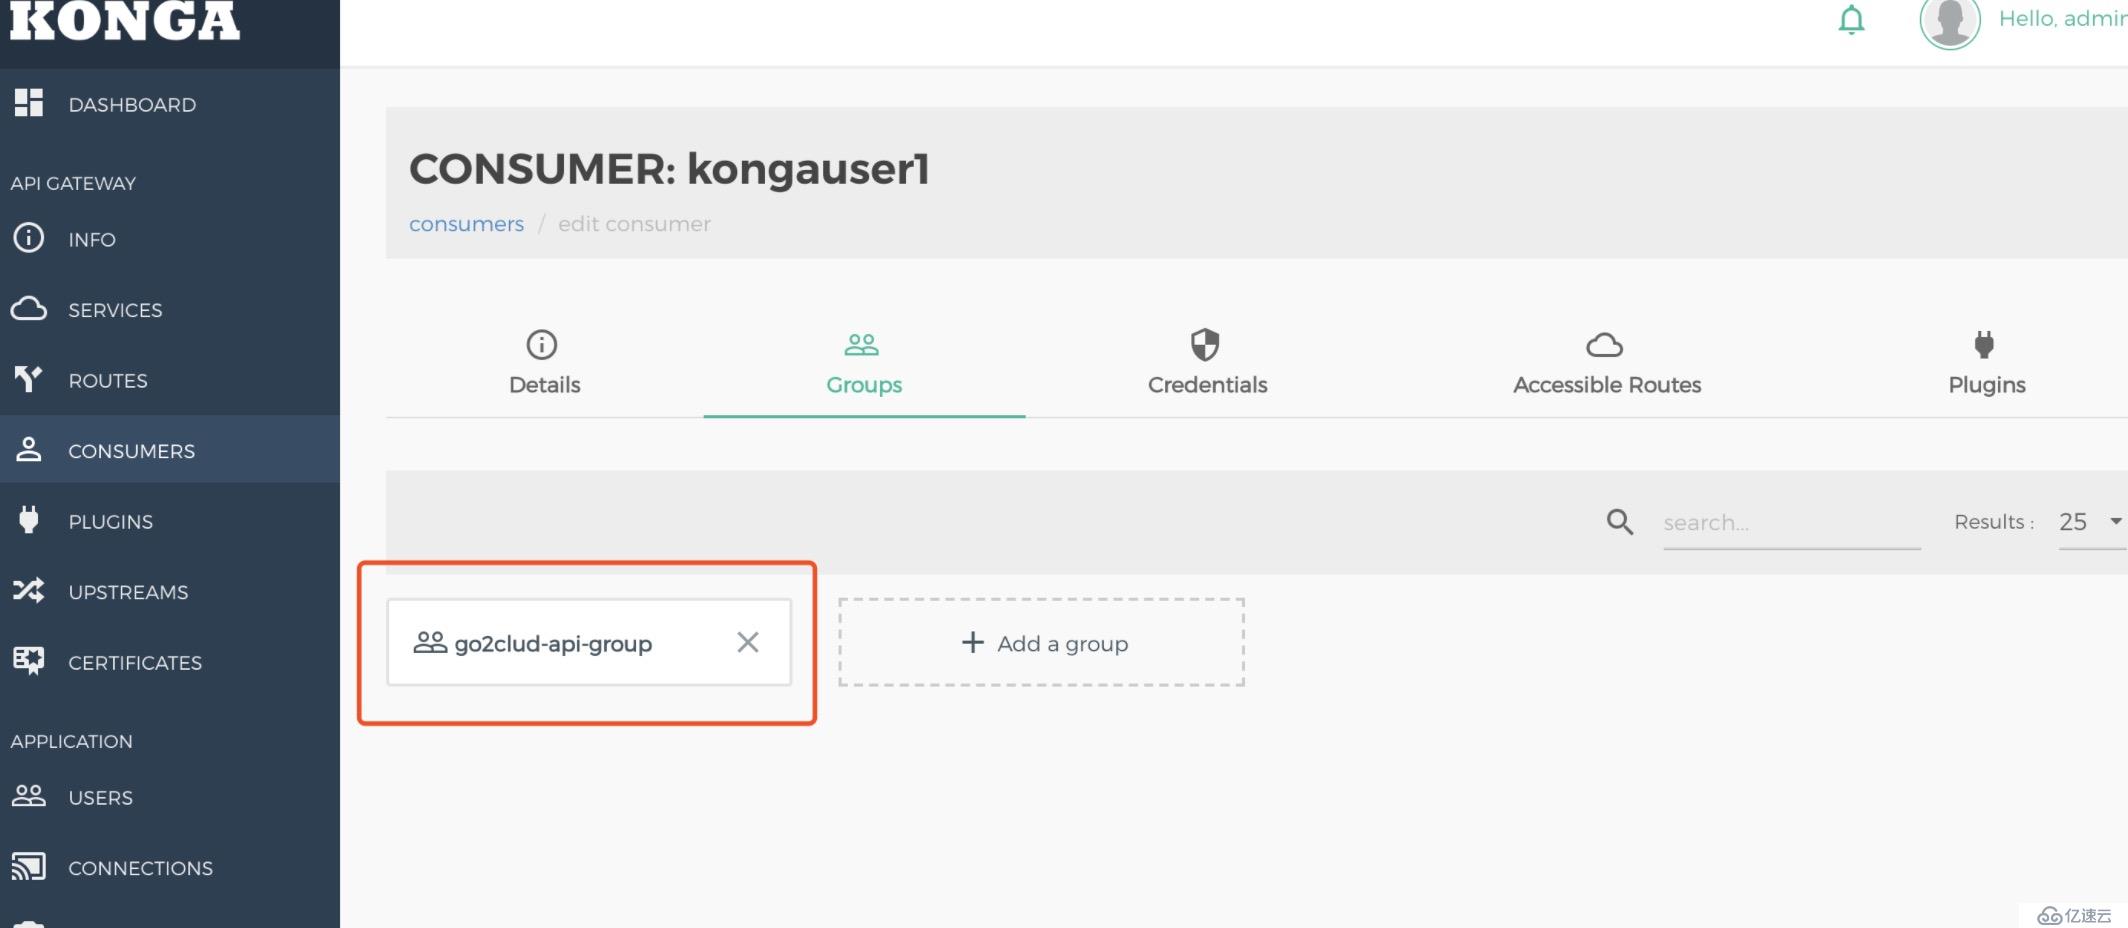
再次访问接口,能正常返回数据。
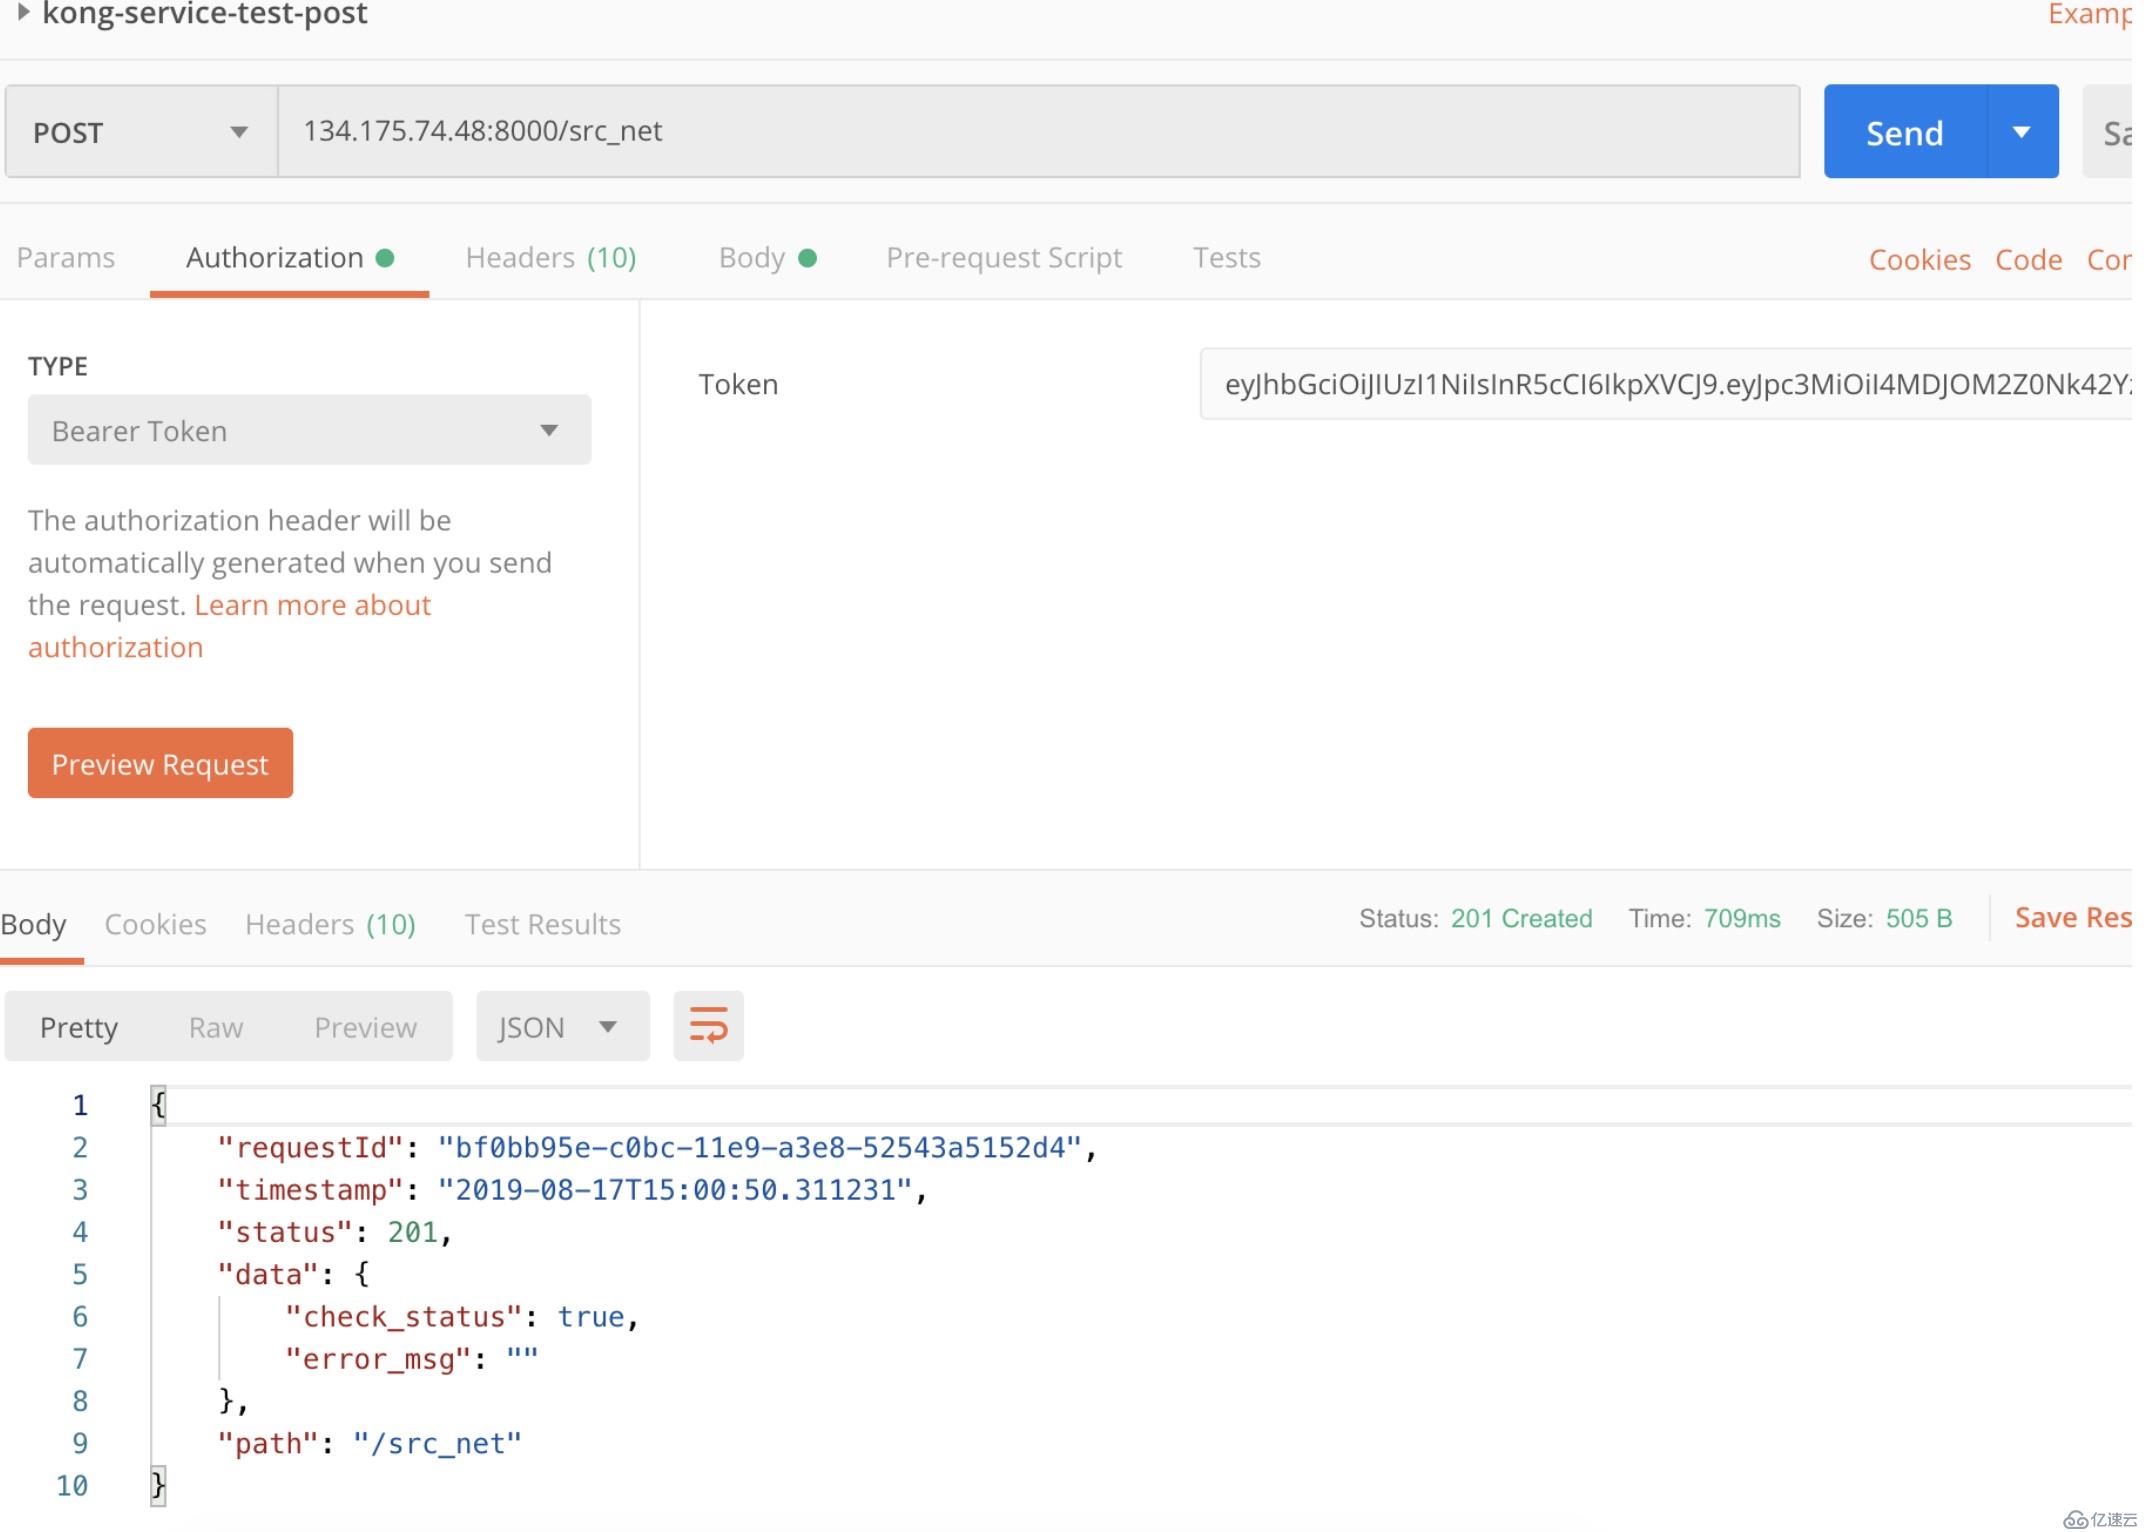
现在就可以对网关暴露的接口进行身份认证和权限控制了。
 curl -i -X POST \
  --url http://134.175.74.48:8001/services/go2cloud-api/plugins/ \
  --data 'name=key-auth'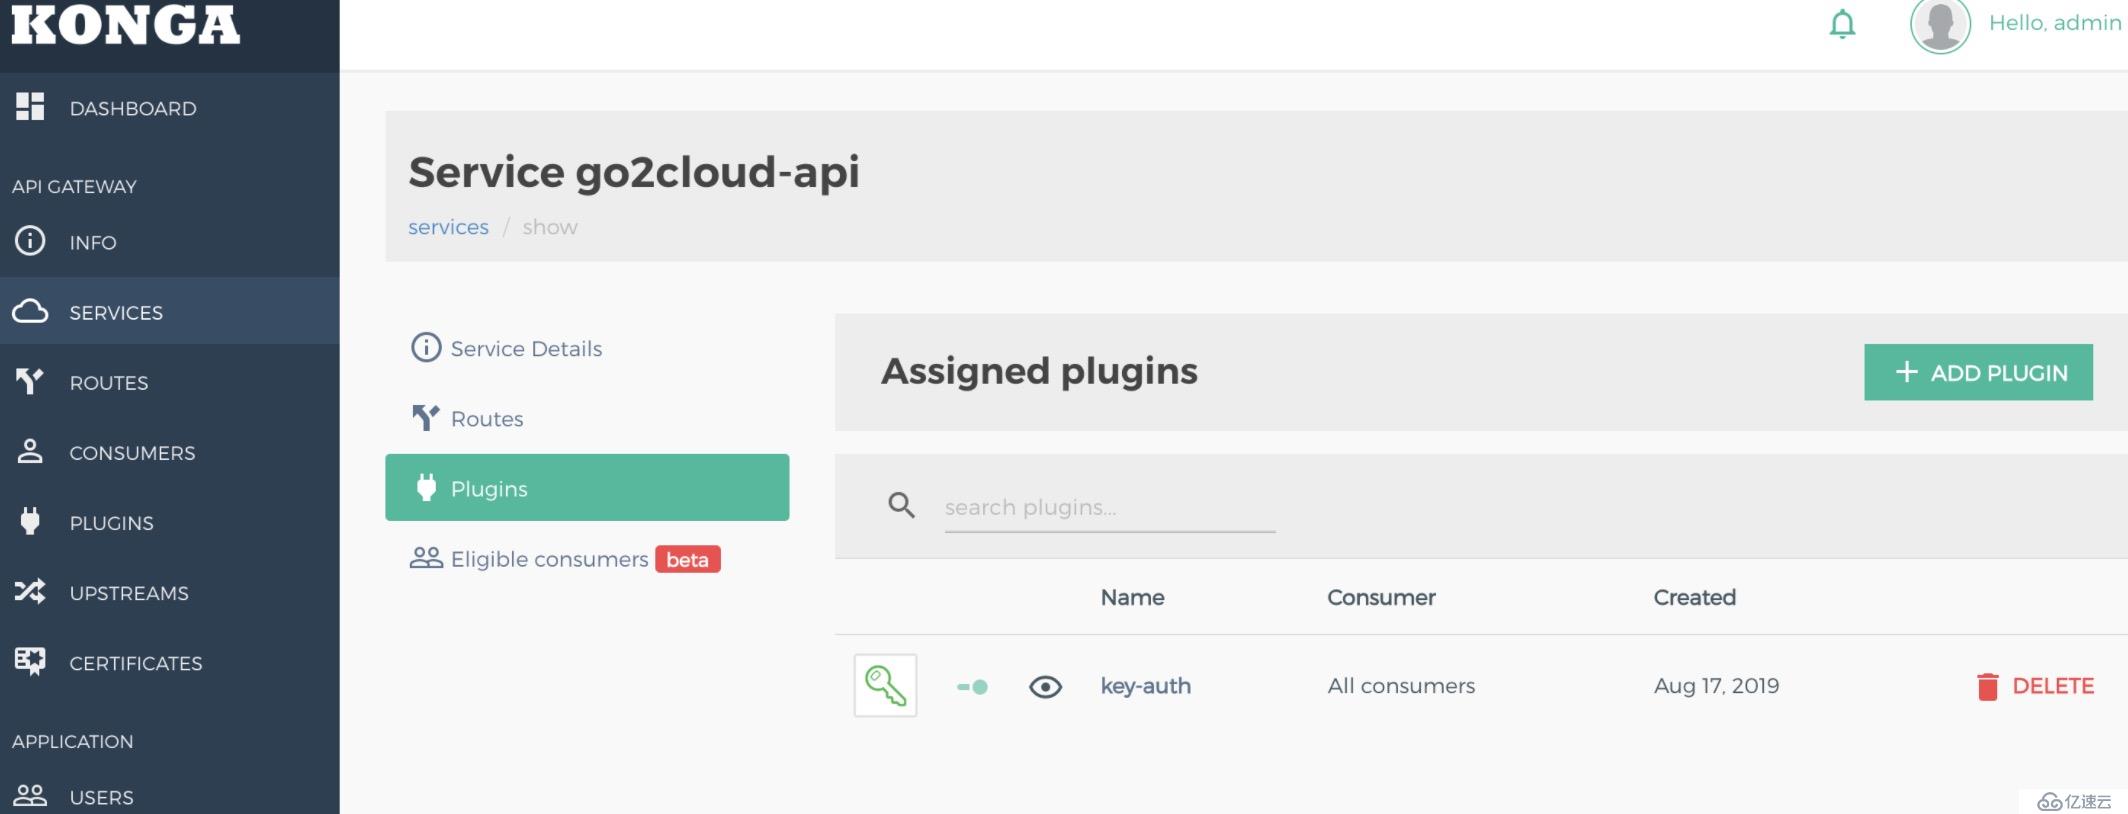
获取到的结果为:
{
    "created_at": 1566027525,
    "config": {
        "key_names": [
            "apikey"
        ],
        "run_on_preflight": true,
        "anonymous": null,
        "hide_credentials": false,
        "key_in_body": false
    },
    "id": "9be2def2-df65-41a4-97b7-52e44b207427",
    "service": {
        "id": "ceb337a3-a6e0-4520-ba7a-f61403e36dcf"
    },
    "name": "key-auth",
    "protocols": [
        "grpc",
        "grpcs",
        "http",
        "https"
    ],
    "enabled": true,
    "run_on": "first",
    "consumer": null,
    "route": null,
    "tags": null
}curl -i -X POST \
--url http://localhost:8001/consumers/ \
--data "username=Jason"
curl -i -X POST \
--url http://localhost:8001/consumers/Jason/key-auth/ \
--data 'key=123456'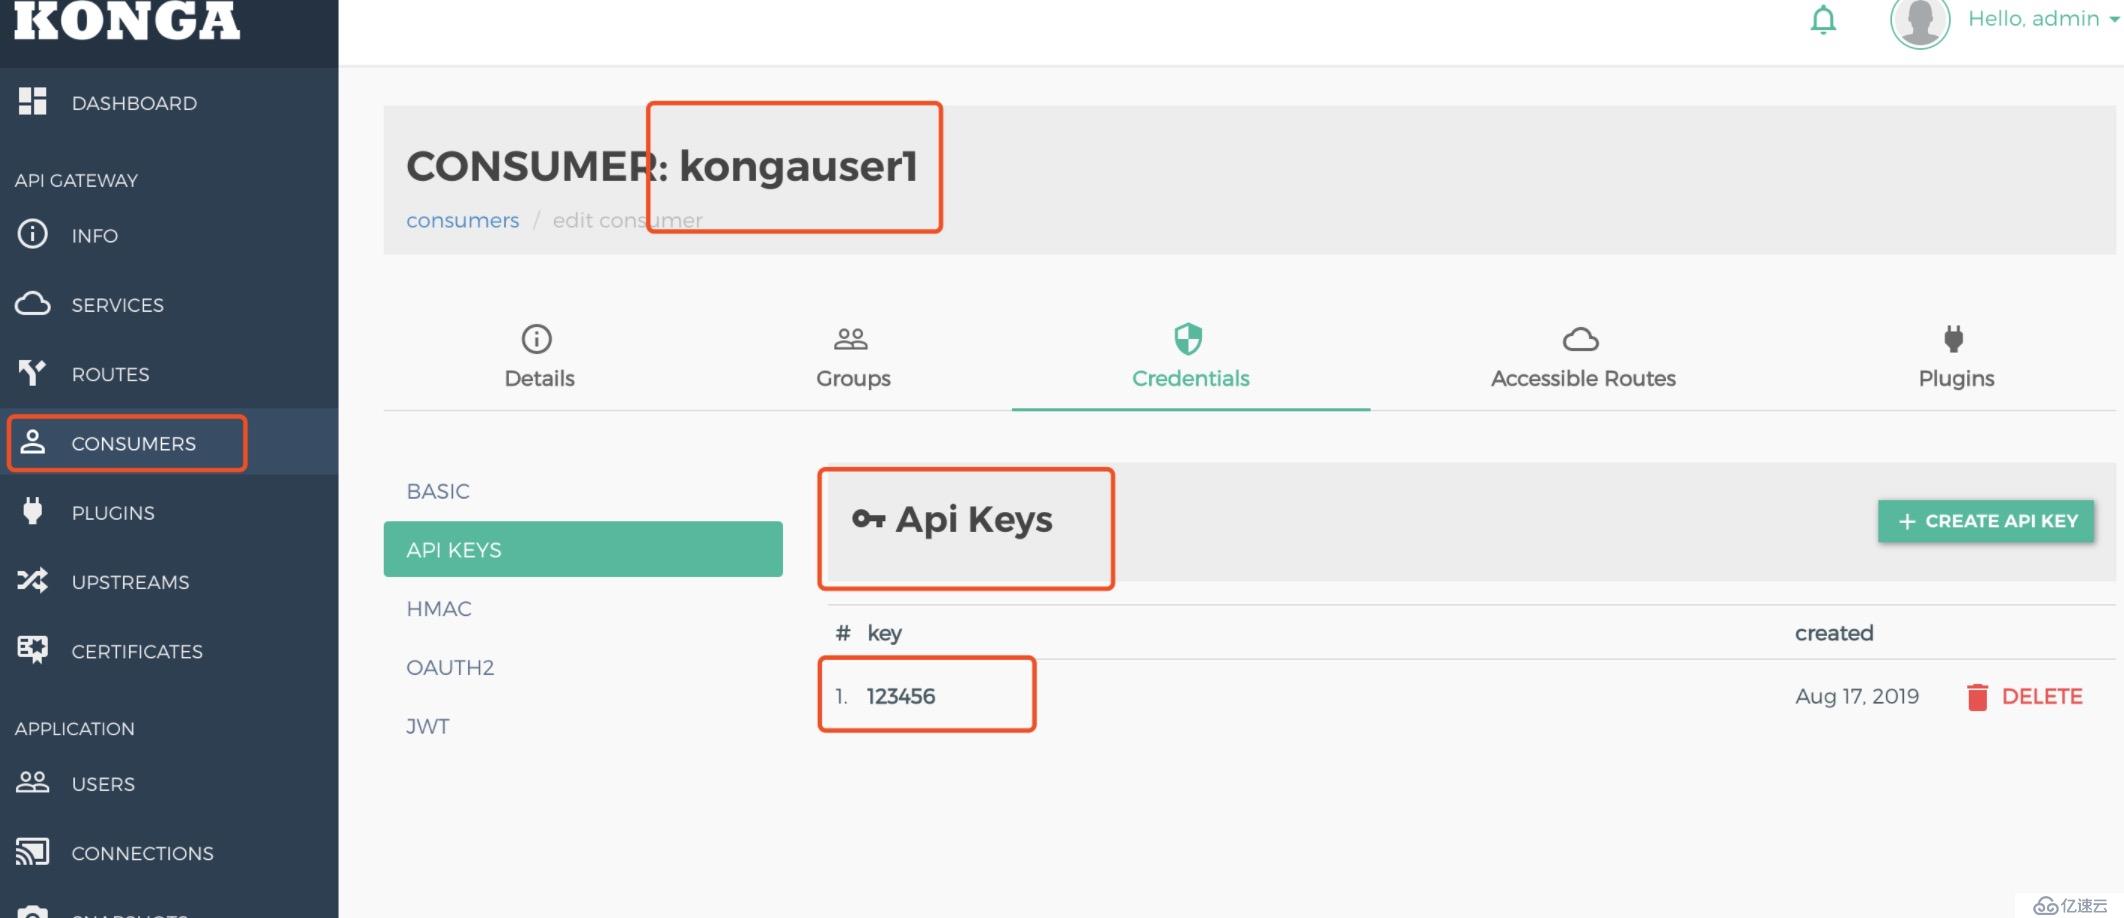
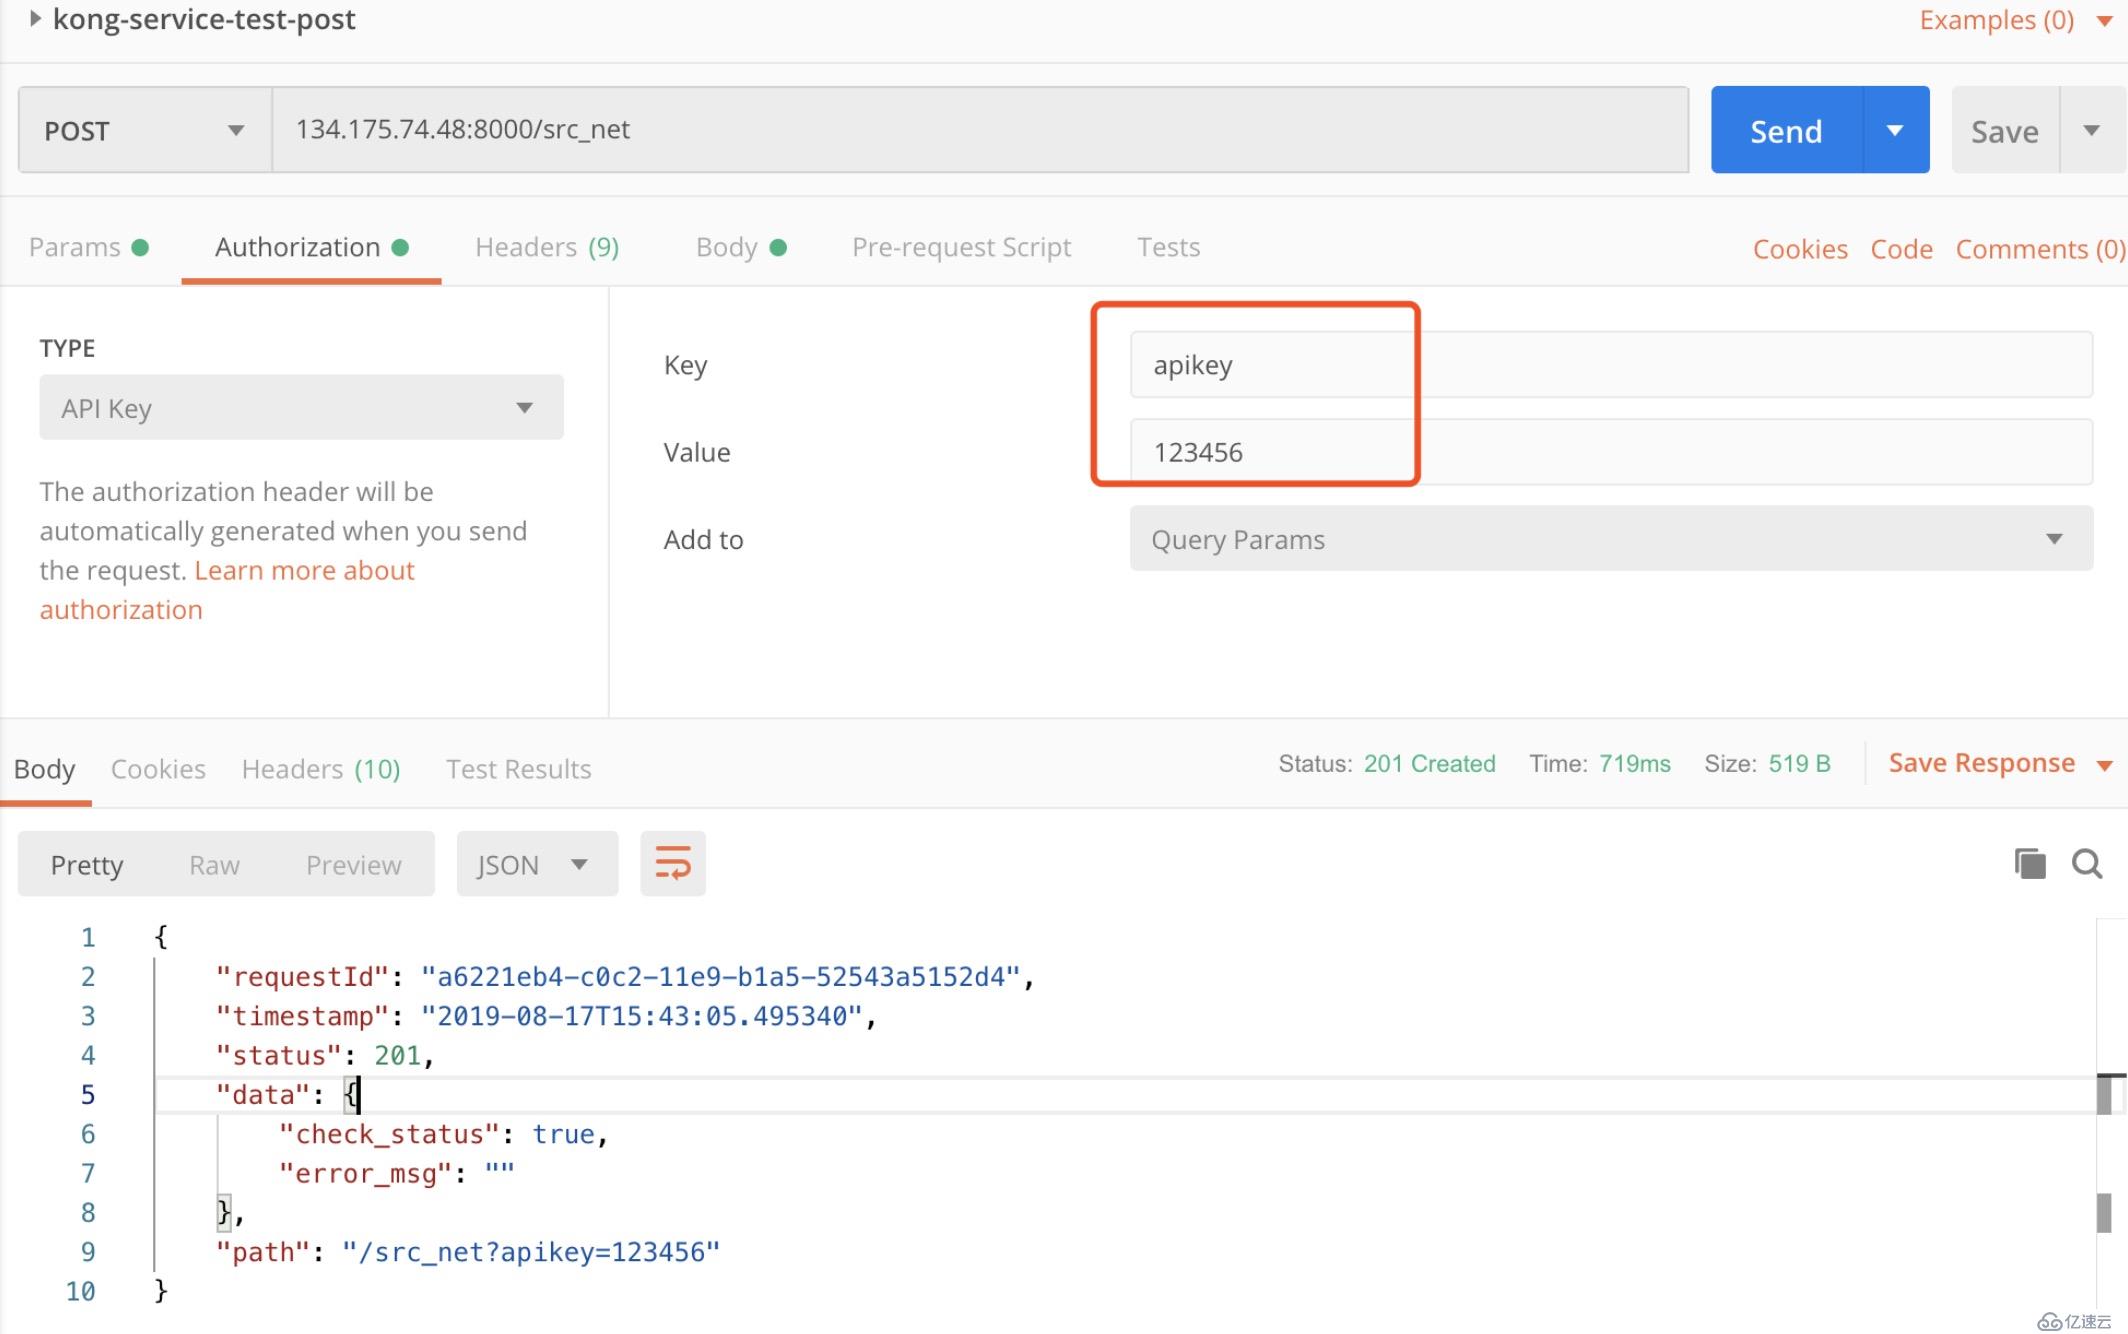
https://docs.konghq.com/hub/)

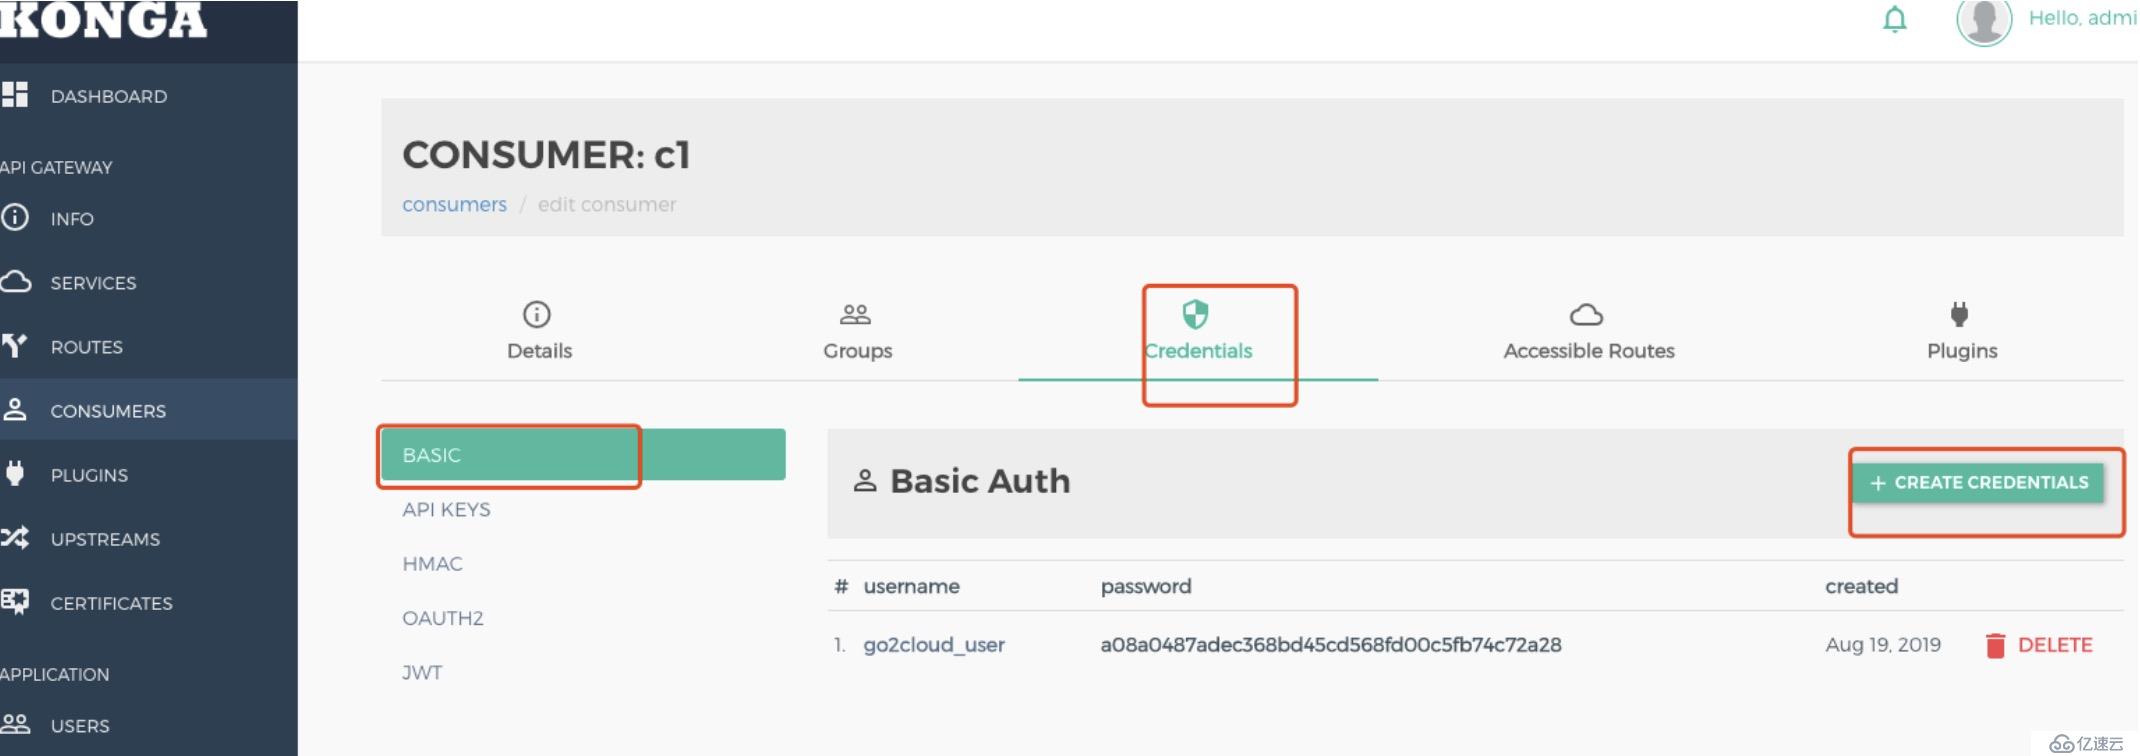
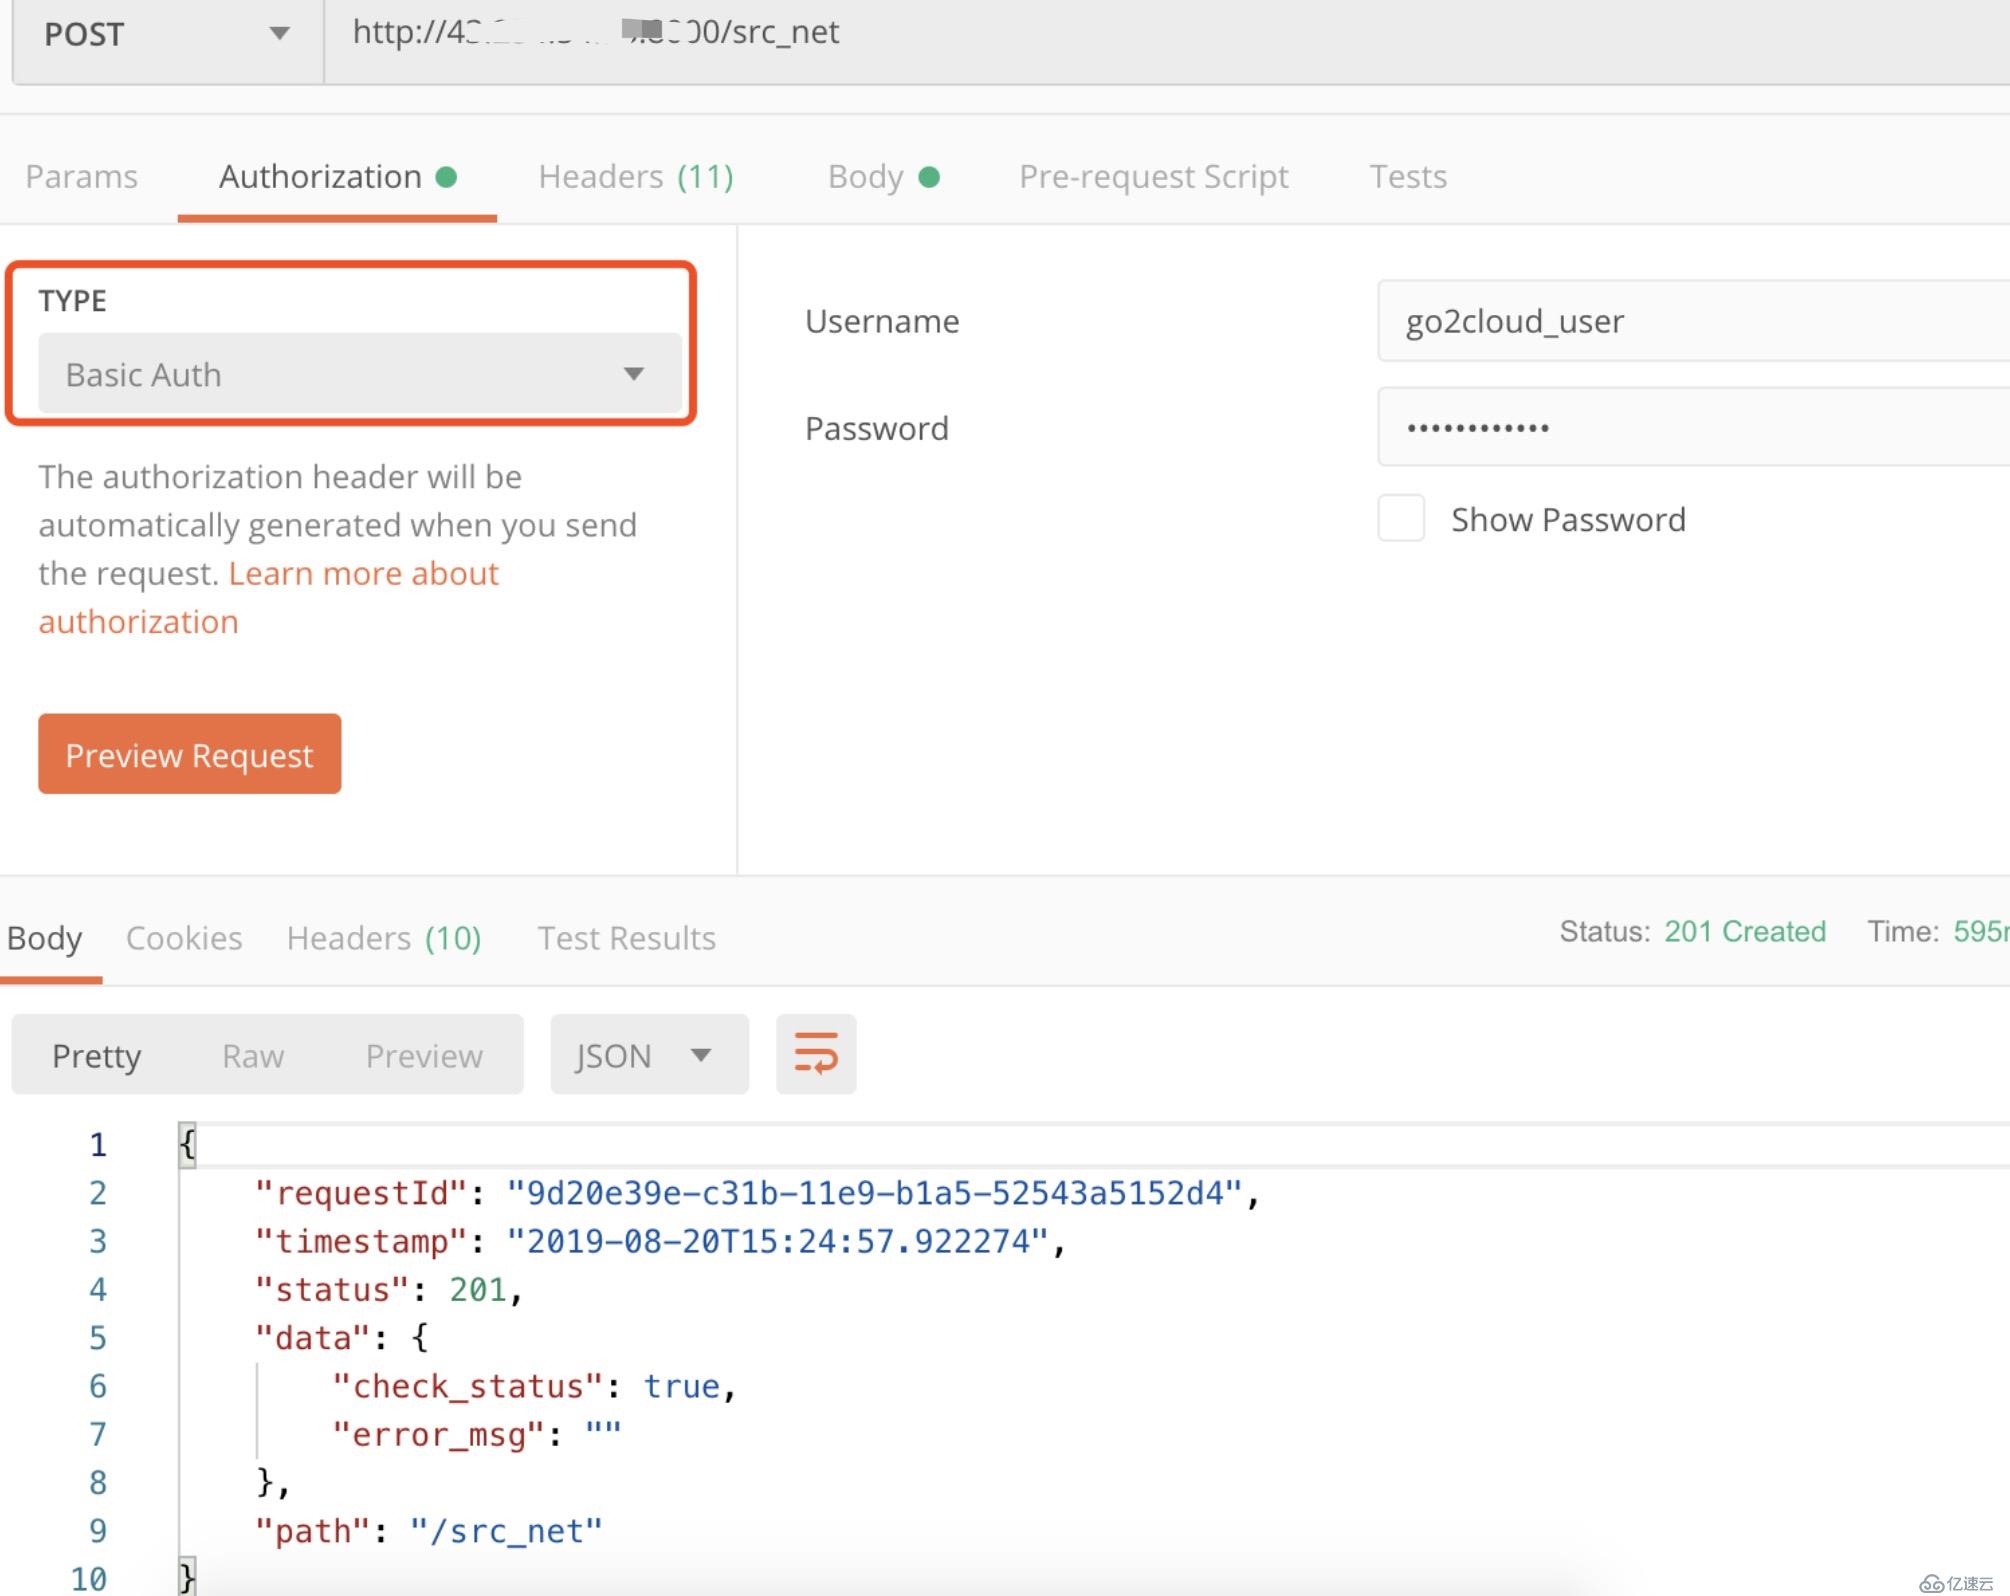
顾名思义,用来设置接口IP的黑白名单
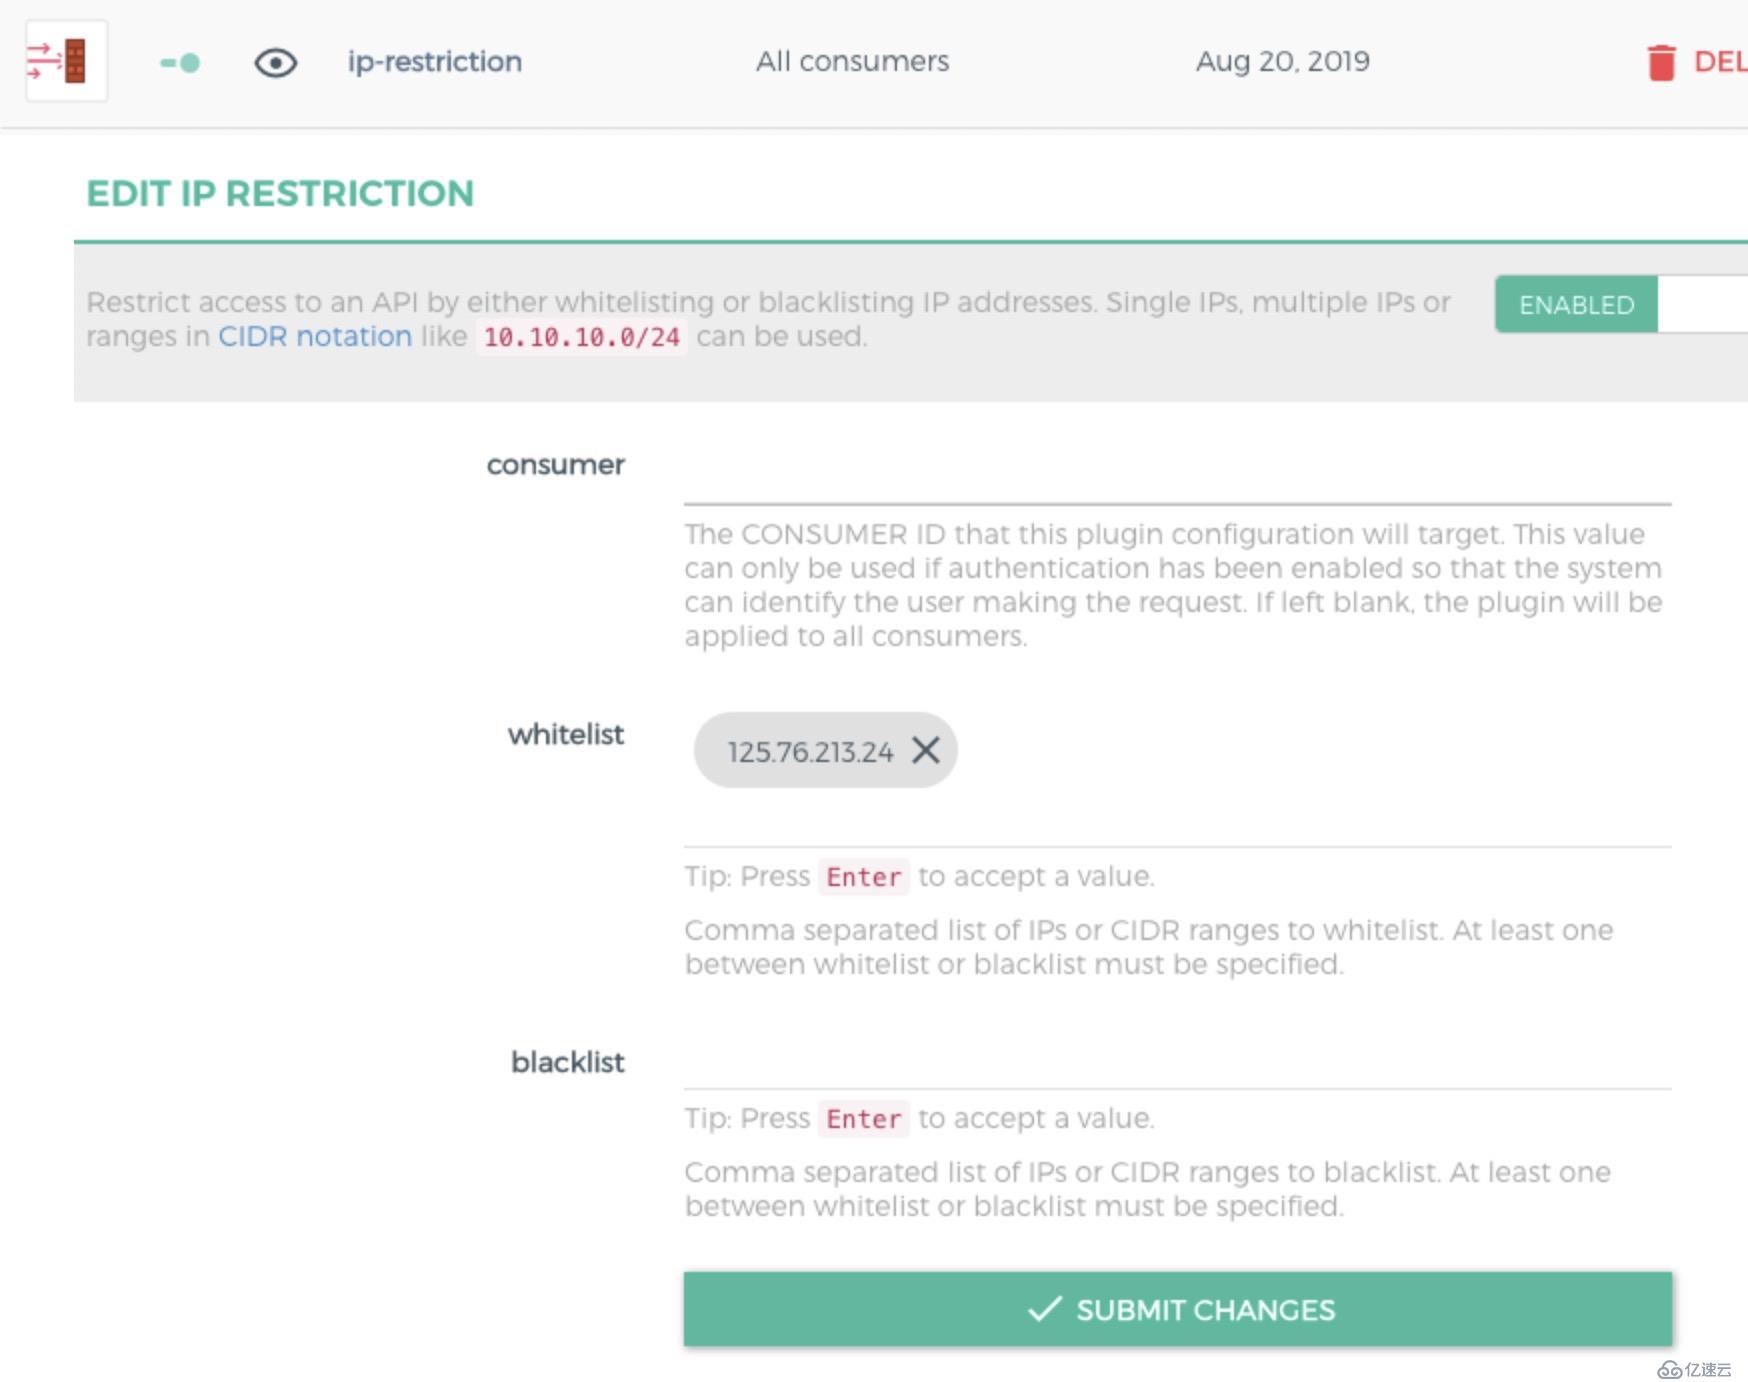
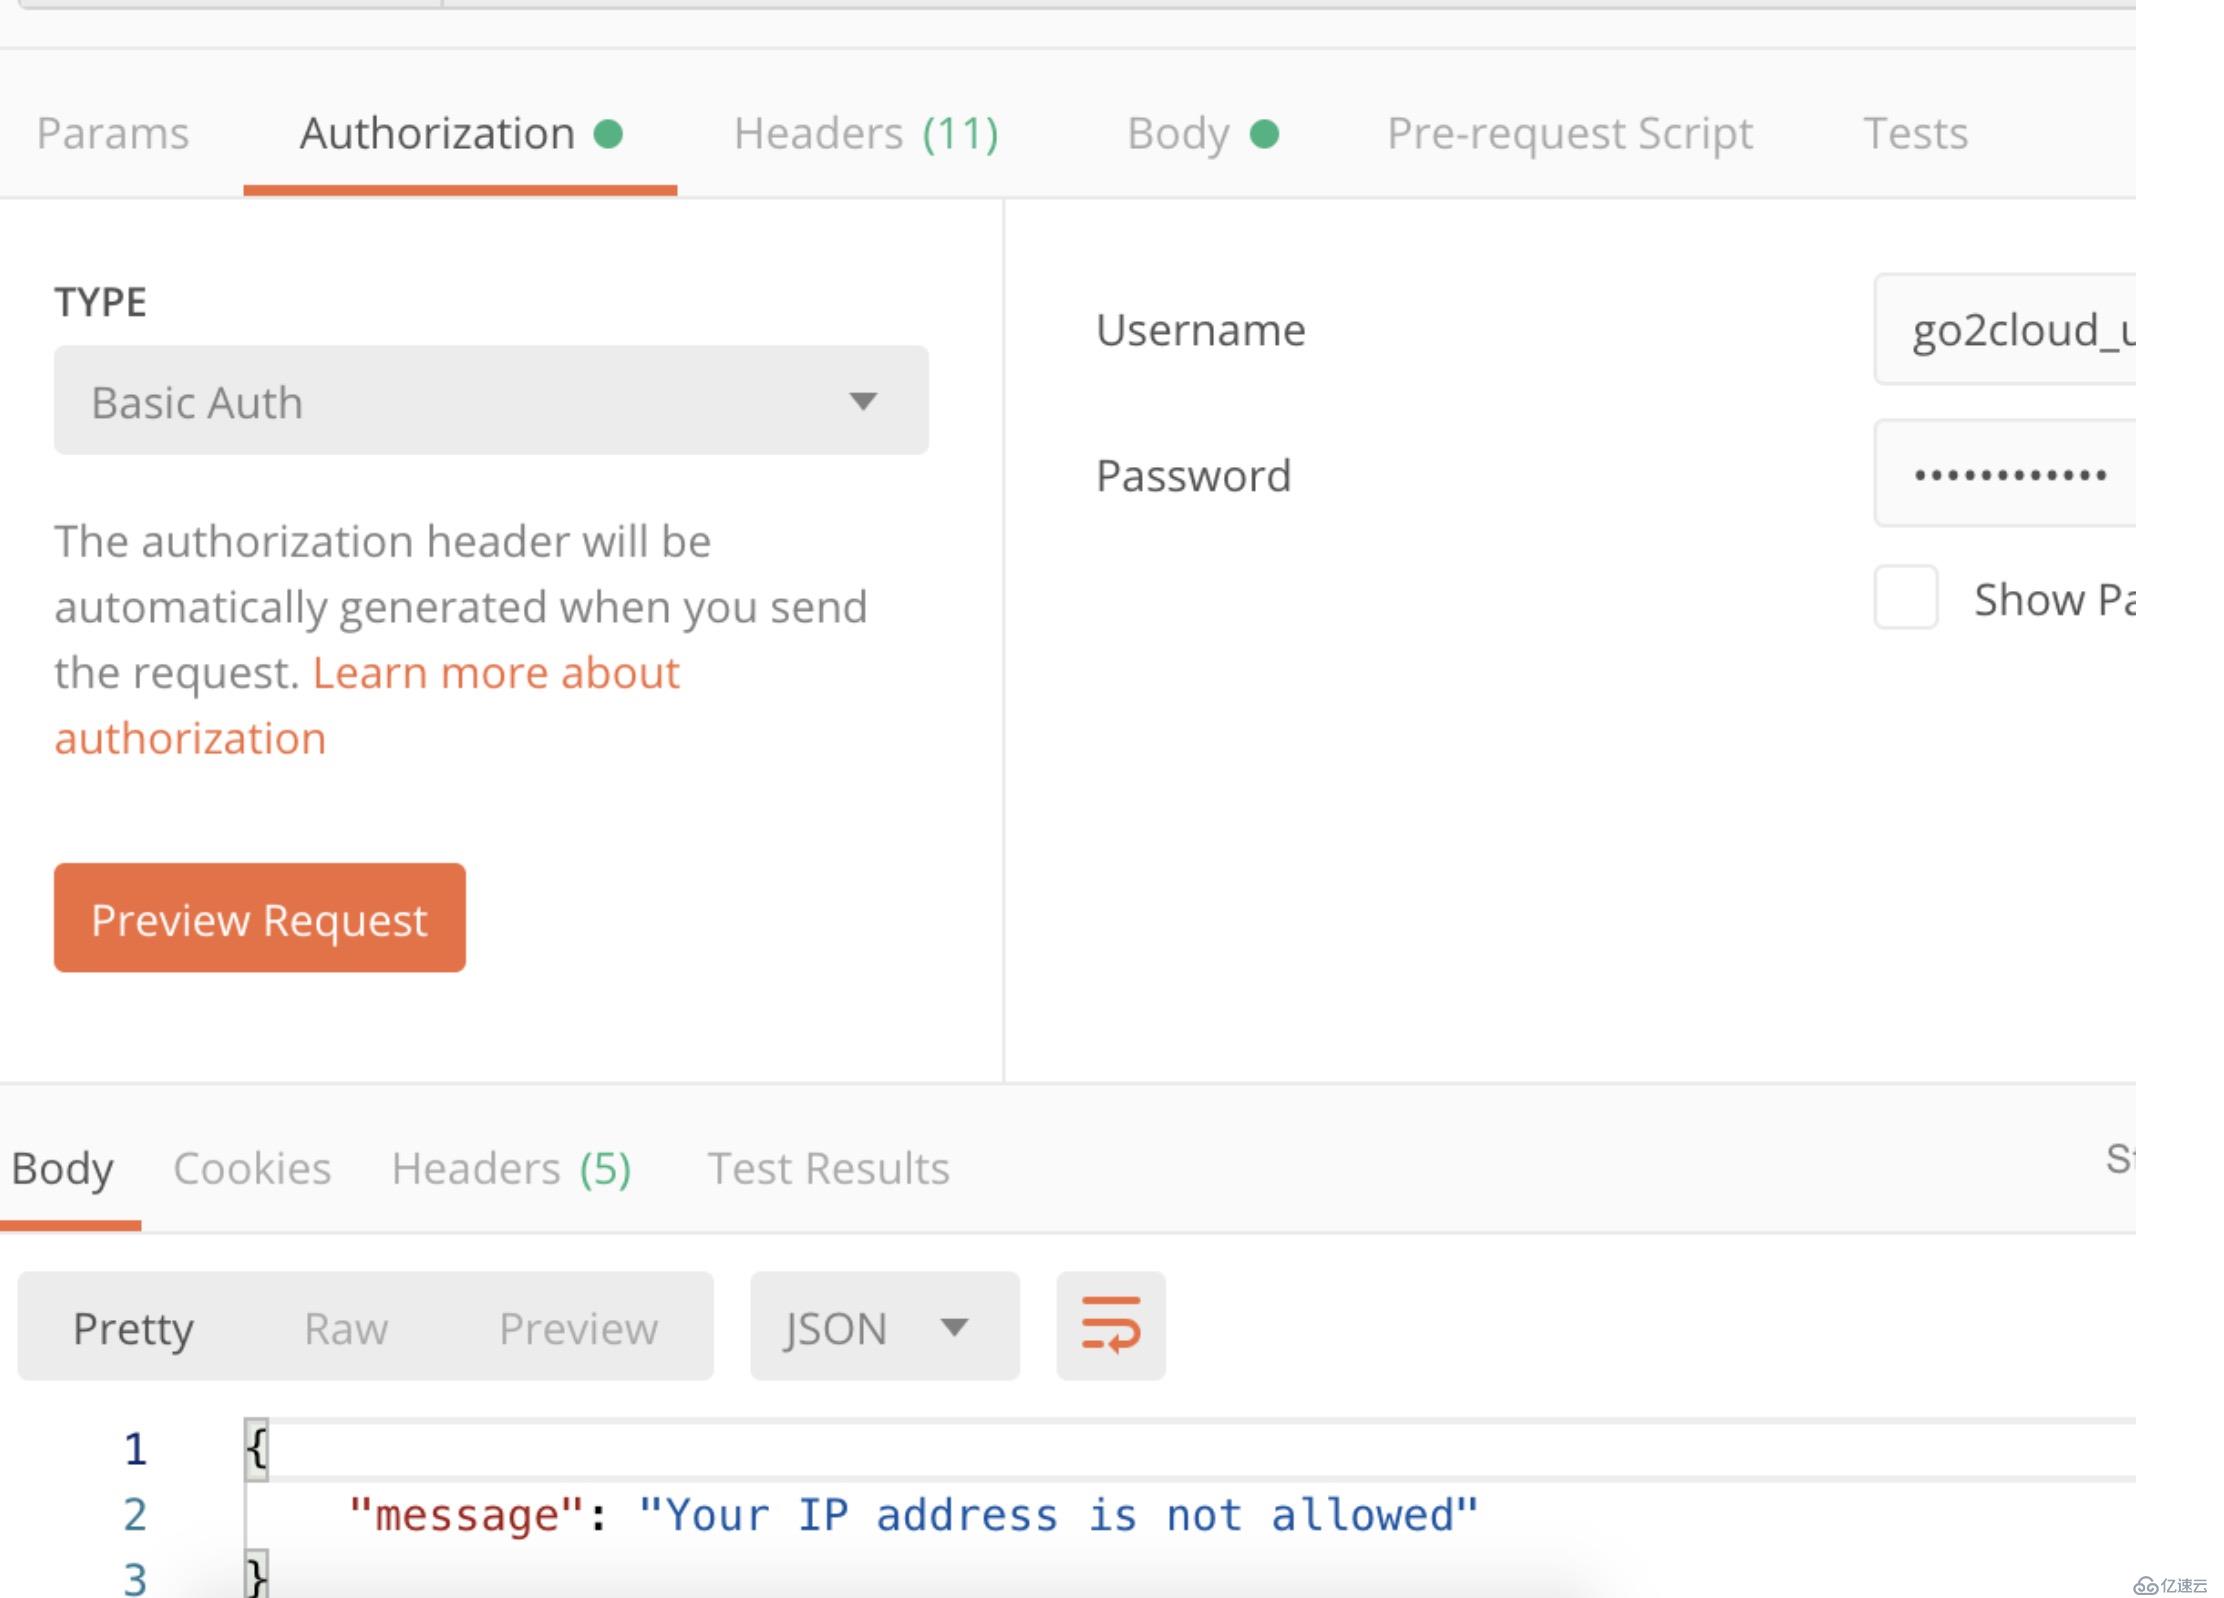
将调用方的IP地址加入到白名单中,可以正常访问。
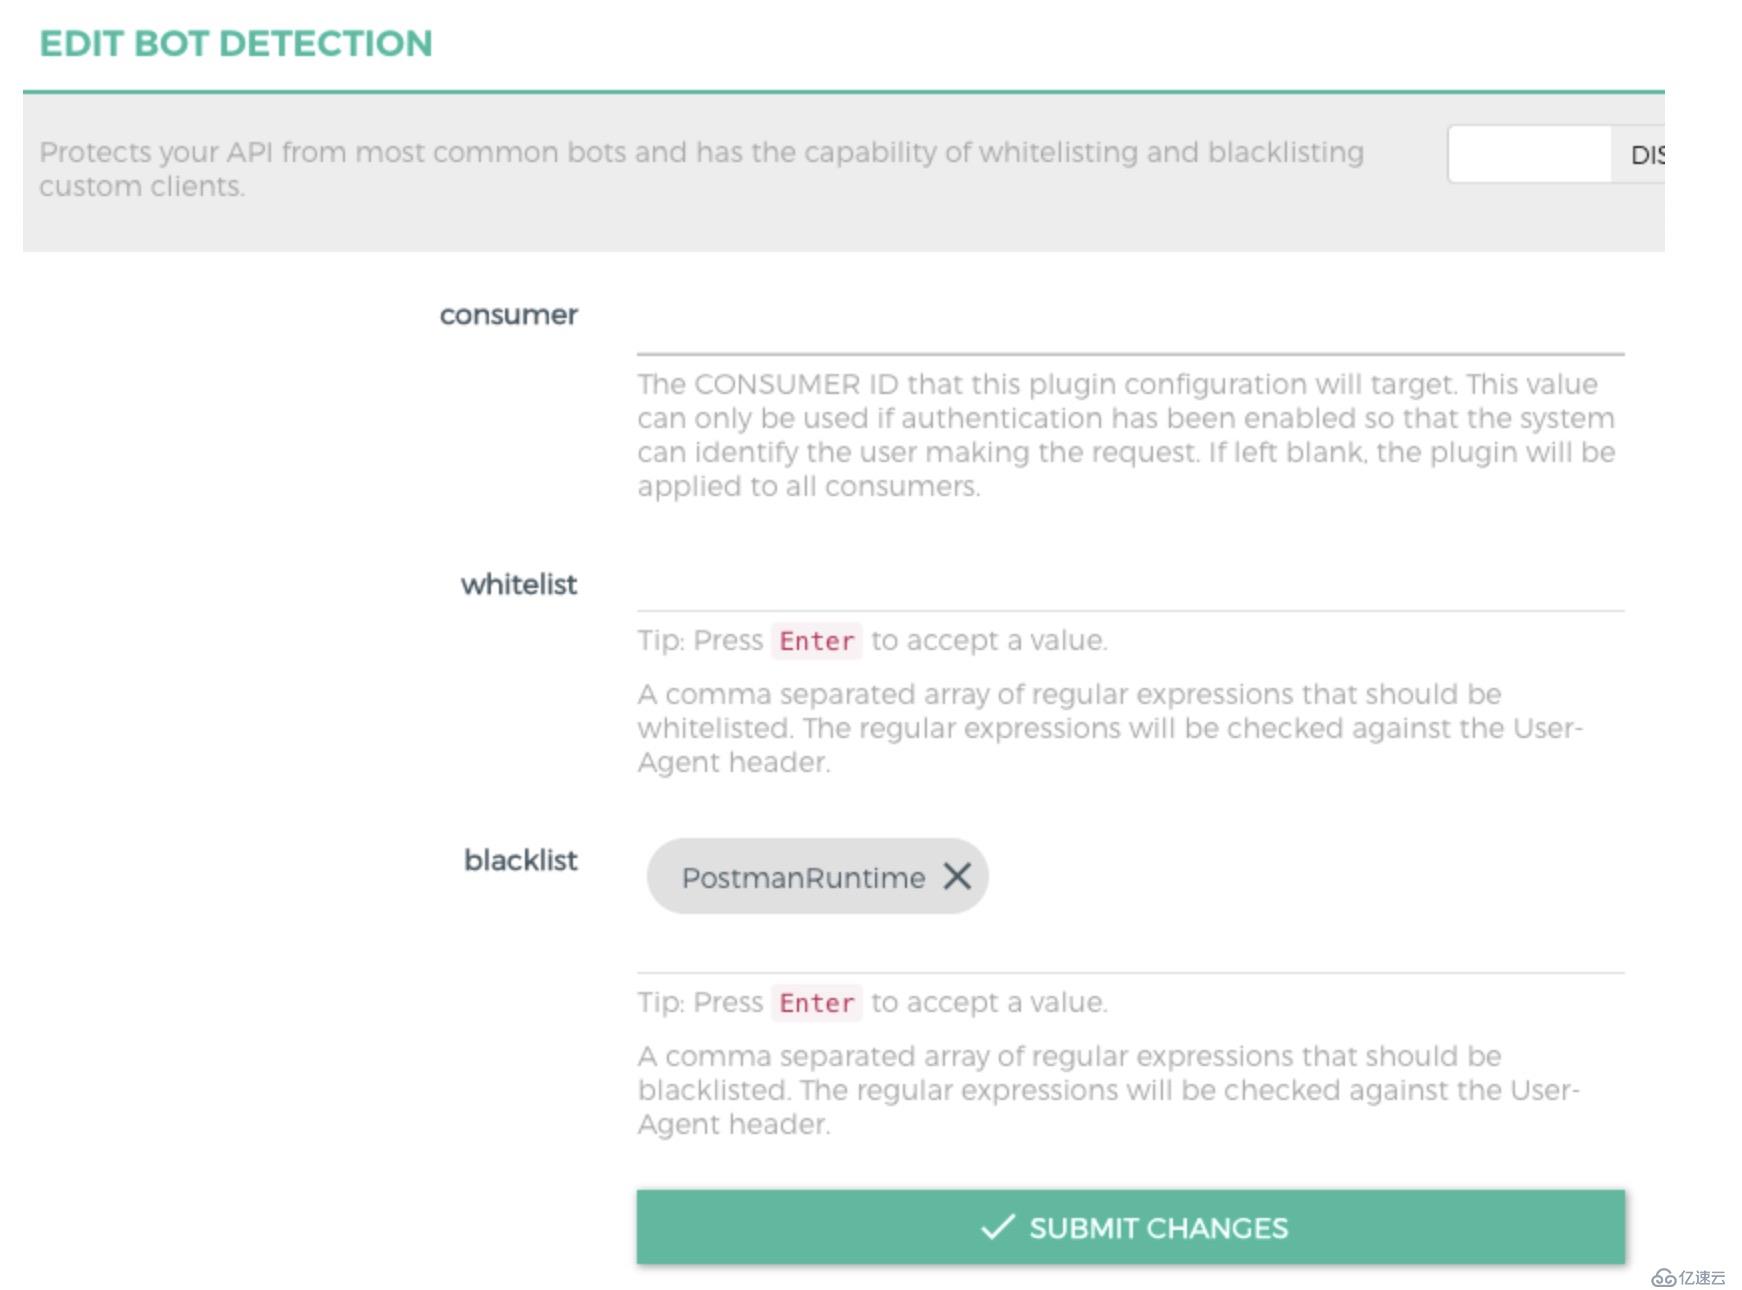
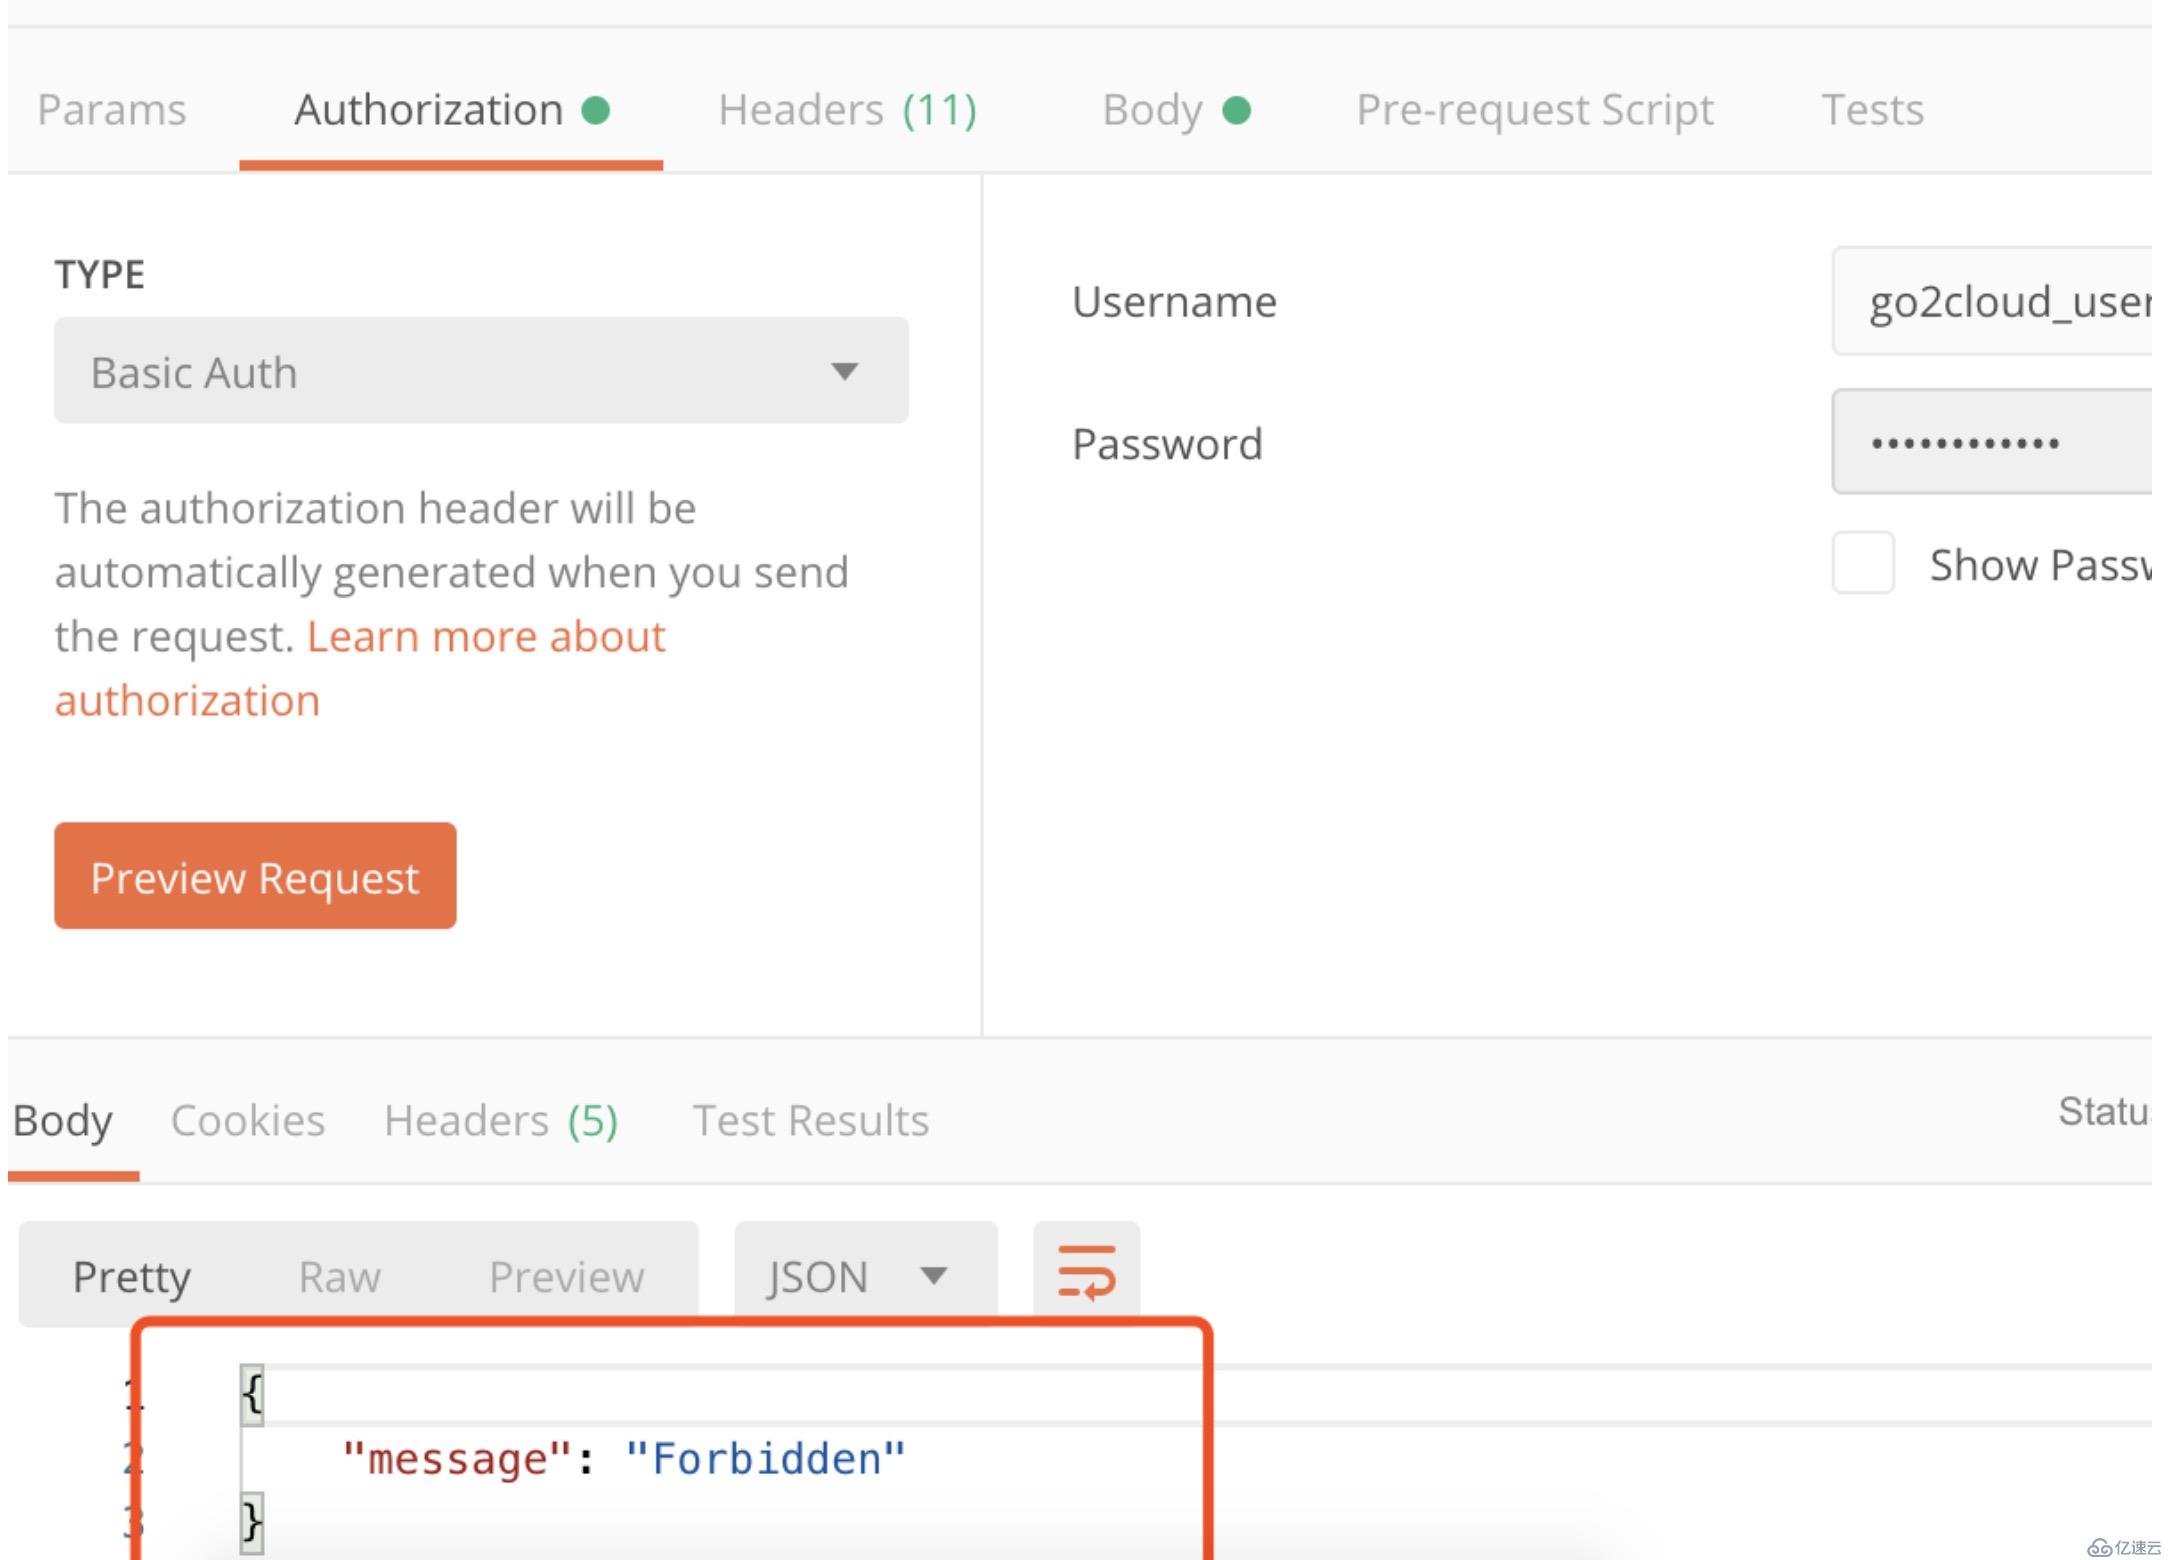
定义每秒/分钟/小时/天/月/年可以发送的请求数量
限制可以根据服务或路由/ip地址/证书
策略可以利用本地,集群或redis
例如配置限制每天只能调用10次
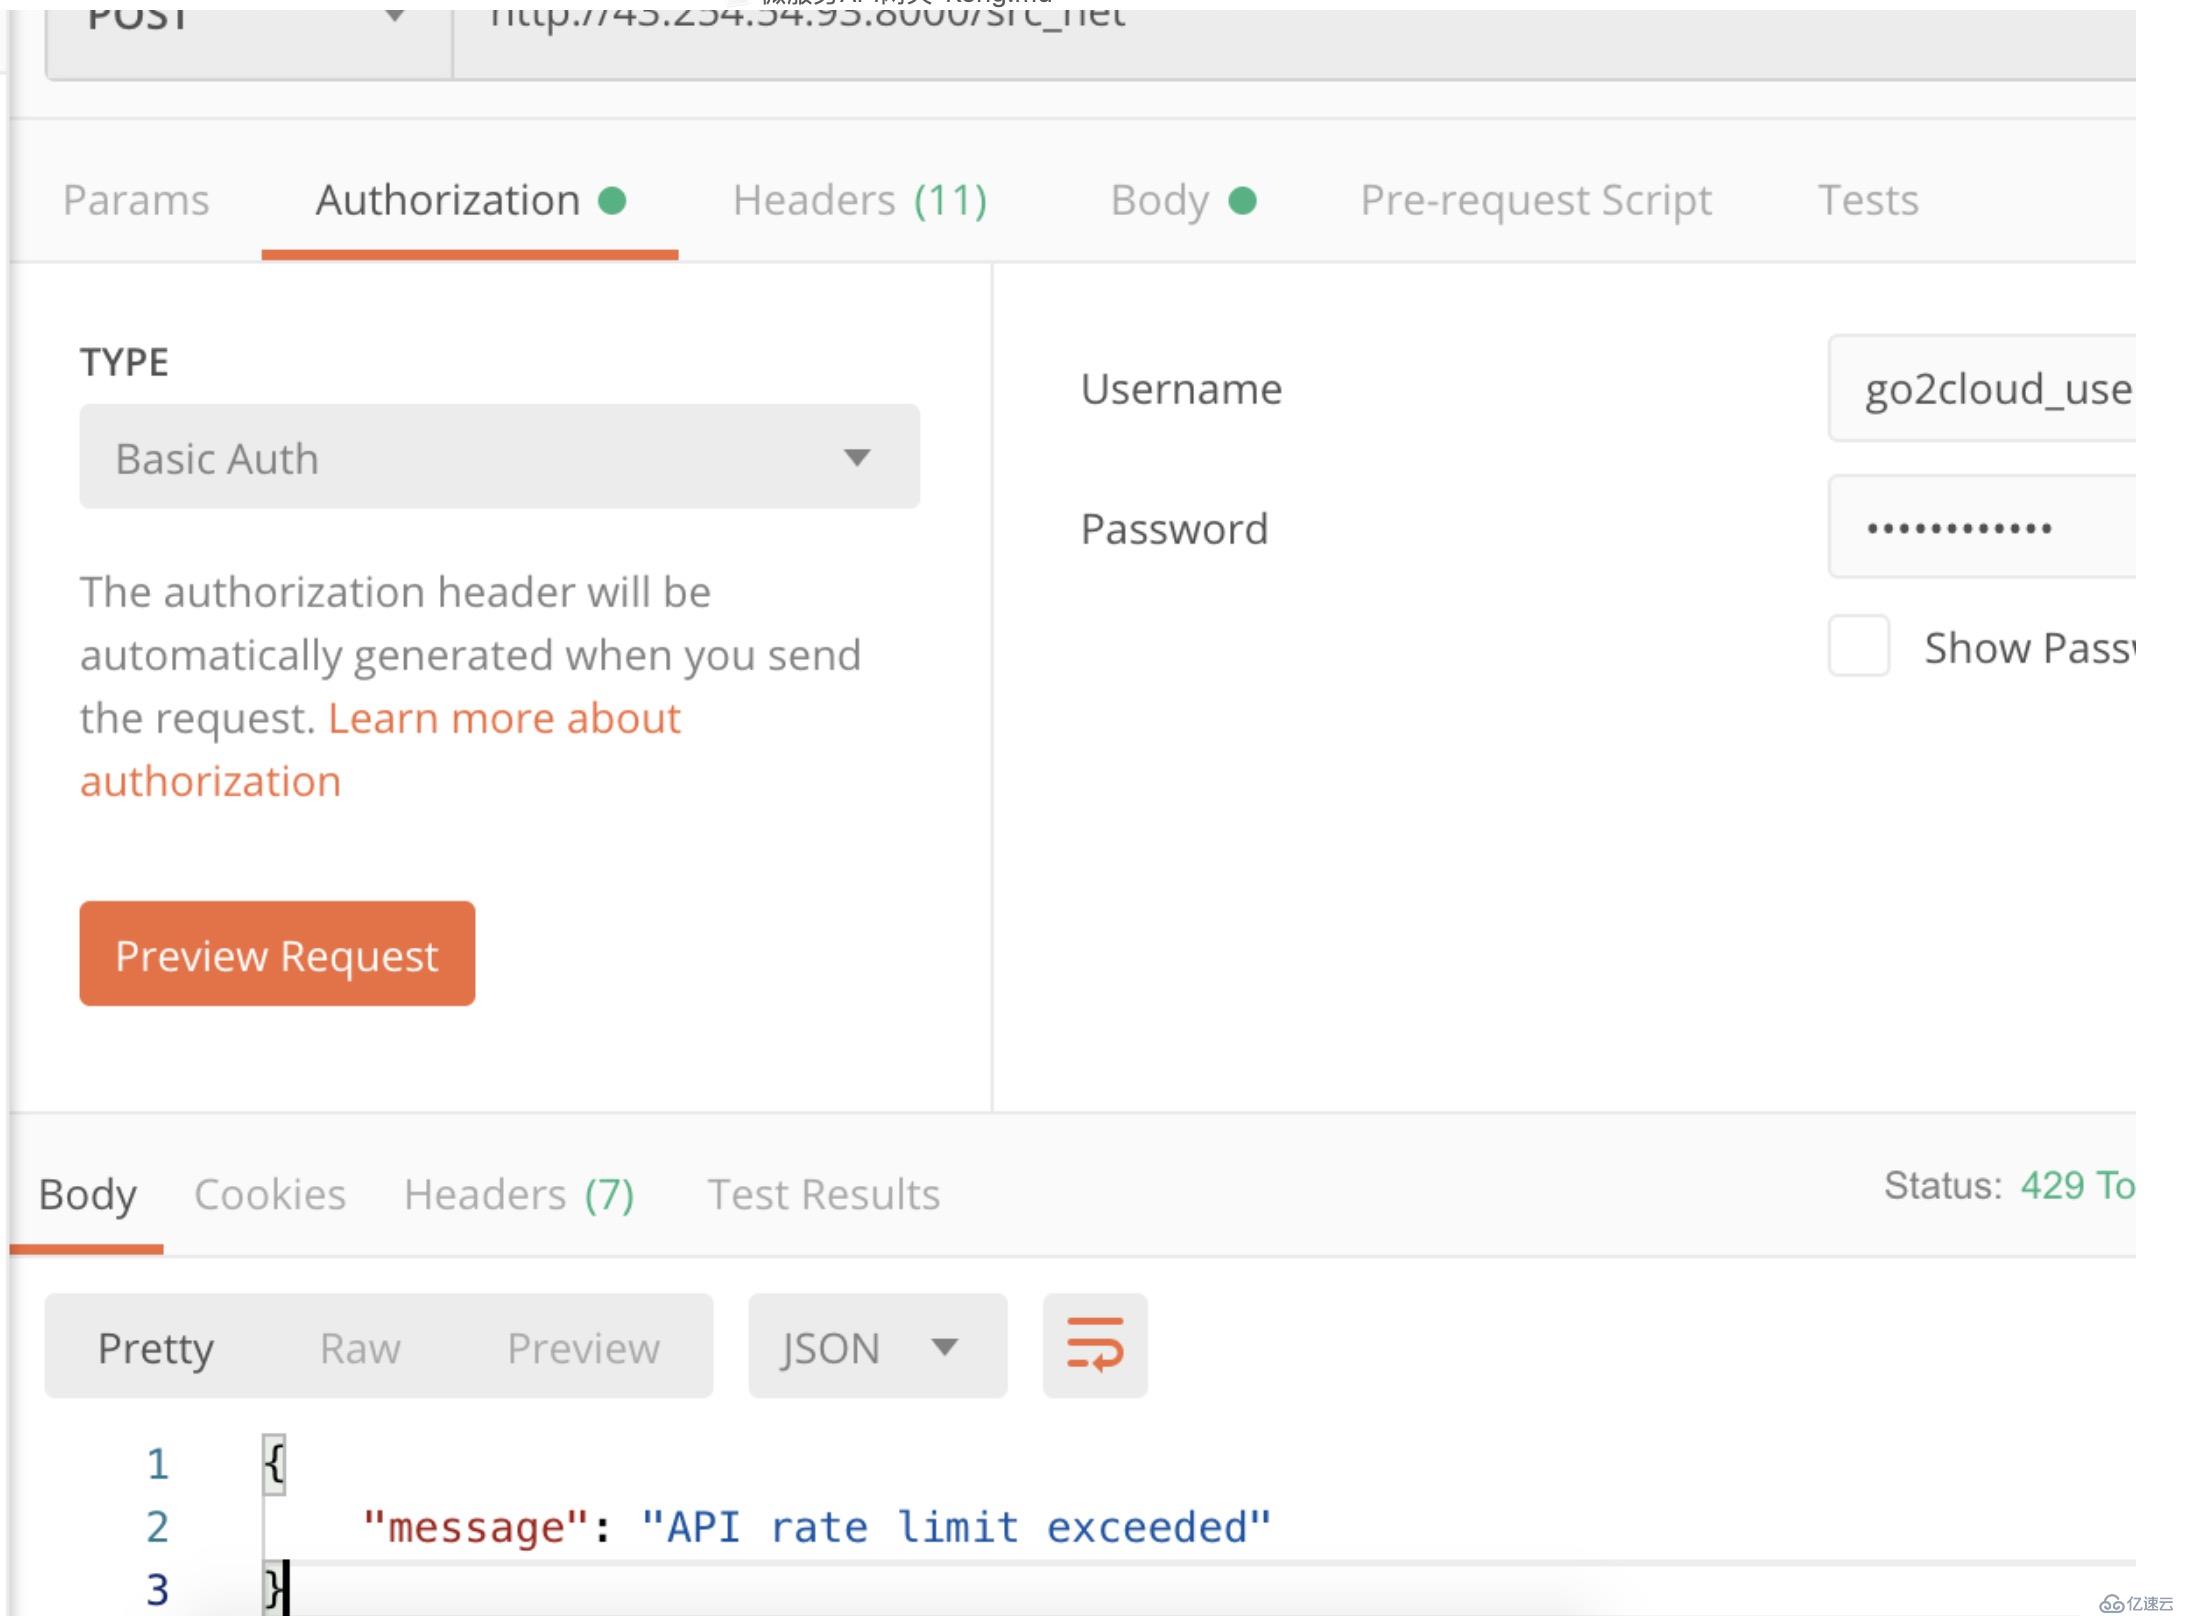
request-size-limiting 请求payload size限制
request-termination 这允许(暂时)阻止API或消费者

此处只简单列举几个插件,更详细的插件请查看,
测试在k8s中目前还没有将konga做成helm部署,后期可以自己将起做成charts方便在k8s中图形化管理。
免责声明:本站发布的内容(图片、视频和文字)以原创、转载和分享为主,文章观点不代表本网站立场,如果涉及侵权请联系站长邮箱:is@yisu.com进行举报,并提供相关证据,一经查实,将立刻删除涉嫌侵权内容。