小编给大家分享一下如何使用vuejs2.0+vuex 2.0构建记事本应用,相信大部分人都还不怎么了解,因此分享这篇文章给大家参考一下,希望大家阅读完这篇文章后大有收获,下面让我们一起去了解一下吧!
开始吧
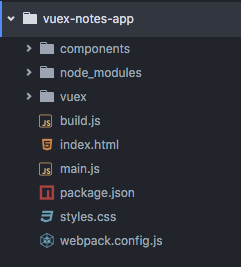
以下是 notes-vuex-app 的源文件目录:

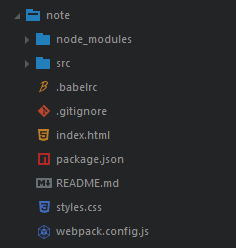
在使用 vue 2 重写这个 app 之前,我在想能不能不改变文件目录结构以及配置位置呢?就是用比较生硬的方式重写,或者说单纯的语法修改。事实是可行的,否则我就不会写这篇文章了。然而面对的问题非常多,但却因此深入的理解了 vue 以及 vuex。最大的问题是 webpack 的构建,如果使用 webpack 2.0+的话,坑比较多。本人是菜鸟,所以最终选择了 vue-cli 提供的两个 webpack 的模板,分别是 webpack-simple 和 webpack,我先使用 webpack-simple,它和原 app 的结构基本吻合。目录如下:

使用 vue-cli 生成基本目录之后,再安装 vuex2 。
main.js 的小改动
原示例 main.js 如下所示,但运行出错了,主要是 Vue 2 的根实例渲染稍有变化
import Vue from 'vue'
import store from './vuex/store'
import App from './components/App.vue'

new Vue({
 store, // 注入到所有子组件
 el: 'body',
 components: { App }
})改正之后:
import Vue from 'vue'
import store from './vuex/store'
import App from './components/App.vue'

new Vue({
  store, // inject store to all children
  el: '#app',
  template: '<App/>',
  components: { App }
})或者
import Vue from 'vue'
import store from './vuex/store'
import App from './components/App.vue'

new Vue({
  store, // inject store to all children
  el: '#app',
  render: h => h(App)
})vuex 2 的变化
这个应用改写的主要问题集中在 vuex 2 的变化上,这些变化确实会让人感到凌乱,我无数次抓耳挠腮的骂娘。不过通过官方给出的示例也可以看出一些端倪。
首先是 action.js,只需注意一点,所有的 dispatch 都要改成 commit。
export const addNote = ({ commit }) => {
 commit('ADD_NOTE')
}

export const editNote = ({ commit }, e) => {
 commit('EDIT_NOTE', e.target.value)
}

export const deleteNote = ({ commit }) => {
 commit('DELETE_NOTE')
}

export const updateActiveNote = ({ commit }, note) => {
 commit('SET_ACTIVE_NOTE', note)
}

export const toggleFavorite = ({ commit }) => {
 commit('TOGGLE_FAVORITE')
}store.js 变化也不大,但是要注意几个地方:
import Vue from 'vue'
import Vuex from 'vuex'
import * as actions from './actions'

Vue.use(Vuex)

const state = {
 notes: [],
 activeNote: {}
}

const mutations = {
 ADD_NOTE (state) {
  const newNote = {
   text: 'New note',
   favorite: false
  }
  state.notes.push(newNote)
  state.activeNote = newNote
 },

 EDIT_NOTE (state, text) {
  state.activeNote.text = text
 },

 DELETE_NOTE (state) {
  state.notes.splice(state.notes.indexOf(state.activeNote),1)
  state.activeNote = state.notes[0] || {}
 },

 TOGGLE_FAVORITE (state) {
  state.activeNote.favorite = !state.activeNote.favorite
 },

 SET_ACTIVE_NOTE (state, note) {
  state.activeNote = note
 }
}

const getters = {
 notes: state => state.notes,
 activeNote: state => state.activeNote,
 activeNoteText: state => state.activeNote.text
}

export default new Vuex.Store({
 state,
 mutations,
 actions,
 getters
})原示例文件中没有将 getters 写到 store.js 中,而是直接在组件中定义的。为了更清晰,我仿照官方示例也提取出来写在了 store.js 中,这样在组件中调用时比较方便。其次也引入了 action.js,并作为 actions 对象传递给 Vuex.store(),这算是 vuex 的标准写法吧,对于后面在组件中调用比较有利。
其中要注意 DELETE_NOTE (state){} 这个方法,原示例使用了 vue1 提供的 remove 方法,但是 vue2 中去掉了这个方法。仔细想想就会明白,这个函数的作用就是删除 notes 数组中的元素。可以使用原生的 splice 方法。如果 JS 基础扎实的话,这里应该很好理解,没有什么大问题。其次相比原示例,添加一个删除后操作的判断。
我之前一直不太理解 flux 的概念,感觉像是新东西,完全不知道它的目的及作用。换成 Vuex,还是有点稀里糊涂。但是通过修改这个示例,基本算是开窍了。这些东西本身并没有玄机奥妙,想一想,如果我们不用框架,而是自己手写一个 todoMVC 时要怎么做?应该也是这样的思路,定义一个 notes 数组变量以及 activeNote 的变量。然后在创建一些改变状态的方法。我在面试中遇到过一个情况,面试官反复问我为什么需要使用框架,用 jQuery 不是也可以实现吗?这样说确实没错,用比较原始的方法当然可以做,只是代码结构会冗余或者凌乱,缺少小而美的特点。框架以及设计模式对代码做了整合封装,对于一个 CURD 应用比较友好,实现起来更方便更简单。我对于 Vuex 的理解就是,它是一个对象,封装了与状态相关的方法和属性。而所谓的状态就是点击、按键等操作之后的变化。
组件中使用 vuex
先看一下 Toolbar.vue 这个组件。修改后的代码如下:
<template>
 <div id="toolbar">
  <i @click="addNote" class="glyphicon glyphicon-plus"></i>
  <i @click="toggleFavorite"
   class="glyphicon glyphicon-star"
   :class="{starred: activeNote.favorite}"></i>
  <i @click="deleteNote" class="glyphicon glyphicon-remove"></i>
 </div>
</template>

<script>

import { mapGetters, mapActions } from 'vuex'

export default {
 computed: mapGetters([
  'activeNote'
 ]),
 methods: {
  ...mapActions([
   'addNote',
   'deleteNote',
   'toggleFavorite'
  ])
 }
}
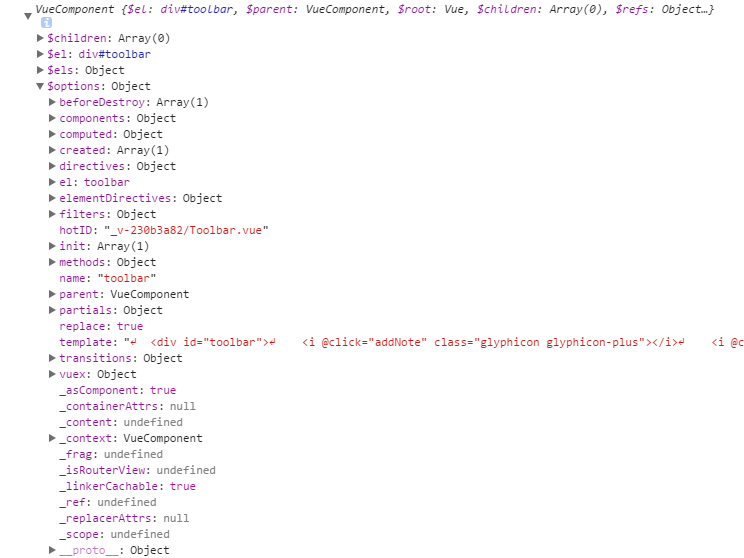
</script>通过和原示例代码对比,这里的区别一目了然。我通过在控制台打印 Vue 实例,折腾很长时间才大体明白怎么回事。vuex 1 在组件中使用时会直接将 getters 以及 actions 挂到 vuex 这个属性上,没有提供 mapGetters 及 mapActions 等一些方法。而 vuex2 使用 mapGetters 及 mapActions 等一些方法将 actions 的方法挂到 Vue 实例上。总的来说,都是把 actions 的方法挂到 Vue 实例上。我们从这个层面上谈谈 Vue 实例,Vue 2 的变化就是其属性的变化。比如 Vue1 中在 methods 中添加的方法可以在 vue 实例的 $options 属性中查看,而 vue2 中这些方法可以直接在第一级属性中查找或者在 $options 属性下的原型方法中 __proto__ 寻找。在 vue1 中可以查看 vuex 这个属性,但是 vue2 中移除了。至于其它的不同,大家可以自己对比,通过这种方式,可以深入理解 vue 的设计思想。
下图是 Vue1 实例截图:

ES5 实现扩展运算符
假设其它组件都以这种方式改好了,就在我们满心欢喜地运行示例时,又报错了。问题出在扩展运算符 ... 上,webpack-simple 这个模板无法解析 ES6 的 ...。为此,我又折腾了很久,想试着修改 webpack 的配置文件,但改动太大。我妥协了,决定抛弃扩展运算符,手写这个方法。当然如果使用 webpack 的模板就没有问题,这个比较简单,我们最后再说。
手写扩展运算符 ... 之前,我们先看一下 mapActions 这个方法。对于 mapGetters 以及 mapActions 这两个函数,最简单的理解办法就是查看 vuex 的源码,最终返回的是一个对象。也就是根据需要获取 store.js 中 actions 对象的某些方法。然后通过扩展运算符把返回的对象拆开然后挂到 Vue 实例上。举例来说(以下只是扩展运算符的用法之一,别的用法可以参考其它的文章):
var obj = {
  a: 1,
  b: 2,
}

var methods = {
  ...obj
}

// console.log(methods)
{
  a: 1,
  b: 2
}明白扩展运算符的用法之后就好办了。为了简单一点,我直接使用 babel 官网的在线解析器,查看扩展运算符的 ES5 写法。
// ES5 实现扩展运算符...
var _extends = Object.assign || function(target) {
  for (var i = 1; i < arguments.length; i++) {
    var source = arguments[i];
    for (var key in source) {
      if (Object.prototype.hasOwnProperty.call(source, key)) {
        target[key] = source[key];
      }
    }
  }
  return target;
};完整的 Toolbar.vue 组件代码如下:
<template>
 <div id="toolbar">
  <i @click="addNote" class="glyphicon glyphicon-plus"></i>
  <i @click="toggleFavorite"
   class="glyphicon glyphicon-star"
   :class="{starred: activeNote.favorite}"></i>
  <i @click="deleteNote" class="glyphicon glyphicon-remove"></i>
  <i @click="_test" class="glyphicon glyphicon-remove"></i>
 </div>
</template>

<script>

import { mapGetters, mapActions } from 'vuex'

// ES5 实现扩展运算符...
var _extends = Object.assign || function(target) {
  for (var i = 1; i < arguments.length; i++) {
    var source = arguments[i];
    for (var key in source) {
      if (Object.prototype.hasOwnProperty.call(source, key)) {
        target[key] = source[key];
      }
    }
  }
  return target;
};

var actions = mapActions([
 'addNote',
 'deleteNote',
 'toggleFavorite'
]);

var methodsObj = _extends({},actions)

export default {
 computed: mapGetters([
  'activeNote'
 ]),
 methods:methodsObj
}
</script>其余两个子组件类似,相信大家已经明白了我的思路,具体代码如下:
NotesList.vue
<template>
 <div id="notes-list">

  <div id="list-header">
   <h3>Notes | coligo</h3>
   <div class="btn-group btn-group-justified" role="group">
    <!-- All Notes button -->
    <div class="btn-group" role="group">
     <button type="button" class="btn btn-default"
      @click="show = 'all'"
      :class="{active: show === 'all'}">
      All Notes
     </button>
    </div>
    <!-- Favorites Button -->
    <div class="btn-group" role="group">
     <button type="button" class="btn btn-default"
      @click="show = 'favorites'"
      :class="{active: show === 'favorites'}">
      Favorites
     </button>
    </div>
   </div>
  </div>
  <!-- render notes in a list -->
  <div class="container">
   <div class="list-group">
    <a v-for="note in filteredNotes"
     class="list-group-item" href="#" rel="external nofollow"
     :class="{active: activeNote === note}"
     @click="updateActiveNote(note)">
     <h5 class="list-group-item-heading">
      {{note.text.trim().substring(0, 30)}}
     </h5>
    </a>
   </div>
  </div>

 </div>
</template>

<script>

import { mapGetters, mapActions } from 'vuex'

// ES5 实现扩展运算符...
var _extends = Object.assign || function(target) {
  for (var i = 1; i < arguments.length; i++) {
    var source = arguments[i];
    for (var key in source) {
      if (Object.prototype.hasOwnProperty.call(source, key)) {
        target[key] = source[key];
      }
    }
  }
  return target;
};

var getters = mapGetters([
 'activeNote'
]);

var filters = {
 filteredNotes: function () {
  if (this.show === 'all'){
   return this.$store.state.notes
  } else if (this.show === 'favorites') {
   return this.$store.state.notes.filter(note => note.favorite)
  }
 }
}

var actions = mapActions(['updateActiveNote'])

var computedObj = _extends({},getters,filters);

var methodsObj = _extends({},actions);

export default {
 data () {
  return {
   show: 'all'
  }
 },
 computed:computedObj,
 methods:methodsObj
}
</script>Editor.vue
<template>
 <div id="note-editor">
  <textarea
   :value="activeNoteText"
   @input="editNote"
   class="form-control">
  </textarea>
 </div>
</template>

<script>

import { mapGetters, mapActions } from 'vuex'

export default {
 computed:mapGetters(['activeNoteText']),
 methods:mapActions(['editNote'])
}
</script>Webpack 模板
直接使用 vue-cli 的 webpack 模板就会简单很多,可以直接解析扩展运算符,代码也会比较简洁。
以上是“如何使用vuejs2.0+vuex 2.0构建记事本应用”这篇文章的所有内容,感谢各位的阅读!相信大家都有了一定的了解,希望分享的内容对大家有所帮助,如果还想学习更多知识,欢迎关注亿速云行业资讯频道!
亿速云「云服务器」,即开即用、新一代英特尔至强铂金CPU、三副本存储NVMe SSD云盘,价格低至29元/月。点击查看>>
免责声明:本站发布的内容(图片、视频和文字)以原创、转载和分享为主,文章观点不代表本网站立场,如果涉及侵权请联系站长邮箱:is@yisu.com进行举报,并提供相关证据,一经查实,将立刻删除涉嫌侵权内容。