这期内容当中小编将会给大家带来有关使用SpringSecurity怎么自定义一个表单登录功能,文章内容丰富且以专业的角度为大家分析和叙述,阅读完这篇文章希望大家可以有所收获。
1.创建SpringSecurity项目
1.1 使用IDEA
先通过IDEA 创建一个SpringBoot项目 并且依赖SpringSecurity,Web依赖

此时pom.xml会自动添加
<dependency>
    <groupId>org.springframework.boot</groupId>
    <artifactId>spring-boot-starter-security</artifactId>
</dependency>
2.扩展 WebSecurityConfigurerAdapter
WebSecurityConfigurerAdapter 是SpringSecurity 提供的用于我们扩展自己的配置
实现WebSecurityConfigurerAdapter经常需要重写的:
1、configure(AuthenticationManagerBuilder auth);
2、configure(WebSecurity web);
3、configure(HttpSecurity http);
2.1 默认 WebSecurityConfigurerAdapter 为我们提供了一些基础配置如下
protected void configure(HttpSecurity http) throws Exception {
  logger.debug("Using default configure(HttpSecurity). If subclassed this will potentially override subclass configure(HttpSecurity).");

  http
    .authorizeRequests()
      .anyRequest().authenticated()
      .and()
    .formLogin().and()
    .httpBasic();
}
2.2 创建自定义的 WebSecurityConfigurer
1.formLogin() 开启表单登录,该方法会应用 FormLoginConfigurer 到HttpSecurity上,后续会被转换为对应的Filter
2.loginPage() 配置自定义的表单页面
3.authorizeRequests().anyRequest().authenticated(); 表示任何请求接口都要认证**
@Configuration
@Slf4j
public class MyWebSecurityConfig extends WebSecurityConfigurerAdapter {


@Override
protected void configure(HttpSecurity http) throws Exception {

    http.csrf().disable()
      .formLogin()
      .loginPage("/mylogin.html")
      .and()
      .authorizeRequests().anyRequest().authenticated();

  }
}
2.3 mylogin.html
<!DOCTYPE html>
<html lang="en">
 <head>
   <meta charset="UTF-8">
   <title>Title</title>
 </head>
 <body>
  <h2>标准登录页面</h2>
  <h4>表单登录</h4>

 <form action="/login" method="post">
  <table>
  <tr>
    <td>用户名:</td>
    <td><input type="text" name="username"/></td>
  </tr>

  <tr>
    <td>密码:</td>
    <td><input type="password" name="password"/></td>
  </tr>

  <tr>
    <td colspan="2">
      <button type="submit">登录</button>
    </td>
  </tr>
  </table>
 </form>
</body>
</html>
3.访问自定义登录页面(注意有重定向过多问题)
启动项目 并且直接访问
http://localhost:8080
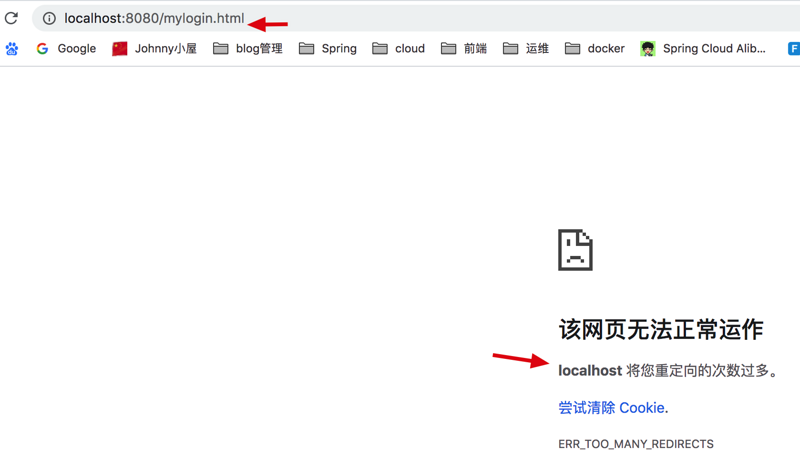
会发现浏览器报 重定向次数过多,这是什么原因呢?
这是因为 我们上面配置了 loginPage("/mylogin.html") ,但是这个路径它没有被允许访问,也就是当重定向到/mylogin.html路径后,还是会因为需要认证 被重定向道 /mylogin.html 导致该错误

4.允许登录页面路径访问 antMatchers("/mylogin.html").permitAll()
只需要在配置的地方 添加 .antMatchers("/mylogin.html").permitAll() 允许这个路径
  http.csrf().disable()
      .formLogin()
      .loginPage("/mylogin.html")
      .and()
      .authorizeRequests()
      .antMatchers("/mylogin.html").permitAll()
      .anyRequest().authenticated();
再次访问,我们自定义的表单就显示出来了(忽略样式。。。)

此时我们输入用户名 user 密码 : 控制台打印
Using generated security password: 6bf253eb-c785-42b6-b147-b0fe2971586e
发现又跳转到 /mylogin.html页面,这是因为 当我们配置了 loginPage("/mylogin.html")之后 处理表单登录的过滤器它所拦截的请求就不再是 /login (默认是 /login) ,拦截的登录请求地址变成了 和 loginPage一样的 mylogin.html
此时如果将 action地址改成 /mylogin.html ,那么再登录 就能成功
<form action="/mylogin.html" method="post">
5.配置自定义登录接口路径 loginProcessingUrl
由于我们上面配置了 loginPage ,则对应登录接口路径也变成了 loginPage所配置的 mylogin.html,但是当我们不想使用这个作为接口路径的时候,可以通过以下配置来修改
通过 loginProcessingUrl 类配置处理登录请求的路径
 http.csrf().disable()
      .formLogin()
      .loginPage("/mylogin.html")
      .loginProcessingUrl("/auth/login")
      .and()
      .authorizeRequests()
      .antMatchers("/mylogin.html").permitAll()
      .anyRequest().authenticated();
记得和action 对应
<form action="/auth/login" method="post">
上述就是小编为大家分享的使用SpringSecurity怎么自定义一个表单登录功能了,如果刚好有类似的疑惑,不妨参照上述分析进行理解。如果想知道更多相关知识,欢迎关注亿速云行业资讯频道。
免责声明:本站发布的内容(图片、视频和文字)以原创、转载和分享为主,文章观点不代表本网站立场,如果涉及侵权请联系站长邮箱:is@yisu.com进行举报,并提供相关证据,一经查实,将立刻删除涉嫌侵权内容。