这篇文章将为大家详细讲解有关怎么在springboot中绑定配置文件,文章内容质量较高,因此小编分享给大家做个参考,希望大家阅读完这篇文章后对相关知识有一定的了解。
先创建一个peron类,然后需要注解configurationProperties(prefix ="person")<br data-filtered="filtered">然后需要加一个@component<br data-filtered="filtered">因为只有在springboot的容器才能提供容器提供的@configurationProperties<br data-filtered="filtered">@Component
@ConfigurationProperties(prefix = "person")
public class Person {
  private String lastName;
  private Integer age;
  private boolean boss;
  private Date birth;
  private Map<String,Object> maps;
  private List<Object> lists;
  private Dog dog;
  public String getLastName() {
    return lastName;
  }
  public void setLastName(String lastName) {
    this.lastName = lastName;
  }
  public Integer getAge() {
    return age;
  }
  public void setAge(Integer age) {
    this.age = age;
  }
  public boolean isBoss() {
    return boss;
  }
  public void setBoss(boolean boss) {
    this.boss = boss;
  }
  public Date getBirth() {
    return birth;
  }
  public void setBirth(Date birth) {
    this.birth = birth;
  }
  public Map<String, Object> getMaps() {
    return maps;
  }
  public void setMaps(Map<String, Object> maps) {
    this.maps = maps;
  }
  public List<Object> getLists() {
    return lists;
  }
  public void setLists(List<Object> lists) {
    this.lists = lists;
  }
  public Dog getDog() {
    return dog;
  }
  public void setDog(Dog dog) {
    this.dog = dog;
  }
  @Override
  public String toString() {
    return "Person [lastName=" + lastName + ", age=" + age + ", boss=" + boss + ", birth=" + birth + ", maps="
        + maps + ", lists=" + lists + ", dog=" + dog + "]";
  }

}dog类
public class Dog {
  private String Name;
  private Integer age;
  public String getName() {
    return Name;
  }
  public void setName(String name) {
    Name = name;
  }
  public Integer getAge() {
    return age;
  }
  public void setAge(Integer age) {
    this.age = age;
  }
  @Override
  public String toString() {
    return "Dog [Name=" + Name + ", age=" + age + "]";
  }

}写完后,ide会提示需要在pom.xml中导入组件处理器。
<!-- 配置文件的处理器 ,配置文件进行绑定就会有提示-->
    <dependency>
      <groupId>org.springframework.boot</groupId>
      <artifactId>spring-boot-configuration-processor</artifactId>
      <optional>true</optional>
    </dependency>
</dependencies>然后创建配置文件,有两种方式,一个时yml文件,另一个时properties
1,application.yml
person:
 last-name: zhangsan
 age: 24
 boss: false
 birth: 2017/12/5
 maps: {k1: v1,k2: v2}
 lists: [lisi, zhangsan]
 dog:
 Name: xiaohei
age: 42.application.properties
中文字,在eclipse中自动转为unicode码
person.age=24
person.last-name=\u5F20\u4E09
person.birth=2000/1/1
person.boss=false
person.maps.k1=value1
person.maps.k2=12
person.dog.name=\u5C0F\u9ED1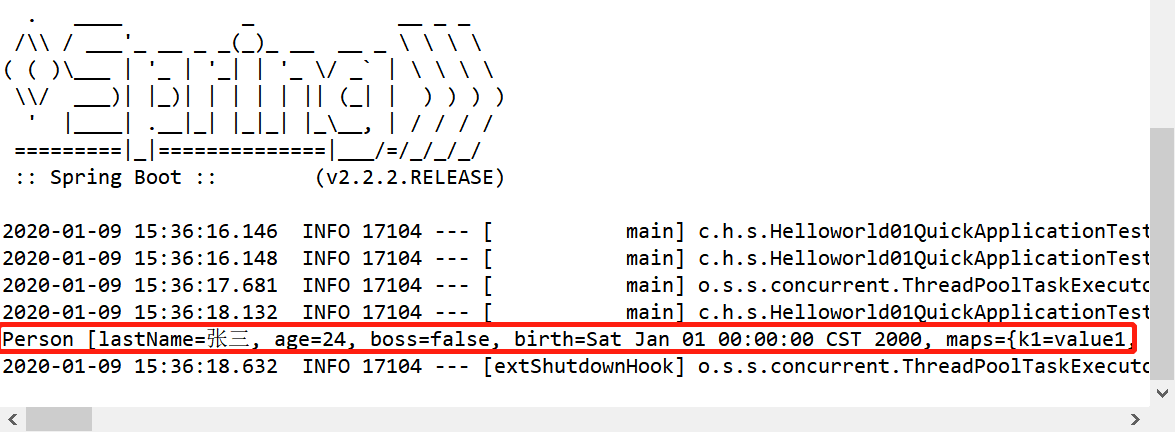
person.dog.age=2在test中使用spring boot的单元测试
@RunWith(SpringRunner.class)
@SpringBootTest
class Helloworld01QuickApplicationTests {
  @Autowired
  Person person;
  @Test
  void contextLoads() {
    System.out.println(person);
  }
}运行,会看到得到配置文件中的数据
在获取配置文件中注入值得时候,可以使用@value,也可以使用@configurationProperties;
如果只是在逻辑中获取一下配置文件中得值,那么就使用@value
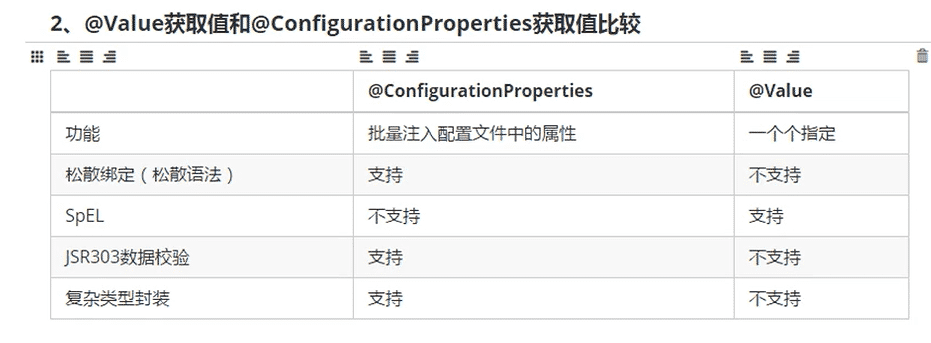
在配置文件注入值得时候也可以校验
在类加入注解@validate
配置文件注入数据校验
@validate
public class person{
@Email
private String last-name;
....
}@PropertySource("classpath:person.properties") :加载指定的配置文件
@ImportResource(“classpath:beans.xml”):导入spring配置文件,让配置文件生效;
springboot推荐给容器增加组件
1.配置类--》spring配置文件
2.使用@bean给容器中增加组件;
配置文件占位符
1.随机数
${random.value}、${random.int}、${random.long}
${random.int(10)}、${random.int[1024,65536]}2.配置文件中找不到属性时的默认值。
${app.name:金毛}来指定找不到属性时的默认值。
profile
1.多个profile文件
Profile是Spring对不同环境提供不同配置功能的支持,可以通过激活、指定参数等方式快速切换环境
一般我们在开发的时候有测试环境,开发环境等。
我们在编写多个配置文件的时候,文件名字是application-(profile).properties/yml(这二种格式的都行)。
默认使用application.properties.
2.yml支持多文档块方式
application.yml
#三个横线属于一个文档块
#激活哪个环境
spring:
 profiles:
  active: test

#测试环境
---
server:
 port: 8081
spring:
 profiles: test

#开发环境
---
server:
 port: 8082
spring: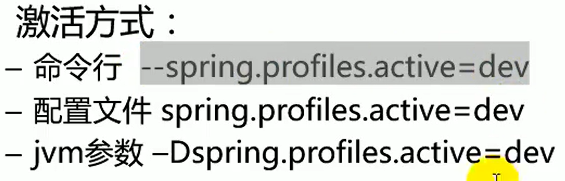
profiles: dev3.激活指定profile
在配置文件中指定spring.profiles.active =dev
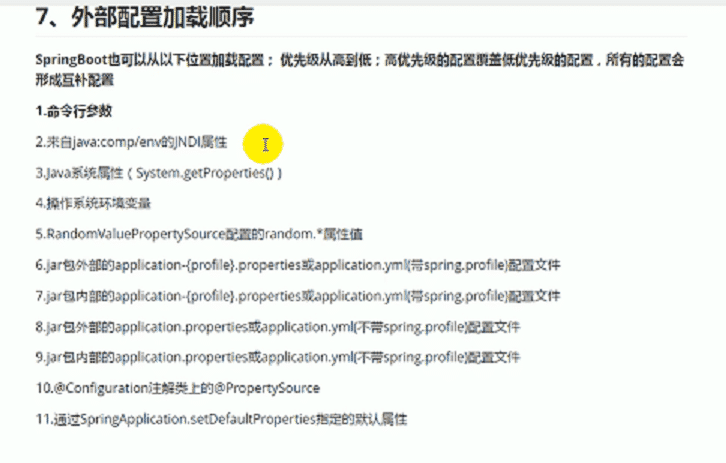
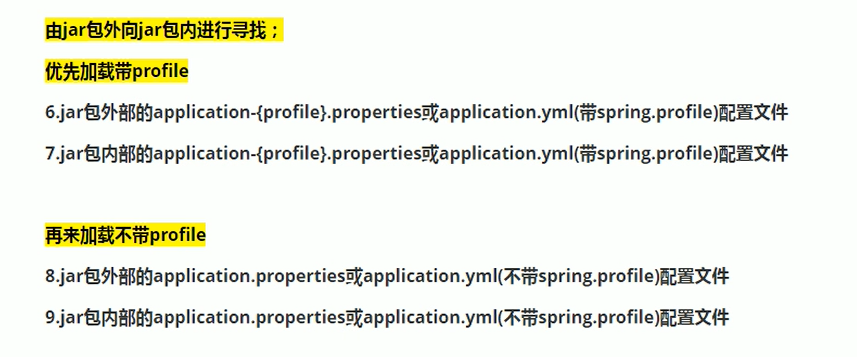
springboot配置文件加载位置

这些配置都会加载,然后进行互补配置。
springboot一种全新的编程规范,其设计目的是用来简化新Spring应用的初始搭建以及开发过程,SpringBoot也是一个服务于框架的框架,服务范围是简化配置文件。
关于怎么在springboot中绑定配置文件就分享到这里了,希望以上内容可以对大家有一定的帮助,可以学到更多知识。如果觉得文章不错,可以把它分享出去让更多的人看到。
亿速云「云服务器」,即开即用、新一代英特尔至强铂金CPU、三副本存储NVMe SSD云盘,价格低至29元/月。点击查看>>
免责声明:本站发布的内容(图片、视频和文字)以原创、转载和分享为主,文章观点不代表本网站立场,如果涉及侵权请联系站长邮箱:is@yisu.com进行举报,并提供相关证据,一经查实,将立刻删除涉嫌侵权内容。


 计算
计算 安全
安全 数据库
数据库 网络和加速
网络和加速 企业服务
企业服务


