一.集成支付宝支付
支付宝集成官方教程 https://docs.open.alipay.com/204/105295/
支付宝集成官方demo https://docs.open.alipay.com/54/104509/
1.导入SDK并添加依赖库
启动IDE(如Xcode),把iOS包中的压缩文件中以下文件拷贝到项目文件夹下,并导入到项目工程中。
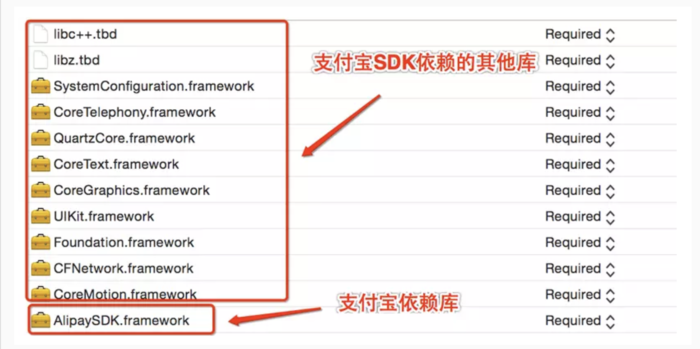
在Build Phases选项卡的Link Binary With Libraries中,增加以下依赖

2.在Appdelegate里面添加代码
引入头文件
#import <AlipaySDK/AlipaySDK.h>添加支付回调方法
- (BOOL)application:(UIApplication *)application openURL:(NSURL *)url sourceApplication:(NSString *)sourceApplication annotation:(id)annotation
{
 if ([url.host isEqualToString:@"safepay"]) {
  // 支付跳转支付宝钱包进行支付,处理支付结果
  [[AlipaySDK defaultService] processOrderWithPaymentResult:url standbyCallback:^(NSDictionary *resultDic) {
   NSLog(@"result = %@",resultDic);
  }];

  // 授权跳转支付宝钱包进行支付,处理支付结果
  [[AlipaySDK defaultService] processAuth_V2Result:url standbyCallback:^(NSDictionary *resultDic) {
   NSLog(@"result = %@",resultDic);
   // 解析 auth code
   NSString *result = resultDic[@"result"];
   NSString *authCode = nil;
   if (result.length>0) {
    NSArray *resultArr = [result componentsSeparatedByString:@"&"];
    for (NSString *subResult in resultArr) {
     if (subResult.length > 10 && [subResult hasPrefix:@"auth_code="]) {
      authCode = [subResult substringFromIndex:10];
      break;
     }
    }
   }
   NSLog(@"授权结果 authCode = %@", authCode?:@"");
  }];
 }
//此处是微信支付
 if ([url.scheme isEqualToString:@"wxf6e443649d826e8e"])
 {
  return [WXApi handleOpenURL:url delegate:(id<WXApiDelegate>)self];
 }
 return YES;
}

// NOTE: 9.0以后使用新API接口
- (BOOL)application:(UIApplication *)app openURL:(NSURL *)url options:(NSDictionary<NSString*, id> *)options
{
 if ([url.host isEqualToString:@"safepay"]) {
  // 支付跳转支付宝钱包进行支付,处理支付结果
  [[AlipaySDK defaultService] processOrderWithPaymentResult:url standbyCallback:^(NSDictionary *resultDic) {
   NSLog(@"result = %@",resultDic);
  }];

  // 授权跳转支付宝钱包进行支付,处理支付结果
  [[AlipaySDK defaultService] processAuth_V2Result:url standbyCallback:^(NSDictionary *resultDic) {
   NSLog(@"result = %@",resultDic);
   // 解析 auth code
   NSString *result = resultDic[@"result"];
   NSString *authCode = nil;
   if (result.length>0) {
    NSArray *resultArr = [result componentsSeparatedByString:@"&"];
    for (NSString *subResult in resultArr) {
     if (subResult.length > 10 && [subResult hasPrefix:@"auth_code="]) {
      authCode = [subResult substringFromIndex:10];
      break;
     }
    }
   }
   NSLog(@"授权结果 authCode = %@", authCode?:@"");
  }];
 }
//此处是微信支付
 if ([url.scheme isEqualToString:@"wxf6e443649d826e8e"])
 {
  return [WXApi handleOpenURL:url delegate:(id<WXApiDelegate>)self];
 }
 return YES;
}3.添加URL Scheme配置
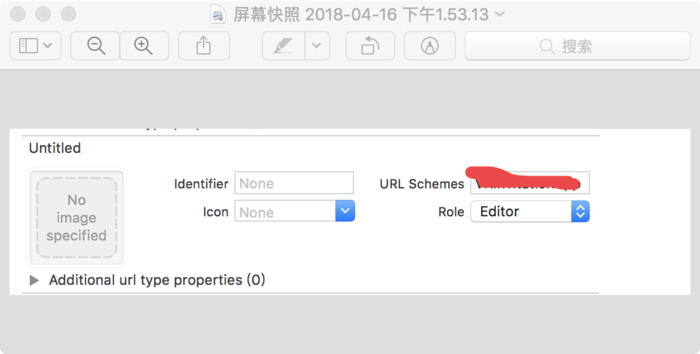
在Targets -> Info 下最后一个找到URL Scheme,
点击“Info”选项卡,在“URL Types”选项中,点击“+”。

4.在支付的地方添加吊起支付宝方法
引入头文件
#import <AlipaySDK/AlipaySDK.h>支付地方添加调起支付宝代码
[[AlipaySDK defaultService] payOrder:@"此处是从后台拿到的订单签名信息" fromScheme:@"这里边填写第三步配置的URL Scheme" callback:^(NSDictionary *resultDic) {
   NSLog(@"=====%@",resultDic);
   if ([resultDic[@"resultStatus"]intValue] == 9000) {
    NSLog(@"成功");
   } else {
    NSLog(@"失败");
   }
}];二.集成微信支付
微信支付集成官方文档 https://pay.weixin.qq.com/wiki/doc/api/app/app.php?chapter=8_5
微信集成官方demo https://pay.weixin.qq.com/wiki/doc/api/app/app.php?chapter=11_1
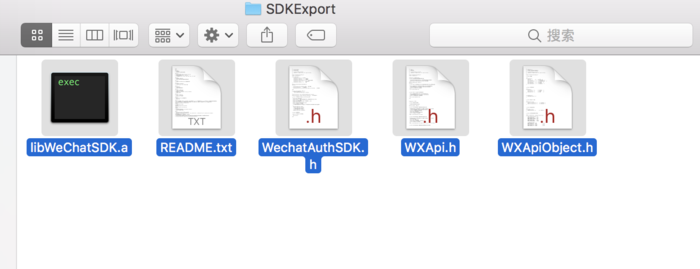
1:导入SDK并添加依赖库

记得添加这两个配置 (画重点)注意看官方Demo里边的README,拿起小本子记下来

2:在APPDelegate里边添加代码
引入头文件
#import <WXApi.h>
并添加回调代理
@interface AppDelegate ()<WXApiDelegate>注册微信
- (BOOL)application:(UIApplication *)application openURL:(NSURL *)url sourceApplication:(NSString *)sourceApplication annotation:(id)annotation
{
 if ([url.host isEqualToString:@"safepay"]) {
  // 支付跳转支付宝钱包进行支付,处理支付结果
  [[AlipaySDK defaultService] processOrderWithPaymentResult:url standbyCallback:^(NSDictionary *resultDic) {
   NSLog(@"result = %@",resultDic);
  }];

  // 授权跳转支付宝钱包进行支付,处理支付结果
  [[AlipaySDK defaultService] processAuth_V2Result:url standbyCallback:^(NSDictionary *resultDic) {
   NSLog(@"result = %@",resultDic);
   // 解析 auth code
   NSString *result = resultDic[@"result"];
   NSString *authCode = nil;
   if (result.length>0) {
    NSArray *resultArr = [result componentsSeparatedByString:@"&"];
    for (NSString *subResult in resultArr) {
     if (subResult.length > 10 && [subResult hasPrefix:@"auth_code="]) {
      authCode = [subResult substringFromIndex:10];
      break;
     }
    }
   }
   NSLog(@"授权结果 authCode = %@", authCode?:@"");
  }];
 }
//此处是微信支付
 if ([url.scheme isEqualToString:@"wxf6e443649d826e8e"])
 {
  return [WXApi handleOpenURL:url delegate:(id<WXApiDelegate>)self];
 }
 return YES;
}

// NOTE: 9.0以后使用新API接口
- (BOOL)application:(UIApplication *)app openURL:(NSURL *)url options:(NSDictionary<NSString*, id> *)options
{
 if ([url.host isEqualToString:@"safepay"]) {
  // 支付跳转支付宝钱包进行支付,处理支付结果
  [[AlipaySDK defaultService] processOrderWithPaymentResult:url standbyCallback:^(NSDictionary *resultDic) {
   NSLog(@"result = %@",resultDic);
  }];

  // 授权跳转支付宝钱包进行支付,处理支付结果
  [[AlipaySDK defaultService] processAuth_V2Result:url standbyCallback:^(NSDictionary *resultDic) {
   NSLog(@"result = %@",resultDic);
   // 解析 auth code
   NSString *result = resultDic[@"result"];
   NSString *authCode = nil;
   if (result.length>0) {
    NSArray *resultArr = [result componentsSeparatedByString:@"&"];
    for (NSString *subResult in resultArr) {
     if (subResult.length > 10 && [subResult hasPrefix:@"auth_code="]) {
      authCode = [subResult substringFromIndex:10];
      break;
     }
    }
   }
   NSLog(@"授权结果 authCode = %@", authCode?:@"");
  }];
 }
//此处是微信支付
 if ([url.scheme isEqualToString:@"wxf6e443649d826e8e"])
 {
  return [WXApi handleOpenURL:url delegate:(id<WXApiDelegate>)self];
 }
 return YES;
}添加微信支付回调代理方法
//微信回调,有支付结果的时候会回调这个方法
- (void)onResp:(BaseResp *)resp
{
 // 支付结果回调
 if([resp isKindOfClass:[PayResp class]]){
  switch (resp.errCode) {
   case WXSuccess:{
    //支付返回结果,实际支付结果需要去自己的服务器端查询
    NSNotification *notification = [NSNotification notificationWithName:@"ORDER_PAY_NOTIFICATION" object:@"success"];
    [[NSNotificationCenter defaultCenter] postNotification:notification];

    break;
   }
   default:{
    NSNotification *notification = [NSNotification notificationWithName:@"ORDER_PAY_NOTIFICATION"object:@"fail"];
    [[NSNotificationCenter defaultCenter] postNotification:notification];
    break;
   }
  }
 }
}3.添加URL Scheme配置
在Targets -> Info 下最后一个找到URL Scheme,
点击“Info”选项卡,在“URL Types”选项中,点击“+” 填写申请的那个APPId。
同上
4.在支付地方添加调起微信方法
引入头文件
#import <WXApi.h>支付地方添加调起微信代码
if ([WXApi isWXAppInstalled]) {NSLog(@"已经安装了微信...");//这里调用后台接口获取订单的详细信息,然后调用微信支付方法}else{}#pragma mark 微信支付方法- (void)WXPayWithAppid:(NSString *)appid partnerid:(NSString *)partnerid prepayid:(NSString *)prepayid package:(NSString *)package noncestr:(NSString *)noncestr timestamp:(NSString *)timestamp sign:(NSString *)sign{//需要创建这个支付对象PayReq *req = [[PayReq alloc] init];//由用户微信号和AppID组成的唯一标识,用于校验微信用户req.openID = appid;// 商家id,在注册的时候给的req.partnerId = partnerid;// 预支付订单这个是后台跟微信服务器交互后,微信服务器传给你们服务器的,你们服务器再传给你req.prepayId = prepayid;// 根据财付通文档填写的数据和签名req.package = package;// 随机编码,为了防止重复的,在后台生成req.nonceStr = noncestr;// 这个是时间戳,也是在后台生成的,为了验证支付的NSString * stamp = timestamp;req.timeStamp = stamp.intValue;// 这个签名也是后台做的req.sign = sign;if ([WXApi sendReq:req]) { //发送请求到微信,等待微信返回onRespNSLog(@"吊起微信成功...");}else{NSLog(@"吊起微信失败...");}}三.银联支付集成
银联手机控件支付 https://link.jianshu.com/?t=https://open.unionpay.com/ajweb/index
银联官网 https://www.aliyun.com/jiaocheng/349377.html
将需要的库文件拖入到自己的项目中,SDK文件所在目录upmp_iphone/paymentcontrol,包含 UPPaymentControl.h、libPaymentControl.a两个文件(老版本是三个,这点不一样)。

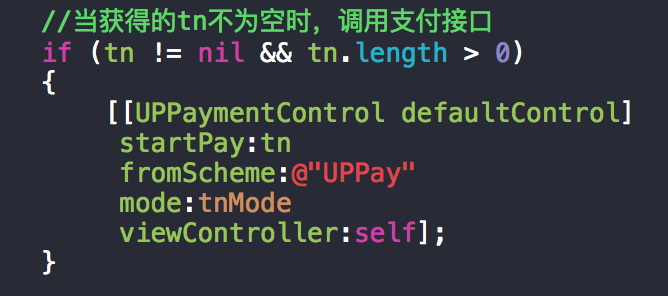
方法需要的几个参数文档上都写的有,tn是交易流水号,你们服务器端传给你的,咱们客户端只有凭借这个参数才能调用支付控件 进行支付的。
到此:第三方支付集成大致集成,请期待下一篇文章对于三种集成调用封装代码
下面是我们分享的iOS支付宝、微信、银联支付集成封装调用(下)、
https://www.jb51.net/article/139185.htm
亿速云「云服务器」,即开即用、新一代英特尔至强铂金CPU、三副本存储NVMe SSD云盘,价格低至29元/月。点击查看>>
免责声明:本站发布的内容(图片、视频和文字)以原创、转载和分享为主,文章观点不代表本网站立场,如果涉及侵权请联系站长邮箱:is@yisu.com进行举报,并提供相关证据,一经查实,将立刻删除涉嫌侵权内容。