这篇文章将为大家详细讲解有关SpringCloud融入Python的实现方法,小编觉得挺实用的,因此分享给大家做个参考,希望大家阅读完这篇文章后可以有所收获。
构建Python web服务
引入py-eureka-client客户端
pip install py_eureka_client
manage.py
#!/usr/bin/env python
import tornado.httpserver
import tornado.ioloop
import tornado.options
import tornado.web
import py_eureka_client.eureka_client as eureka_client
from tornado.options import define, options
from time import sleep
define("port", default=3333, help="run on the given port", type=int)
class IndexHandler(tornado.web.RequestHandler):
def get(self):
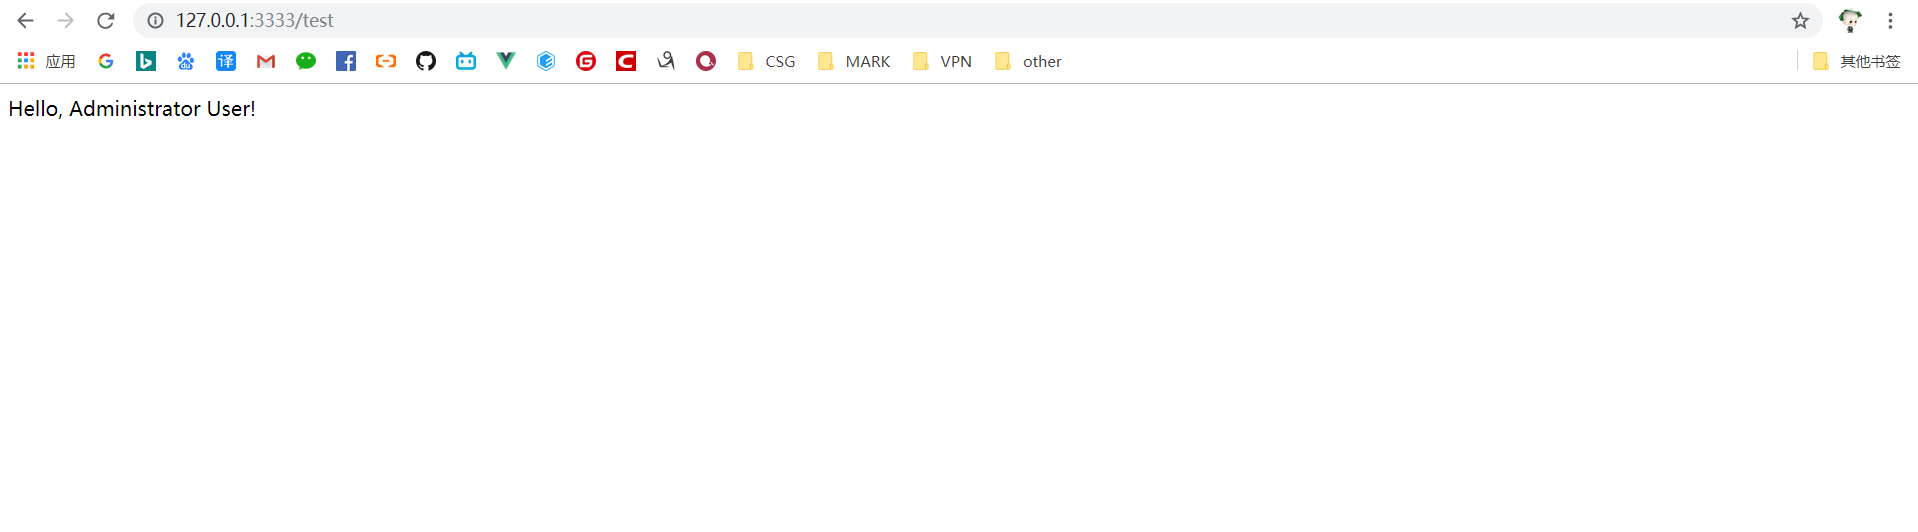
username = self.get_argument('username', 'Hello')
self.write(username + ', Administrator User!')
def post(self):
username = self.get_argument('username', 'Hello')
self.write(username + ', Administrator User!')
class MainHandler(tornado.web.RequestHandler):
def get(self):
username = self.get_argument('username', 'Hello')
self.write(username + ', Coisini User!')
def post(self):
username = self.get_argument('username', 'Hello')
self.write(username + ', Coisini User!')
def main():
tornado.options.parse_command_line()
# 注册eureka服务
eureka_client.init_registry_client(eureka_server="http://localhost:31091/eureka/,http://localhost:8761/eureka/",
app_name="python-tornado",
instance_port=3333)
app = tornado.web.Application(handlers=[(r"/test", IndexHandler), (r"/main", MainHandler)])
http_server = tornado.httpserver.HTTPServer(app)
http_server.listen(options.port)
tornado.ioloop.IOLoop.instance().start()
if __name__ == '__main__':
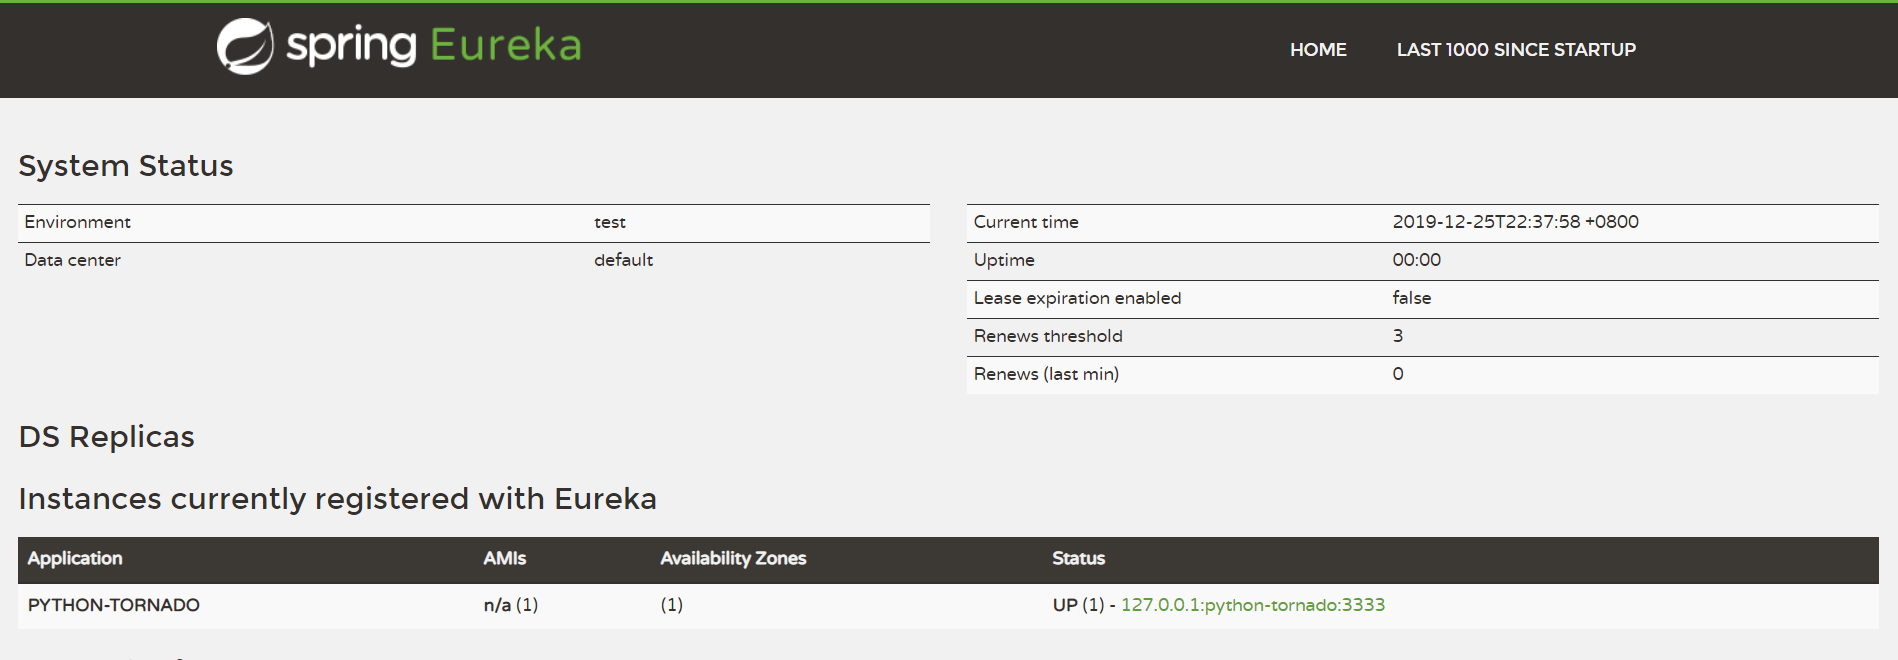
main()大致说下上述代码,向端口为31091的注册中心注册服务名为python-tornado的服务,端口为3333,提供两个请求方式为GET和POST,接口路径为/test和/main的外部调用接口
启动python服务(在此之前要创建一个Eureka服务注册中心)
python manage.py runserver
运行结果
服务调用(Feign) - Feign用于便捷调用HTTP API
congfig类中需添加注解@EnableFeignClients,具体使用请百度
TestController.java
@RestController
public class TestController {
  private TestAPIClient testAPIClient;

  @Autowired
  public TestController(TestAPIClient testAPIClient) {
    this.testAPIClient = testAPIClient;
  }

  @PostMapping("/test")
  public String test(@RequestParam String username) throws Exception {
    return this.testAPIClient.test(username);
  }

  @GetMapping("/test")
  public String test1() throws Exception {
    return this.testAPIClient.test1();
  }
}TestAPIClient.java
@FeignClient(name="python-tornado", configuration = FeignConfigure.class)
public interface TestAPIClient {
  @PostMapping("/test")
  String test(@RequestParam("username") String username);

  @GetMapping("/test")
  String test1();
}FeignConfigure.java
import feign.Logger;
import feign.codec.Encoder;
import feign.form.spring.SpringFormEncoder;
import org.springframework.beans.factory.ObjectFactory;
import org.springframework.beans.factory.annotation.Autowired;
import org.springframework.boot.autoconfigure.web.HttpMessageConverters;
import org.springframework.cloud.netflix.feign.support.SpringEncoder;
import org.springframework.context.annotation.Bean;
import org.springframework.context.annotation.Configuration;

@Configuration
public class FeignConfigure {
  @Bean
  Logger.Level feignLoggerLevel() {
    return Logger.Level.FULL;
  }

  @Autowired
  private ObjectFactory<HttpMessageConverters> messageConverters;

  @Bean
  public Encoder feignFormEncoder() {
    return new SpringFormEncoder(new SpringEncoder(messageConverters));
  }
}Feign依赖
<!-- Feign Client -->
<dependency>
  <groupId>org.springframework.cloud</groupId>
  <artifactId>spring-cloud-starter-feign</artifactId>
</dependency>
<dependency>
  <groupId>io.github.openfeign.form</groupId>
  <artifactId>feign-form</artifactId>
  <version>3.4.1</version>
</dependency>
<dependency>
  <groupId>io.github.openfeign.form</groupId>
  <artifactId>feign-form-spring</artifactId>
  <version>3.4.1</version>
</dependency>运行结果

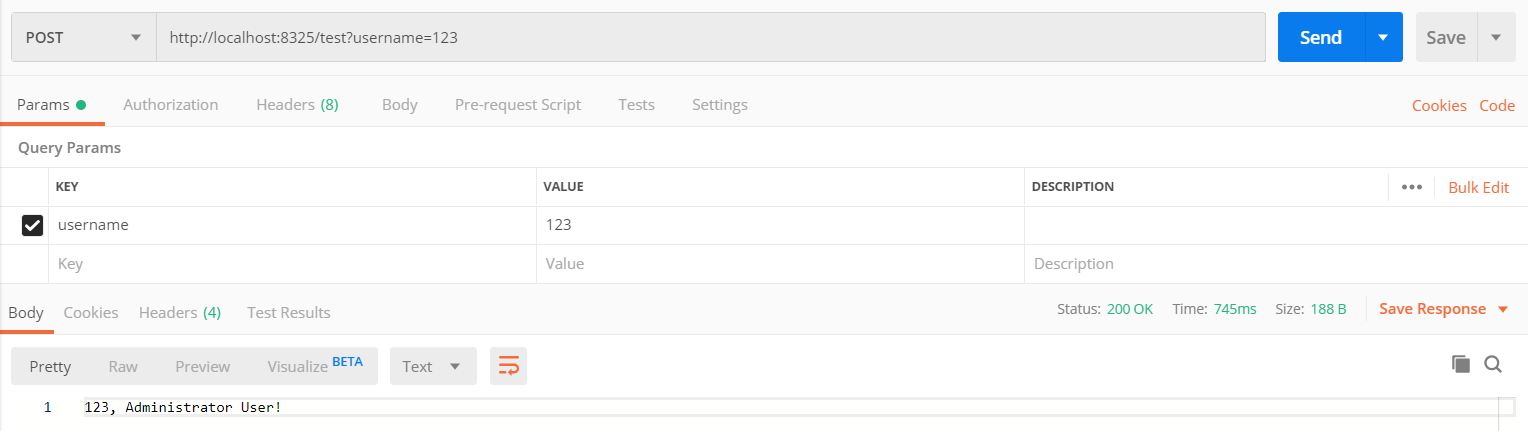
在这里,我们用请求工具Postman来测试一下,可以看出,由TestController调用TestAPIClient再调用Python服务,至此,已完成微服务调用Python Web服务
关于“SpringCloud融入Python的实现方法”这篇文章就分享到这里了,希望以上内容可以对大家有一定的帮助,使各位可以学到更多知识,如果觉得文章不错,请把它分享出去让更多的人看到。
亿速云「云服务器」,即开即用、新一代英特尔至强铂金CPU、三副本存储NVMe SSD云盘,价格低至29元/月。点击查看>>
免责声明:本站发布的内容(图片、视频和文字)以原创、转载和分享为主,文章观点不代表本网站立场,如果涉及侵权请联系站长邮箱:is@yisu.com进行举报,并提供相关证据,一经查实,将立刻删除涉嫌侵权内容。


 计算
计算 安全
安全 数据库
数据库 网络和加速
网络和加速 企业服务
企业服务


