еҰӮдҪ•дҪҝз”ЁSpring Boot 2 Thymeleafе®һзҺ°жңҚеҠЎеҷЁз«ҜиЎЁеҚ•йӘҢиҜҒ
иҝҷзҜҮж–Үз« дё»иҰҒд»Ӣз»ҚеҰӮдҪ•дҪҝз”ЁSpring Boot 2 Thymeleafе®һзҺ°жңҚеҠЎеҷЁз«ҜиЎЁеҚ•йӘҢиҜҒпјҢж–Үдёӯд»Ӣз»Қзҡ„йқһеёёиҜҰз»ҶпјҢе…·жңүдёҖе®ҡзҡ„еҸӮиҖғд»·еҖјпјҢж„ҹе…ҙи¶Јзҡ„е°Ҹдјҷдјҙ们дёҖе®ҡиҰҒзңӢе®ҢпјҒ
иҝҷзҜҮж–Үз« дё»иҰҒд»Ӣз»ҚдәҶSpring Boot 2 ThymeleafжңҚеҠЎеҷЁз«ҜиЎЁеҚ•йӘҢиҜҒе®һзҺ°иҜҰи§Ј,ж–ҮдёӯйҖҡиҝҮзӨәдҫӢд»Јз Ғд»Ӣз»Қзҡ„йқһеёёиҜҰз»ҶпјҢеҜ№еӨ§е®¶зҡ„еӯҰд№ жҲ–иҖ…е·ҘдҪңе…·жңүдёҖе®ҡзҡ„еҸӮиҖғеӯҰд№ д»·еҖј,йңҖиҰҒзҡ„жңӢеҸӢеҸҜд»ҘеҸӮиҖғдёӢ
иЎЁеҚ•йӘҢиҜҒеҲҶдёәеүҚз«ҜйӘҢиҜҒе’ҢжңҚеҠЎеҷЁз«ҜйӘҢиҜҒгҖӮ
жңҚеҠЎеҷЁз«ҜйӘҢиҜҒж–№йқўпјҢJavaжҸҗдҫӣдәҶдё»иҰҒз”ЁдәҺж•°жҚ®йӘҢиҜҒзҡ„JSR 303规иҢғпјҢиҖҢHibernate Validatorе®һзҺ°дәҶJSR 303规иҢғгҖӮ
йЎ№зӣ®дҫқиө–еҠ е…Ҙspring-boot-starter-thymeleafж—¶пјҢй»ҳи®Өе°ұдјҡеҠ е…ҘHibernate Validatorзҡ„дҫқиө–гҖӮ
ејҖеҸ‘зҺҜеўғпјҡIntelliJ IDEA 2019.2.2
Spring BootзүҲжң¬пјҡ2.1.8
ж–°е»әдёҖдёӘеҗҚз§°дёәdemoзҡ„Spring BootйЎ№зӣ®гҖӮ
1гҖҒpom.xml
<dependency>
      <groupId>org.springframework.boot</groupId>
      <artifactId>spring-boot-starter-web</artifactId>
    </dependency>

    <dependency>
      <groupId>org.springframework.boot</groupId>
      <artifactId>spring-boot-starter-thymeleaf</artifactId>
    </dependency>

    <dependency>
      <groupId>org.springframework.boot</groupId>
      <artifactId>spring-boot-devtools</artifactId>
    </dependency>
2гҖҒsrc/main/java/com/example/demo/User.java
package com.example.demo;
import org.hibernate.validator.constraints.Length;
import javax.validation.constraints.NotBlank;
import javax.validation.constraints.Size;
public class User {
@NotBlank(message = "з”ЁжҲ·еҗҚдёҚиғҪдёәз©ә")
String name;
@Length(min = 11, max = 11, message = "жүӢжңәеҸ·й•ҝеәҰеҝ…йЎ»11дҪҚ")
String phone;
@Size(min = 6, max = 20, message = "еҜҶз Ғй•ҝеәҰ6-20дҪҚ")
String password;
public String getName() {
return name;
}
public void setName(String name) {
this.name = name;
}
public String getPhone() {
return phone;
}
public void setPhone(String phone) {
this.phone = phone;
}
public String getPassword() {
return password;
}
public void setPassword(String password) {
this.password = password;
}
}3гҖҒsrc/main/java/com/example/demo/FormController.java
package com.example.demo;
import org.springframework.stereotype.Controller;
import org.springframework.validation.BindingResult;
import org.springframework.validation.ObjectError;
import org.springframework.web.bind.annotation.ModelAttribute;
import org.springframework.web.bind.annotation.PathVariable;
import org.springframework.web.bind.annotation.PostMapping;
import org.springframework.web.bind.annotation.RequestMapping;
import javax.validation.Valid;
import java.util.List;
@Controller
public class FormController {
@RequestMapping("/{form}")
public String form(@PathVariable String form, @ModelAttribute User user){
return form;
}
@PostMapping("/submit")
public String submit(@Valid User user, BindingResult result){
if (result.hasErrors()) {
List<ObjectError> list = result.getAllErrors();
for (ObjectError error : list) {
System.out.println(error.getDefaultMessage());
}
return "form";
}
//дёҡеҠЎйҖ»иҫ‘еӨ„зҗҶ
return "form";
}
}4гҖҒsrc/main/resources/templates/form.html
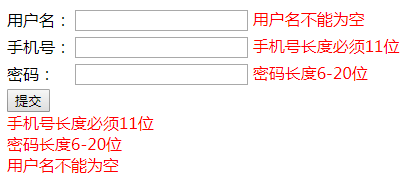
еүҚз«ҜйҖҡиҝҮ#fieldsеҜ№иұЎиҫ“еҮәй”ҷиҜҜдҝЎжҒҜжңү2з§Қж–№ејҸпјҢ1з§ҚжҳҜеңЁжҜҸдёӘеӯ—ж®өеҗҺйқўиҫ“еҮәпјҢеҸҰ1з§ҚжҳҜе…ЁйғЁеңЁдёҖиө·иҫ“еҮәгҖӮ
<!DOCTYPE html>
<html>
<head>
<meta charset="UTF-8">
<title>иЎЁеҚ•зҡ„жҸҗдәӨеӨ„зҗҶ</title>
<style>
.fieldError{color: red}
</style>
</head>
<body>
<form method="post" th:action="@{/submit}" th:object="${user}">
<table>
<tr>
<td>з”ЁжҲ·еҗҚпјҡ</td>
<td><input type="text" th:field="*{name}" />
<span class="fieldError" th:if="${#fields.hasErrors('*{name}')}" th:errors="*{name}"></span>
</td>
</tr>
<tr>
<td>жүӢжңәеҸ·пјҡ</td>
<td><input type="text" th:field="*{phone}" />
<span class="fieldError" th:if="${#fields.hasErrors('*{phone}')}" th:errors="*{phone}"></span>
</td>
</tr>
<tr>
<td>еҜҶз Ғпјҡ</td>
<td><input type="text" th:field="*{password}" />
<span class="fieldError" th:if="${#fields.hasErrors('*{password}')}" th:errors="*{password}"></span>
</td>
</tr>
<tr>
<td colspan="2">
<input type="submit" value="жҸҗдәӨ" />
<div th:each="err : ${#fields.errors('*')}">
<span th:text="${err}" class="fieldError"></span>
</div>
</td>
</tr>
</table>
</form>
</body>
</html>еҗҜеҠЁжңҚеҠЎеҗҺпјҢжөҸи§ҲеҷЁи®ҝй—®http://localhost:8080/formпјҢзӮ№еҮ»жҸҗдәӨжҢүй’®пјҢз»“жһңеҰӮдёӢпјҡ
д»ҘдёҠжҳҜвҖңеҰӮдҪ•дҪҝз”ЁSpring Boot 2 Thymeleafе®һзҺ°жңҚеҠЎеҷЁз«ҜиЎЁеҚ•йӘҢиҜҒвҖқиҝҷзҜҮж–Үз« зҡ„жүҖжңүеҶ…е®№пјҢж„ҹи°ўеҗ„дҪҚзҡ„йҳ…иҜ»пјҒеёҢжңӣеҲҶдә«зҡ„еҶ…е®№еҜ№еӨ§е®¶жңүеё®еҠ©пјҢжӣҙеӨҡзӣёе…ізҹҘиҜҶпјҢж¬ўиҝҺе…іжіЁдәҝйҖҹдә‘иЎҢдёҡиө„и®Ҝйў‘йҒ“пјҒ


