这期内容当中小编将会给大家带来有关Springboot中怎么实现分布式限流,文章内容丰富且以专业的角度为大家分析和叙述,阅读完这篇文章希望大家可以有所收获。
限流算法介绍
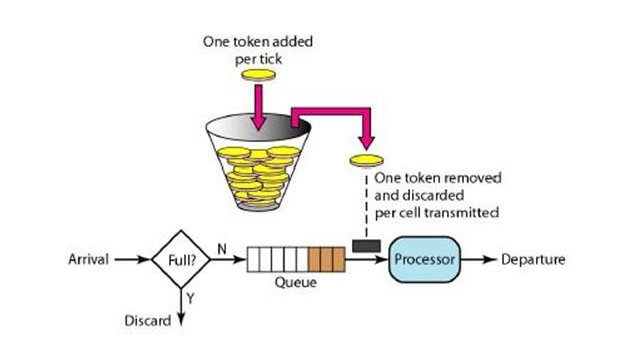
a、令牌桶算法
令牌桶算法的原理是系统会以一个恒定的速度往桶里放入令牌,而如果请求需要被处理,则需要先从桶里获取一个令牌,当桶里没有令牌可取时,则拒绝服务。 当桶满时,新添加的令牌被丢弃或拒绝。

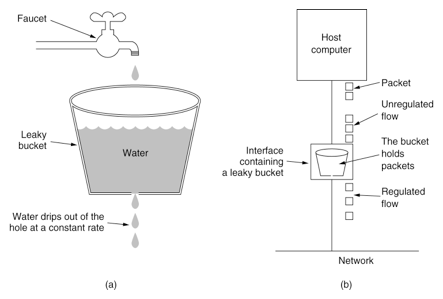
b、漏桶算法
其主要目的是控制数据注入到网络的速率,平滑网络上的突发流量,数据可以以任意速度流入到漏桶中。漏桶算法提供了一种机制,通过它,突发流量可以被整形以便为网络提供一个稳定的流量。 漏桶可以看作是一个带有常量服务时间的单服务器队列,如果漏桶为空,则不需要流出水滴,如果漏桶(包缓存)溢出,那么水滴会被溢出丢弃

c、计算器限流
计数器限流算法是比较常用一种的限流方案也是最为粗暴直接的,主要用来限制总并发数,比如数据库连接池大小、线程池大小、接口访问并发数等都是使用计数器算法
如:使用AomicInteger来进行统计当前正在并发执行的次数,如果超过域值就直接拒绝请求,提示系统繁忙
限流具体代码实践
a、导入依赖
<dependencies>
  <dependency>
    <groupId>org.springframework.boot</groupId>
    <artifactId>spring-boot-starter-aop</artifactId>
  </dependency>
  <dependency>
    <groupId>org.springframework.boot</groupId>
    <artifactId>spring-boot-starter-web</artifactId>
  </dependency>
  <dependency>
    <groupId>org.springframework.boot</groupId>
    <artifactId>spring-boot-starter-data-redis</artifactId>
  </dependency>
  <dependency>
    <groupId>com.google.guava</groupId>
    <artifactId>guava</artifactId>
    <version>21.0</version>
  </dependency>
  <dependency>
    <groupId>org.apache.commons</groupId>
    <artifactId>commons-lang3</artifactId>
  </dependency>
  <dependency>
    <groupId>org.springframework.boot</groupId>
    <artifactId>spring-boot-starter-test</artifactId>
  </dependency>
</dependencies>
b、属性配置
在application.properites资源文件中添加redis相关的配置项
spring.redis.host=192.168.68.110
spring.redis.port=6379
spring.redis.password=123456
默认情况下spring-boot-data-redis为我们提供了StringRedisTemplate但是满足不了其它类型的转换,所以还是得自己去定义其它类型的模板
import org.springframework.context.annotation.Bean;
import org.springframework.context.annotation.Configuration;
import org.springframework.data.redis.connection.lettuce.LettuceConnectionFactory;
import org.springframework.data.redis.core.RedisTemplate;
import org.springframework.data.redis.serializer.GenericJackson2JsonRedisSerializer;
import org.springframework.data.redis.serializer.StringRedisSerializer;

import java.io.Serializable;

/**
 * redis配置
 */
@Configuration
public class RedisConfig {

  @Bean
  public RedisTemplate<String, Serializable> limitRedisTemplate(LettuceConnectionFactory redisConnectionFactory) {
    RedisTemplate<String, Serializable> template = new RedisTemplate<>();
    template.setKeySerializer(new StringRedisSerializer());
    template.setValueSerializer(new GenericJackson2JsonRedisSerializer());
    template.setConnectionFactory(redisConnectionFactory);
    return template;
  }
}
d、Limit 注解
具体代码如下
import com.carry.enums.LimitType;

import java.lang.annotation.Documented;
import java.lang.annotation.ElementType;
import java.lang.annotation.Inherited;
import java.lang.annotation.Retention;
import java.lang.annotation.RetentionPolicy;
import java.lang.annotation.Target;

/**
 * 限流
 */
@Target({ElementType.METHOD, ElementType.TYPE})
@Retention(RetentionPolicy.RUNTIME)
@Inherited
@Documented
public @interface Limit {

  /**
   * 资源的名字
   *
   * @return String
   */
  String name() default "";

  /**
   * 资源的key
   *
   * @return String
   */
  String key() default "";

  /**
   * Key的prefix
   *
   * @return String
   */
  String prefix() default "";

  /**
   * 给定的时间段
   * 单位秒
   *
   * @return int
   */
  int period();

  /**
   * 最多的访问限制次数
   *
   * @return int
   */
  int count();

  /**
   * 类型
   *
   * @return LimitType
   */
  LimitType limitType() default LimitType.CUSTOMER;
}
package com.carry.enums;
public enum LimitType {
/**
* 自定义key
*/
CUSTOMER,
/**
* 根据请求者IP
*/
IP;
}e、Limit 拦截器(AOP)
我们可以通过编写 Lua 脚本实现自己的API,核心就是调用execute方法传入我们的 Lua 脚本内容,然后通过返回值判断是否超出我们预期的范围,超出则给出错误提示。
import com.carry.annotation.Limit;
import com.carry.enums.LimitType;
import com.google.common.collect.ImmutableList;
import org.apache.commons.lang3.StringUtils;
import org.aspectj.lang.ProceedingJoinPoint;
import org.aspectj.lang.annotation.Around;
import org.aspectj.lang.annotation.Aspect;
import org.aspectj.lang.reflect.MethodSignature;
import org.slf4j.Logger;
import org.slf4j.LoggerFactory;
import org.springframework.beans.factory.annotation.Autowired;
import org.springframework.context.annotation.Configuration;
import org.springframework.data.redis.core.RedisTemplate;
import org.springframework.data.redis.core.script.DefaultRedisScript;
import org.springframework.data.redis.core.script.RedisScript;
import org.springframework.web.context.request.RequestContextHolder;
import org.springframework.web.context.request.ServletRequestAttributes;

import javax.servlet.http.HttpServletRequest;
import java.io.Serializable;
import java.lang.reflect.Method;


@Aspect
@Configuration
public class LimitInterceptor {

  private static final Logger logger = LoggerFactory.getLogger(LimitInterceptor.class);

  private final RedisTemplate<String, Serializable> limitRedisTemplate;

  @Autowired
  public LimitInterceptor(RedisTemplate<String, Serializable> limitRedisTemplate) {
    this.limitRedisTemplate = limitRedisTemplate;
  }


  @Around("execution(public * *(..)) && @annotation(com.carry.annotation.Limit)")
  public Object interceptor(ProceedingJoinPoint pjp) {
    MethodSignature signature = (MethodSignature) pjp.getSignature();
    Method method = signature.getMethod();
    Limit limitAnnotation = method.getAnnotation(Limit.class);
    LimitType limitType = limitAnnotation.limitType();
    String name = limitAnnotation.name();
    String key;
    int limitPeriod = limitAnnotation.period();
    int limitCount = limitAnnotation.count();
    switch (limitType) {
      case IP:
        key = getIpAddress();
        break;
      case CUSTOMER:
        key = limitAnnotation.key();
        break;
      default:
        key = StringUtils.upperCase(method.getName());
    }
    ImmutableList<String> keys = ImmutableList.of(StringUtils.join(limitAnnotation.prefix(), key));
    try {
      String luaScript = buildLuaScript();
      RedisScript<Number> redisScript = new DefaultRedisScript<>(luaScript, Number.class);
      Number count = limitRedisTemplate.execute(redisScript, keys, limitCount, limitPeriod);
      logger.info("Access try count is {} for name={} and key = {}", count, name, key);
      if (count != null && count.intValue() <= limitCount) {
        return pjp.proceed();
      } else {
        throw new RuntimeException("You have been dragged into the blacklist");
      }
    } catch (Throwable e) {
      if (e instanceof RuntimeException) {
        throw new RuntimeException(e.getLocalizedMessage());
      }
      throw new RuntimeException("server exception");
    }
  }

  /**
   * 限流 脚本
   *
   * @return lua脚本
   */
  public String buildLuaScript() {
    StringBuilder lua = new StringBuilder();
    lua.append("local c");
    lua.append("\nc = redis.call('get',KEYS[1])");
    // 调用不超过最大值,则直接返回
    lua.append("\nif c and tonumber(c) > tonumber(ARGV[1]) then");
    lua.append("\nreturn c;");
    lua.append("\nend");
    // 执行计算器自加
    lua.append("\nc = redis.call('incr',KEYS[1])");
    lua.append("\nif tonumber(c) == 1 then");
    // 从第一次调用开始限流,设置对应键值的过期
    lua.append("\nredis.call('expire',KEYS[1],ARGV[2])");
    lua.append("\nend");
    lua.append("\nreturn c;");
    return lua.toString();
  }

  private static final String UNKNOWN = "unknown";

  /**
   * 获取IP地址
   * @return
   */
  public String getIpAddress() {
    HttpServletRequest request = ((ServletRequestAttributes) RequestContextHolder.getRequestAttributes()).getRequest();
    String ip = request.getHeader("x-forwarded-for");
    if (ip == null || ip.length() == 0 || UNKNOWN.equalsIgnoreCase(ip)) {
      ip = request.getHeader("Proxy-Client-IP");
    }
    if (ip == null || ip.length() == 0 || UNKNOWN.equalsIgnoreCase(ip)) {
      ip = request.getHeader("WL-Proxy-Client-IP");
    }
    if (ip == null || ip.length() == 0 || UNKNOWN.equalsIgnoreCase(ip)) {
      ip = request.getRemoteAddr();
    }
    return ip;
  }
}
f、控制层
在接口上添加@Limit()注解,如下代码会在 Redis 中生成过期时间为 100s 的 key = test 的记录,特意定义了一个AtomicInteger用作测试
import com.carry.annotation.Limit;
import org.springframework.web.bind.annotation.GetMapping;
import org.springframework.web.bind.annotation.RestController;

import java.util.concurrent.atomic.AtomicInteger;


@RestController
public class LimiterController {

  private static final AtomicInteger ATOMIC_INTEGER = new AtomicInteger();

  @Limit(key = "test", period = 100, count = 10, name="resource", prefix = "limit")
  @GetMapping("/test")
  public int testLimiter() {
    // 意味着100S内最多可以访问10次
    return ATOMIC_INTEGER.incrementAndGet();
  }
}
注意:上面例子保存在redis中的key值应该为“limittest”,即@Limit中prefix的值+key的值
测试
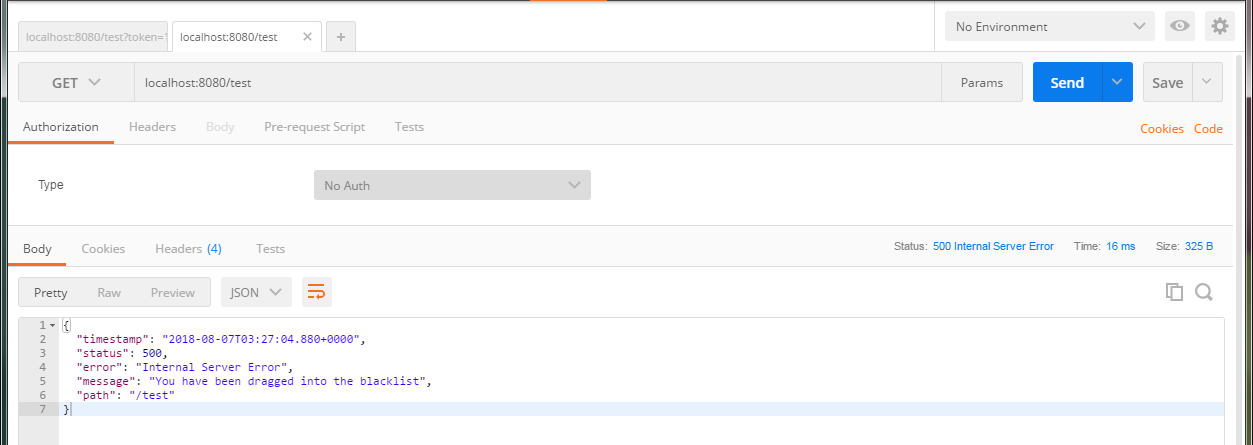
我们在postman中快速访问localhost:8080/test,当访问数超过10时出现以下结果

上述就是小编为大家分享的Springboot中怎么实现分布式限流了,如果刚好有类似的疑惑,不妨参照上述分析进行理解。如果想知道更多相关知识,欢迎关注亿速云行业资讯频道。
免责声明:本站发布的内容(图片、视频和文字)以原创、转载和分享为主,文章观点不代表本网站立场,如果涉及侵权请联系站长邮箱:is@yisu.com进行举报,并提供相关证据,一经查实,将立刻删除涉嫌侵权内容。