javaеҰӮдҪ•е®һзҺ°ж°ҙжіўзә№жү©ж•Јж•Ҳжһң
иҝҷзҜҮж–Үз« з»ҷеӨ§е®¶еҲҶдә«зҡ„жҳҜжңүе…іjavaеҰӮдҪ•е®һзҺ°ж°ҙжіўзә№жү©ж•Јж•Ҳжһңзҡ„еҶ…е®№гҖӮе°Ҹзј–и§үеҫ—жҢәе®һз”Ёзҡ„пјҢеӣ жӯӨеҲҶдә«з»ҷеӨ§е®¶еҒҡдёӘеҸӮиҖғпјҢдёҖиө·и·ҹйҡҸе°Ҹзј–иҝҮжқҘзңӢзңӢеҗ§гҖӮ
дёҖгҖҒеҺҹзҗҶ
жЁЎжӢҹж°ҙжіўзә№ж•ҲжһңпјҢжңҖеёёи§Ғзҡ„жҳҜsineжҲ–иҖ…cosnзҡ„еҮҪж•°пјҢе‘ЁжңҹжҖ§еҸҳеҢ–пјҢиҙҙиҝ‘иҮӘ然гҖӮ
еҪ“ж°ҙжіўзә№дёӯдёӯй—ҙејҖе§Ӣеҗ‘еӣӣе‘Ёжү©ж•Јзҡ„ж—¶еҖҷпјҢдёҖиҲ¬йғҪжҳҜж…ўж…ўзҡ„еӨұеҺ»иғҪйҮҸпјҢжҢҜе№…д№ҹжҳҜи¶ҠжқҘи¶Ҡе°ҸпјҢжүҖд»ҘзЁӢеәҸиҰҒжЁЎжӢҹиҝҷдёӘиҝҮзЁӢж—¶еҖҷпјҢиҰҒеҠ дёҠдёҖдёӘиғҪйҮҸйҖ’еҮҸеӣ еӯҗгҖӮ然еҗҺз”Ёе…¬ејҸ y = a*sine(bx + c)жқҘиЎЁзӨәжіўзә№е…¬ејҸгҖӮ
дәҢгҖҒзЁӢеәҸе®һзҺ°
жңҖйҮҚиҰҒзҡ„дёҖжӯҘжҳҜи®Ўз®—ж°ҙжіўзә№зҡ„жҢҜе№…гҖӮеңЁд»»ж„ҸдёҖзӮ№зЎ®е®ҡж°ҙжіўзҡ„дёӯеҝғдҪҚзҪ®пјҢеҸҜд»ҘжҳҜйј ж ҮйҡҸжңәйҖүеҸ–пјҢеҜ№еҚҠеҫ„иҢғеӣҙеҶ…зҡ„еғҸзҙ дҪҚзҪ®е®һзҺ°ж°ҙжіўз”ҹжҲҗпјҢ然еҗҺиҪ¬жҚўдёәдҪҚзҪ®пјҢеҜ№дҪҚзҪ®е®һзҺ°жө®зӮ№ж•°еҸ–ж•ҙпјҢ然еҗҺдҪҝз”ЁйҖӮеҪ“зҡ„жҸ’еҖјз®—жі•пјҢжң¬дҫӢдҪҝз”ЁеҸҢзәҝжҖ§жҸ’еҖјгҖӮ
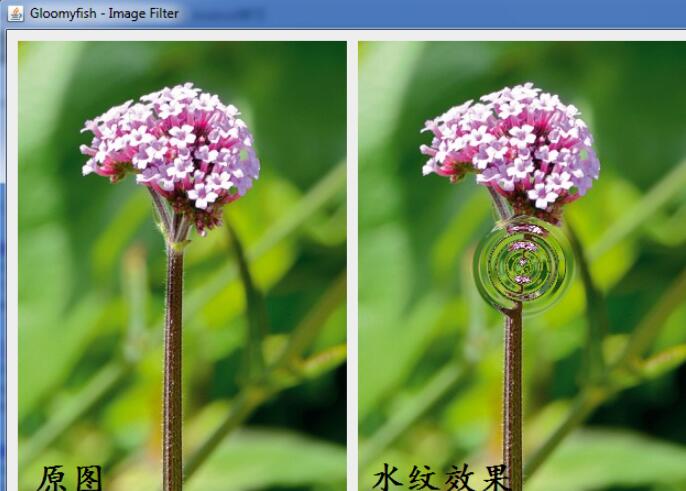
дёүгҖҒзЁӢеәҸж•Ҳжһң
еӣӣгҖҒж»Өй•ңе®Ңе…Ёжәҗд»Јз Ғ
иҝҷж¬ЎжҲ‘еҶҷдәҶдәӣдёӯж–ҮжіЁи§ЈпјҢдёҚз»ҷжәҗд»Јз Ғзҡ„еҚҡж–ҮдёҚжҳҜеҘҪеҚҡж–Ү
package com.gloomyfish.filter.study;
import java.awt.image.BufferedImage;
public class WaterFilter extends AbstractBufferedImageOp {
private float wavelength = 16;
private float amplitude = 10;
private float phase = 0;
private float centreX = 0.5f;
private float centreY = 0.5f;
private float radius = 50;
private float radius2 = 0;
private float icentreX;
private float icentreY;
public WaterFilter() {
}
@Override
public BufferedImage filter(BufferedImage src, BufferedImage dest) {
int width = src.getWidth();
int height = src.getHeight();
if ( dest == null )
dest = createCompatibleDestImage( src, null );
int[] inPixels = new int[width*height];
int[] outPixels = new int[width*height];
getRGB( src, 0, 0, width, height, inPixels );
icentreX = width * centreX;
icentreY = height * centreY;
if ( radius == 0 )
radius = Math.min(icentreX, icentreY);
radius2 = radius*radius;
int index = 0;
float[] out = new float[2];
for(int row=0; row<height; row++) {
for(int col=0; col<width; col++) {
index = row * width + col;
// иҺ·еҸ–ж°ҙжіўзҡ„жү©ж•ЈдҪҚзҪ®пјҢжңҖйҮҚиҰҒзҡ„дёҖжӯҘ
generateWaterRipples(col, row, out);
int srcX = (int)Math.floor( out[0] );
int srcY = (int)Math.floor( out[1] );
float xWeight = out[0]-srcX;
float yWeight = out[1]-srcY;
int nw, ne, sw, se;
// иҺ·еҸ–е‘ЁеӣҙеӣӣдёӘеғҸзҙ пјҢжҸ’еҖјз”ЁпјҢ
if ( srcX >= 0 && srcX < width-1 && srcY >= 0 && srcY < height-1) {
// Easy case, all corners are in the image
int i = width*srcY + srcX;
nw = inPixels[i];
ne = inPixels[i+1];
sw = inPixels[i+width];
se = inPixels[i+width+1];
} else {
// Some of the corners are off the image
nw = getPixel( inPixels, srcX, srcY, width, height );
ne = getPixel( inPixels, srcX+1, srcY, width, height );
sw = getPixel( inPixels, srcX, srcY+1, width, height );
se = getPixel( inPixels, srcX+1, srcY+1, width, height );
}
// еҸ–еҫ—еҜ№еә”зҡ„жҢҜе№…дҪҚзҪ®P(x, y)зҡ„еғҸзҙ пјҢдҪҝз”ЁеҸҢзәҝжҖ§жҸ’еҖј
/*if(xWeight >=0 || yWeight >= 0)
{
outPixels[index] = ImageMath.bilinearInterpolate(xWeight, yWeight, nw, ne, sw, se);
}
else
{
outPixels[index] = inPixels[index];
}*/
outPixels[index] = ImageMath.bilinearInterpolate(xWeight, yWeight, nw, ne, sw, se);
}
}
setRGB( dest, 0, 0, width, height, outPixels );
return dest;
}
private int getPixel(int[] pixels, int x, int y, int width, int height) {
if (x < 0 || x >= width || y < 0 || y >= height) {
return 0; // жңүзӮ№жҡҙеҠӣе•ҰпјҢжҮ’еҫ—з®Ўе•Ұ
}
return pixels[ y*width+x ];
}
protected void generateWaterRipples(int x, int y, float[] out) {
float dx = x-icentreX;
float dy = y-icentreY;
float distance2 = dx*dx + dy*dy;
// зЎ®е®ҡ water rippleзҡ„еҚҠеҫ„пјҢеҰӮжһңеңЁеҚҠеҫ„д№ӢеӨ–пјҢе°ұзӣҙжҺҘиҺ·еҸ–еҺҹжқҘдҪҚзҪ®пјҢдёҚз”Ёи®Ўз®—иҝҒ移йҮҸ
if (distance2 > radius2) {
out[0] = x;
out[1] = y;
} else {
// еҰӮжһңеңЁradiusеҚҠеҫ„д№ӢеҶ…пјҢи®Ўз®—еҮәжқҘ
float distance = (float)Math.sqrt(distance2);
// и®Ўз®—ж”№зӮ№жҢҜе№…
float amount = amplitude * (float)Math.sin(distance / wavelength * ImageMath.TWO_PI - phase);
// и®Ўз®—иғҪйҮҸжҚҹеӨұпјҢ
amount *= (radius-distance)/radius; // и®Ўз®—иғҪйҮҸжҚҹеӨұпјҢ
if ( distance != 0 )
amount *= wavelength/distance;
// еҫ—еҲ°water ripple жңҖз»ҲиҝҒ移дҪҚзҪ®
out[0] = x + dx*amount;
out[1] = y + dy*amount;
}
}
}ж„ҹи°ўеҗ„дҪҚзҡ„йҳ…иҜ»пјҒе…ідәҺвҖңjavaеҰӮдҪ•е®һзҺ°ж°ҙжіўзә№жү©ж•Јж•ҲжһңвҖқиҝҷзҜҮж–Үз« е°ұеҲҶдә«еҲ°иҝҷйҮҢдәҶпјҢеёҢжңӣд»ҘдёҠеҶ…е®№еҸҜд»ҘеҜ№еӨ§е®¶жңүдёҖе®ҡзҡ„её®еҠ©пјҢи®©еӨ§е®¶еҸҜд»ҘеӯҰеҲ°жӣҙеӨҡзҹҘиҜҶпјҢеҰӮжһңи§үеҫ—ж–Үз« дёҚй”ҷпјҢеҸҜд»ҘжҠҠе®ғеҲҶдә«еҮәеҺ»и®©жӣҙеӨҡзҡ„дәәзңӢеҲ°еҗ§пјҒ


