本文实例讲述了Java实现指定线程执行顺序的三种方式。分享给大家供大家参考,具体如下:
方法一:通过共享对象锁加上可见变量来实现。
public class MyService {
  private volatile int orderNum = 1;
  public synchronized void methodA() {
    try {
      while (orderNum != 1) {
        wait();
      }
      for (int i = 0; i < 2; i++) {
        System.out.println("AAAAA");
      }
      orderNum = 2;
      notifyAll();
    } catch (InterruptedException e) {
      e.printStackTrace();
    }
  }
  public synchronized void methodB() {
    try {
      while (orderNum != 2) {
        wait();
      }
      for (int i = 0; i < 2; i++) {
        System.out.println("BBBBB");
      }
      orderNum = 3;
      notifyAll();
    } catch (InterruptedException e) {
      e.printStackTrace();
    }
  }
  public synchronized void methodC() {
    try {
      while (orderNum != 3) {
        wait();
      }
      for (int i = 0; i < 2; i++) {
        System.out.println("CCCCC");
      }
      orderNum = 1;
      notifyAll();
    } catch (InterruptedException e) {
      e.printStackTrace();
    }
  }
}
import service.MyService;
public class ThreadAA extends Thread {
  private MyService dbtools;
  public ThreadAA(MyService dbtools) {
    super();
    this.dbtools = dbtools;
  }
  @Override
  public void run() {
    dbtools.methodA();
  }
}
import service.MyService;
public class ThreadBB extends Thread {
  private MyService dbtools;
  public ThreadBB(MyService dbtools) {
    super();
    this.dbtools = dbtools;
  }
  @Override
  public void run() {
    dbtools.methodB();
  }
}
import service.MyService;
public class ThreadCC extends Thread {
  private MyService dbtools;
  public ThreadCC(MyService dbtools) {
    this.dbtools = dbtools;
  }
  @Override
  public void run() {
    dbtools.methodC();
  }
}
import extthread.ThreadCC;
import service.MyService;
import extthread.ThreadAA;
import extthread.ThreadBB;
public class Run {
  public static void main(String[] args) {
    MyService myService = new MyService();
    for (int i = 0; i < 2; i++) {
      ThreadBB output = new ThreadBB(myService);
      output.start();
      ThreadAA input = new ThreadAA(myService);
      input.start();
      ThreadCC threadCC = new ThreadCC(myService);
      threadCC.start();
    }
  }
}
执行结果:
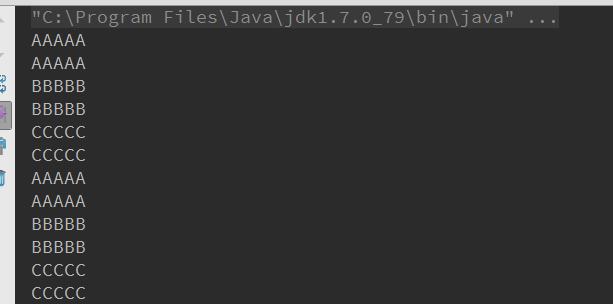
可以看到线程的启动按顺序执行了。共享对象锁,可以保证每个方法只能同时有一个线程进入,配合wait和notifyall方法,可以启动或者唤醒线程。
方法二:通过主线程Join()
class T11 extends Thread {
  public void run() {
    System.out.println("in T1");
  }
}
class T22 extends Thread {
  public void run() {
    System.out.println("in T2");
  }
}
class T33 extends Thread {
  public void run() {
    System.out.println("in T3");
  }
}
public class Test2 {
  public static void main(String[] args) throws InterruptedException {
    T11 t1 = new T11();
    T22 t2 = new T22();
    T33 t3 = new T33();
    t1.start();
    t1.join();
    t2.start();
    t2.join();
    t3.start();
  }
}
方法三:通过线程执行时Join()
class T1 extends Thread {
  public void run(){
    Random random = new Random();
    try {
      Thread.sleep(random.nextInt(1000));
    } catch (InterruptedException e) {
      e.printStackTrace();
    }
    System.out.println("in T1");
  }
}
class T2 extends Thread{
  private Thread thread;
  public T2(Thread thread) {
    this.thread = thread;
  }
  public void run(){
    try {
      thread.join();
    } catch (InterruptedException e) {
      e.printStackTrace();
    }
    System.out.println("in T2");
  }
}
class T3 extends Thread{
  private Thread thread;
  public T3(Thread thread) {
    this.thread = thread;
  }
  public void run(){
    try {
      thread.join();
    } catch (InterruptedException e) {
      e.printStackTrace();
    }
    System.out.println("in T3");
  }
}
public class Test {
  public static void main(String[] args) throws InterruptedException {
    T1 t1 = new T1();
    T2 t2 = new T2(t1);
    T3 t3 = new T3(t2);
    t2.start();
    t1.start();
    t3.start();
  }
}
更多java相关内容感兴趣的读者可查看本站专题:《Java进程与线程操作技巧总结》、《Java数据结构与算法教程》、《Java操作DOM节点技巧总结》、《Java文件与目录操作技巧汇总》和《Java缓存操作技巧汇总》
希望本文所述对大家java程序设计有所帮助。
亿速云「云服务器」,即开即用、新一代英特尔至强铂金CPU、三副本存储NVMe SSD云盘,价格低至29元/月。点击查看>>
免责声明:本站发布的内容(图片、视频和文字)以原创、转载和分享为主,文章观点不代表本网站立场,如果涉及侵权请联系站长邮箱:is@yisu.com进行举报,并提供相关证据,一经查实,将立刻删除涉嫌侵权内容。


 计算
计算 安全
安全 数据库
数据库 网络和加速
网络和加速 企业服务
企业服务


