拦截器功能强大,能够深入方法前后,常应用于日志记录、权限检查和性能检测等,几乎是项目中不可或缺的一部分,本文就来实现Spring Boot自定义拦截器的配置。
理论指导
问:Spring Boot怎么配置拦截器?
答:配置一个拦截器需要两步完成。
代码实现
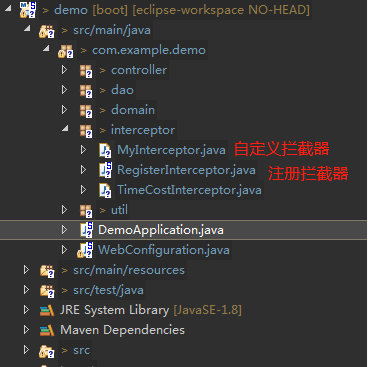
目录结构:

具体代码:
MyInterceptor.java
public class MyInterceptor implements HandlerInterceptor {

  /**
   * preHandle在执行Controller之前执行,返回true,则继续执行Contorller
   * 返回false则请求中断。
   */
  @Override
  public boolean preHandle(HttpServletRequest httpServletRequest, HttpServletResponse httpServletResponse, Object o)
      throws Exception {
    //只有返回true才会继续向下执行,返回false取消当前请求
    long startTime = System.currentTimeMillis();
    httpServletRequest.setAttribute("startTime", startTime);
    return true;
  }

  /**
   * postHandle是在请求执行完,但渲染ModelAndView返回之前执行
   */
  @Override
  public void postHandle(HttpServletRequest httpServletRequest, HttpServletResponse httpServletResponse, Object o,
      ModelAndView modelAndView) throws Exception {
    long startTime = (Long) httpServletRequest.getAttribute("startTime");
    long endTime = System.currentTimeMillis();
    long executeTime = endTime - startTime;
    StringBuilder sb = new StringBuilder(1000);
    SimpleDateFormat simpleDateFormat = new SimpleDateFormat("yyyy-MM-dd HH:mm:ss");
    String date = simpleDateFormat.format(new Date());
    sb.append("-----------------------").append(date).append("-------------------------------------\n");
    sb.append("URI    : ").append(httpServletRequest.getRequestURI()).append("\n");
    sb.append("CostTime : ").append(executeTime).append("ms").append("\n");
    sb.append("-------------------------------------------------------------------------------");
    System.out.println(sb.toString());
  }

  /**
   * afterCompletion是在整个请求执行完毕后执行
   */
  @Override
  public void afterCompletion(HttpServletRequest httpServletRequest, HttpServletResponse httpServletResponse,
      Object o, Exception e) throws Exception {
  }

}RegisterInterceptor.java
/**
 * 继承WebMvcConfigurationSupport继承并重写addInterceptor方法用于注册拦截器
 * WebMvcConfigureAdapter已经过时了!!
 */
@Configuration
public class RegisterInterceptor extends WebMvcConfigurationSupport {
  @Override
  public void addInterceptors(InterceptorRegistry registry) {
    registry.addInterceptor(new MyInterceptor()).addPathPatterns("/**");
    super.addInterceptors(registry);
  }
}拦截效果

更新
跨域访问
由于JavaScript同源策略,凡是发送请求url的协议、域名、端口三者之间任意一与当前页面地址不同即为跨域。具体的看下表
|
URL
|
说明
|
是否允许通信
|
|
http://www.a.com/a.js
http://www.a.com/b.js
|
同一域名下
|
允许
|
|
http://www.a.com/lab/a.js
http://www.a.com/script/b.js
|
同一域名下不同文件夹
|
允许
|
|
http://www.a.com:8000/a.js
http://www.a.com/b.js
|
同一域名,不同端口
|
不允许
|
|
http://www.a.com/a.js
https://www.a.com/b.js
|
同一域名,不同协议
|
不允许
|
|
http://www.a.com/a.js
http://70.32.92.74/b.js
|
域名和域名对应ip
|
不允许
|
|
http://www.a.com/a.js
http://script.a.com/b.js
|
主域相同,子域不同
|
不允许
|
|
http://www.a.com/a.js
http://a.com/b.js
|
同一域名,不同二级域名(同上)
|
不允许(cookie这种情况下也不允许访问)
|
|
http://www.cnblogs.com/a.js
http://www.a.com/b.js
|
不同域名
|
不允许
|
上面代码是可以实现拦截器基本功能,但是这样是不可以跨域访问的,前端请求接口会有报错:XMLHttpRequest cannot loadhttp://xxx/. No 'Access-Control-Allow-Origin' header is present on the requested resource. Origin 'null' is therefore not allowed access.
解决方案是设置请求头Access-Control-Allow-Origin为“*”或者设置为和request相同的Origin。
①在拦截器中添加一个设置请求头的方法。
  public void crossDomain(HttpServletRequest request, HttpServletResponse response) {
    response.setHeader("Access-Control-Allow-Origin", request.getHeader("Origin"));
    response.setHeader("Access-Control-Allow-Credentials", "true");
}②在preHandle中调用这个方法。
public boolean preHandle(HttpServletRequest request, HttpServletResponse response, Object handler)
      throws Exception {
    crossDomain(request, response);
    long startTime = System.currentTimeMillis();
    request.setAttribute("startTime", startTime);
    return true;
}以上就是本文的全部内容,希望对大家的学习有所帮助,也希望大家多多支持亿速云。
亿速云「云服务器」,即开即用、新一代英特尔至强铂金CPU、三副本存储NVMe SSD云盘,价格低至29元/月。点击查看>>
免责声明:本站发布的内容(图片、视频和文字)以原创、转载和分享为主,文章观点不代表本网站立场,如果涉及侵权请联系站长邮箱:is@yisu.com进行举报,并提供相关证据,一经查实,将立刻删除涉嫌侵权内容。