小编给大家分享一下andriod搭建轮询框架的方法,相信大部分人都还不怎么了解,因此分享这篇文章给大家参考一下,希望大家阅读完这篇文章后大有收获,下面让我们一起去了解一下吧!
很多时候Android应用需要每间隔一段时间向服务器请求数据,如果服务器数据有更新则通知界面变化。Android中最常用的红点一般采用的就是轮询,红点是为了在数据有更新时及时的提醒用户,比如朋友圈更新,当用户的朋友圈更新时就会显示红点,就是通过移动端不断的向服务器查询朋友圈的更新状态。
相关知识点
在实现轮询框架时会主要会要到下面两个类,会结合轮询框架对这三个类进行讲解,在应用中分析会理解更加深刻。
1、IntentService IntentService是一种特殊的Service,继承了Service并且是一个抽象类,必须创建它的子类才能用。IntentService可以用于执行后台耗时的任务,当任务执行后会自动停止,IntentService的优先级比一般的线程高,比较适合执行一些优先级高的后台任务。
2、PendingIntent PendingIntent是延迟的intent,主要用来在某个事件完成后执行特定的Action。PendingIntent包含了Intent及Context,所以就算Intent所属程序结束,PendingIntent依然有效,可以在其他程序中使用。PendingIntent一般作为参数传给某个实例,在该实例完成某个操作后自动执行PendingIntent上的Action,也可以通过PendingIntent的send函数手动执行,并可以在send函数中设置OnFinished表示send成功后执行的动作。
轮询框架实现
要实现轮询,可以借鉴Handler中的looper机制,如下图,维护一个消息队列,循环的从消息队列中取出消息来执行,轮询框架可以定时的向消息队列中加入消息,然后循环中消息队列中取出消息执行。

可以自己实现一个Looper,但是IntentService中已经包含了一个Looper和一个HandlerThread。因此轮询框架中使用IntentService作为循环框架。继承IntentService接口来实现处理消息访问服务器。
PollingService 用于每次轮询时向请求服务器接口数据。
public class PollingService extends IntentService {
	public static final String ACTION_CHECK_CIRCLE_UPDATE="ACTION_CHECK_CIRCLE_UPDATE";
	public static final long DEFAULT_MIN_POLLING_INTERVAL = 60000;//最短轮询间隔1分钟
 public PollingService() {
  super("PollingService");
 }

 @Override
 protected void onHandleIntent(Intent intent) {
  if (intent == null)
   return;
  final String action = intent.getAction();
  if (ACTION_CHECK_Circle_UPDATE.equals(action)) {
   CheckCircleOfFriendsUpdate();//这个是访问服务器获取朋友圈是否更新
  }
 }
}
PollingService 用来处理接到轮询的消息之后在 onHandleIntent(Intent intent) 中根据Intent所带有的action不同来进行访问服务器不同的接口获取数据。
PollingUtil 用于控制轮询服务的开始和结束 使用PollingUtil中的startPollingService来根据action和context生成一个PendingIntent,并将PendingIntent交给PollingScheduler来处理。PollingScheduler是一个线程池控制类。
public class PollingUtil {
 /**
  * 开始轮询服务
  */
 public static void startPollingService(final Context context, String action) {
   //包装需要执行Service的Intent
   Intent intent = new Intent(context, PollingService.class);
   intent.setAction(action);
   PendingIntent pendingIntent = PendingIntent.getService(context, 0,
     intent, PendingIntent.FLAG_UPDATE_CURRENT);
   PollingScheduler.getInstance().addScheduleTask(pendingIntent, 0, PollingService.DEFAULT_MIN_POLLING_INTERVAL);
  }
 }
 /**
  * 停止轮询服务
  *
  * @param context
  */
 public static void stopPollingServices(Context context, String action) {
   PollingScheduler.getInstance().clearScheduleTasks();
  }
 }
PollingScheduler实现定时向IntentService的Looper中加入消息 PollingScheduler中生成一个单线程池,addScheduleTask中定时的执行pendingIntent.send(),其中PendingIntent是由 PendingIntent pendingIntent = PendingIntent.getService(context, 0,intent, PendingIntent.FLAG_UPDATE_CURRENT); 生成的,pendingIntent.send()函数会调用Service.startService()来开启一个服务。
public class PollingScheduler {
 private static PollingScheduler sInstance;
 private ScheduledExecutorService mScheduler;

 private PollingScheduler() {
  mScheduler = Executors.newSingleThreadScheduledExecutor();
 }

 public static synchronized PollingScheduler getInstance() {
  if (sInstance == null) {
   sInstance = new PollingScheduler();
  }
  if (sInstance.mScheduler.isShutdown()) {
   sInstance.mScheduler = Executors.newSingleThreadScheduledExecutor();
  }
  return sInstance;
 }

 public void addScheduleTask(final PendingIntent pendingIntent, long initialDelay, long period) {
  Runnable command = new Runnable() {
   @Override
   public void run() {
    try {
     pendingIntent.send();
    } catch (PendingIntent.CanceledException e) {
     e.printStackTrace();
    }
   }
  };
  mScheduler.scheduleAtFixedRate(command, initialDelay, period, TimeUnit.MILLISECONDS);
 }

 public void clearScheduleTasks() {
  mScheduler.shutdownNow();
 }
}
代码分析
先给出类图之间的关系如下:
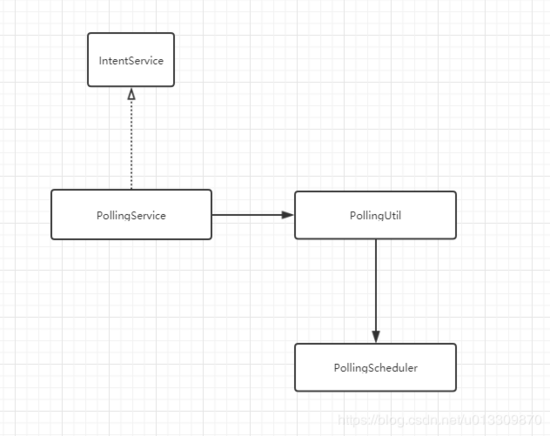
PollingService继承了IntentService,并且在PollingUtil的startPollingService方法中通过 Intent intent = new Intent(context, PollingService.class); 和将PendingIntent 与PollingService关联起来,并将PendingIntent加入到定时执行的线程池中,在PollingScheduler 中使用 pendingIntent.send();
由于PendingIntent与PollingService关联,所以执行pendingIntent.send()的时候会调用PollingIntentServide中的onStart()方法。onStart()方法是IntentService中的方法,代码如下:
 @Override
 public void onStart(@Nullable Intent intent, int startId) {
  Message msg = mServiceHandler.obtainMessage();
  msg.arg1 = startId;
  msg.obj = intent;
  mServiceHandler.sendMessage(msg);
 }
在onstart()中有一个 mServiceHandler.sendMessage(msg); ,找到mServiceHandler的生成位置:
 @Override
 public void onCreate() {
  super.onCreate();
  HandlerThread thread = new HandlerThread("IntentService[" + mName + "]");
  thread.start();

  mServiceLooper = thread.getLooper();
  mServiceHandler = new ServiceHandler(mServiceLooper);
 }
在IntentService的onCreate方法中生成了一个HandlerThread,一个mServiceLooper,一个mServiceHandler,其中mServiceHandler.sendMessage(msg)中的msg都会放到mServiceLooper,执行时从mServiceLooper中取出执行,其中ServiceHandler 的代码如下
 private final class ServiceHandler extends Handler {
  public ServiceHandler(Looper looper) {
   super(looper);
  }

  @Override
  public void handleMessage(Message msg) {
   onHandleIntent((Intent)msg.obj);
   stopSelf(msg.arg1);
  }
 }
handleMessage(Message msg)中会调用onHandleIntent((Intent)msg.obj);方法,也就是在PollingService中重写的onHandleIntent方法。 因此我们在addScheduleTask中不断的执行pending.send()方法,会不断的调用IntentService中的onStart方法中的mServiceHandler.sendMessage(msg);不断的向消息队列中发消息,然后在onHandleIntent处理消息。 这样一个轮询框架就完成了。
以上是“andriod搭建轮询框架的方法”这篇文章的所有内容,感谢各位的阅读!相信大家都有了一定的了解,希望分享的内容对大家有所帮助,如果还想学习更多知识,欢迎关注亿速云行业资讯频道!
免责声明:本站发布的内容(图片、视频和文字)以原创、转载和分享为主,文章观点不代表本网站立场,如果涉及侵权请联系站长邮箱:is@yisu.com进行举报,并提供相关证据,一经查实,将立刻删除涉嫌侵权内容。


