这篇文章将为大家详细讲解有关Android如何实现应用程序的闪屏效果,小编觉得挺实用的,因此分享给大家做个参考,希望大家阅读完这篇文章后可以有所收获。
效果图:

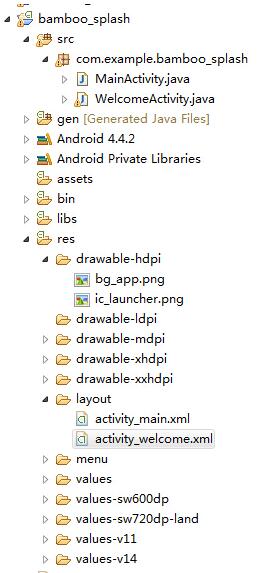
demo框架如下:

1、闪屏的布局如下:其实就是一张背景图
<?xml version="1.0" encoding="utf-8"?>
<LinearLayout xmlns:android="http://schemas.android.com/apk/res/android"
 android:layout_width="match_parent"
 android:layout_height="match_parent"
 android:background="@drawable/bg_app"
 android:orientation="vertical" >
</LinearLayout>2、WelcomeActivity.java的代码如下:
package com.example.bamboo_splash;

import android.app.Activity;
import android.content.Intent;
import android.os.Bundle;
import android.os.Handler;
import android.view.animation.AlphaAnimation;
import android.view.animation.Animation;
import android.view.animation.Animation.AnimationListener;

public class WelcomeActivity extends Activity {


 @Override
 protected void onCreate(Bundle savedInstanceState) {
 super.onCreate(savedInstanceState);
 setContentView(R.layout.activity_welcome);
 /** 方式一*/
// AlphaAnimation animation=new AlphaAnimation(0.3f, 1f);
// animation.setDuration(3000);
// animation.setAnimationListener(new AnimationListener() {
//
// @Override
// public void onAnimationStart(Animation animation) {
//
// }
//
// @Override
// public void onAnimationRepeat(Animation animation) {
//
// }
// /** 动画结束执行的方法*/
// @Override
// public void onAnimationEnd(Animation animation) {
// redirectTo();
// }
// });

 /** 方式二*/
 new Handler().postDelayed(new Runnable() {

 @Override
 public void run() {
 redirectTo();
 }
 }, 3000);
 }
 /**
 * 即将跳转的页面
 */
 public void redirectTo(){
 Intent intent=new Intent(WelcomeActivity.this, MainActivity.class);
 startActivity(intent);
 finish();
 }
}这样一个简单的闪屏效果就实现了呢,而且闪屏效果的实现有很多都方式,思路就是让你开始的节面等待个几秒钟,然后显示。
关于“Android如何实现应用程序的闪屏效果”这篇文章就分享到这里了,希望以上内容可以对大家有一定的帮助,使各位可以学到更多知识,如果觉得文章不错,请把它分享出去让更多的人看到。
亿速云「云服务器」,即开即用、新一代英特尔至强铂金CPU、三副本存储NVMe SSD云盘,价格低至29元/月。点击查看>>
免责声明:本站发布的内容(图片、视频和文字)以原创、转载和分享为主,文章观点不代表本网站立场,如果涉及侵权请联系站长邮箱:is@yisu.com进行举报,并提供相关证据,一经查实,将立刻删除涉嫌侵权内容。