这篇文章主要介绍Spring中如何借助Redis设计一个简单访问计数器,文中介绍的非常详细,具有一定的参考价值,感兴趣的小伙伴们一定要看完!
I. 设计
一个简单的访问计数器,主要利用redis的hash结构,对应的存储结构如下:
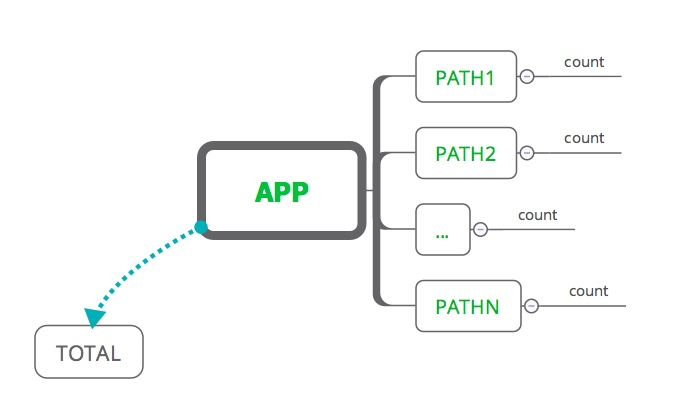
存储结构比较简单,为了扩展,每个应用(or站点)对应一个APP,然后根据path路径进行分页统计,最后有一个特殊的用于统计全站的访问计数
II. 实现
主要就是利用Redis的hash结构,然后实现数据统计,并没有太多的难度,Spring环境下搭建redis环境可以参考:
Spring之RedisTemplate配置与使用
1. Redis封装类
针对几个常用的做了简单的封装,直接使用RedisTemplate的excute方法进行的操作,当然也是可以使用 template.opsForValue() 等便捷方式,这里采用JSON方式进行对象的序列化和反序列化
public class QuickRedisClient {
  private static final Charset CODE = Charset.forName("UTF-8");
  private static RedisTemplate<String, String> template;

  public static void register(RedisTemplate<String, String> template) {
    QuickRedisClient.template = template;
  }

  public static void nullCheck(Object... args) {
    for (Object obj : args) {
      if (obj == null) {
        throw new IllegalArgumentException("redis argument can not be null!");
      }
    }
  }

  public static byte[] toBytes(String key) {
    nullCheck(key);
    return key.getBytes(CODE);
  }

  public static byte[][] toBytes(List<String> keys) {
    byte[][] bytes = new byte[keys.size()][];
    int index = 0;
    for (String key : keys) {
      bytes[index++] = toBytes(key);
    }
    return bytes;
  }

  public static String getStr(String key) {
    return template.execute((RedisCallback<String>) con -> {
      byte[] val = con.get(toBytes(key));
      return val == null ? null : new String(val);
    });
  }

  public static void putStr(String key, String value) {
    template.execute((RedisCallback<Void>) con -> {
      con.set(toBytes(key), toBytes(value));
      return null;
    });
  }

  public static Long incr(String key, long add) {
    return template.execute((RedisCallback<Long>) con -> {
      Long record = con.incrBy(toBytes(key), add);
      return record == null ? 0L : record;
    });
  }

  public static Long hIncr(String key, String field, long add) {
    return template.execute((RedisCallback<Long>) con -> {
      Long record = con.hIncrBy(toBytes(key), toBytes(field), add);
      return record == null ? 0L : record;
    });
  }

  public static <T> T hGet(String key, String field, Class<T> clz) {
    return template.execute((RedisCallback<T>) con -> {
      byte[] records = con.hGet(toBytes(key), toBytes(field));
      if (records == null) {
        return null;
      }

      return JSON.parseObject(records, clz);
    });
  }

  public static <T> Map<String, T> hMGet(String key, List<String> fields, Class<T> clz) {
    List<byte[]> list =
        template.execute((RedisCallback<List<byte[]>>) con -> con.hMGet(toBytes(key), toBytes(fields)));
    if (CollectionUtils.isEmpty(list)) {
      return Collections.emptyMap();
    }

    Map<String, T> result = new HashMap<>();
    for (int i = 0; i < fields.size(); i++) {
      if (list.get(i) == null) {
        continue;
      }

      result.put(fields.get(i), JSON.parseObject(list.get(i), clz));
    }
    return result;
  }
}
对应的配置类
package com.git.hui.story.cache.redis;

import com.git.hui.story.cache.redis.serializer.DefaultStrSerializer;
import org.springframework.cache.CacheManager;
import org.springframework.context.annotation.Bean;
import org.springframework.context.annotation.Configuration;
import org.springframework.context.annotation.PropertySource;
import org.springframework.core.env.Environment;
import org.springframework.data.redis.cache.RedisCacheManager;
import org.springframework.data.redis.connection.RedisConnectionFactory;
import org.springframework.data.redis.connection.RedisPassword;
import org.springframework.data.redis.connection.lettuce.LettuceConnectionFactory;
import org.springframework.data.redis.core.RedisTemplate;

/**
 * Created by yihui in 18:45 18/6/11.
 */
@Configuration
@PropertySource(value = "classpath:application.yml")
public class RedisConf {

  private final Environment environment;

  public RedisConf(Environment environment) {
    this.environment = environment;
  }

  @Bean
  public CacheManager cacheManager() {
    return RedisCacheManager.RedisCacheManagerBuilder.fromConnectionFactory(redisConnectionFactory()).build();
  }

  @Bean
  public RedisTemplate<String, String> redisTemplate(RedisConnectionFactory redisConnectionFactory) {
    RedisTemplate<String, String> redisTemplate = new RedisTemplate<>();
    redisTemplate.setConnectionFactory(redisConnectionFactory);

    DefaultStrSerializer serializer = new DefaultStrSerializer();
    redisTemplate.setValueSerializer(serializer);
    redisTemplate.setHashValueSerializer(serializer);
    redisTemplate.setKeySerializer(serializer);
    redisTemplate.setHashKeySerializer(serializer);

    redisTemplate.afterPropertiesSet();

    QuickRedisClient.register(redisTemplate);
    return redisTemplate;
  }


  @Bean
  public RedisConnectionFactory redisConnectionFactory() {
    LettuceConnectionFactory fac = new LettuceConnectionFactory();
    fac.getStandaloneConfiguration().setHostName(environment.getProperty("spring.redis.host"));
    fac.getStandaloneConfiguration().setPort(Integer.parseInt(environment.getProperty("spring.redis.port")));
    fac.getStandaloneConfiguration()
        .setPassword(RedisPassword.of(environment.getProperty("spring.redis.password")));
    fac.afterPropertiesSet();
    return fac;
  }
}
2. Controller 支持
首先是定义请求参数:
@Data
public class WebCountReqDO implements Serializable {
  private String appKey;
  private String referer;
}
其次是实现Controller接口,稍稍注意下,根据path进行计数的逻辑:
如果请求参数显示指定了referer参数,则用传入的参数进行统计
如果没有显示指定referer,则根据header获取referer
解析referer,分别对path和host进行统计+1,这样站点的统计计数就是根据host来的,而页面的统计计数则是根据path路径来的
@Slf4j
@RestController
@RequestMapping(path = "/count")
public class WebCountController {

  @RequestMapping(path = "cc", method = {RequestMethod.GET})
  public ResponseWrapper<CountDTO> addCount(WebCountReqDO webCountReqDO) {
    String appKey = webCountReqDO.getAppKey();
    if (StringUtils.isBlank(appKey)) {
      return ResponseWrapper.errorReturnMix(Status.StatusEnum.ILLEGAL_PARAMS_MIX, "请指定APPKEY!");
    }

    String referer = ReqInfoContext.getReqInfo().getReferer();
    if (StringUtils.isBlank(referer)) {
      referer = webCountReqDO.getReferer();
    }

    if (StringUtils.isBlank(referer)) {
      return ResponseWrapper.errorReturnMix(Status.StatusEnum.FAIL_MIX, "无法获取请求referer!");
    }

    return ResponseWrapper.successReturn(doUpdateCnt(appKey, referer));
  }


  private CountDTO doUpdateCnt(String appKey, String referer) {
    try {
      if (!referer.startsWith("http")) {
        referer = "https://" + referer;
      }

      URI uri = new URI(referer);
      String host = uri.getHost();
      String path = uri.getPath();
      long count = QuickRedisClient.hIncr(appKey, path, 1);
      long total = QuickRedisClient.hIncr(appKey, host, 1);
      return new CountDTO(count, total);
    } catch (Exception e) {
      log.error("get referer path error! referer: {}, e: {}", referer, e);
      return new CountDTO(1L, 1L);
    }
  }
}
以上是“Spring中如何借助Redis设计一个简单访问计数器”这篇文章的所有内容,感谢各位的阅读!希望分享的内容对大家有帮助,更多相关知识,欢迎关注亿速云行业资讯频道!
免责声明:本站发布的内容(图片、视频和文字)以原创、转载和分享为主,文章观点不代表本网站立场,如果涉及侵权请联系站长邮箱:is@yisu.com进行举报,并提供相关证据,一经查实,将立刻删除涉嫌侵权内容。


