这篇文章主要介绍了Android4.0开发之Keyguard解锁屏机制的示例分析,具有一定借鉴价值,感兴趣的朋友可以参考下,希望大家阅读完这篇文章之后大有收获,下面让小编带着大家一起了解一下。
具体如下:
Keyguard解锁屏是Android系统中必不可少的模块,用户在开机后或者在点击Power按钮屏幕变亮后首先看到的画面即为解锁屏模块对应的界面。Keyguard模块功能相对简单:
第一:直观地显示手机当前的关键信息:比如电池信息、运营商信息、日期信息以及通话短信信息等。
第二:增强手机的安全性能:为了安全,用户可以在Setting里的Secure选项中设置password、pattern、account等不同的安全策略,防止非法用户访问手机系统。
但从代码实现的角度该模块逻辑还是比较复杂,不但需要监听系统中的多种event,比如sim、电话、电池以及Carrier等状态,还要正确反映、显示屏幕的不同状态。为了对Keyguard模块的处理逻辑有更清晰的理解,下面首先从系统构成的角度概括介绍Keyguard解锁屏模块的框架,然后对解锁屏模块中重要的处理逻辑进行详细介绍。
一、系统介绍
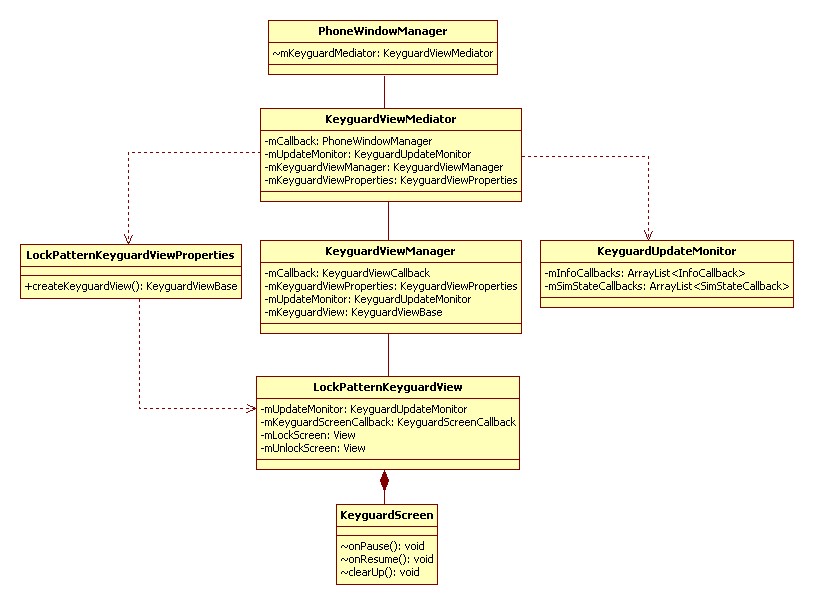
Keyguard解锁屏模块的框架类图如下:

图中仅列出了Keyguard解锁屏模块涉及的重要类,这些类实现了Keyguard模块的主要功能,它们的作用如下:
PhoneWindowManager是解锁屏模块对外交互的接口,窗口管理Service、电源管理Service等外部模块都是通过PhoneWindowManager访问Keyguard内部功能。
KeyguardViewMediator类为解锁屏模块的中介者,以中介的身份处理keyguard状态变化,处理event、power管理、PhoneWindowManager通知等请求,并作为回调对象供解锁屏模块的其它类回调。
KeyguardUpdateMonitor类为解锁屏模块的监听者,它负责监听时间、sim卡、运营商信息、电池信息、电话信息等状态的变化,并通知keyguard View模块更新显示。
KeyguardViewManager类为解锁屏view模块的管理者,管理解锁屏界面的创建、显示、隐藏以及重置等。
LockPatternKeyguardView类为解锁屏模块的View界面,为所有解锁屏界面的host view。根据设置的安全策略,显示不同的解锁屏界面。Google原生代码中实现了6种解锁屏界面:
1) LockScreen:用于显示屏幕加锁状态
2) PatternUnlockScreen:实现图案解锁模式
3) SimPukUnlockScreen:屏幕实现SIM PUK码解锁模式
4) SimUnlockScreen:实现Sim PIN码解锁模式
5) AccountUnlockScreen:实现 GOOGLE 帐户解锁
6) PasswordUnlockScreen:实现自定义密码解锁模式
二、主要逻辑
1、Keyguard模块启动、显示逻辑
即手机开机进入系统到锁屏界面显示的过程。手机系统启动过程中会自动启动Keyguard解锁屏模块,该模块的创建始于WindowManagerService类,时序图如下:

1)WindowManagerService在启动时会实例化PhoneWindowManager对象mPolicy,并在窗口管理Policy线程PolicyThread中初始化,代码如下:
public void run() {
 Looper.prepare();
 WindowManagerPolicyThread.set(this, Looper.myLooper());
 ......
 mPolicy.init(mContext, mService, mService, mPM);
 ......
 Looper.loop();
}
从代码中可以看到PhoneWindowManager在独立的线程和Looper消息队列中处理Message事件,该Looper对象也为解锁屏模块使用以处理所有handler消息。
2)mPolicy函数init中创建解锁屏模块的中介者——KeyguardViewMediator对象。
3)在KeyguardViewMediator的构造函数中创建LockPatternKeyguardViewProperties、KeyguardUpdateMonitor、KeyguardViewManager等重要对象:
public KeyguardViewMediator(Context context, PhoneWindowManager callback,
   LocalPowerManager powerManager) {
  ……
  mUpdateMonitor = new KeyguardUpdateMonitor(context);
  mUpdateMonitor.registerInfoCallback(this);
  mUpdateMonitor.registerSimStateCallback(this);
  mLockPatternUtils = new LockPatternUtils(mContext);
  mKeyguardViewProperties
= new LockPatternKeyguardViewProperties(mLockPatternUtils, mUpdateMonitor);
  mKeyguardViewManager = new KeyguardViewManager(
    context, WindowManagerImpl.getDefault(), this,
    mKeyguardViewProperties, mUpdateMonitor);
  ……
 }
KeyguardViewMediator中记录了PhoneWindowManager、PowerManager等对象,同时也保存了LockPatternKeyguardViewProperties、KeyguardUpdateMonitor、KeyguardViewManager等模块内的重要对象,这样该类以中介者身份在Keyguard模块对外交互以及内部各对象间的交互中发挥了重要作用。
4)KeyguardUpdateMonitor构造函数中创建mHandler,用以响应处理该类监听的各事件状态的改变,并在handle处理函数中通知mInfoCallbacks和mSimStateCallbacks保存的监听对象,监听事件有ACTION_TIME_TICK、ACTION_TIME_CHANGED、ACTION_BATTERY_CHANGED、ACTION_TIMEZONE_CHANGED、ACTION_SIM_STATE_CHANGED、 ACTION_PHONE_STATE_CHANGED、RINGER_MODE_CHANGED_ACTION
至此Keyguard解锁屏模块中重要的类对象已经实例化,但是还未涉及解锁屏View界面的创建和显示。
5)系统启动后解锁屏界面的首次显示始于WindowManagerService的systemReady函数,通知PhoneWindowManager系统就绪,代码如下:
public void systemReady() {
 mPolicy.systemReady();
}
6)PhoneWindowManager的systemReady函数中通知解锁屏模块的中介者KeyguardViewMediator对象系统就绪
7)中介者KeyguardViewMediator类中处理系统就绪情形:调用doKeyguardLocked函数显示解锁屏界面:
public void onSystemReady() {
 synchronized (this) {
   mSystemReady = true;
   doKeyguardLocked();
 }
}
private void doKeyguardLocked() {
  ......
  // if the keyguard is already showing, don't bother
  if (mKeyguardViewManager.isShowing()) {
   if (DEBUG) Log.d(TAG, "doKeyguard: not showing because it is already showing");
   return;
  }
  .....
  if (DEBUG) Log.d(TAG, "doKeyguard: showing the lock screen");
  showLocked();
}
showLocked函数中发送SHOW消息异步处理解锁屏界面显示的请求。
8)handleShow中处理界面显示的消息请求,函数中调用KeyguardViewManager的函数show实现解锁屏界面的真正显示:
public synchronized void show() {
  ......
  if (mKeyguardHost == null) {
   if (DEBUG) Log.d(TAG, "keyguard host is null, creating it...");
   mKeyguardHost = new KeyguardViewHost(mContext, mCallback);
   ......
   mViewManager.addView(mKeyguardHost, lp);
  }
  ......
  mViewManager.updateViewLayout(mKeyguardHost, mWindowLayoutParams);
  if (mKeyguardView == null) {
   mKeyguardView = mKeyguardViewProperties.createKeyguardView(mContext, mUpdateMonitor, this);
   ......
   mKeyguardHost.addView(mKeyguardView, lp);
   ......
  }
  ......
}
该函数中主要创建了Keyguard显示View中的两个重要的对象:mKeyguardHost和mKeyguardView,它们都是继承于FrameLayout,为解锁屏视图的根view。
9)在创建对象mKeyguardView时根据解锁屏mode创建解锁屏界面:
protected void updateScreen(Mode mode, boolean force) {
   ......
  // Re-create the lock screen if necessary
  if (mode == Mode.LockScreen || mShowLockBeforeUnlock) {
   if (force || mLockScreen == null) {
    recreateLockScreen();
   }
  }
  // Re-create the unlock screen if necessary. This is primarily required to properly handle
  // SIM state changes. This typically happens when this method is called by reset()
  if (mode == Mode.UnlockScreen) {
   final UnlockMode unlockMode = getUnlockMode();
   if (force || mUnlockScreen == null || unlockMode != mUnlockScreenMode) {
    recreateUnlockScreen(unlockMode);
   }
  }
  ......
}
10)在函数createLockScreen或者createUnlockScreenFor中创建具体的Lock或者Unlock View界面,并调用show函数进行显示
至此,Keyguard解锁屏模块从系统开机启动到界面显示的处理逻辑已介绍完成。
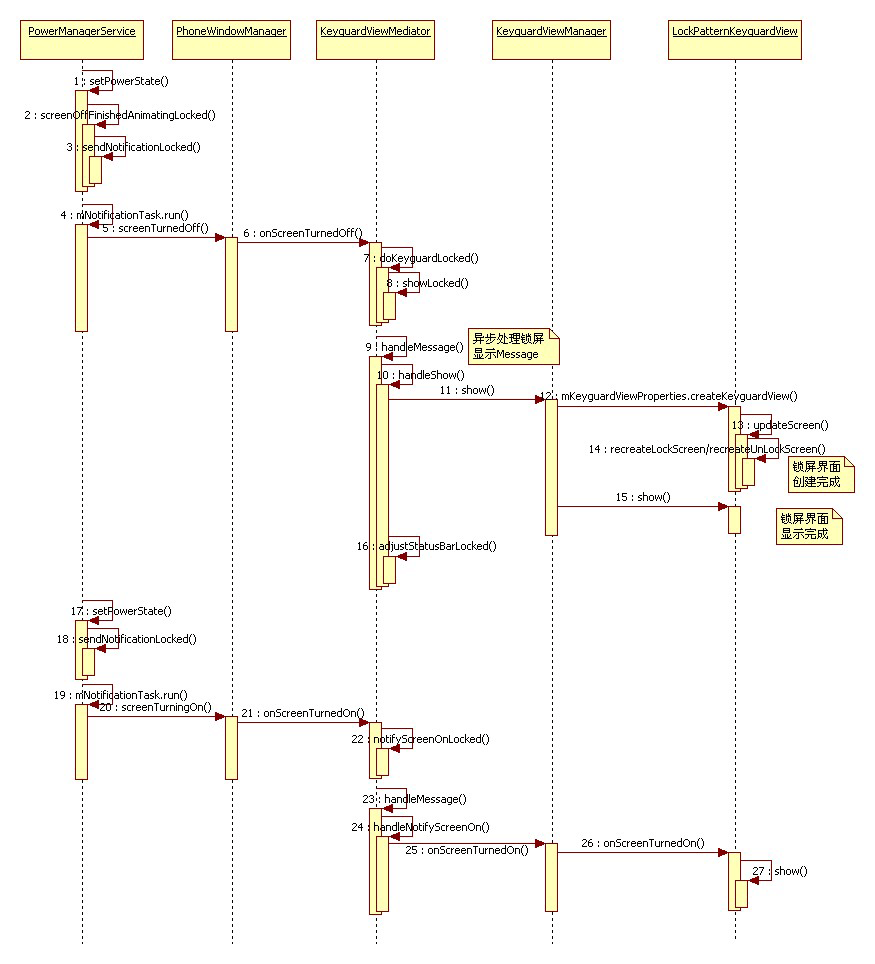
2、两次按下Power按钮屏幕亮->暗->亮过程中锁屏模块处理逻辑
连续两次按下Power按钮屏幕亮->暗->亮过程中解锁屏模块处理逻辑的时序图如下:

1)在函数PowerManagerService:setPowerState中响应Power按钮的按下,代码如下:
private void setPowerState(int newState, boolean noChangeLights, int reason)
{
  synchronized (mLocks) {
   ……
   if (oldScreenOn != newScreenOn) {
    if (newScreenOn) {
     // When the user presses the power button, we need to always send out the
     // notification that it's going to sleep so the keyguard goes on. But
     // we can't do that until the screen fades out, so we don't show the keyguard
     // too early.
     if (mStillNeedSleepNotification) {
      sendNotificationLocked(false, WindowManagerPolicy.OFF_BECAUSE_OF_USER);
     }
     ……
     if (err == 0) {
      sendNotificationLocked(true, -1);
      // Update the lights *after* taking care of turning the
      // screen on, so we do this after our notifications are
      // enqueued and thus will delay turning on the screen light
      // until the windows are correctly displayed.
      if (stateChanged) {
       updateLightsLocked(newState, 0);
      }
      mPowerState |= SCREEN_ON_BIT;
     }
    } else {
     ……
     if (!mScreenBrightness.animating) {
      err = screenOffFinishedAnimatingLocked(reason);
     }
     ……
    }
   }
   ……
  }
}
根据上面的代码逻辑,屏幕即将变暗时调用函数screenOffFinishedAnimatingLocked,屏幕即将变亮时调用函数sendNotificationLocked。
2)函数sendNotificationLocked发送Notification Task线程到handler,并异步执行通知解锁屏模块进行状态更新:
private Runnable mNotificationTask = new Runnable()
{
  public void run()
  {
   while (true) {
    ......
    if (value == 1) {
     policy.screenTurningOn(mScreenOnListener);
     ......
    }
    else if (value == 0) {
     policy.screenTurnedOff(why);
     ......
    }
    else {
     // If we're in this case, then this handler is running for a previous
     // paired transaction. mBroadcastWakeLock will already have been released.
     break;
    }
   }
  }
};
上面的线程函数run中分别处理了屏幕变暗和变亮的情形。按下Power按钮屏幕变暗时调用了函数screenTurnedOff,why为变暗的原因,此处值为OFF_BECAUSE_OF_USER。
3)KeyguardViewMediator中根据屏幕变暗的原因分别处理屏幕变暗事件:
/**
* Called to let us know the screen was turned off.
* @param why either {@link WindowManagerPolicy#OFF_BECAUSE_OF_USER},
* {@link WindowManagerPolicy#OFF_BECAUSE_OF_TIMEOUT} or
* {@link WindowManagerPolicy#OFF_BECAUSE_OF_PROX_SENSOR}.
*/
public void onScreenTurnedOff(int why) {
 synchronized (this) {
 ……
 else if (mShowing) { //若是(mShowing)则重置显示界面,否则重新显示锁屏界面
    notifyScreenOffLocked();
    resetStateLocked();
   } else if (why == WindowManagerPolicy.OFF_BECAUSE_OF_TIMEOUT) {
    // if the screen turned off because of timeout, set an alarm
    // to enable it a little bit later (i.e, give the user a chance
    // to turn the screen back on within a certain window without
    // having to unlock the screen)
    ……
    if (timeout <= 0) {
     // Lock now
     mSuppressNextLockSound = true;
     doKeyguardLocked();
    } else {
     // Lock in the future
     long when = SystemClock.elapsedRealtime() + timeout;
     Intent intent = new Intent(DELAYED_KEYGUARD_ACTION);
     intent.putExtra("seq", mDelayedShowingSequence);
     PendingIntent sender = PendingIntent.getBroadcast(mContext,
       0, intent, PendingIntent.FLAG_CANCEL_CURRENT);
     mAlarmManager.set(AlarmManager.ELAPSED_REALTIME_WAKEUP, when,
       sender);
    }
   } else if (why == WindowManagerPolicy.OFF_BECAUSE_OF_PROX_SENSOR) {
    // Do not enable the keyguard if the prox sensor forced the screen off.
   } else { //显示锁屏屏幕
    doKeyguardLocked();
   }
  }
}
4)调用doKeyguardLocked重新显示锁屏界面,随后的锁屏界面显示逻辑与Keyguard模块启动显示中的8~10步相同,不再赘述。
5)按下Power按钮屏幕即将由暗->亮时代码处理逻辑重新执行1~2步,第二步中屏幕变亮时调用的函数是PhoneWindowManager:screenTurningOn。
6)函数screenTurningOn中调用中介者KeyguardViewMediator的函数onScreenTurnedOn,该函数直接调用屏幕变亮异步通知函数KeyguardViewMediator:notifyScreenOnLocked,告知解锁屏模块屏幕即将变亮。
7)函数handleNotifyScreenOn响应屏幕变亮的通知
8)程序执行到LockPatternKeyguardView:onScreenTurnedOn函数,并调用show函数进行解锁屏界面的显示,代码如下:
public void show() {
  if (mMode == Mode.LockScreen) {
   ((KeyguardScreen) mLockScreen).onResume();
  } else {
   ((KeyguardScreen) mUnlockScreen).onResume();
  }
  ......
 }
至此,逻辑处理完成。
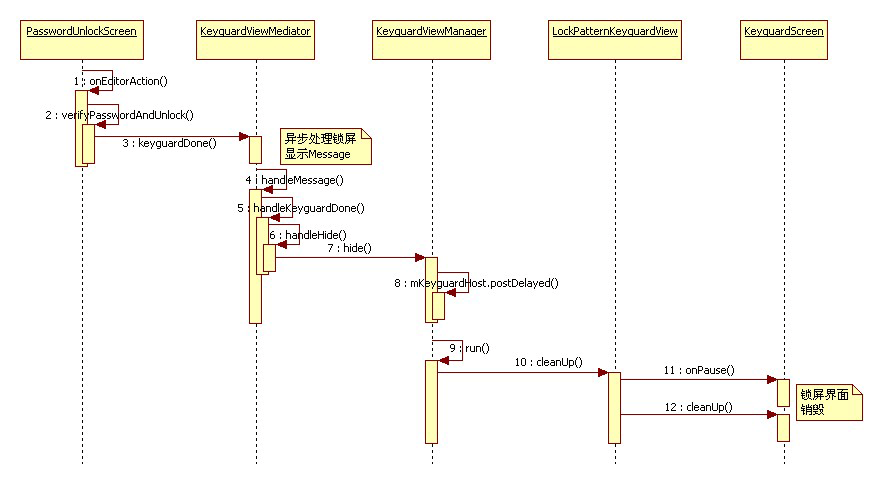
3、自定义口令解锁逻辑
自定义口令解锁始于PasswordUnlockScreen,时序图如下:

1)解锁屏界面输入密码点击确定按钮后,在函数onEditorAction中进行响应:
public boolean onEditorAction(TextView v, int actionId, KeyEvent event) {
  // Check if this was the result of hitting the enter key
  if (actionId == EditorInfo.IME_NULL || actionId == EditorInfo.IME_ACTION_DONE
    || actionId == EditorInfo.IME_ACTION_NEXT) {
   verifyPasswordAndUnlock();
   return true;
  }
  return false;
}2)在函数verifyPasswordAndUnlock中对输入的密码进行判断,如果输入正确,测调用keyguardDone响应解锁完成的操作。mCallback.keyguardDone(true)调用是所有解锁屏mode情形在解锁成功后必须调用的函数,随后的处理逻辑对于不同的解锁屏界面也是相同的。
3)回调KeyguardScreenCallback和KeyguardViewMediator的函数keyguardDone,在后者的keyguardDone函数中,异步发送keyDone事件:
public void keyguardDone(boolean authenticated, boolean wakeup) {
 synchronized (this) {
  ……
  Message msg = mHandler.obtainMessage(KEYGUARD_DONE);
  msg.arg1 = wakeup ? 1 : 0;
  mHandler.sendMessage(msg);
  ……
 }
}4)函数KeyguardViewMediator:handleKeyguardDone异步处理keyguardDone事件,调用handleHide隐藏锁屏界面。
5)KeyguardViewManager.hide函数中调用锁屏界面的销毁函LockPatternKeyguardView:cleanUp数隐藏销毁界面,如下:
public void cleanUp() {
 if (mLockScreen != null) {
  ((KeyguardScreen) mLockScreen).onPause();
  ((KeyguardScreen) mLockScreen).cleanUp();
  this.removeView(mLockScreen);
  mLockScreen = null;
 }
 if (mUnlockScreen != null) {
  ((KeyguardScreen) mUnlockScreen).onPause();
  ((KeyguardScreen) mUnlockScreen).cleanUp();
  this.removeView(mUnlockScreen);
  mUnlockScreen = null;
 }
 ......
}
至此,解锁完成。
感谢你能够认真阅读完这篇文章,希望小编分享的“Android4.0开发之Keyguard解锁屏机制的示例分析”这篇文章对大家有帮助,同时也希望大家多多支持亿速云,关注亿速云行业资讯频道,更多相关知识等着你来学习!
免责声明:本站发布的内容(图片、视频和文字)以原创、转载和分享为主,文章观点不代表本网站立场,如果涉及侵权请联系站长邮箱:is@yisu.com进行举报,并提供相关证据,一经查实,将立刻删除涉嫌侵权内容。