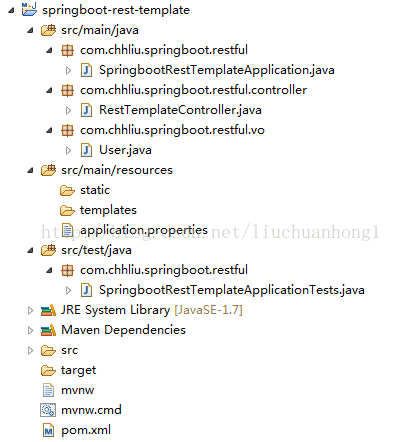
RestTemplate是Spring提供的用于访问Rest服务的客户端,RestTemplate提供了多种便捷访问远程Http服务的方法,能够大大提高客户端的编写效率。前面的博客中https://www.jb51.net/article/132885.htm,已经使用Jersey客户端来实现了消费spring boot的Restful服务,接下来,我们使用RestTemplate来消费前面示例中的Restful服务,前面的示例:
springboot整合H2内存数据库,实现单元测试与数据库无关性
该示例提供的Restful服务如下:http://localhost:7900/user/1
{"id":1,"username":"user1","name":"张三","age":20,"balance":100.00}


pom文件依赖如下:
<?xml version="1.0" encoding="UTF-8"?>
<project xmlns="http://maven.apache.org/POM/4.0.0" xmlns:xsi="http://www.w3.org/2001/XMLSchema-instance"
  xsi:schemaLocation="http://maven.apache.org/POM/4.0.0 http://maven.apache.org/xsd/maven-4.0.0.xsd">
  <modelVersion>4.0.0</modelVersion>

  <groupId>com.chhliu.springboot.restful</groupId>
  <artifactId>springboot-rest-template</artifactId>
  <version>0.0.1-SNAPSHOT</version>
  <packaging>jar</packaging>

  <name>springboot-rest-template</name>
  <description>Demo project for Spring Boot RestTemplate</description>

  <parent>
    <groupId>org.springframework.boot</groupId>
    <artifactId>spring-boot-starter-parent</artifactId>
    <version>1.4.3.RELEASE</version>
    <relativePath/> <!-- lookup parent from repository -->
  </parent>

  <properties>
    <project.build.sourceEncoding>UTF-8</project.build.sourceEncoding>
    <project.reporting.outputEncoding>UTF-8</project.reporting.outputEncoding>
    <java.version>1.7</java.version>
  </properties>

  <dependencies>
    <dependency>
      <groupId>org.springframework.boot</groupId>
      <artifactId>spring-boot-starter-web</artifactId>
    </dependency>

    <dependency>
      <groupId>org.springframework.boot</groupId>
      <artifactId>spring-boot-starter-test</artifactId>
      <scope>test</scope>
    </dependency>
    <!-- 热启动,热部署依赖包,为了调试方便,加入此包 -->
    <dependency>
      <groupId>org.springframework.boot</groupId>
      <artifactId>spring-boot-devtools</artifactId>
      <optional>true</optional>
    </dependency>
  </dependencies>

  <build>
    <plugins>
      <plugin>
        <groupId>org.springframework.boot</groupId>
        <artifactId>spring-boot-maven-plugin</artifactId>
      </plugin>
    </plugins>
  </build>
</project>
由于我们使用RestTemplate调用Restful服务后,需要将对应的json串转换成User对象,所以需要将这个类拷贝到该工程中,如下:
package com.chhliu.springboot.restful.vo;

import java.math.BigDecimal;

public class User {
 private Long id;

 private String username;

 private String name;

 private Short age;

 private BigDecimal balance;

 // ……省略getter和setter方法
/**
 * attention:
 * Details:TODO
 * @author chhliu
 * 创建时间:2017-1-20 下午2:05:45
 * @return
 */
@Override
public String toString() {
  return "User [id=" + id + ", username=" + username + ", name=" + name
      + ", age=" + age + ", balance=" + balance + "]";
}
}
package com.chhliu.springboot.restful.controller;

import org.springframework.beans.factory.annotation.Autowired;
import org.springframework.web.bind.annotation.GetMapping;
import org.springframework.web.bind.annotation.PathVariable;
import org.springframework.web.bind.annotation.RestController;
import org.springframework.web.client.RestTemplate;

import com.chhliu.springboot.restful.vo.User;

@RestController
public class RestTemplateController {
  @Autowired
  private RestTemplate restTemplate;

  @GetMapping("/template/{id}")
  public User findById(@PathVariable Long id) {
        // http://localhost:7900/user/是前面服务的对应的url
        User u = this.restTemplate.getForObject("http://localhost:7900/user/" + id,
        User.class);
    System.out.println(u);
    return u;
  }
}
package com.chhliu.springboot.restful;

import org.springframework.beans.factory.annotation.Autowired;
import org.springframework.boot.SpringApplication;
import org.springframework.boot.autoconfigure.SpringBootApplication;
import org.springframework.boot.web.client.RestTemplateBuilder;
import org.springframework.context.annotation.Bean;
import org.springframework.web.client.RestTemplate;

@SpringBootApplication
public class SpringbootRestTemplateApplication {
  // 启动的时候要注意,由于我们在controller中注入了RestTemplate,所以启动的时候需要实例化该类的一个实例
  @Autowired
  private RestTemplateBuilder builder;

    // 使用RestTemplateBuilder来实例化RestTemplate对象,spring默认已经注入了RestTemplateBuilder实例
  @Bean
  public RestTemplate restTemplate() {
    return builder.build();
  }

  public static void main(String[] args) {
    SpringApplication.run(SpringbootRestTemplateApplication.class, args);
  }
}
在浏览器中输入:http://localhost:7902/template/1
测试结果如下:
控制台打印结果:
User [id=1, username=user1, name=张三, age=20, balance=100.00]
通过上面的测试,说明我们已经成功的调用了spring boot的Restful服务。
上面的测试中,有一个很不好的地方,
User u = this.restTemplate.getForObject("http://localhost:7900/user/" + id,
User.class); 此处出现了硬编码,当服务器地址改变的时候,需要改动对应的代码,改进的方法,将Restful服务的地址写到配置文件中。
修改controller如下:
package com.chhliu.springboot.restful.controller;

import org.springframework.beans.factory.annotation.Autowired;
import org.springframework.beans.factory.annotation.Value;
import org.springframework.web.bind.annotation.GetMapping;
import org.springframework.web.bind.annotation.PathVariable;
import org.springframework.web.bind.annotation.RestController;
import org.springframework.web.client.RestTemplate;

import com.chhliu.springboot.restful.vo.User;

@RestController
public class RestTemplateController {
  @Autowired
  private RestTemplate restTemplate;

    // Restful服务对应的url地址
  @Value("${user.userServicePath}")
  private String userServicePath;

  @GetMapping("/template/{id}")
  public User findById(@PathVariable Long id) {
    User u = this.restTemplate.getForObject(this.userServicePath + id, User.class);
    System.out.println(u);
    return u;
  }
}
配置文件修改如下:
server.port:7902
user.userServicePath=http://localhost:7900/user/
启动程序:
发现测试是ok的,后面我们会引入spring cloud对这种调用方式进行进一步的改进!
以上就是本文的全部内容,希望对大家的学习有所帮助,也希望大家多多支持亿速云。
亿速云「云服务器」,即开即用、新一代英特尔至强铂金CPU、三副本存储NVMe SSD云盘,价格低至29元/月。点击查看>>
免责声明:本站发布的内容(图片、视频和文字)以原创、转载和分享为主,文章观点不代表本网站立场,如果涉及侵权请联系站长邮箱:is@yisu.com进行举报,并提供相关证据,一经查实,将立刻删除涉嫌侵权内容。