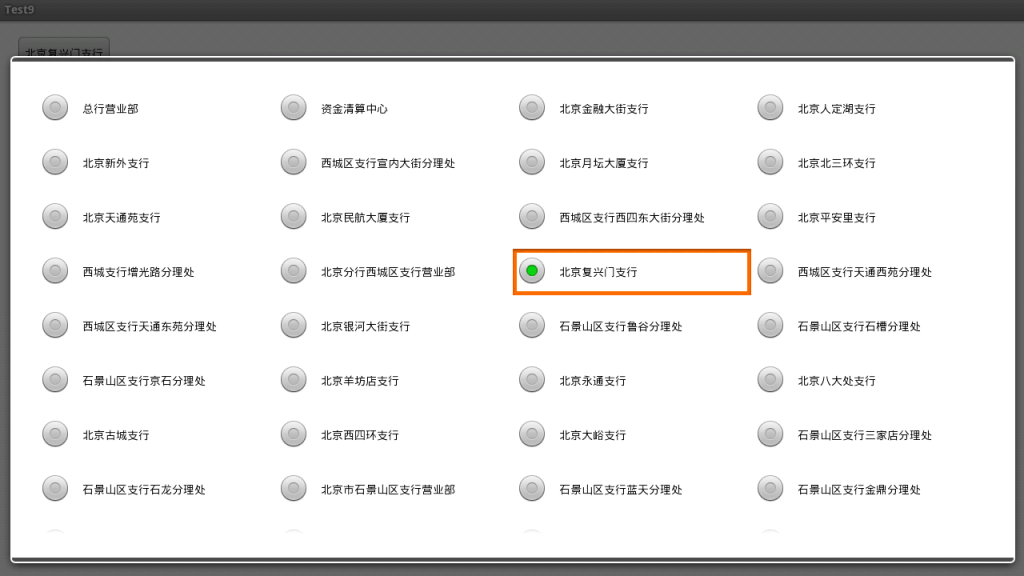
本文实例讲述了Android编程实现多列显示的下拉列表框Spinner功能。分享给大家供大家参考,具体如下:
先上张效果图:

严格来说,这并不是一个下拉列表,只不过实现的效果很像是下拉列表
实现原理:
该下拉列表其实是一个AlertDialog.Builder,给它设置了一个以LinearLayout布局的View。该View内使用了一个GridView组件,
代码:
package yyy.testandroid9;
private Intent intent;
private int index = 0;
private SharedPreferences preferences;
private File file;
private Spinner spinner;
private GridView gridView;
private LinearLayout layout;
private Builder builder;
private AlertDialog dialog;
private MyAdapter adapter;
/** Called when the activity is first created. */
@Override
public void onCreate(Bundle savedInstanceState) {
    super.onCreate(savedInstanceState);
    setContentView(R.layout.main);
    LayoutInflater inflater = LayoutInflater.from(this);
    layout = (LinearLayout) inflater.inflate(R.layout.bank_grid, null);
    gridView = (GridView) layout.findViewById(R.id.grid);
    adapter = new MyAdapter(this);
    gridView.setAdapter(adapter);
    button1 = (Button) findViewById(R.id.button1);
    button2 = (Button) findViewById(R.id.button2);
    textView = (TextView) findViewById(R.id.textview);
    builder = new Builder(TestAndroid9Activity.this);
    builder.setView(layout);
    button1.setOnClickListener(new OnClickListener() {
      public void onClick(View arg0) {
        // TODO Auto-generated method stub
         if(dialog == null){
           dialog = builder.show();
         }
         dialog.show();
      }
    });
    gridView.setOnItemClickListener(new OnItemClickListener() {
      public void onItemClick(AdapterView<?> arg0, View arg1, int position,
          long arg3) {
        // TODO Auto-generated method stub
        button1.setText(getResources().getStringArray(R.array.city)[position]);
        dialog.dismiss();
        adapter.map.put(index, false);
        adapter.map.put(position, true);
        index = position;
        adapter.notifyDataSetChanged();
      }
    });
}
private class MyAdapter extends BaseAdapter{
    private Context context;
    private String[] citys;
    private LayoutInflater inflater;
    public HashMap<Integer, Boolean> map;
    public MyAdapter(Context context) {
      super();
      this.context = context;
      citys = context.getResources().getStringArray(R.array.city);
      inflater = LayoutInflater.from(context);
      map = new HashMap<Integer, Boolean>();
      for(int i=0;i<citys.length;i++){
        map.put(i, false);
      }
    }
    public int getCount() {
      // TODO Auto-generated method stub
      return citys.length;
    }
    public Object getItem(int position) {
      // TODO Auto-generated method stub
      return null;
    }
    public long getItemId(int position) {
      // TODO Auto-generated method stub
      return position;
    }
    public View getView(int position, View view, ViewGroup parent) {
      // TODO Auto-generated method stub
      if(view == null){
        view = inflater.inflate(R.layout.bank_item, null);
      }
      TextView textView = (TextView) view.findViewById(R.id.list_text);
      RadioButton radioButton = (RadioButton) view.findViewById(R.id.radiobutton);
      radioButton.setChecked(map.get(position));
      textView.setText(citys[position]);
      return view;
    }
}
bank_grid.xml
<?xml version="1.0" encoding="utf-8"?>
<LinearLayout xmlns:android="http://schemas.android.com/apk/res/android"
  android:layout_width="fill_parent"
  android:layout_height="fill_parent"
  android:orientation="vertical"
  android:padding="20dp"
  android:background="#ffffff"
  android:id="@+id/grid_layout">
  <GridView
    android:id="@+id/grid"
      android:layout_width="fill_parent"
      android:layout_height="fill_parent"
      android:verticalSpacing="20px"
      android:horizontalSpacing="10px"
      android:numColumns="4"
      android:scrollbars="vertical"
      android:layout_margin="10dp"/>
</LinearLayout>
bank_item.xml
<?xml version="1.0" encoding="utf-8"?>
<LinearLayout xmlns:android="http://schemas.android.com/apk/res/android"
  android:layout_width="fill_parent"
  android:layout_height="fill_parent"
  android:background="#ffffff"
   >
   <RadioButton
    android:id="@+id/radiobutton"
    android:layout_width="wrap_content"
    android:layout_height="wrap_content"
    android:layout_marginRight="15dp"
    android:focusable="false"
    android:clickable="false"
    android:focusableInTouchMode="false"
    />
  <TextView
    android:id="@+id/list_text"
    android:layout_width="wrap_content"
    android:layout_height="wrap_content"
    android:textColor="#000000"
    android:layout_gravity="center_vertical"/>
</LinearLayout>
更多关于Android相关内容感兴趣的读者可查看本站专题:《Android视图View技巧总结》、《Android布局layout技巧总结》、《Android开发入门与进阶教程》、《Android调试技巧与常见问题解决方法汇总》、《Android基本组件用法总结》及《Android控件用法总结》
希望本文所述对大家Android程序设计有所帮助。
免责声明:本站发布的内容(图片、视频和文字)以原创、转载和分享为主,文章观点不代表本网站立场,如果涉及侵权请联系站长邮箱:is@yisu.com进行举报,并提供相关证据,一经查实,将立刻删除涉嫌侵权内容。