这篇文章将为大家详细讲解有关利用Android怎么绘制一个太极图,文章内容质量较高,因此小编分享给大家做个参考,希望大家阅读完这篇文章后对相关知识有一定的了解。
Android是通过graphics类来显示2D图形的。其中graphics中包括了Canvas、Paint、Color、Bitmap等类。graphics具有绘制点、线、颜色、2D几何图形、图像处理等功能。其中Color和Bitmap是很常用的类,本文主要要讲的是Canvas和Paint。顾名思义就是画布和画笔。
Canvas类
Canvas即画布,我们需要做的就是使用之前设置好的Paint来绘制图形。系统通过 Canvas 为我们提供了一些基础的绘图 API :
1、canvas.drawPoint(float x, float y, @NonNull Paint paint);
作用:绘制点。
参数:绘制点的 x 坐标,y 坐标,画笔参数
2、canvas.drawLine(float startX, float startY, float stopX, float stopY, @NonNull Paint paint);
作用:绘制线。
参数:起点的 x 坐标,起点 y 坐标,终点 x 坐标,终点 y 坐标,画笔
3、canvas.drawRect(@NonNull RectF rect, @NonNull Paint paint);
作用:绘制矩形。
参数:矩形参数,画笔参数
矩形参数构造方法:如下代码,分别为矩形的上下左右的坐标
public RectF(float left, float top, float right, float bottom) {}
4、canvas.drawVertices();
作用:绘制多边形。
参数:
5、canvas.drawArc(float left, float top, float right, float bottom, float startAngle, float sweepAngle, boolean useCenter, @NonNull Paint paint);
作用:绘制弧线。
参数:左端,上端,右端,底部,开始的角度,扫过的角度,圆弧的两段是否与圆心连线,画笔参数
6、canvas.drawCircle(float cx, float cy, float radius, @NonNull Paint paint);
作用:绘制圆。
参数:圆心 x 坐标,圆心 y 坐标,半径,画笔参数
7、canvas.drawText();
作用:绘制文字
参数:文字左下角 x 坐标,文字左下角 y 坐标,
8、canvas.drawOval(float left, float top, float right, float bottom, @NonNull Paint paint);
作用:绘制椭圆
参数:左端,上端,右端,下端,画笔参数
9、canvas.drawRoundRect(float left, float top, float right, float bottom, float rx, float ry,@NonNull Paint paint);
作用:绘制圆角矩形
参数:左端,上端,右端,下端,x轴上的圆角半径,y 轴上的圆角半径,画笔参数
系统画笔工具所提供的 API :
1、mPaint.setAntiAlias();
设置反锯齿
参数:true,false
2、mPaint.setColor();
设置画笔颜色
参数:颜色值
3、mPaint.setARGB();
设置画笔的 A,R,G,B
参数:A,R,G,B
4、mPaint.setAlpha();
设置画笔的透明度
参数:取值范围在 0 - 255 之间
5、mPaint.setTextSize();
设置画笔文字的大小
参数:必须大于 0
6、mPaint.setStyle();
设置画笔的风格(填充和描边)
参数:Paint.Style.FILL(填充),Paint.Style.STROKE(描边),Paint.Style.FILL_AND_STROKE(填充和描边)
7、mPaint.setStrokeWidth();
设置画笔描边时的宽度
参数:浮点型
Paint类
和日常绘图一样,要绘制图形,首先得选择合适的画笔。那么同理android中绘图首先得调整画笔,按照自己的需要设置画笔的相关属性,系统给我提供的常用API如下:
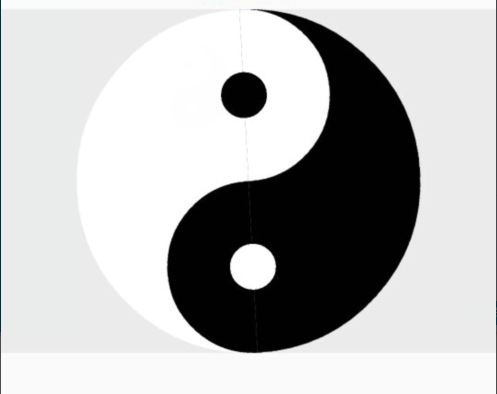
接下来我将通过绘制太极图来学习Android绘图机制。
先看看太极图:

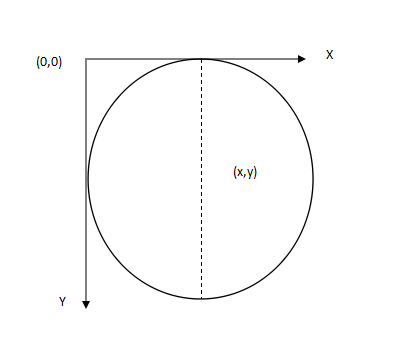
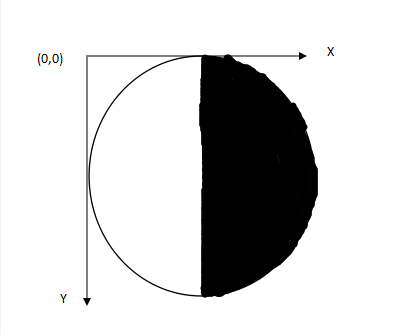
现在就要开始一步一步的将他画出来, 我们可以借鉴图层的概念。首先绘制最底部的图层,为了方便我们将其左,右两边分别设置白色和黑色:


图中(x,y)是圆心坐标。这里我设置的x=getWidth() / 2;y=getHeight() / 2;半径r=getHeight() / 2;
现在我们就来看看代码,在定义View的OnDraw(Canvas canvas)方法中:
//绘制最外层大圆
 mPaint.setColor(Color.BLACK);//设置画笔颜色为黑色
 mPaint.setStyle(Paint.Style.FILL_AND_STROKE);//设置画笔style实心
 RectF rect= new RectF(getWidth() / 2 - getHeight() / 2,
 0, getWidth() / 2 + getHeight() / 2, getHeight());//圆弧的外接矩形
 canvas.drawArc(rect, 270, 180, false, mPaint);
 mPaint.setColor(Color.WHITE);//设置画笔颜色为白色
 canvas.drawArc(rect, 90, 180, false, mPaint);
代码中rect即圆的外接四边形,其构造函数RectF(float left, float top, float right, float bottom)的四个参数分别对应四边形最左边的x坐标值;左上边的y坐标值;最右边的x坐标值;最下边的y坐标值。可以看出代码中:
 left=getWidth() / 2 - getHeight() / 2;
 top=0;
 right=getWidth() / 2 + getHeight() / 2;
 bottom=getHeight();
四个值确定了圆的外接四边形。
canvas.drawArc(rect, 90, 180, false, mPaint);第一个参数即是我们上边确定的区域,第二个参数是开始绘制的角度(90度,x轴方向顺时针旋转),第三个参数扫描的度数,第四个参数设置好的画笔Paint。
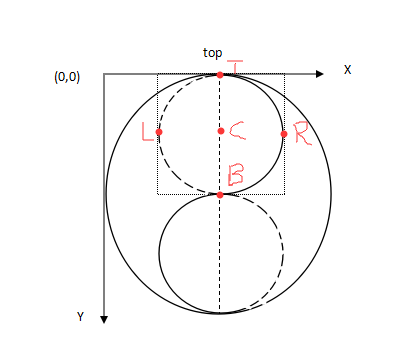
接下来我们要着手绘制中间图层,中间图层可以看做是两个上下外切的半圆,上边白色右半圆,下边黑色左半圆:

同理,我们应该也是先确定外接四边形的区域,然后在画圆弧这里就不再详述。
//绘制中间层上边圆
 mPaint.setColor(Color.BLACK);
 rect= new RectF(getWidth()/2-getHeight()/4,0,getWidth() / 2 + getHeight() / 4, getHeight() /2);
 canvas.drawArc(rect, 90, 180, false, mPaint);
 //绘制中间层下边圆
 mPaint.setColor(Color.WHITE);
 rect= new RectF(getWidth()/2-getHeight() / 4, getHeight() / 2, getWidth() / 2 + getHeight() / 4, getHeight());
 canvas.drawArc(rect, 270, 180, false, mPaint);
最后,最上边图层上下两个小圆
//绘制最上层白色小圆
 mPaint.setColor(Color.WHITE);
 canvas.drawCircle(getWidth() / 2, getHeight() / 4, getHeight() / 10, mPaint);
 //绘制最上层黑色小圆
 mPaint.setColor(Color.BLACK);
 mPaint.setStyle(Paint.Style.FILL);
 canvas.drawCircle(getWidth() / 2, getHeight() * 3 / 4, getHeight() / 10, mPaint);
canvas.drawCircle是用来画圆的,第一个参数是圆心x坐标值,第二个参数是y坐标值,第三个坐标是圆的半径,第四个是设置的画笔。
到此就画出了一个太极图。
附上自定义View的代码 :
package com.chuck.mobile.changecountview.widget;

import android.content.Context;
import android.graphics.Canvas;
import android.graphics.Color;
import android.graphics.Paint;
import android.graphics.Path;
import android.graphics.RectF;
import android.util.AttributeSet;
import android.view.View;

/**
 * 项目名称:changecountview
 * 类描述:
 * 创建人:Administrator
 * 创建时间:2015/12/11 16:37
 * 修改人:Administrator
 * 修改时间:2015/12/11 16:37
 * 修改备注:
 */
public class CustomeView extends View{
 private Paint mPaint=new Paint();
 private Path path=new Path();
 private float degress=90;
 public CustomeView(Context context) {
 super(context);
 }

 public CustomeView(Context context, AttributeSet attrs) {
 super(context, attrs);
 }

 public CustomeView(Context context, AttributeSet attrs, int defStyleAttr) {
 super(context, attrs, defStyleAttr);
 }

 @Override
 protected void onDraw(Canvas canvas) {
 //绘制最外层大圆
 mPaint.setColor(Color.BLACK);//设置画笔颜色为黑色
 mPaint.setStyle(Paint.Style.FILL_AND_STROKE);//设置画笔style实心
 RectF rect= new RectF(getWidth() / 2 - getHeight() / 2,
 0, getWidth() / 2 + getHeight() / 2, getHeight());//圆弧的外接矩形
 canvas.drawArc(rect, 270, 180, false, mPaint);
 mPaint.setColor(Color.WHITE);//设置画笔颜色为白色
 canvas.drawArc(rect, 90, 180, false, mPaint);
 //绘制中间层上边圆
 mPaint.setColor(Color.BLACK);
 rect= new RectF(getWidth()/2-getHeight()/4,0,getWidth() / 2 + getHeight() / 4, getHeight() /2);
 canvas.drawArc(rect, 90, 180, false, mPaint);
 //绘制中间层下边圆
 mPaint.setColor(Color.WHITE);
 rect= new RectF(getWidth()/2-getHeight() / 4, getHeight() / 2, getWidth() / 2 + getHeight() / 4, getHeight());
 canvas.drawArc(rect, 270, 180, false, mPaint);
 //绘制最上层白色小圆
 mPaint.setColor(Color.WHITE);
 canvas.drawCircle(getWidth() / 2, getHeight() / 4, getHeight() / 10, mPaint);
 //绘制最上层黑色小圆
 mPaint.setColor(Color.BLACK);
 mPaint.setStyle(Paint.Style.FILL);
 canvas.drawCircle(getWidth() / 2, getHeight() * 3 / 4, getHeight() / 10, mPaint);
 }
}
然后在布局文件中使用自定义View
<com.chuck.mobile.changecountview.widget.CustomeView
 android:layout_width="match_parent"
 android:layout_height="250dp"
 android:background="@color/gray"/>
如果想让这个太极图转起来,方法有很多,可以使用动画也可以通过旋转画布的方式实现。我自己使用了通过线程在旋转画布的方法。大家掌握了Android 2D绘图技巧就可以绘制自己感兴趣的图案。
关于利用Android怎么绘制一个太极图就分享到这里了,希望以上内容可以对大家有一定的帮助,可以学到更多知识。如果觉得文章不错,可以把它分享出去让更多的人看到。
免责声明:本站发布的内容(图片、视频和文字)以原创、转载和分享为主,文章观点不代表本网站立场,如果涉及侵权请联系站长邮箱:is@yisu.com进行举报,并提供相关证据,一经查实,将立刻删除涉嫌侵权内容。