Spring MVC使用教程?针对这个问题,这篇文章详细介绍了相对应的分析和解答,希望可以帮助更多想解决这个问题的小伙伴找到更简单易行的方法。
什么是Spring MVC
Spring MVC属于SpringFrameWork的后续产品,已经融合在Spring Web Flow里面。Spring 框架提供了构建 Web 应用程序的全功能 MVC 模块。使用 Spring 可插入的 MVC 架构,从而在使用Spring进行WEB开发时,可以选择使用Spring的SpringMVC框架或集成其他MVC开发框架,如Struts1,Struts2等。
今天先从写一个Spring MVC的HelloWorld开始,让我们看看如何搭建起一个Spring mvc的环境并运行程序。
软件参数
Eclipse:Mars.1 Release (4.5.1)
Tomcat: 8.0.36
JDK:1.8.0_60
Spring-framework: 4.0.4.RELEASE
新建项目
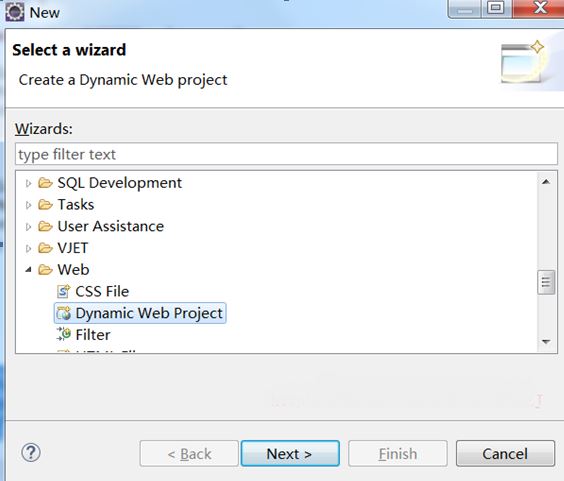
File-New-Other,选择Dynamic web project

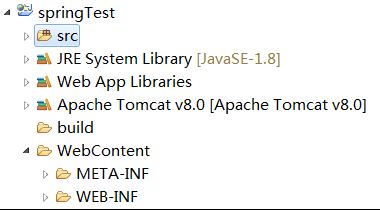
项目建好之后,目录结构如下:

导入jar包
我们基于Spring mvc框架进行开发,需要依赖一下的spring jar包:
spring-aop-4.0.4.RELEASE.jar
spring-beans-4.0.4.RELEASE.jar
spring-context-4.0.4.RELEASE.jar
spring-core-4.0.4.RELEASE.jar
spring-expression-4.0.4.RELEASE.jar
spring-web-4.0.4.RELEASE.jar
spring-webmvc-4.0.4.RELEASE.jar
commons-logging-1.1.1.jar(用来打印log)
在WEB-INF目录下新建lib文件夹,并将上面的jar包放入其中。
配置文件及编写代码
web.xml(WEB-INF下)
<?xml version="1.0" encoding="UTF-8"?>
<web-app xmlns:xsi="http://www.w3.org/2001/XMLSchema-instance"
xmlns="http://java.sun.com/xml/ns/javaee"
xsi:schemaLocation="http://java.sun.com/xml/ns/javaee http://java.sun.com/xml/ns/javaee/web-app_2_5.xsd"
id="WebApp_ID" version="2.5">
<!-- 配置DispatchcerServlet -->
<servlet>
<servlet-name>springDispatcherServlet</servlet-name>
<servlet-class>org.springframework.web.servlet.DispatcherServlet</servlet-class>
<!-- 配置Spring mvc下的配置文件的位置和名称 -->
<init-param>
<param-name>contextConfigLocation</param-name>
<param-value>classpath:springmvc.xml</param-value>
</init-param>
<load-on-startup>1</load-on-startup>
</servlet>
<servlet-mapping>
<servlet-name>springDispatcherServlet</servlet-name>
<url-pattern>/</url-pattern>
</servlet-mapping>
</web-app>注意:1. line12-15用于配置spring mvc的配置文件的位置和名称,这里说明会新建一个springmvc.xml的配置文件
2. 我们也可以不新建springmvc.xml,而是用默认的,默认的配置文件格式为/WEB-INF/[servlet-name]-servlet.xml,对应这里的就是springDispatcherServlet-servlet.xml
3. 这里的servlet-mapping表示拦截的模式,这里是“/”,表示对于所有的请求的拦截,包括静态资源如html, js, jpg等。这时候对于静态资源的访问就会报404的错误。关于如何解决后面会介绍
Springmvc.xml(scr下)
在src目录下新建springmvc.xml
<?xml version="1.0" encoding="UTF-8"?>
<beans xmlns="http://www.springframework.org/schema/beans"
xmlns:xsi="http://www.w3.org/2001/XMLSchema-instance"
xmlns:context="http://www.springframework.org/schema/context"
xmlns:mvc="http://www.springframework.org/schema/mvc"
xsi:schemaLocation="http://www.springframework.org/schema/beans http://www.springframework.org/schema/beans/spring-beans.xsd
http://www.springframework.org/schema/context http://www.springframework.org/schema/context/spring-context-4.0.xsd
http://www.springframework.org/schema/mvc http://www.springframework.org/schema/mvc/spring-mvc-4.0.xsd">
<!-- 配置自动扫描的包 -->
<context:component-scan base-package="com.jackie.springmvc"></context:component-scan>
<!-- 配置视图解析器 如何把handler 方法返回值解析为实际的物理视图 -->
<bean class="org.springframework.web.servlet.view.InternalResourceViewResolver">
<property name = "prefix" value="/WEB-INF/views/"></property>
<property name = "suffix" value = ".jsp"></property>
</bean>
</beans>注意:1. line12表示spring监听的范围,这里是在com.jackie.springmvc下
2. line15-18,是添加了一个视图解析器,用于把在控制器中handler的结构解析为实际的物理视图,这个要配合controller类来解析,详见下面。
HelloWorld.java(com.jackie.springmvc.handlers下)
 package com.jackie.springmvc.handlers;
 import org.springframework.stereotype.Controller;
 import org.springframework.web.bind.annotation.RequestMapping;
 @Controller
 public class HelloWorld {
  /**
  * 1. 使用RequestMapping注解来映射请求的URL
  * 2. 返回值会通过视图解析器解析为实际的物理视图, 对于InternalResourceViewResolver视图解析器,会做如下解析
  * 通过prefix+returnVal+suffix 这样的方式得到实际的物理视图,然后会转发操作
  * "/WEB-INF/views/success.jsp"
  * @return
  */
  @RequestMapping("/helloworld")
  public String hello(){
   System.out.println("hello world");
   return "result";
  }
 }
注意:
1. 首先要在类的前面添加“Controller”注解,表示是spring的控制器,这里会写一个方法hello()
2. hello方法上方有一个@RequestMapping, 是用于匹配请求的路径,比如这里匹配的请求路径就是“http://localhost:8080/springTest/springmvc/helloworld”,即当tomcat服务启动后,在浏览器输入这个url时,如果在这个方法打断点了,就会跳入该方法。
3. 这个return的结果不是乱写的,这个返回的字符串就是与上面springmvc.xml中line15-18进行配合的,springmvc.xml中声明了prefix和suffix,而夹在这两者之间的就是这里返回的字符串,所以执行完这个方法后,我们可以得到这样的请求资源路径“/WEB-INF/views/success.jsp”,这个success.jsp是需要我们新建的
index.jsp(WebContent下)
在新建success.jsp之前,我们需要有一个入口,也就是这里的index.jsp
 <%@ page language="java" contentType="text/html; charset=ISO-8859-1"
  pageEncoding="ISO-8859-1"%>
 <!DOCTYPE html PUBLIC "-//W3C//DTD HTML 4.01 Transitional//EN" "http://www.w3.org/TR/html4/loose.dtd">
 <html>
 <head>
 <meta http-equiv="Content-Type" content="text/html; charset=ISO-8859-1">
 <title>Insert title here</title>
 </head>
 <body>
 <a href="helloworld" rel="external nofollow" >hello world</a>
 </body>
 </html>
当访问index.jsp时,页面上会展示一个超链接,点击超链后,url中的地址就会发生跳转,由“http://localhost:8080/springTest/index.jsp”跳转到“http://localhost:8080/springTest/helloworld”,而这个url请求就会进入HelloWorld中的hello方法,因为其与该方法上的“/helloworld”匹配。
success.jsp(WEB-INF/views下)
该页面是作为请求成功后的相应页面
<%@ page language="java" contentType="text/html; charset=ISO-8859-1"
  pageEncoding="ISO-8859-1"%>
 <!DOCTYPE html PUBLIC "-//W3C//DTD HTML 4.01 Transitional//EN" "http://www.w3.org/TR/html4/loose.dtd">
 <html>
 <head>
 <meta http-equiv="Content-Type" content="text/html; charset=ISO-8859-1">
 <title>Insert title here</title>
 </head>
 <body>
 <h5>Success Page</h5>
 </body>
 </html>
至此,我们完成了基于Spring mvc框架的HelloWorld程序的开发,包括要依赖的jar包,配置的文件,控制器代码的编写和展示页面的编写等。
除此以外,再介绍下整个配置过程中遇到的一些小问题:
1. tomcat服务器的添加
从前面的介绍可以看出,我们的程序是通过浏览器发请求来获取想要的页面,那么这里就免不了要有一个web服务器,这里就是tomcat。
首先你需要下载个tomcat,然后在eclipse->windows->preference->servers中绑定这个tomcat服务器;
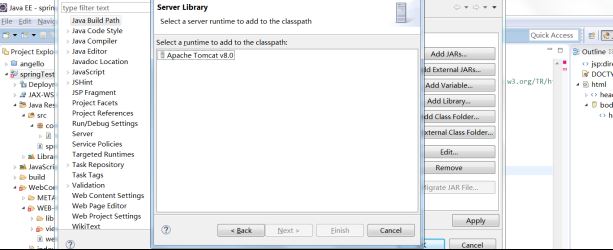
其次你需要在你新建的spring mvc项目中添加tomcat的支持,否则在新建的jsp文件中会提示报错“The superclass javax.servlet.http.HttpServlet was not found on the Java Build Path”
右键项目->build path->configure build path->add library->server runtime, 选择你的tomcat即可

有了tomcat服务器,你就可以在index.jsp上右键run on server,选择你的tomcat服务器,这样就可以启动tomcat服务,帮助你完成网页的请求和响应操作。
2. spring mvc如何访问静态资源
关于使用spring mvc处理静态资源,比如html(发现之前的springmvc.xml中<property name = "suffix" value = ".jsp"></property>定义为jsp结尾就可以成功跳转,但是如果改为html并在web-inf下面新建了html文件后,并将suffix这里的".jsp"改为".html",无法跳转到想要的html页面,并且给出404错误,同时console给出错误信息为:No mapping found for HTTP request with URI [/springTest/WEB-INF/views/result.html] in DispatcherServlet)
最后发现是需要让spring明确要处理静态资源,原来的web.xml中只有
<servlet-mapping>
  <servlet-name>springDispatcherServlet</servlet-name>
  <url-pattern>/</url-pattern>
 </servlet-mapping>
其匹配的都是controller中类似@RequestMapping("/springmvc/helloworld")这样的注解配置的请求,而对于类似html/css/jpg等资源的访问就会得不到,所以需要在web.xml中加入以下类型的支持
<servlet-mapping>
  <servlet-name>default</servlet-name>
  <url-pattern>*.css</url-pattern>
 </servlet-mapping>
 <servlet-mapping>
  <servlet-name>default</servlet-name>
  <url-pattern>*.gif</url-pattern>
 </servlet-mapping>
 <servlet-mapping>
  <servlet-name>default</servlet-name>
  <url-pattern>*.jpg</url-pattern>
 </servlet-mapping>
 <servlet-mapping>
  <servlet-name>default</servlet-name>
  <url-pattern>*.js</url-pattern>
 </servlet-mapping>
 <servlet-mapping>
  <servlet-name>default</servlet-name>
  <url-pattern>*.html</url-pattern>
 </servlet-mapping>
这样就可以保证spring 能够拦截并处理静态资源
这里将HelloWorld.java中的hello方法改为:
@RequestMapping("/helloworld")
 public String hello(){
  System.out.println("hello world");
  return "Jackie";
}
Springmvc.xml改为:
class="org.springframework.web.servlet.view.InternalResourceViewResolver">
   <property name = "prefix" value="/WEB-INF/views/"></property>
   <property name = "suffix" value = ".jpg"></property>
</bean>
关于Spring MVC使用教程问题的解答就分享到这里了,希望以上内容可以对大家有一定的帮助,如果你还有很多疑惑没有解开,可以关注亿速云行业资讯频道了解更多相关知识。
免责声明:本站发布的内容(图片、视频和文字)以原创、转载和分享为主,文章观点不代表本网站立场,如果涉及侵权请联系站长邮箱:is@yisu.com进行举报,并提供相关证据,一经查实,将立刻删除涉嫌侵权内容。