Ngxin作为一个强大的开源软件是可以先做为高可用集群服务的,这篇博文就介绍一下nginx+Keepalived是如何实现高性能+高可用集群服务的
环境介绍:
硬件: 4台虚拟服务器
系统:CentOS 7.3
软件:Keepalived、Apache、Nginx
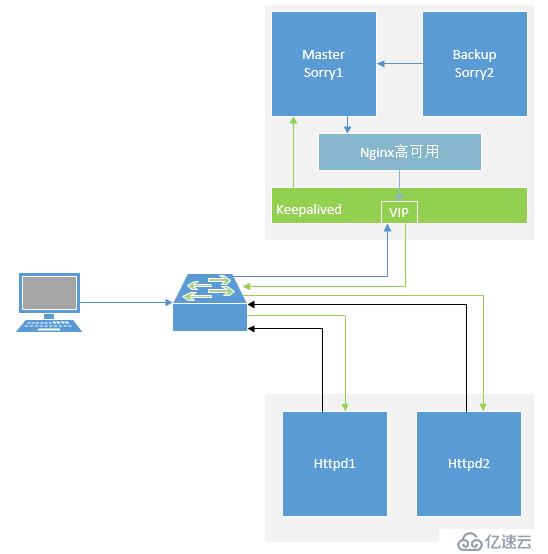
IP及主机名
Master
主机名:shiyan1
IP地址:172.18.17.31
Backup
主机名:shiyan2
IP地址:172.18.17.32
Httpd1
主机名:shiyan3
IP地址:172.18.17.33
Httpd2
主机名:shiyan4
IP地址:172.18.17.34
四台服务器初始化配置(四台服务器相同的配置)
关闭防火墙
    [root@shiyan~ ]# systemctl disable firewalld
    [root@shiyan~ ]# systemctl stop firewalld
    [root@shiyan~ ]# iptables –F
关闭Selinux
    [root@shiyan~ ]# vim /etc/selinux/config
       SELINUX=disabled
#保存重启系统生效安装软件
Master/Backup
[root@shiyan~ ]# yum install keepalived httpd nginx #(Nginx需要单独配置EPEL源)Httpd1/Httpd2
[root@shiyan~ ]# yum install httpdHttpd1配置
    [root@shiyan3 ~ ]# mkdir -p /app/apache/html/
    [root@shiyan3 ~ ]# chown -R apache.apache /app/apache/html/
    [root@shiyan3 ~ ]# echo "Apache Server 1" > /app/apache/html/index.html
    [root@shiyan3 ~ ]# vim /etc/httpd/conf/httpd.conf
          #此处是更改httpd.conf中的内容,并非添加内容
       DocumentRoot "/app/apache/html"
       #更改为自定义的路径

       #
       # Relax access to content within /var/www.
       #
       <Directory "/app/apache">    #更改为自定义的路径
       AllowOverride None
       # Allow open access:
       Require all granted
       </Directory>

       # Further relax access to the default document root:
       <Directory "/app/apache/html">     #更改为自定义的路径.
     [root@shiyan3 ~ ]# systemctl restart httpd

     #测试网站是否正常运行
     [root@yum ~ ]# curl http://172.18.17.33
Apache Server 1 #测试成功Httpd2配置
    [root@shiyan4 ~ ]# mkdir -p /app/apache/html/
    [root@shiyan4 ~ ]# chown -R apache.apache /app/apache/html/
    [root@shiyan4 ~ ]# echo "Apache Server 2" > /app/apache/html/index.html
    [root@shiyan4 ~ ]# vim /etc/httpd/conf/httpd.conf
          #此处是更改httpd.conf中的内容,并非添加内容
       DocumentRoot "/app/apache/html"
       #更改为自定义的路径

       #
       # Relax access to content within /var/www.
       #
       <Directory "/app/apache">    #更改为自定义的路径
       AllowOverride None
       # Allow open access:
       Require all granted
       </Directory>

       # Further relax access to the default document root:
       <Directory "/app/apache/html">     #更改为自定义的路径.
    [root@shiyan4 ~ ]# systemctl restart httpd
          #测试网站是否正常运行
        [root@yum ~ ]# curl http://172.18.17.34
Apache Server 2 #测试成功Master配置
   配置Sorry-Server
    [root@shiyan1 ~ ]# mkdir -p /app/apache/html/
    [root@shiyan1 ~ ]# chown -R apache.apache /app/apache/html/
    [root@shiyan1 ~ ]# echo "<h2>Sorry Server 1</h2>" > /app/apache/html/index.html
    [root@shiyan1 ~ ]# vim /etc/httpd/conf/httpd.conf
       #此处是更改httpd.conf中的内容,并非添加内容
       Listen 8080
       DocumentRoot "/app/apache/html"
       #更改为自定义的路径

       #
       # Relax access to content within /var/www.
       #
       <Directory "/app/apache">    #更改为自定义的路径
       AllowOverride None
       # Allow open access:
       Require all granted
       </Directory>

       # Further relax access to the default document root:
       <Directory "/app/apache/html">     #更改为自定义的路径.
    [root@shiyan1 ~ ]# systemctl restart http
               #测试网站是否正常运行
        [root@yum ~ ]# curl http://172.18.17.31:8080
              <h2>Sorry Server 1</h2>  #测试成功
      配置Keepalived
           [root@shiyan1 ~ ]# cp /etc/keepalived/keepalived.conf{,.bak}    #备份文件
           [root@shiyan1 ~ ]# vim /etc/keepalived/keepalived.conf
              global_defs {
               notification_email {
                  root   #定义收邮件的用户
               }
               notification_email_from Alexandre.Cassen@firewall.loc
               smtp_server 172.18.17.31   #定义邮件地址
               smtp_connect_timeout 30
               router_id node1            #定义节点名称
            }

            vrrp_instance VI_1 {
                state MASTER              #定义节点为主节点模式
                interface ens33           #定义使用ens33为VIP网卡
                virtual_router_id 51      #定义节点编号
                priority 150              #定义优先级
                advert_int 1
                authentication {
                    auth_type PASS
                    auth_pass 1111
                }
                virtual_ipaddress {
                    172.18.17.30          #定义VIP
                }
            }
~      配置Nginx服务
            [root@shiyan1 ~ ]# vim /etc/nginx/nginx.conf
                #添加nginx集群
                upstream websrvs {
                    server 172.18.17.33:80;
                    server 172.18.17.34:80;
                    server 127.0.0.1:8080 backup;
                }
                #server 部分的内容需要全部注释掉

            [root@shiyan1 ~ ]# vim /etc/nginx/conf.d/default.conf
                    server {
                    listen       80;
                    location / {
                        root  html;
                        proxy_pass http://websrvs;
                        index  index.html index.htm;
                    }
                }
            [root@shiyan1 ~ ]# systemctl restart nginx
            [root@shiyan1 ~ ]# systemctl restart keepalived
[root@shiyan1 ~ ]# systemctl restart httpdBackup配置
   配置Sorry-Server
    [root@shiyan2 ~ ]# mkdir -p /app/apache/html/
    [root@shiyan2 ~ ]# chown -R apache.apache /app/apache/html/
    [root@shiyan2 ~ ]# echo "<h2>Sorry Server 2</h2>" > /app/apache/html/index.html
    [root@shiyan2 ~ ]# vim /etc/httpd/conf/httpd.conf
       #此处是更改httpd.conf中的内容,并非添加内容
       Listen 8080
       DocumentRoot "/app/apache/html"
       #更改为自定义的路径

       #
       # Relax access to content within /var/www.
       #
       <Directory "/app/apache">    #更改为自定义的路径
       AllowOverride None
       # Allow open access:
       Require all granted
       </Directory>

       # Further relax access to the default document root:
       <Directory "/app/apache/html">     #更改为自定义的路径.
    [root@shiyan2 ~ ]# systemctl restart http
               #测试网站是否正常运行
        [root@yum ~ ]# curl http://172.18.17.31:8080
              <h2>Sorry Server 2</h2>  #测试成功
   配置Keepalived
     [root@shiyan2 ~ ]# cp /etc/keepalived/keepalived.conf{,.bak}    #备份文件
     [root@shiyan2 ~ ]# vim /etc/keepalived/keepalived.conf
              global_defs {
               notification_email {
                  root   #定义收邮件的用户
               }
               notification_email_from Alexandre.Cassen@firewall.loc
               smtp_server 172.18.17.31   #定义邮件地址
               smtp_connect_timeout 30
               router_id node1            #定义节点名称
            }

            vrrp_instance VI_1 {
                state MASTER              #定义节点为主节点模式
                interface ens33           #定义使用ens33为VIP网卡
                virtual_router_id 51      #定义节点编号
                priority 150              #定义优先级
                advert_int 1
                authentication {
                    auth_type PASS
                    auth_pass 1111
                }
                virtual_ipaddress {
                    172.18.17.30          #定义VIP
                }
            }
~  配置Nginx服务
      [root@shiyan2 ~ ]# vim /etc/nginx/nginx.conf
         #添加nginx集群
          upstream websrvs {
           server 172.18.17.33:80;
           server 172.18.17.34:80;
           server 127.0.0.1:8080 backup;
           }
           #server 部分的内容需要全部注释掉

      [root@shiyan2 ~ ]# vim /etc/nginx/conf.d/default.conf
           server {
           listen       80;
           location / {
           root  html;
           proxy_pass http://websrvs;
           index  index.html index.htm;
           }
          }
       [root@shiyan2 ~ ]# systemctl restart keepalived
       [root@shiyan2 ~ ]# systemctl restart nginx
[root@shiyan2 ~ ]# systemctl restart httpd测试环境
 #默认使用rr算法依次轮询访问后端httpd服务器
    [root@yum ~ ]# curl http://172.18.17.30
    Apache Server 1
    [root@yum ~ ]# curl http://172.18.17.30
    Apache Server 2

 #关闭后端http1服务,这样只能访问httpd2的服务
     [root@yum ~ ]# curl http://172.18.17.30
      Apache Server 2
     [root@yum ~ ]# curl http://172.18.17.30
      Apache Server 2

 #关闭两台后端主机的httpd服务,这样因为没有后端服务器所以Master的sorry-server提供服务
    [root@yum ~ ]# curl http://172.18.17.30
    <h2>Sorry Server 1</h2>
 #关闭Master测试
    [root@yum ~ ]# curl http://172.18.17.30
<h2>Sorry Server 2</h2>亿速云「云服务器」,即开即用、新一代英特尔至强铂金CPU、三副本存储NVMe SSD云盘,价格低至29元/月。点击查看>>
免责声明:本站发布的内容(图片、视频和文字)以原创、转载和分享为主,文章观点不代表本网站立场,如果涉及侵权请联系站长邮箱:is@yisu.com进行举报,并提供相关证据,一经查实,将立刻删除涉嫌侵权内容。


 计算
计算 安全
安全 数据库
数据库 网络和加速
网络和加速 企业服务
企业服务


