SpringBoot中如何实现下载上传?针对这个问题,这篇文章详细介绍了相对应的分析和解答,希望可以帮助更多想解决这个问题的小伙伴找到更简单易行的方法。
最近在学习SpringBoot,以下是最近学习整理的实现文件上传下载的Java代码:
1、开发环境:
IDEA15+ Maven+JDK1.8
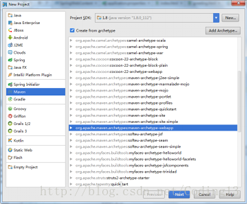
2、新建一个maven工程:

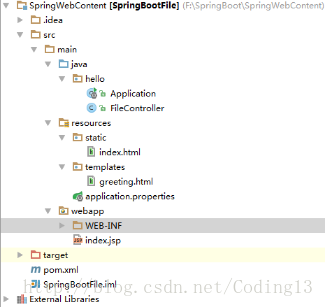
3、工程框架

4、pom.xml文件依赖项
<project xmlns="http://maven.apache.org/POM/4.0.0" xmlns:xsi="http://www.w3.org/2001/XMLSchema-instance"
 xsi:schemaLocation="http://maven.apache.org/POM/4.0.0 http://maven.apache.org/maven-v4_0_0.xsd">
 <modelVersion>4.0.0</modelVersion>
 <groupId>SpringWebContent</groupId>
 <artifactId>SpringWebContent</artifactId>
 <packaging>war</packaging>
 <version>1.0-SNAPSHOT</version>
 <name>SpringWebContent Maven Webapp</name>
 <url>http://maven.apache.org</url>
 <parent>
  <groupId>org.springframework.boot</groupId>
  <artifactId>spring-boot-starter-parent</artifactId>
  <version>1.4.3.RELEASE</version>
 </parent>
 <dependencies>
  <dependency>
   <groupId>org.springframework.boot</groupId>
   <artifactId>spring-boot-starter-thymeleaf</artifactId>
  </dependency>
  <dependency>
   <groupId>org.springframework.boot</groupId>
   <artifactId>spring-boot-devtools</artifactId>
   <optional>true</optional>
  </dependency>
  <dependency>
   <groupId>junit</groupId>
   <artifactId>junit</artifactId>
   <version>3.8.1</version>
   <scope>test</scope>
  </dependency>
 </dependencies>
 <properties>
  <java.version>1.8</java.version>
 </properties>
 <build>
  <finalName>SpringWebContent</finalName>
 <plugins>
 <plugin>
  <groupId>org.springframework.boot</groupId>
  <artifactId>spring-boot-maven-plugin</artifactId>
 </plugin>
</plugins>
 </build>
</project>5、Application.java
import org.springframework.boot.SpringApplication;
import org.springframework.boot.autoconfigure.SpringBootApplication;
@SpringBootApplication
public class Application {

  public static void main(String[] args) {
    SpringApplication.run(Application.class, args);
  }
}6、FileController.java
import org.springframework.stereotype.Controller;
import org.springframework.ui.Model;
import org.springframework.web.bind.annotation.RequestMapping;
import org.springframework.web.bind.annotation.RequestMethod;
import org.springframework.web.bind.annotation.RequestParam;
import org.slf4j.Logger;
import org.slf4j.LoggerFactory;
import org.springframework.web.bind.annotation.ResponseBody;
import org.springframework.web.multipart.MultipartFile;
import org.springframework.web.multipart.MultipartHttpServletRequest;
import javax.servlet.http.HttpServletRequest;
import javax.servlet.http.HttpServletResponse;
import java.io.*;
import java.util.List;

@Controller
public class FileController {
  @RequestMapping("/greeting")
  public String greeting(@RequestParam(value="name", required=false, defaultValue="World") String name, Model model) {
    model.addAttribute("name", name);
    return "greeting";
  }
  private static final Logger logger = LoggerFactory.getLogger(FileController.class);
  //文件上传相关代码
  @RequestMapping(value = "upload")
  @ResponseBody
  public String upload(@RequestParam("test") MultipartFile file) {
    if (file.isEmpty()) {
      return "文件为空";
    }
    // 获取文件名
    String fileName = file.getOriginalFilename();
    logger.info("上传的文件名为:" + fileName);
    // 获取文件的后缀名
    String suffixName = fileName.substring(fileName.lastIndexOf("."));
    logger.info("上传的后缀名为:" + suffixName);
    // 文件上传后的路径
    String filePath = "E://test//";
    // 解决中文问题,liunx下中文路径,图片显示问题
    // fileName = UUID.randomUUID() + suffixName;
    File dest = new File(filePath + fileName);
    // 检测是否存在目录
    if (!dest.getParentFile().exists()) {
      dest.getParentFile().mkdirs();
    }
    try {
      file.transferTo(dest);
      return "上传成功";
    } catch (IllegalStateException e) {
      e.printStackTrace();
    } catch (IOException e) {
      e.printStackTrace();
    }
    return "上传失败";
  }

  //文件下载相关代码
  @RequestMapping("/download")
  public String downloadFile(org.apache.catalina.servlet4preview.http.HttpServletRequest request, HttpServletResponse response){
    String fileName = "FileUploadTests.java";
    if (fileName != null) {
      //当前是从该工程的WEB-INF//File//下获取文件(该目录可以在下面一行代码配置)然后下载到C:\\users\\downloads即本机的默认下载的目录
      String realPath = request.getServletContext().getRealPath(
          "//WEB-INF//");
      File file = new File(realPath, fileName);
      if (file.exists()) {
        response.setContentType("application/force-download");// 设置强制下载不打开
        response.addHeader("Content-Disposition",
            "attachment;fileName=" + fileName);// 设置文件名
        byte[] buffer = new byte[1024];
        FileInputStream fis = null;
        BufferedInputStream bis = null;
        try {
          fis = new FileInputStream(file);
          bis = new BufferedInputStream(fis);
          OutputStream os = response.getOutputStream();
          int i = bis.read(buffer);
          while (i != -1) {
            os.write(buffer, 0, i);
            i = bis.read(buffer);
          }
          System.out.println("success");
        } catch (Exception e) {
          e.printStackTrace();
        } finally {
          if (bis != null) {
            try {
              bis.close();
            } catch (IOException e) {
              e.printStackTrace();
            }
          }
          if (fis != null) {
            try {
              fis.close();
            } catch (IOException e) {
              e.printStackTrace();
            }
          }
        }
      }
    }
    return null;
  }
  //多文件上传
  @RequestMapping(value = "/batch/upload", method = RequestMethod.POST)
  @ResponseBody
  public String handleFileUpload(HttpServletRequest request) {
    List<MultipartFile> files = ((MultipartHttpServletRequest) request)
        .getFiles("file");
    MultipartFile file = null;
    BufferedOutputStream stream = null;
    for (int i = 0; i < files.size(); ++i) {
      file = files.get(i);
      if (!file.isEmpty()) {
        try {
          byte[] bytes = file.getBytes();
          stream = new BufferedOutputStream(new FileOutputStream(
              new File(file.getOriginalFilename())));
          stream.write(bytes);
          stream.close();

        } catch (Exception e) {
          stream = null;
          return "You failed to upload " + i + " => "
              + e.getMessage();
        }
      } else {
        return "You failed to upload " + i
            + " because the file was empty.";
      }
    }
    return "upload successful";
}7、index.html
<!DOCTYPE html>
<html lang="en">
<head>
  <title>Getting Started: Serving Web Content</title>
  <meta http-equiv="Content-Type" content="text/html; charset=UTF-8" />
</head>
<body>
<p>Get your greeting <a href="/greeting" rel="external nofollow" >here</a></p>
<form action="/upload" method="POST" enctype="multipart/form-data">
  文件:<input type="file" name="test"/>
  <input type="submit" />
</form>
<a href="/download" rel="external nofollow" >下载test</a>
<p>多文件上传</p>
<form method="POST" enctype="multipart/form-data" action="/batch/upload">
  <p>文件1:<input type="file" name="file" /></p>
  <p>文件2:<input type="file" name="file" /></p>
  <p><input type="submit" value="上传" /></p>
</form>
</html>关于SpringBoot中如何实现下载上传问题的解答就分享到这里了,希望以上内容可以对大家有一定的帮助,如果你还有很多疑惑没有解开,可以关注亿速云行业资讯频道了解更多相关知识。
亿速云「云服务器」,即开即用、新一代英特尔至强铂金CPU、三副本存储NVMe SSD云盘,价格低至29元/月。点击查看>>
免责声明:本站发布的内容(图片、视频和文字)以原创、转载和分享为主,文章观点不代表本网站立场,如果涉及侵权请联系站长邮箱:is@yisu.com进行举报,并提供相关证据,一经查实,将立刻删除涉嫌侵权内容。