这篇文章主要讲解了“Spring声明式事务控制是什么”,文中的讲解内容简单清晰,易于学习与理解,下面请大家跟着小编的思路慢慢深入,一起来研究和学习“Spring声明式事务控制是什么”吧!
一、编程式事务控制相关对象
1、PlatformTransactionManager 接口是 spring 的事务管理器,它里面提供了我们常用的操作事务的方法。

2、TransactionDefinition
TransactionDefinition 是事务的定义信息对象,里面有如下方法:

(1)事务隔离级别:设置隔离级别,可以解决事务并发产生的问题,如脏读、不可重复读和虚读。
(2)事务传播行为
REQUIRED:如果当前没有事务,就新建一个事务,如果已经存在一个事务中,加入到这个事务中。一般的选择(默认值)。
SUPPORTS:支持当前事务,如果当前没有事务,就以非事务方式执行(没有事务)。
MANDATORY:使用当前的事务,如果当前没有事务,就抛出异常。
REQUERS_NEW:新建事务,如果当前在事务中,把当前事务挂起。
NOT_SUPPORTED:以非事务方式执行操作,如果当前存在事务,就把当前事务挂起。
NEVER:以非事务方式运行,如果当前存在事务,抛出异常。
NESTED:如果当前存在事务,则在嵌套事务内执行。如果当前没有事务,则执行 REQUIRED 类似的操作。
超时时间:默认值是-1,没有超时限制。如果有,以秒为单位进行设置。
是否只读:建议查询时设置为只读。
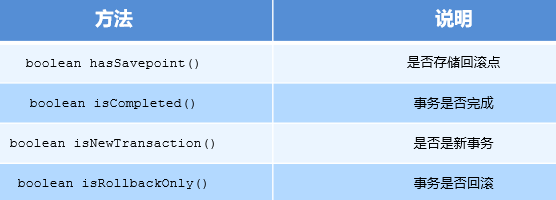
3、TransactionStatus
TransactionStatus 接口提供的是事务具体的运行状态,方法介绍如下。

二、基于 XML 的声明式事务控制
1、声明式事务控制是什么?
Spring的声明式事务顾名思义就是采用声明的方式来处理事务。这里所说的声明,就是指在配置文件中声明,用在 Spring 配置文件中声明式的处理事务来代替代码式的处理事务。它的作用是事务管理不侵入开发的组件。具体来说,业务逻辑对象就不会意识到正在事务管理之中,事实上也应该如此,因为事务管理是属于系统层面的服务,而不是业务逻辑的一部分,如果想要改变事务管理策划的话,也只需要在定义文件中重新配置即可。而且在不需要事务管理的时候,只要在设定文件上修改一下,即可移去事务管理服务,无需改变代码重新编译,这样维护起来极其方便。
2、声明式事务控制的实现
(1)引入tx命名空间
<beans xmlns="http://www.springframework.org/schema/beans"
xmlns:xsi="http://www.w3.org/2001/XMLSchema-instance"
xmlns:context="http://www.springframework.org/schema/context"
xmlns:aop="http://www.springframework.org/schema/aop"
xmlns:tx="http://www.springframework.org/schema/tx"
xsi:schemaLocation="
http://www.springframework.org/schema/context
http://www.springframework.org/schema/context/spring-context.xsd
http://www.springframework.org/schema/aop
http://www.springframework.org/schema/aop/spring-aop.xsd
http://www.springframework.org/schema/tx
http://www.springframework.org/schema/tx/spring-tx.xsd
http://www.springframework.org/schema/beans
http://www.springframework.org/schema/beans/spring-beans.xsd">
(2)配置事务增强
<!--平台事务管理器-->
<bean id="transactionManager"
class="org.springframework.jdbc.datasource.DataSourceTransactionManager">
<property name="dataSource" ref="dataSource"></property>
</bean>
<!--事务增强配置-->
<tx:advice id="txAdvice" transaction-manager="transactionManager">
<tx:attributes>
<tx:method name="*"/>
</tx:attributes>
</tx:advice>
(3)配置事务 AOP 织入
<!--事务的aop增强-->
<aop:config>
<aop:pointcut id="myPointcut" expression="execution(* com.itheima.service.impl.*.*(..))"/>
<aop:advisor advice-ref="txAdvice" pointcut-ref="myPointcut"></aop:advisor>
</aop:config>
(4)测试事务控制转账业务代码
@Override
public void transfer(String outMan, String inMan, double money) {
accountDao.out(outMan,money);
int i = 1/0;
accountDao.in(inMan,money);
}
三、基于注解的声明式事务控制
1、注解配置声明式事务控制
(1)编写 AccoutDao
@Repository("accountDao")
public class AccountDaoImpl implements AccountDao {
@Autowired
private JdbcTemplate jdbcTemplate;
public void out(String outMan, double money) {
jdbcTemplate.update("update account set money=money-? where name=?",money,outMan);
}
public void in(String inMan, double money) {
jdbcTemplate.update("update account set money=money+? where name=?",money,inMan);
}
}
(2)编写 AccoutService
@Service("accountService")
@Transactional
public class AccountServiceImpl implements AccountService {
@Autowired
private AccountDao accountDao;
@Transactional(isolation = Isolation.READ_COMMITTED,propagation = Propagation.REQUIRED)
public void transfer(String outMan, String inMan, double money) {
accountDao.out(outMan,money);
int i = 1/0;
accountDao.in(inMan,money);
}
}
(3)编写 applicationContext.xml 配置文件
<!—之前省略datsSource、jdbcTemplate、平台事务管理器的配置-->
<!--组件扫描-->
<context:component-scan base-package="com.itheima"/>
<!--事务的注解驱动-->
<tx:annotation-driven/>
感谢各位的阅读,以上就是“Spring声明式事务控制是什么”的内容了,经过本文的学习后,相信大家对Spring声明式事务控制是什么这一问题有了更深刻的体会,具体使用情况还需要大家实践验证。这里是亿速云,小编将为大家推送更多相关知识点的文章,欢迎关注!
免责声明:本站发布的内容(图片、视频和文字)以原创、转载和分享为主,文章观点不代表本网站立场,如果涉及侵权请联系站长邮箱:is@yisu.com进行举报,并提供相关证据,一经查实,将立刻删除涉嫌侵权内容。