本篇内容介绍了“SpringBoot整合MybatisPlus配置多数据源增强插件的方法是什么”的有关知识,在实际案例的操作过程中,不少人都会遇到这样的困境,接下来就让小编带领大家学习一下如何处理这些情况吧!希望大家仔细阅读,能够学有所成!
实际的项目中,经常会用到不同的数据库以满足项目的实际需求。随着业务的并发量的不断增加,一个项目使用多个数据库:主从复制、读写分离、分布式数据库等方式,越来越常见。
MyBatis-Plus(简称 MP)是一个MyBatis的增强工具,在MyBatis的基础上只做增强不做改变,为简化开发、提高效率而生。
插件特点
无代码侵入:只做增强不做改变,引入它不会对现有工程产生影响。
强大的 CRUD 操作:通过少量配置即可实现单表大部分 CRUD 操作满足各类使用需求。
支持 Lambda 形式调用:通过 Lambda 表达式,方便的编写各类查询条件。
支持主键自动生成:可自由配置,解决主键问题。
内置代码生成工具:采用代码或者 Maven 插件可快速生成各层代码。
内置分页插件:基于 MyBatis 物理分页,开发者无需关心具体操作。
内置性能分析插件:可输出 Sql 语句以及其执行时间。

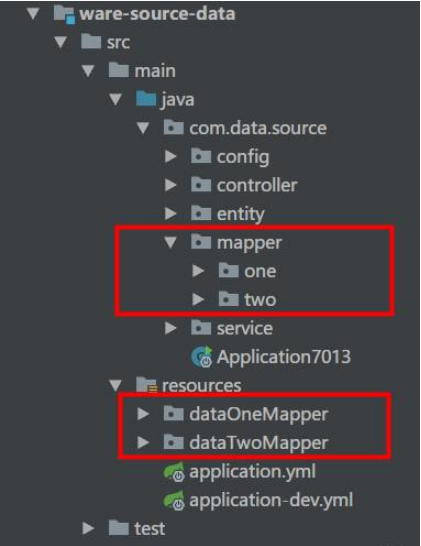
注意:mapper层和mapper.xml层分别放在不同目录下,以便mybatis扫描加载。
spring:
  # 数据源配置
  datasource:
    type: com.alibaba.druid.pool.DruidDataSource
    admin-data:
      driverClassName: com.mysql.jdbc.Driver
      dbUrl: jdbc:mysql://127.0.0.1:3306/cloud-admin-data?useUnicode=true&characterEncoding=UTF8&zeroDateTimeBehavior=convertToNull&useSSL=false
      username: root
      password: 123
      initialSize: 20
      maxActive: 100
      minIdle: 20
      maxWait: 60000
      poolPreparedStatements: true
      maxPoolPreparedStatementPerConnectionSize: 30
      timeBetweenEvictionRunsMillis: 60000
      minEvictableIdleTimeMillis: 30000
      maxEvictableIdleTimeMillis: 60000
      validationQuery: SELECT 1 FROM DUAL
      testOnBorrow: false
      testOnReturn: false
      testWhileIdle: true
      connectionProperties: druid.stat.mergeSql=true;druid.stat.slowSqlMillis=5000
      filters: stat,wall
    user-data:
      driverClassName: com.mysql.jdbc.Driver
      dbUrl: jdbc:mysql://127.0.0.1:3306/cloud-user-data?useUnicode=true&characterEncoding=UTF8&zeroDateTimeBehavior=convertToNull&useSSL=false
      username: root
      password: 123
      initialSize: 20
      maxActive: 100
      minIdle: 20
      maxWait: 60000
      poolPreparedStatements: true
      maxPoolPreparedStatementPerConnectionSize: 30
      timeBetweenEvictionRunsMillis: 60000
      minEvictableIdleTimeMillis: 30000
      maxEvictableIdleTimeMillis: 60000
      validationQuery: SELECT 1 FROM DUAL
      testOnBorrow: false
      testOnReturn: false
      testWhileIdle: true
      connectionProperties: druid.stat.mergeSql=true;druid.stat.slowSqlMillis=5000
      filters: stat,wall
这里参数的形式是多样的,只需要配置参数扫描即可。
@Component
@ConfigurationProperties(prefix = "spring.datasource.admin-data")
public class DruidOneParam {
    private String dbUrl;
    private String username;
    private String password;
    private String driverClassName;
    private int initialSize;
    private int maxActive;
    private int minIdle;
    private int maxWait;
    private boolean poolPreparedStatements;
    private int maxPoolPreparedStatementPerConnectionSize;
    private int timeBetweenEvictionRunsMillis;
    private int minEvictableIdleTimeMillis;
    private int maxEvictableIdleTimeMillis;
    private String validationQuery;
    private boolean testWhileIdle;
    private boolean testOnBorrow;
    private boolean testOnReturn;
    private String filters;
    private String connectionProperties;
    // 省略 GET 和 SET
}@Configuration
@MapperScan(basePackages = {"com.data.source.mapper.one"},sqlSessionTemplateRef = "sqlSessionTemplateOne")
public class DruidOneConfig {
private static final Logger LOGGER = LoggerFactory.getLogger(DruidOneConfig.class) ;
@Resource
private DruidOneParam druidOneParam ;
@Bean("dataSourceOne")
public DataSource dataSourceOne () {
DruidDataSource datasource = new DruidDataSource();
datasource.setUrl(druidOneParam.getDbUrl());
datasource.setUsername(druidOneParam.getUsername());
datasource.setPassword(druidOneParam.getPassword());
datasource.setDriverClassName(druidOneParam.getDriverClassName());
datasource.setInitialSize(druidOneParam.getInitialSize());
datasource.setMinIdle(druidOneParam.getMinIdle());
datasource.setMaxActive(druidOneParam.getMaxActive());
datasource.setMaxWait(druidOneParam.getMaxWait());
datasource.setTimeBetweenEvictionRunsMillis(druidOneParam.getTimeBetweenEvictionRunsMillis());
datasource.setMinEvictableIdleTimeMillis(druidOneParam.getMinEvictableIdleTimeMillis());
datasource.setMaxEvictableIdleTimeMillis(druidOneParam.getMaxEvictableIdleTimeMillis());
datasource.setValidationQuery(druidOneParam.getValidationQuery());
datasource.setTestWhileIdle(druidOneParam.isTestWhileIdle());
datasource.setTestOnBorrow(druidOneParam.isTestOnBorrow());
datasource.setTestOnReturn(druidOneParam.isTestOnReturn());
datasource.setPoolPreparedStatements(druidOneParam.isPoolPreparedStatements());
datasource.setMaxPoolPreparedStatementPerConnectionSize(druidOneParam.getMaxPoolPreparedStatementPerConnectionSize());
try {
datasource.setFilters(druidOneParam.getFilters());
} catch (Exception e) {
LOGGER.error("druid configuration initialization filter", e);
}
datasource.setConnectionProperties(druidOneParam.getConnectionProperties());
return datasource;
}
@Bean
public SqlSessionFactory sqlSessionFactoryOne() throws Exception{
SqlSessionFactoryBean factory = new SqlSessionFactoryBean();
ResourcePatternResolver resolver = new PathMatchingResourcePatternResolver();
factory.setDataSource(dataSourceOne());
factory.setMapperLocations(resolver.getResources("classpath*:/dataOneMapper/*.xml"));
return factory.getObject();
}
@Bean(name="transactionManagerOne")
public DataSourceTransactionManager transactionManagerOne(){
return new DataSourceTransactionManager(dataSourceOne());
}
@Bean(name = "sqlSessionTemplateOne")
public SqlSessionTemplate sqlSessionTemplateOne() throws Exception {
return new SqlSessionTemplate(sqlSessionFactoryOne());
}
}注意事项
MapperScan 在指定数据源上配置;
SqlSessionFactory 配置扫描的Mapper.xml地址 ;
DataSourceTransactionManager 配置该数据源的事务;
两个数据源的配置手法相同,不赘述 ;
数据源一:简单查询
@Service
public class AdminUserServiceImpl implements AdminUserService {

@Resource
  private AdminUserMapper adminUserMapper ;

@Override
  public AdminUser selectByPrimaryKey (Integer id) {
      return adminUserMapper.selectByPrimaryKey(id) ;
  }
}
数据源二:事务操作
@Service
public class UserBaseServiceImpl implements UserBaseService {

@Resource
  private UserBaseMapper userBaseMapper ;

@Override
  public UserBase selectByPrimaryKey(Integer id) {
      return userBaseMapper.selectByPrimaryKey(id);
  }
  // 使用指定数据源的事务

@Transactional(value = "transactionManagerTwo")

@Override
  public void insert(UserBase record) {
      // 这里数据写入失败
      userBaseMapper.insert(record) ;
      // int i = 1/0 ;
  }
}
注意:这里的需要指定该数据源配置的事务管理器。
<dependency>
    <groupId>com.baomidou</groupId>
    <artifactId>mybatis-plus-boot-starter</artifactId>
    <version>3.0.7.1</version>
    <exclusions>
        <exclusion>
            <groupId>com.baomidou</groupId>
            <artifactId>mybatis-plus-generator</artifactId>
        </exclusion>
    </exclusions>
</dependency>
<dependency>
    <groupId>com.baomidou</groupId>
    <artifactId>mybatis-plus</artifactId>
    <version>3.0.7.1</version>
</dependency>
mybatis-plus:
  mapper-locations: classpath*:/mapper/*.xml
  typeAliasesPackage: com.digital.market.*.entity
  global-config:
    db-config:
      id-type: AUTO
      field-strategy: NOT_NULL
      logic-delete-value: -1
      logic-not-delete-value: 0
    banner: false
  configuration:
    log-impl: org.apache.ibatis.logging.stdout.StdOutImpl
    map-underscore-to-camel-case: true
    cache-enabled: false
    call-setters-on-nulls: true
    jdbc-type-for-null: 'null'
mapper层
UserBaseMapper extends BaseMapper<UserBase>
实现层
UserBaseServiceImpl extends ServiceImpl<UserBaseMapper,UserBase> implements UserBaseService
接口层
UserBaseService extends IService<UserBase>
<mapper namespace="com.plus.batis.mapper.UserBaseMapper" >
  <resultMap id="BaseResultMap" type="com.plus.batis.entity.UserBase" >
    <id column="id" property="id" jdbcType="INTEGER" />
    <result column="user_name" property="userName" jdbcType="VARCHAR" />
    <result column="pass_word" property="passWord" jdbcType="VARCHAR" />
    <result column="phone" property="phone" jdbcType="VARCHAR" />
    <result column="email" property="email" jdbcType="VARCHAR" />
    <result column="create_time" property="createTime" jdbcType="TIMESTAMP" />
    <result column="update_time" property="updateTime" jdbcType="TIMESTAMP" />
    <result column="state" property="state" jdbcType="INTEGER" />
  </resultMap>
  <sql id="Base_Column_List" >
    id, user_name, pass_word, phone, email, create_time, update_time, state
  </sql>
  <select id="selectByParam" parameterType="com.plus.batis.entity.QueryParam" resultMap="BaseResultMap">
    select * from hc_user_base
  </select>
</mapper>
注意事项
BaseMapper中的方法都已默认实现;这里也可以自定义实现一些自己的方法。
@RestController
@RequestMapping("/user")
public class UserBaseController {
    private static final Logger LOGGER = LoggerFactory.getLogger(UserBaseController.class) ;
    @Resource
    private UserBaseService userBaseService ;
    @RequestMapping("/info")
    public UserBase getUserBase (){
        return userBaseService.getById(1) ;
    }
    @RequestMapping("/queryInfo")
    public String queryInfo (){
        UserBase userBase1 = userBaseService.getOne(new QueryWrapper<UserBase>().orderByDesc("create_time")) ;
        LOGGER.info("倒叙取值:{}",userBase1.getUserName());
        Integer count = userBaseService.count() ;
        LOGGER.info("查询总数:{}",count);
        UserBase userBase2 = new UserBase() ;
        userBase2.setId(1);
        userBase2.setUserName("spring");
        boolean resFlag = userBaseService.saveOrUpdate(userBase2) ;
        LOGGER.info("保存更新:{}",resFlag);
        Map<String, Object> listByMap = new HashMap<>() ;
        listByMap.put("state","0") ;
        Collection<UserBase> listMap = userBaseService.listByMap(listByMap) ;
        LOGGER.info("ListByMap查询:{}",listMap);
        boolean removeFlag = userBaseService.removeById(3) ;
        LOGGER.info("删除数据:{}",removeFlag);
        return "success" ;
    }
    @RequestMapping("/queryPage")
    public IPage<UserBase> queryPage (){
        QueryParam param = new QueryParam() ;
        param.setPage(1);
        param.setPageSize(10);
        param.setUserName("cicada");
        param.setState(0);
        return userBaseService.queryPage(param) ;
    }
    @RequestMapping("/pageHelper")
    public PageInfo<UserBase> pageHelper (){
        return userBaseService.pageHelper(new QueryParam()) ;
    }
}
这里pageHelper方法是使用PageHelper插件自定义的方法。
“SpringBoot整合MybatisPlus配置多数据源增强插件的方法是什么”的内容就介绍到这里了,感谢大家的阅读。如果想了解更多行业相关的知识可以关注亿速云网站,小编将为大家输出更多高质量的实用文章!
免责声明:本站发布的内容(图片、视频和文字)以原创、转载和分享为主,文章观点不代表本网站立场,如果涉及侵权请联系站长邮箱:is@yisu.com进行举报,并提供相关证据,一经查实,将立刻删除涉嫌侵权内容。