这篇文章主要讲解了“RHEL8怎么搭建Nginx Web服务”,文中的讲解内容简单清晰,易于学习与理解,下面请大家跟着小编的思路慢慢深入,一起来研究和学习“RHEL8怎么搭建Nginx Web服务”吧!
| RHEL 8 搭建 Nginx Web 服务前请把 yum 源配好。 |
环境
Red Hat Enterprise
Linux release 8.0
VMware Workstation Pro 14
搭建步骤
[root@localhost ~]# systemctl stop httpd  #把 httpd 停掉,防止它影响 Nginx
[root@localhost ~]# yum install -y nginx
[root@localhost ~]# systemctl start nginx
[root@localhost ~]# iptables -F
[root@localhost ~]# systemctl stop firewalld
[root@localhost ~]# systemctl disable firewalld
[root@localhost ~]# setenforce 0
[root@localhost ~]# ifconfig
ens33: flags=4163<UP,BROADCAST,RUNNING,MULTICAST>  mtu 1500
        inet 192.168.10.118  netmask 255.255.255.0  broadcast 192.168.10.255
        inet6 fe80::e09a:769b:83f0:8efa  prefixlen 64  scopeid 0x20
        ether 00:50:56:34:0d:74  txqueuelen 1000  (Ethernet)
        RX packets 2908  bytes 1777392 (1.6 MiB)
        RX errors 0  dropped 0  overruns 0  frame 0
        TX packets 1800  bytes 244006 (238.2 KiB)
        TX errors 0  dropped 0 overruns 0  carrier 0  collisions 0
lo: flags=73<UP,LOOPBACK,RUNNING>  mtu 65536
        inet 127.0.0.1  netmask 255.0.0.0
        inet6 ::1  prefixlen 128  scopeid 0x10
        loop  txqueuelen 1000  (Local Loopback)
        RX packets 0  bytes 0 (0.0 B)
        RX errors 0  dropped 0  overruns 0  frame 0
        TX packets 0  bytes 0 (0.0 B)
        TX errors 0  dropped 0 overruns 0  carrier 0  collisions 0
virbr0: flags=4099<UP,BROADCAST,MULTICAST>  mtu 1500
        inet 192.168.122.1  netmask 255.255.255.0  broadcast 192.168.122.255
        ether 52:54:00:9c:ef:c6  txqueuelen 1000  (Ethernet)
        RX packets 0  bytes 0 (0.0 B)
        RX errors 0  dropped 0  overruns 0  frame 0
        TX packets 0  bytes 0 (0.0 B)
TX errors 0 dropped 0 overruns 0 carrier 0 collisions 0在浏览器输入 192.168.10.118 查看 Nginx Web 服务器的状态

查看 nginx 软件包的文件列表
[root@localhost ~]# rpm -ql nginx
/etc/logrotate.d/nginx
/etc/nginx/fastcgi.conf
/etc/nginx/fastcgi.conf.default
/etc/nginx/fastcgi_params
/etc/nginx/fastcgi_params.default
/etc/nginx/koi-utf
/etc/nginx/koi-win
/etc/nginx/mime.types
/etc/nginx/mime.types.default
/etc/nginx/nginx.conf
/etc/nginx/nginx.conf.default
...省略部分内容...自定义首页内容
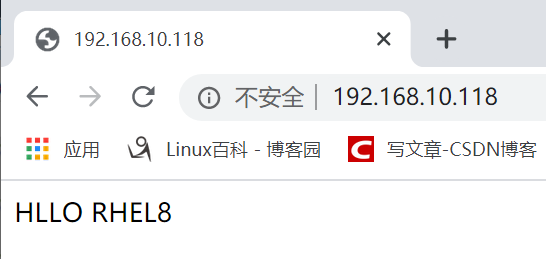
[root@localhost ~]# echo "HLLO RHEL8" > /usr/share/nginx/html/index.html
[root@localhost ~]# systemctl restart nginx在浏览器输入 192.168.10.118 查看
设置文件共享服务
[root@localhost ~]# mv /usr/share/nginx/html/* /var/lib/nginx/tmp/
[root@localhost ~]# touch /usr/share/nginx/html/file{1..10}
[root@localhost ~]# ls /usr/share/nginx/html/
file1  file10  file2  file3  file4  file5  file6  file7  file8  file9
[root@localhost ~]# systemctl restart nginx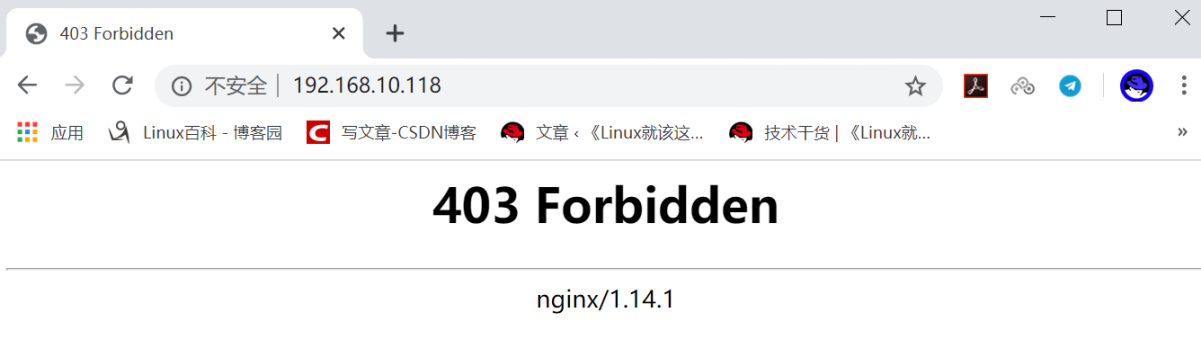
遇到 403 Forbidden 报错,原因是配置文件没配好,解决方法如下:
[root@localhost html]# grep -v "#" /etc/nginx/nginx.conf
user nginx;
worker_processes auto;
error_log /var/log/nginx/error.log;
pid /run/nginx.pid;
include /usr/share/nginx/modules/*.conf;
events {
    worker_connections 1024;
}
http {
    log_format  main  '$remote_addr - $remote_user [$time_local] "$request" '
                      '$status $body_bytes_sent "$http_referer" '
                      '"$http_user_agent" "$http_x_forwarded_for"';
    access_log  /var/log/nginx/access.log  main;
    sendfile            on;
    tcp_nopush          on;
    tcp_nodelay         on;
    keepalive_timeout   65;
    types_hash_max_size 2048;
    include             /etc/nginx/mime.types;
    default_type        application/octet-stream;
    include /etc/nginx/conf.d/*.conf;
    server {
        listen       80 default_server;
        listen       [::]:80 default_server;
        server_name  localhost;
        root         /usr/share/nginx/html;
        include /etc/nginx/default.d/*.conf;

        location / {
             index  index.html index.htm;
             autoindex on;
             autoindex_exact_size on;
             autoindex_localtime on;
             charset utf-8;
             }
         }
}参考以上配置进行修改
[root@localhost ~]# vim /etc/nginx/nginx.conf
[root@localhost ~]# systemctl restart nginx在浏览器输入 192.168.10.118 查看文件共享状态

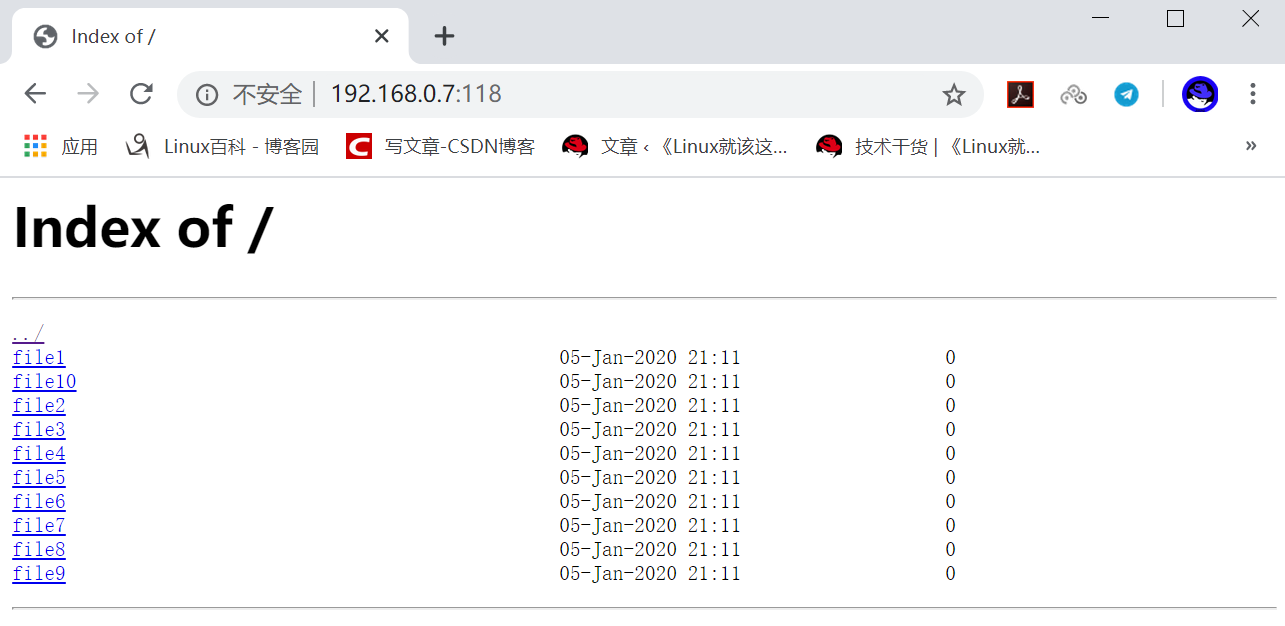
设置端口映射
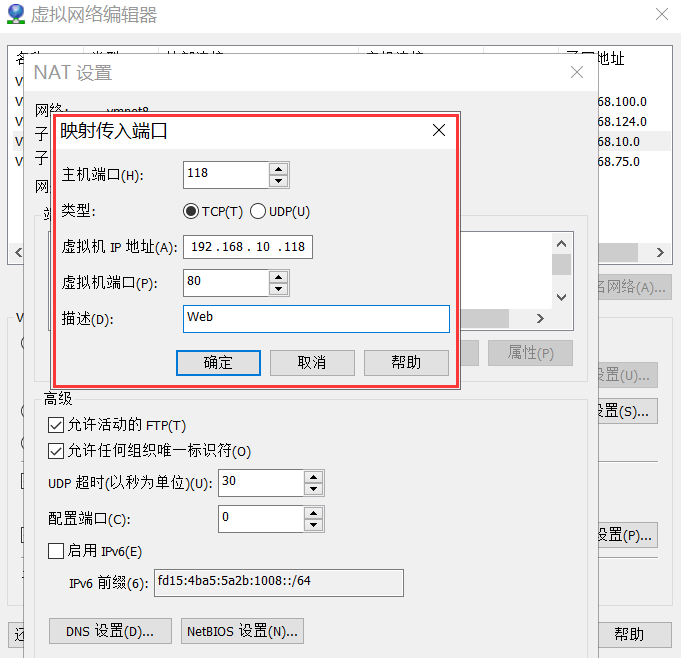
查看宿主机IP
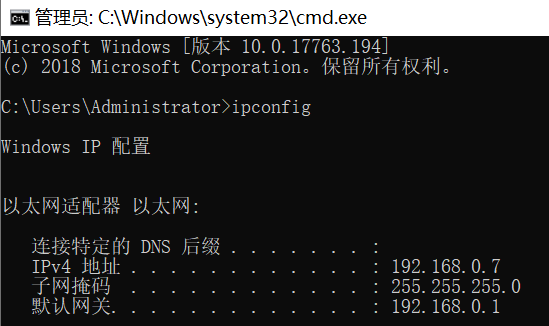
在浏览器输入 192.168.0.7:118 测试文件共享服务状态
在 RHEL8 上用 yum 安装的 Nginx Web 服务对中文的支持比较好
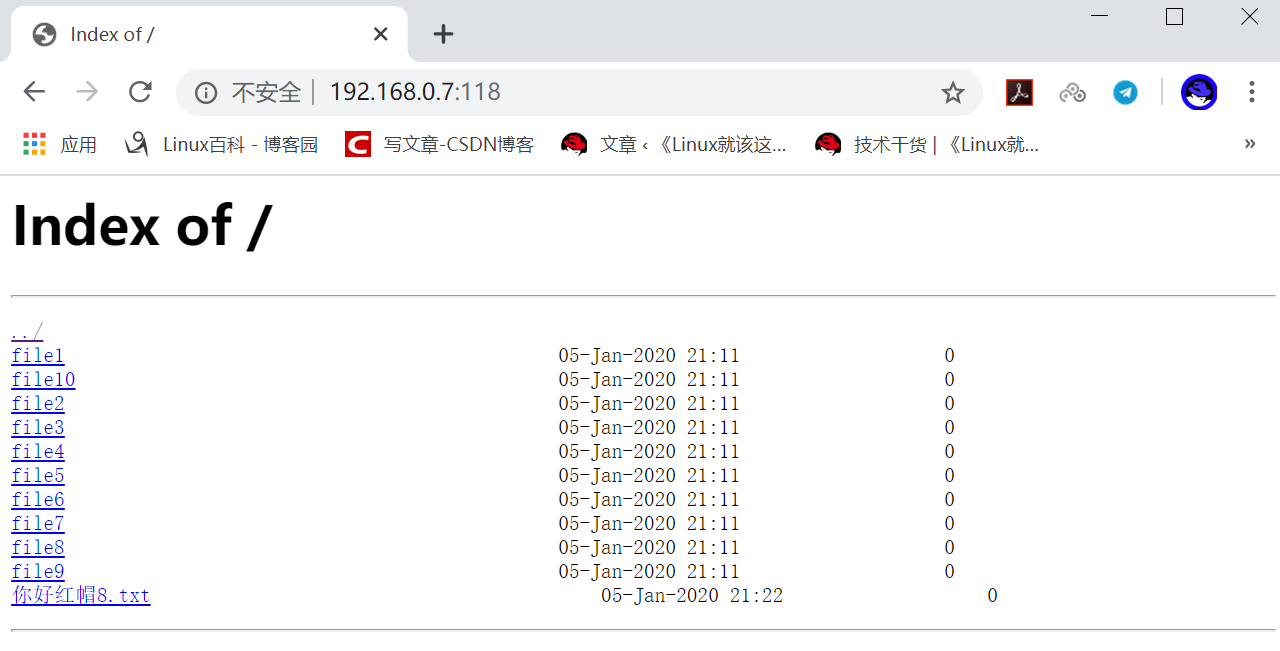
[root@localhost ~]# touch /usr/share/nginx/html/你好红帽8.txt
[root@localhost ~]# systemctl restart nginx感谢各位的阅读,以上就是“RHEL8怎么搭建Nginx Web服务”的内容了,经过本文的学习后,相信大家对RHEL8怎么搭建Nginx Web服务这一问题有了更深刻的体会,具体使用情况还需要大家实践验证。这里是亿速云,小编将为大家推送更多相关知识点的文章,欢迎关注!
亿速云「云服务器」,即开即用、新一代英特尔至强铂金CPU、三副本存储NVMe SSD云盘,价格低至29元/月。点击查看>>
免责声明:本站发布的内容(图片、视频和文字)以原创、转载和分享为主,文章观点不代表本网站立场,如果涉及侵权请联系站长邮箱:is@yisu.com进行举报,并提供相关证据,一经查实,将立刻删除涉嫌侵权内容。
原文链接:http://blog.itpub.net/31524109/viewspace-2708714/


 计算
计算 安全
安全 数据库
数据库 网络和加速
网络和加速 企业服务
企业服务


