今天就跟大家聊聊有关vue项目中如何实现刷新左侧菜单栏,可能很多人都不太了解,为了让大家更加了解,小编给大家总结了以下内容,希望大家根据这篇文章可以有所收获。
这个是我们html里面的超链接,而我们的点击事件的跳转就是通过这个超链接实现的。
<el-menu-item index="3-1"><a href="#/commodity-list" rel="external nofollow" >
然后我们要创建一个js文件,将我们要跳转的路径导入
import ChannelList from './src/commodity-manage/channel-list/channel-list'
配置路由管理:
const router = new VueRouter({
 routes: [
 {
   path: '/commodity-list',
   name: 'commodity-list',
   component: commodityStorage,
   children: []
  }
]
path:就是我们要跳转的路径
name:跳转文件的名字
component:配置了映射的组件
在html文件中配置了<router-view/>
<router-view :key="key"></router-view>
是用来渲染通过路由映射过来的组件,当路径更改时,<router-view> 中的内容也会发生更改
在js文件中使用computed来进行监听
 //每次让路由生成不同的值,用于重新加载组件,达到刷新数据的效果
  computed: {
   key() {
     return this.$route.name !== undefined? this.$route.name +new Date(): this.$route +new Date()
   }
},补充知识:vue:路由菜单(element 和 antd)
在 vue 中 使用 UI框架中的菜单,给菜单如何添加路由呢?其中会出现路由样式的问题。请看下面两种UI方法。
注)使用框架的时候注入知道的吧。。。。。防止有些人xxxx,我还是写一下。

场景:使用 elementUI 的 NavMenu 时。
这里请注意:可以不使用 router-link,在 e-menu 上面绑定 route 或者 :route = 'true' ,然后遍历的时候 :index=‘route.path' (:index=‘路径')。
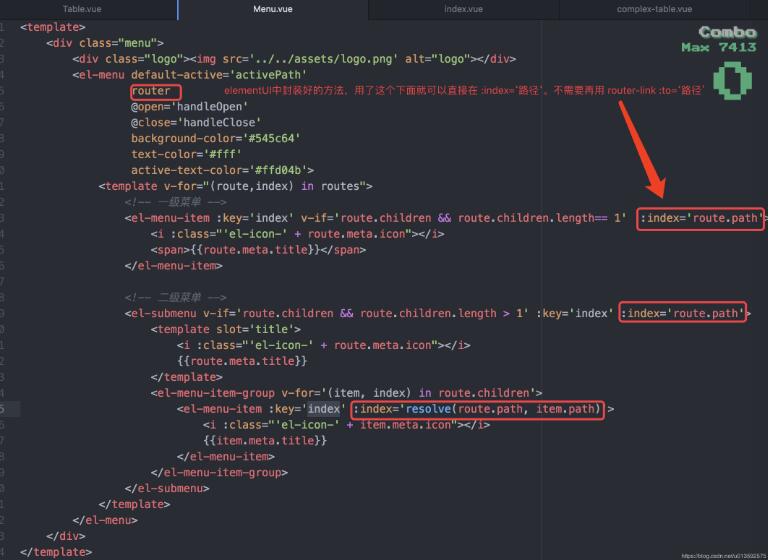
代码
<template>
  <div class="menu">
    <el-menu default-active='activePath'
         router
         @open='handleOpen'
         @close='handleClose'
         background-color='#545c64'
         text-color='#fff'
         active-text-color='#ffd04b' >
      <template v-for="(route,index) in routes">
        <!-- 一级菜单 -->
        <el-menu-item :key='index' v-if='route.children && route.children.length== 1' :index='route.path'>
          <i :class="'el-icon-' + route.meta.icon"></i>
          <span>{{route.meta.title}}</span>
        </el-menu-item>

        <!-- 二级菜单 -->
        <el-submenu v-if='route.children && route.children.length > 1' :key='index' :index='route.path'>
          <template slot='title'>
            <i :class="'el-icon-' + route.meta.icon"></i>
            {{route.meta.title}}
          </template>
          <el-menu-item-group v-for='(item, index) in route.children'>
            <el-menu-item :key='index' :index='resolve(route.path, item.path)'>
              <i :class="'el-icon-' + item.meta.icon"></i>
              {{item.meta.title}}
            </el-menu-item>
          </el-menu-item-group>
        </el-submenu>
      </template>
    </el-menu>
  </div>
</template>

<script>

export default {
  name: 'Menu',
  data() {
   return {
     activePath: this.$router.path,
   }
  },
  computed: { // 计算属性:获取路由
    routes() {
      console.log('test', this.$router)
      console.log('ddd', this.$router.options.routes)
      return this.$router.options.routes
    },
  },
  methods: {
    resolve(p,i){
     return `${p}/${i}`
    },
    handleOpen(key, keyPath) {
      console.log(key, keyPath);
    },
    handleClose(key, keyPath) {
      console.log(key, keyPath);
    }
  },
}
</script>

<style lang='less'>
  .el-menu {
    text-align: left;
  }
</style>
场景:使用 antd 的 Menu 时。
这个里面是需要使用route-link做路由跳转的。
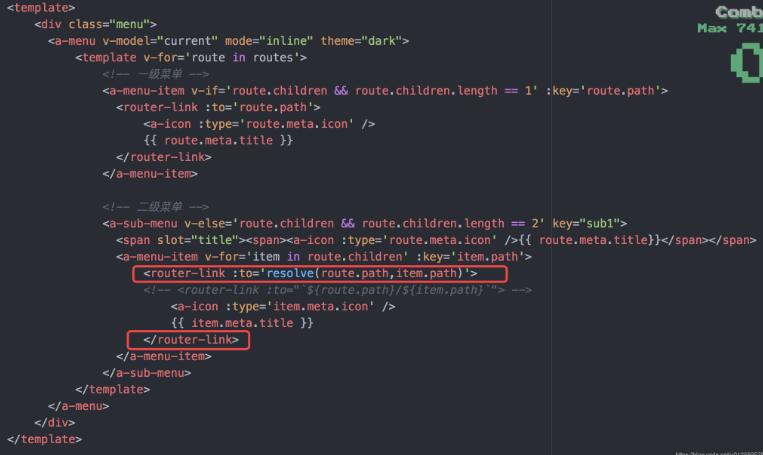
代码
<template>
  <div class="menu">
   <a-menu v-model="current" mode="inline" theme="dark">
     <template v-for='route in routes'>
       <!-- 一级菜单 -->
       <a-menu-item v-if='route.children && route.children.length == 1' :key='route.path'>
        <router-link :to='route.path'>
          <a-icon :type='route.meta.icon' />
          {{ route.meta.title }}
        </router-link>
       </a-menu-item>

       <!-- 二级菜单 -->
       <a-sub-menu v-else='route.children && route.children.length == 2' key="sub1">
        <span slot="title"><span><a-icon :type='route.meta.icon' />{{ route.meta.title}}</span></span>
        <a-menu-item v-for='item in route.children' :key='item.path'>
          <router-link :to='resolve(route.path,item.path)'>
          <!-- <router-link :to="`${route.path}/${item.path}`"> -->
            <a-icon :type='item.meta.icon' />
            {{ item.meta.title }}
          </router-link>
        </a-menu-item>
       </a-sub-menu>
     </template>
   </a-menu>
  </div>
</template>

<script>

export default {
  name: 'Menu',
  data() {
   return {
     current: ['/'],
   }
  },
  computed: { // 计算属性:获取路由
    routes() {
      console.log('test', this.$router)
      console.log('ddd', this.$router.options.routes)
      return this.$router.options.routes
    },
  },
  methods:{
    resolve(p,i){
     return `${p}/${i}`
    },
  },
}
</script>
看完上述内容,你们对vue项目中如何实现刷新左侧菜单栏有进一步的了解吗?如果还想了解更多知识或者相关内容,请关注亿速云行业资讯频道,感谢大家的支持。
免责声明:本站发布的内容(图片、视频和文字)以原创、转载和分享为主,文章观点不代表本网站立场,如果涉及侵权请联系站长邮箱:is@yisu.com进行举报,并提供相关证据,一经查实,将立刻删除涉嫌侵权内容。


