这篇文章给大家分享的是有关OpenCV如何实现图像转换为漫画效果的方法的内容。小编觉得挺实用的,因此分享给大家做个参考。一起跟随小编过来看看吧。
1、先canny提取图像的边缘并强化,翻转边缘为黑色,将像素值转换为0-1的值
2、将图像进行双边滤波处理,然后将像素值缩短为每10个灰度级为一个值
3、将前两步得到的结果相乘,显示结果
#include <iostream>
using namespace std;
#include "opencv2/core.hpp"
#include "opencv2/highgui.hpp"
#include "opencv2/imgproc.hpp"
using namespace cv;
int main()
{
Mat img = imread("1.jpg");
float radius = img.cols > img.rows ? (img.rows / 3) : (img.cols / 3);
const double exponential_e = exp(1.0);
/** EDgES **/
// Apply median filter to remove possible noise
Mat imgMedian;
medianBlur(img, imgMedian, 7);
// Detect edges with canny
Mat imgCanny;
Canny(imgMedian, imgCanny, 50, 150);
// Dilate the edges
Mat kernel = getStructuringElement(MORPH_RECT, Size(2, 2));
dilate(imgCanny, imgCanny, kernel);
// Scale edges values to 1 and invert values
imgCanny = imgCanny / 255;
imgCanny = 1 - imgCanny;
// Use float values to allow multiply between 0 and 1
Mat imgCannyf;
imgCanny.convertTo(imgCannyf, CV_32FC3);
// Blur the edgest to do smooth effect
blur(imgCannyf, imgCannyf, Size(5, 5));
/** COLOR **/
// Apply bilateral filter to homogenizes color
Mat imgBF;
bilateralFilter(img, imgBF, 9, 150.0, 150.0);
// truncate colors
Mat result = imgBF / 25;
result = result * 25;
/** MERgES COLOR + EDgES **/
// Create a 3 channles for edges
Mat imgCanny3c;
Mat cannyChannels[] = { imgCannyf, imgCannyf, imgCannyf };
merge(cannyChannels, 3, imgCanny3c);
// Convert color result to float
Mat resultf;
result.convertTo(resultf, CV_32FC3);
// Multiply color and edges matrices
// cout << imgCanny3c << endl;
multiply(resultf, imgCanny3c, resultf);
// cout << resultf << endl;
// convert to 8 bits color
resultf.convertTo(result, CV_8UC3);
// Show image
imshow("Result", result);
waitKey(0);
return 0;
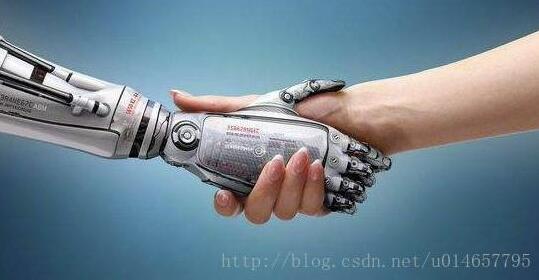
}原图为:
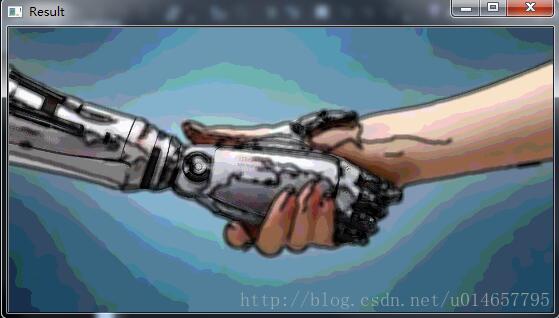
效果图为:
感谢各位的阅读!关于OpenCV如何实现图像转换为漫画效果的方法就分享到这里了,希望以上内容可以对大家有一定的帮助,让大家可以学到更多知识。如果觉得文章不错,可以把它分享出去让更多的人看到吧!
亿速云「云服务器」,即开即用、新一代英特尔至强铂金CPU、三副本存储NVMe SSD云盘,价格低至29元/月。点击查看>>
免责声明:本站发布的内容(图片、视频和文字)以原创、转载和分享为主,文章观点不代表本网站立场,如果涉及侵权请联系站长邮箱:is@yisu.com进行举报,并提供相关证据,一经查实,将立刻删除涉嫌侵权内容。


 计算
计算 安全
安全 数据库
数据库 网络和加速
网络和加速 企业服务
企业服务


