本篇文章为大家展示了Spring Cloud如何实现远程调用负载均衡,内容简明扼要并且容易理解,绝对能使你眼前一亮,通过这篇文章的详细介绍希望你能有所收获。
负载均衡
使用微服务后,为了能够承担高并发的压力,同一个服务可能会启动多个实例。这时候消费者就需要负载均衡,把请求分散到各个实例。负载均衡主要有两种设计:
服务端负载均衡客户端负载均衡
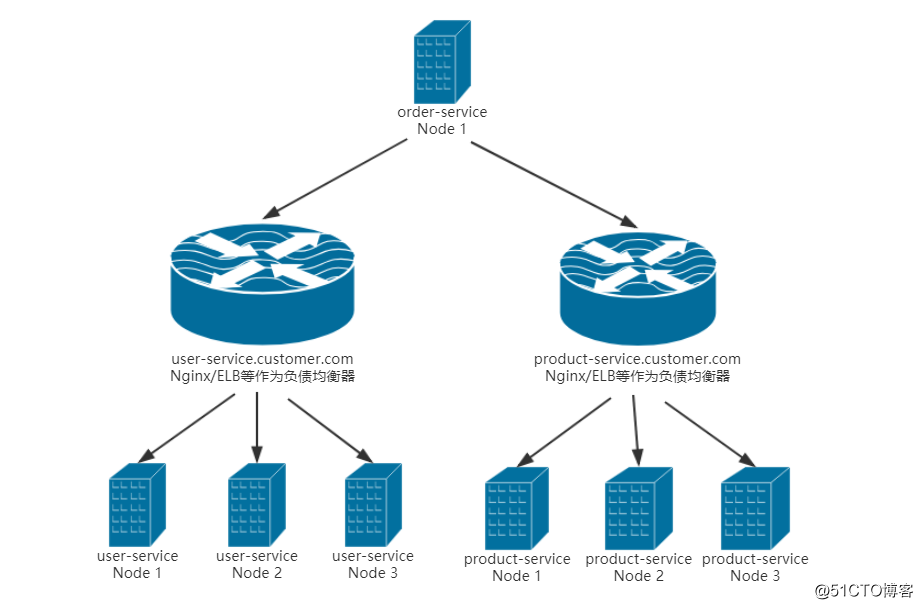
对于传统的分布式服务来说,大多使用服务端负载均衡。一般会使用Nginx或者ELB等工具作为负载均衡器,如下图:

传统负载均衡
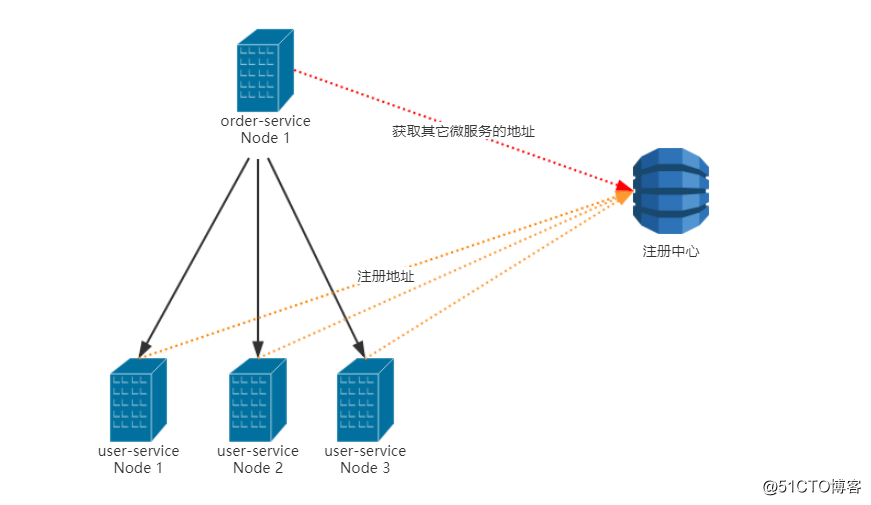
而在Spring Cloud中,使用的是「客户端负载均衡」的方式,使用「Ribbon」组件来实现客户端的负载均衡。只要引入了微服务注册中心依赖,就会自动引入Ribbon依赖。客户端负载均衡原理如下图:

客户端负载均衡
Ribbon的原理
Ribbon利用了RestTemplate的拦截器(接口是ClientHttpRequestInterceptor)机制,在拦截器中实现的负载均衡。负载均衡的基本实现就是利用从「服务注册中心」获取可用的服务地址列表,然后通过一定算法负载,决定使用哪一个服务地址来进行HTTP调用。
详情可以查看LoadBalancerInterceptor这个类,位于org.springframework.cloud.client.loadbalancer包下。
使用Ribbon
首先定义一下生产者「service-user」,我这里使用容器启动了多个生产者实例,每个实例具有不同的id,我的示例代码里面启动了两个实例:
service-user-1
service-user-2
代码:
@RestController
@RequestMapping
public class HelloController {

  @Value("${spring.cloud.consul.discovery.instanceId}")
  private String instanceId;

  @GetMapping("hello")
  public String hello() {
    return String.format("hello, this is %s", instanceId);
  }
}然后对于消费者「service-order」,可以使用Java声明式注解的方式来使用Ribbon,只需要在消费者给RestTemplate类型的Bean配上一个@LoadBalanced就可以了。然后再配置一下负载均衡策略:
@Configuration
public class RibbonConfig {

  @Bean
  @LoadBalanced
  public RestTemplate ribbonRestTemplate(){
    return new RestTemplate();
  }

  @Bean
  public IRule ribbonRule() {
    return new RandomRule(); // 随机负载均衡
  }
}然后就可以直接使用自动注入的RestTemplate类型的Bean了:
@RestController
@RequestMapping
public class HelloController {

  @Autowired
  RestTemplate restTemplate;

  @GetMapping("/ribbon/service-user")
  public String ribbonService(){
    return restTemplate.getForObject("http://service-user/hello", String.class);
  }
}这个时候访问消费者的/ribbon/service-user,刷新几次,就会看到下面两个随机的响应:
hello, this is service-user-2
hello, this is service-user-1
负载均衡策略
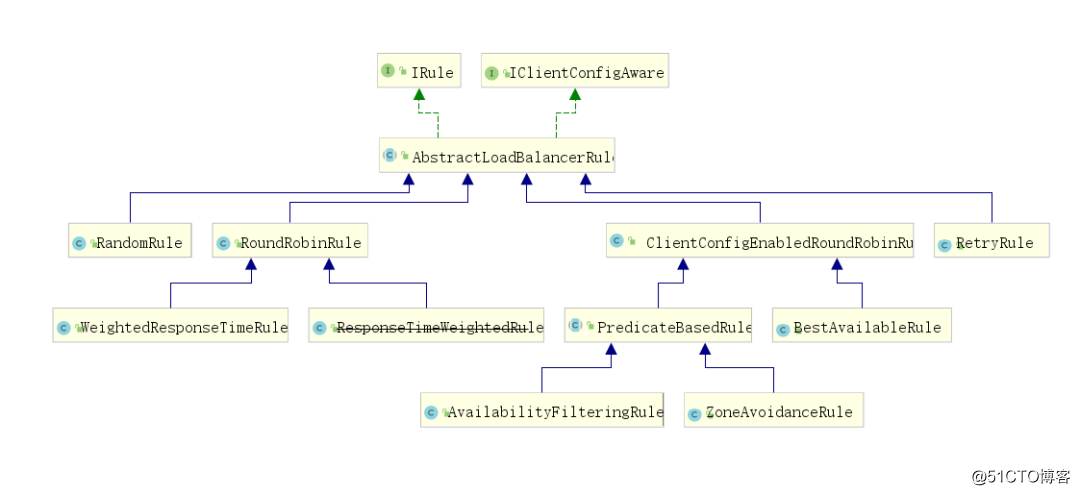
查看IRule接口的实现类,可以看到Ribbon的所有负载均衡策略,查看各实现类顶部的注释可以看到它的具体策略:

负载均衡器
远程调用
Spring Cloud提供了OpenFeign组件(以前叫Feign)来进行远程的HTTP调用。它是对RestTemplate的一个封装。
Feign是一个声明式Web Service客户端。使用Feign能让编写Web Service客户端更加简单。Spring Cloud对Feign进行了封装,使其支持了Spring MVC标准注解和HttpMessageConverters。Feign可以与微服务注册中心和Ribbon组合使用以支持负载均衡。
使用OpenFeign
第一步,引入依赖:
implementation 'org.springframework.cloud:spring-cloud-starter-openfeign'第二步,启动配置,在启动类上添加@EnableFeignClients注解:
@SpringBootApplicationbr/>@EnableFeignClients
public class ServiceOrderApplication {
public static void main(String[] args) {
  SpringApplication.run(ServiceOrderApplication.class, args);
}
}第三步:声明调用接口,我这里案例是service-order调用service-user的/hello接口,这里的注解就跟Spring MVC的注解一致:
注意Feign在做POST请求的时候有一个小坑,详情参考:SpringCloud Feign Post表单请求。
@FeignClient("service-user")
public interface UserClient {
  @GetMapping("hello")
  String getUserHello();
}第四步:使用,注解使用@Autowired注解注入就可以了:
@RestController
@RequestMapping
public class HelloController {

  @Autowired
  UserClient userClient;

  @GetMapping("hello")
  public String hello() {
    return "hello, this is order service";
  }

  @GetMapping("userHello")
  public String user() {
    return userClient.getUserHello() + ", this is order-service";
  }
}是不是看起来非常简单?
OpenFeign集成Ribbon
前面我们提到,OpenFeign底层是对RestTemplate的一个封装,而Ribbon是通过给RestTemplate添加过滤器来实现的,所以OpenFeign天生就自动集成了Ribbon,我们不需要任何额外的配置。
在上述代码中,启动后,可以访问service-order的/userHello端口,不断刷新,发现已经实现了负载均衡。
上述内容就是Spring Cloud如何实现远程调用负载均衡,你们学到知识或技能了吗?如果还想学到更多技能或者丰富自己的知识储备,欢迎关注亿速云行业资讯频道。
亿速云「云服务器」,即开即用、新一代英特尔至强铂金CPU、三副本存储NVMe SSD云盘,价格低至29元/月。点击查看>>
免责声明:本站发布的内容(图片、视频和文字)以原创、转载和分享为主,文章观点不代表本网站立场,如果涉及侵权请联系站长邮箱:is@yisu.com进行举报,并提供相关证据,一经查实,将立刻删除涉嫌侵权内容。