这篇文章将为大家详细讲解有关使用spring boot实现profiles动态切换,文章内容质量较高,因此小编分享给大家做个参考,希望大家阅读完这篇文章后对相关知识有一定的了解。
具体做法:
1、首先在pom中添加profiles:
<profiles>
  <profile>
   <id>dev</id>
   <activation>
     <activeByDefault>true</activeByDefault>
   </activation>
   <properties>
     <spring.profiles.active>dev</spring.profiles.active>
   </properties>
   <dependencies>
     <dependency>
      <groupId>org.springframework.boot</groupId>
      <artifactId>spring-boot-devtools</artifactId>
      <optional>true</optional>
     </dependency>
     <dependency>
      <groupId>org.springframework.boot</groupId>
      <artifactId>spring-boot-starter-undertow</artifactId>
     </dependency>
   </dependencies>
  </profile>

  <profile>
   <id>prod</id>
   <dependencies>
     <dependency>
      <groupId>org.springframework.boot</groupId>
      <artifactId>spring-boot-starter-undertow</artifactId>
     </dependency>
   </dependencies>
   <properties>
     <spring.profiles.active>prod</spring.profiles.active>
   </properties>
  </profile>
</profiles>dev指开发模式,prod指生产模式,如需其他模式,只需要添加profile即可.
2、在pom.xml的build中添加plugin:
<plugin>
  <groupId>org.apache.maven.plugins</groupId>
  <artifactId>maven-resources-plugin</artifactId>
  <version>${maven-resources-plugin.version}</version>
  <executions>
   <execution>
     <id>default-resources</id>
     <phase>validate</phase>
     <goals>
      <goal>copy-resources</goal>
     </goals>
     <configuration>
      <outputDirectory>target/classes</outputDirectory>
      <useDefaultDelimiters>false</useDefaultDelimiters>
      <delimiters>
        <delimiter>#</delimiter>
      </delimiters>
      <resources>
        <resource>
         <directory>src/main/resources/</directory>
         <filtering>true</filtering>
         <includes>
           <include>**/*.xml</include>
           <include>**/*.yml</include>
         </includes>
        </resource>
        <resource>
         <directory>src/main/resources/</directory>
         <filtering>false</filtering>
         <excludes>
           <exclude>**/*.xml</exclude>
           <exclude>**/*.yml</exclude>
         </excludes>
        </resource>
      </resources>
     </configuration>
   </execution>
  </executions>
</plugin>该配置用来在打包的时候修改配置文件。
3、编写DefaultProfileUtil工具类来添加默认启动配置文件:
import org.springframework.boot.SpringApplication;
import org.springframework.core.env.Environment;

import java.util.HashMap;
import java.util.Map;

/**
 * Utility class to load a Spring profile to be used as default
 * when there is no <code>spring.profiles.active</code> set in the environment or as command line argument.
 * If the value is not available in <code>application.yml</code> then <code>dev</code> profile will be used as default.
 */
public final class DefaultProfileUtil {

  private static final String SPRING_PROFILE_DEFAULT = "spring.profiles.default";

  private DefaultProfileUtil(){
  }

  /**
   * Set a default to use when no profile is configured.
   *
   * @param app the spring application
   */
  public static void addDefaultProfile(SpringApplication app) {
    Map<String, Object> defProperties = new HashMap<>();
    /*
    * The default profile to use when no other profiles are defined
    * This cannot be set in the <code>application.yml</code> file.
    * See https://github.com/spring-projects/spring-boot/issues/1219
    */
    defProperties.put(SPRING_PROFILE_DEFAULT, Constants.SPRING_PROFILE_DEVELOPMENT);
    app.setDefaultProperties(defProperties);
    System.out.println(app);
  }

  /**
   * Get the profiles that are applied else get default profiles.
   */
  public static String[] getActiveProfiles(Environment env) {
    String[] profiles = env.getActiveProfiles();
    if (profiles.length == 0) {
      return env.getDefaultProfiles();
    }
    return profiles;
  }
}public class Constants {
public static final String SPRING_PROFILE_DEVELOPMENT = "dev";
public static final String SPRING_PROFILE_PRODUCTION = "prod";
private Constants() {
}
}4、修改application.yml配置文件,添加(采用application.properties文件):
spring:
  profiles:
active: #spring.profiles.active#maven的构建的时候会替换#spring.profiles.active#
5、修改项目的启动类:
@SpringBootApplication
public class Demo1Application {

  private static final Logger log = LoggerFactory.getLogger(Demo1Application.class);

  public static void main(String[] args) {
   SpringApplication app = new SpringApplication(Demo1Application.class);
   DefaultProfileUtil.addDefaultProfile(app);
   Environment env = app.run(args).getEnvironment();
   log.info("\n----------------------------------------------------------\n\t" +
         "Application '{}' is running! Access URLs:\n\t" +
         "Local: \t\thttp://localhost:{}\n\t" +
         "----------------------------------------------------------",
      env.getProperty("spring.application.name"),
      env.getProperty("server.port"));
  }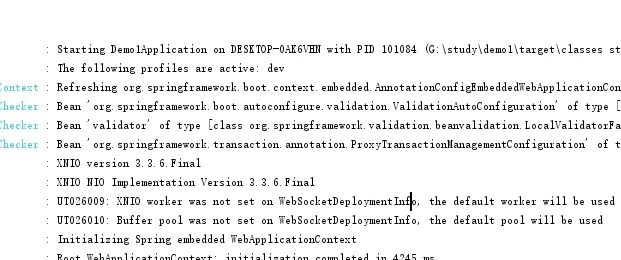
}以上修改完成之后,在启动的时候会显示:The following profiles are active: dev 默认dev模式切换成功。
6、构建项目:
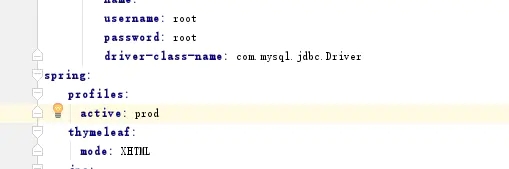
采用mvn clean package -Pprod命令构建,最后的配置文件会被改成:
关于使用spring boot实现profiles动态切换就分享到这里了,希望以上内容可以对大家有一定的帮助,可以学到更多知识。如果觉得文章不错,可以把它分享出去让更多的人看到。
亿速云「云服务器」,即开即用、新一代英特尔至强铂金CPU、三副本存储NVMe SSD云盘,价格低至29元/月。点击查看>>
免责声明:本站发布的内容(图片、视频和文字)以原创、转载和分享为主,文章观点不代表本网站立场,如果涉及侵权请联系站长邮箱:is@yisu.com进行举报,并提供相关证据,一经查实,将立刻删除涉嫌侵权内容。


 计算
计算 安全
安全 数据库
数据库 网络和加速
网络和加速 企业服务
企业服务


