本篇文章给大家分享的是有关python Cartopy的基础使用方法,小编觉得挺实用的,因此分享给大家学习,希望大家阅读完这篇文章后可以有所收获,话不多说,跟着小编一起来看看吧。
前言
常用地图底图的绘制一般由Basemap或者cartopy模块完成,由于Basemap库是基于python2开发的一个模块,目前已经不开发维护。故简单介绍cartopy模块的一些基础操作。 一、基础介绍
首先导入相关模块。
import numpy as np
import matplotlib.pyplot as plt
import cartopy.crs as ccrs
import cartopy.feature as cfeature
from cartopy.mpl.ticker import LongitudeFormatter, LatitudeFormatter首先介绍参数projection,该命令可以配合ccrs设置投影类型,此处以方形投影命令为示例。其中central_longitude参数为投影中心位置。其中心设置与Basemap设置规则一样,详情可以看上一篇文章。
ax=plt.axes(projection=ccrs.PlateCarree(central_longitude=0))在设置好绘制类型后,绘制地图各特征量。其代码如下:
#ax.add_feature(cfeature.LAKES.with_scale(scale))
ax.add_feature(cfeature.OCEAN.with_scale(scale))
#ax.add_feature(cfeature.RIVERS.with_scale(scale))
#ax.add_feature(cfeature.LAND.with_scale(scale),lw=0.5)
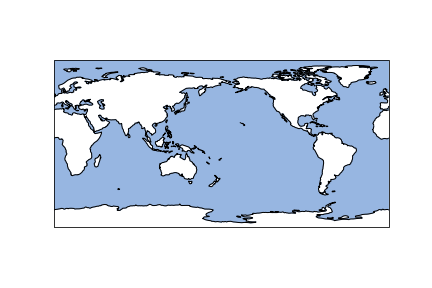
ax.add_feature(cfeature.COASTLINE.with_scale(scale),lw=2)参数scale为地图分辨率,目前支持10m,50m,110m,参数lw为线条粗细。此处绘制海岸线和海洋,效果图如下:

在绘制结束后,作为地图。经纬度自然是必不可少的,在该模块中,引进同时设置坐标轴标签改变该标签刻度的表示,具体形式如下:
ax.set_xticks(np.arange(0,361,40), crs=ccrs.PlateCarree())
ax.set_yticks(np.arange(-90,90+30,30), crs=ccrs.PlateCarree())
#zero_direction_label用来设置经度的0度加不加E和W
lon_formatter = LongitudeFormatter(zero_direction_label=False)
lat_formatter = LatitudeFormatter()
ax.xaxis.set_major_formatter(lon_formatter)
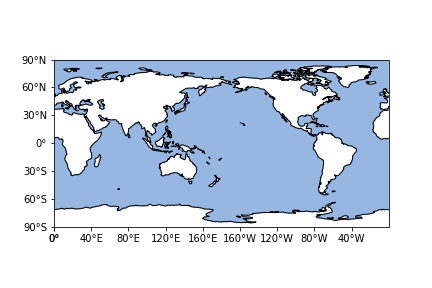
ax.yaxis.set_major_formatter(lat_formatter)可以看到效果图如下:

当然如果想对坐标轴粗细变化可以引入一下命令。
ax.outline_patch.set_visible(False)
ax.spines['bottom'].set_visible(True)
ax.spines['left'].set_visible(True)
ax.spines['right'].set_visible(True)
ax.spines['top'].set_visible(True)
ax.spines['bottom'].set_linewidth(2.5);###设置底部坐标轴的粗细
ax.spines['left'].set_linewidth(2.5);####设置左边坐标轴的粗细
ax.spines['right'].set_linewidth(2.5);###设置右边坐标轴的粗细
ax.spines['top'].set_linewidth(2.5);####设置上部坐标轴的粗细应该在该模块下,控制坐标轴的命令已经和常规不一样。因此先关闭该控制,然后开启常规坐标轴设置。
二、区域地图的绘制
当我们在某一小块区域研究时,需要绘制区域地图。此时我们可以引入命令:
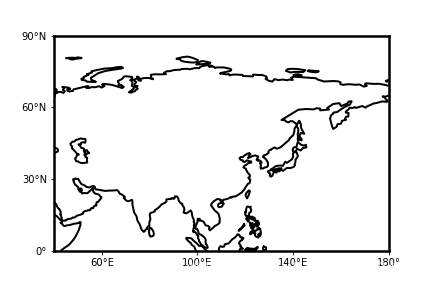
ax.set_extent(box,crs=ccrs.PlateCarree())其中box为绘制区域,crs为投影类型。其他命令基本不变。设置box为[40,180,0,90],可得到效果图如下:

总结
为方便各位读者,我书写了绘制地图的函数,大家在使用时可直接调用。此处示例为方形投影,若希望绘制其他投影。只需要修改函数部分参数即可。代码如下:
def map_make(scale,box,xstep,ystep):
  ax=plt.axes(projection=ccrs.PlateCarree(central_longitude=180))
  a = (box[1]-box[0])//xstep
  x_start = box[1] - a*xstep
  a = (box[3]-box[2])//ystep
  y_start = box[3] - a*ystep
  ax.set_extent(box,crs=ccrs.PlateCarree())
  #ax.add_feature(cfeature.LAKES.with_scale(scale))
  #ax.add_feature(cfeature.OCEAN.with_scale(scale))
  #ax.add_feature(cfeature.RIVERS.with_scale(scale))
  #ax.add_feature(cfeature.LAND.with_scale(scale),lw=0.5)
  ax.add_feature(cfeature.COASTLINE.with_scale(scale),lw=2)

  ax.set_xticks(np.arange(x_start,box[1]+xstep,xstep), crs=ccrs.PlateCarree())
  ax.set_yticks(np.arange(y_start,box[3]+ystep,ystep), crs=ccrs.PlateCarree())
  #zero_direction_label用来设置经度的0度加不加E和W
  lon_formatter = LongitudeFormatter(zero_direction_label=False)
  lat_formatter = LatitudeFormatter()
  ax.xaxis.set_major_formatter(lon_formatter)
  ax.yaxis.set_major_formatter(lat_formatter)
  #添加网格线
  ax.grid()

  ax.outline_patch.set_visible(False)
  ax.spines['bottom'].set_visible(True)
  ax.spines['left'].set_visible(True)
  ax.spines['right'].set_visible(True)
  ax.spines['top'].set_visible(True)
  ax.spines['bottom'].set_linewidth(2.5);###设置底部坐标轴的粗细
  ax.spines['left'].set_linewidth(2.5);####设置左边坐标轴的粗细
  ax.spines['right'].set_linewidth(2.5);###设置右边坐标轴的粗细
  ax.spines['top'].set_linewidth(2.5);####设置上部坐标轴的粗细

return ax以上就是python Cartopy的基础使用方法,小编相信有部分知识点可能是我们日常工作会见到或用到的。希望你能通过这篇文章学到更多知识。更多详情敬请关注亿速云行业资讯频道。
亿速云「云服务器」,即开即用、新一代英特尔至强铂金CPU、三副本存储NVMe SSD云盘,价格低至29元/月。点击查看>>
免责声明:本站发布的内容(图片、视频和文字)以原创、转载和分享为主,文章观点不代表本网站立场,如果涉及侵权请联系站长邮箱:is@yisu.com进行举报,并提供相关证据,一经查实,将立刻删除涉嫌侵权内容。