本篇文章给大家分享的是有关在SpringBoot环境如何实现整合Swagger2,小编觉得挺实用的,因此分享给大家学习,希望大家阅读完这篇文章后可以有所收获,话不多说,跟着小编一起来看看吧。
一、导入maven包
<dependency>
  <groupId>io.springfox</groupId>
  <artifactId>springfox-swagger2</artifactId>
  <version>2.9.2</version>
</dependency>
<dependency>
  <groupId>io.springfox</groupId>
  <artifactId>springfox-swagger-ui</artifactId>
  <version>2.9.2</version>
</dependency>二、添加工具类
@Configuration
@EnableSwagger2
public class SwaggerConfig {
  @Bean
  public Docket createRestApi() {
    return new Docket(DocumentationType.SWAGGER_2)
        .pathMapping("/")
        .select()
        .apis(RequestHandlerSelectors.basePackage("com.nvn.controller"))
        .paths(PathSelectors.any())
        .build().apiInfo(new ApiInfoBuilder()
            .title("SpringBoot整合Swagger")
            .description("SpringBoot整合Swagger,详细信息......")
            .version("1.0")
            .build());
  }
}三、添加注解
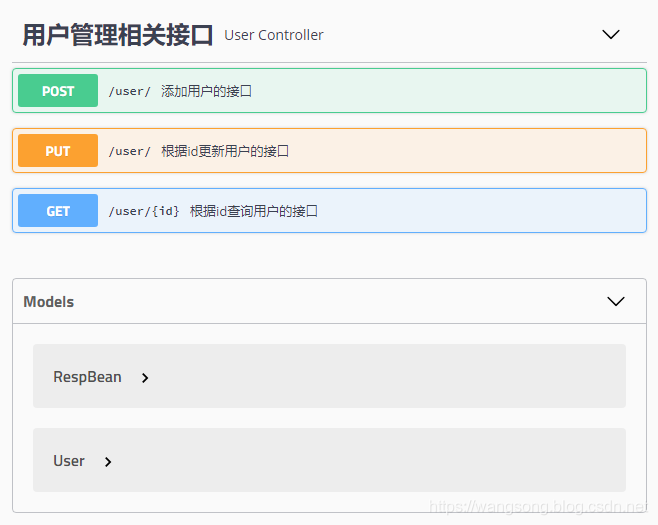
@RestController
@Api(tags = "用户管理相关接口")
@RequestMapping("/user")
public class UserController {

  @PostMapping("/")
  @ApiOperation("添加用户的接口")
  @ApiImplicitParams({
      @ApiImplicitParam(name = "username", value = "用户名", defaultValue = "李四"),
      @ApiImplicitParam(name = "address", value = "用户地址", defaultValue = "深圳", required = true)
  }
  )
  public RespBean addUser(String username, @RequestParam(required = true) String address) {
    return new RespBean();
  }

  @GetMapping("/")
  @ApiOperation("根据id查询用户的接口")
  @ApiImplicitParam(name = "id", value = "用户id", defaultValue = "99", required = true)
  public User getUserById(@PathVariable Integer id) {
    User user = new User();
    user.setId(id);
    return user;
  }
  @PutMapping("/{id}")
  @ApiOperation("根据id更新用户的接口")
  public User updateUserById(@RequestBody User user) {
    return user;
  }
}四、注解说明
五、如果参数是一个对象,对于参数的描述可以放在实体类中。
@ApiModel
public class User {
  @ApiModelProperty(value = "用户id")
  private Integer id;
  @ApiModelProperty(value = "用户名")
  private String username;
  @ApiModelProperty(value = "用户地址")
  private String address;
  //getter/setter
}六、效果
附:如果我们的Spring Boot项目中集成了Spring Security,那么如果不做额外配置,Swagger2文档可能会被拦截,此时只需要在Spring Security的配置类中重写configure方法,添加如下过滤即可:
@Override
public void configure(WebSecurity web) throws Exception {
  web.ignoring()
      .antMatchers("/swagger-ui.html")
      .antMatchers("/v2/**")
      .antMatchers("/swagger-resources/**");
}以上就是在SpringBoot环境如何实现整合Swagger2,小编相信有部分知识点可能是我们日常工作会见到或用到的。希望你能通过这篇文章学到更多知识。更多详情敬请关注亿速云行业资讯频道。
亿速云「云服务器」,即开即用、新一代英特尔至强铂金CPU、三副本存储NVMe SSD云盘,价格低至29元/月。点击查看>>
免责声明:本站发布的内容(图片、视频和文字)以原创、转载和分享为主,文章观点不代表本网站立场,如果涉及侵权请联系站长邮箱:is@yisu.com进行举报,并提供相关证据,一经查实,将立刻删除涉嫌侵权内容。


 计算
计算 安全
安全 数据库
数据库 网络和加速
网络和加速 企业服务
企业服务


