这篇文章给大家分享的是有关一篇文章帮你弄懂什么是WSGI的内容。小编觉得挺实用的,因此分享给大家做个参考。一起跟随小编过来看看吧。
写了几年的python web,却还不知道WSGI是什么东西,是不是大有人在。 说来也正常,因为作为开发者很少需要去了解wsgi是什么,也能把网站做出来。
但是如果你想自己写个web框架玩玩,就不得不去了解wsgi了。
回顾一下,我们在用python做web开发的时候,一般基于某个web框架来开发,django或者是flask等其它框架。 业务开发完成后,就要部署到某台服务器中提供对外的访问。
这时候你去网上一搜,他们都会告诉你需要用 gunicorn或者是uwsgi 来部署。 那么gunicorn、uwsgi 又是什么玩意。
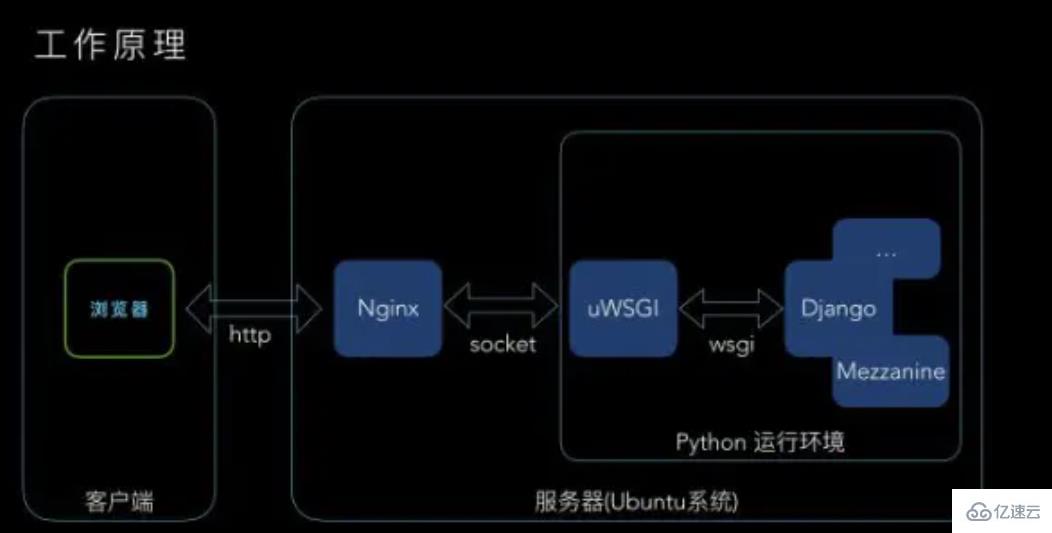
看这个图你就明白了,图我是从网上找的

这里的uwsgi或者gunicorn扮演的角色就是web服务器的角色,这里的服务器是软件层面的服务器,用于处理浏览器发过来的HTTP请求以及将响应结果返回给前端。而Web框架的主要任务就是处理业务逻辑生成结果给web服务器,再由web服务器返回给浏览器。
而web框架和web服务器之间的通信需要遵循一套规范,这个规范就是WSGI了。
为什么要搞这么一套规范出来? 规范就是为了统一标准,方便大家所用
想象一下,我们手机充电的接口现在都是Type-c的,Type-c 就是一种规范, 手机厂商按照这个规范去生产手机, 充电器厂商按照Type-c的规范生产充电器,不同厂商的手机就可以和不同厂商的充电器搭配使用。 而苹果却自成一套规范,最后导致Android充电器无法给苹果充电。
](p9-juejin.byteimg.com/tos-cn-i-k3…)
那如何写出一个符合 WSGI规范的应用(框架)程序和服务器呢?
如上图所示,左边是web服务器,右边是web框架,或者说应用程序。
WSGI规定应用程序必须是一个可调用对象(可调用对象可以是函数,也可以是类,还可以是实现了 __call__的实例对象),而且必须接受两个参数,该对象的返回值必须是可迭代对象。
我们可以写个最简单的应用程序的例子
HELLO_WORLD = b"Hello world!\n"def application(environ, start_response):
    status = '200 OK'
    response_headers = [('Content-type', 'text/plain')]
start_response(status, response_headers) return [HELLO_WORLD]复制代码application 是一个函数,肯定是可调用对象,然后接收两个参数,两个参数分别是:environ和start_response
调用 start_response 函数负责将响应头、状态码传递给服务器, 响应体则由application函数返回给服务器, 一个完整的http response 就由这两个函数提供。
但凡是实现了wsgi的web框架都会有这样一个可调用对象
WSGI 服务器端做的事情就是每次接收HTTP请求,构建environ对象,然后调用application对象,最后将HTTP Response返回给浏览器。
下面就是一个完整的wsgi server 的代码
import socketimport sysfrom io import StringIOclass WSGIServer(object):
    address_family = socket.AF_INET
    socket_type = socket.SOCK_STREAM
    request_queue_size = 1

    def __init__(self, server_address):
        # Create a listening socket
        self.listen_socket = listen_socket = socket.socket(
            self.address_family,
            self.socket_type
        )        # Allow to reuse the same address
        listen_socket.setsockopt(socket.SOL_SOCKET, socket.SO_REUSEADDR, 1)        # Bind
        listen_socket.bind(server_address)        # Activate
        listen_socket.listen(self.request_queue_size)        # Get server host name and port
        host, port = self.listen_socket.getsockname()[:2]
        self.server_name = socket.getfqdn(host)
        self.server_port = port        # Return headers set by Web framework/Web application
        self.headers_set = []    def set_app(self, application):
        self.application = application    def serve_forever(self):
        listen_socket = self.listen_socket        while True:            # New client connection
            self.client_connection, client_address = listen_socket.accept()            # Handle one request and close the client connection. Then
            # loop over to wait for another client connection
            self.handle_one_request()    def handle_one_request(self):
        self.request_data = request_data = self.client_connection.recv(1024)        # Print formatted request data a la 'curl -v'
        print(''.join(            '< {line}\n'.format(line=line)            for line in request_data.splitlines()
        ))
        self.parse_request(request_data)        # Construct environment dictionary using request data
        env = self.get_environ()        # It's time to call our application callable and get
        # back a result that will become HTTP response body
        result = self.application(env, self.start_response)        # Construct a response and send it back to the client
        self.finish_response(result)    def parse_request(self, text):
        request_line = text.splitlines()[0]
        request_line = request_line.rstrip('\r\n')        # Break down the request line into components
        (self.request_method,  # GET
         self.path,  # /hello
         self.request_version  # HTTP/1.1
         ) = request_line.split()    def get_environ(self):
        env = {}        # The following code snippet does not follow PEP8 conventions
        # but it's formatted the way it is for demonstration purposes
        # to emphasize the required variables and their values
        #
        # Required WSGI variables
        env['wsgi.version'] = (1, 0)
        env['wsgi.url_scheme'] = 'http'
        env['wsgi.input'] = StringIO.StringIO(self.request_data)
        env['wsgi.errors'] = sys.stderr
        env['wsgi.multithread'] = False
        env['wsgi.multiprocess'] = False
        env['wsgi.run_once'] = False
        # Required CGI variables
        env['REQUEST_METHOD'] = self.request_method  # GET
        env['PATH_INFO'] = self.path  # /hello
        env['SERVER_NAME'] = self.server_name  # localhost
        env['SERVER_PORT'] = str(self.server_port)  # 8888
        return env    def start_response(self, status, response_headers, exc_info=None):
        # Add necessary server headers
        server_headers = [
            ('Date', 'Tue, 31 Mar 2015 12:54:48 GMT'),
            ('Server', 'WSGIServer 0.2'),
        ]
        self.headers_set = [status, response_headers + server_headers]        # To adhere to WSGI specification the start_response must return
        # a 'write' callable. We simplicity's sake we'll ignore that detail
        # for now.
        # return self.finish_response

    def finish_response(self, result):
        try:
            status, response_headers = self.headers_set
            response = 'HTTP/1.1 {status}\r\n'.format(status=status)            for header in response_headers:
                response += '{0}: {1}\r\n'.format(*header)
            response += '\r\n'
            for data in result:
                response += data            # Print formatted response data a la 'curl -v'
            print(''.join(                '> {line}\n'.format(line=line)                for line in response.splitlines()
            ))
            self.client_connection.sendall(response)        finally:
            self.client_connection.close()


SERVER_ADDRESS = (HOST, PORT) = 'localhost', 8080def make_server(server_address, application):
    server = WSGIServer(server_address)
    server.set_app(application)    return serverif __name__ == '__main__':
    httpd = make_server(SERVER_ADDRESS, application)
    print('WSGIServer: Serving HTTP on port {port} ...\n'.format(port=PORT))
httpd.serve_forever()复制代码当然,如果只是写个用于开发环境用的server,用不着这么麻烦自己造轮子,因为python内置模块中就提供有 wsgi server 的功能。
from wsgiref.simple_server import make_server
srv = make_server('localhost', 8080, application)
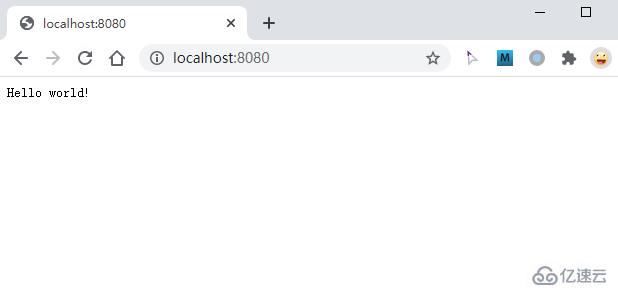
srv.serve_forever()复制代码只要3行代码就可以提供wsgi服务器,是不是超级方便,最后来访问测试下浏览器发起一个请求的效果

感谢各位的阅读!关于一篇文章帮你弄懂什么是WSGI就分享到这里了,希望以上内容可以对大家有一定的帮助,让大家可以学到更多知识。如果觉得文章不错,可以把它分享出去让更多的人看到吧!
亿速云「云服务器」,即开即用、新一代英特尔至强铂金CPU、三副本存储NVMe SSD云盘,价格低至29元/月。点击查看>>
免责声明:本站发布的内容(图片、视频和文字)以原创、转载和分享为主,文章观点不代表本网站立场,如果涉及侵权请联系站长邮箱:is@yisu.com进行举报,并提供相关证据,一经查实,将立刻删除涉嫌侵权内容。