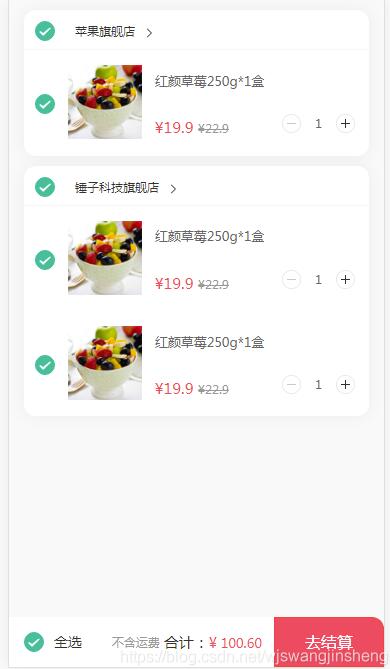
这篇文章给大家介绍在vue项目中使用vant实现一个购物车功能,内容非常详细,感兴趣的小伙伴们可以参考借鉴,希望对大家能有所帮助。
具体内容如下
这是效果图:

话不多少,直接上代码:
<template>
<div class="cart">
<div class="st-spacing-main" v-for="(item) in cartInfoList" :key="item.id">
<div class="st-item product-item">
<div class="st-border-bottom store-title">
<p @click="checkShop(item)">
<van-checkbox v-model="item.checked">
<span>
{{item.shopTitle}}
<van-icon name="arrow"/>
</span>
</van-checkbox>
</p>
</div>
<ul class="commodity-list" v-for="(pros,value) in item.productList" :key="value">
<li @click="ischeck(item,pros)">
<van-checkbox v-model="pros.isChecked"></van-checkbox>
</li>
<li>
//这是商品组件
<product-cart size="mini" type="number" :option="3"></product-cart>
</li>
</ul>
</div>
</div>
<van-submit-bar class="settlement" :price="10060" button-text="去结算" @submit="onSubmit">
<van-checkbox v-model="isCheckAll" @click="checkAll()">全选</van-checkbox>
<span class="cart-freight" slot="default">不含运费</span>
</van-submit-bar>
</div>
</template>
<script>
export default {
data () {
return {
cartInfoList: [
{
id: 1,
shopTitle: '苹果旗舰店', // 商店名
checked: false, // 商店选择的状态
checkedCount: 0, // 此商店被选择的商品数量
productList: [
{
isChecked: false, // 商品选择状态
productTitle: '2019款macbook/苹果/MF893/A国航笔记本', // 产品名
category: '15寸/2.3/8G/256/土豪金/标准套餐',
price: 10200, // 价格
count: 1 // 数量
}
]
},
{
id: 2,
shopTitle: '锤子科技旗舰店',
checked: false,
checkedCount: 0,
productList: [
{
isChecked: false,
productTitle: '锤子手机手感保护膜',
category: '登陆月球',
price: 9.9,
count: 1
},
{
isChecked: false,
productTitle: '锤子手机pro割手版',
category: '128G/割手版',
price: 1790,
count: 1
}
]
}
],
isCheckAll: false, // 是否全选
allPrice: 0, // 所有价格
allShops: 0, // 被选中的商店数量
allCount: 0 // 被选中的产品数量
}
},
methods: {
// 选中单个商品
ischeck (item, pro) {
// 为未选中的时候改变为false,反之为true
!pro.isChecked ? this._checkTrue(item, pro) : this._checkFalse(item, pro)
},
// 修改单个商品的true
_checkTrue (item, pro) {
pro.isChecked = true // 将商品选中状态改为true
// 这里执行了两部,选中商品数量先+1,再与该店铺商品数量比较,如果相等就更改店铺选中状态为true
if (++item.checkedCount === item.productList.length) {
item.checked = true
} else {
return ''
}
// ++item.checkedCount === item.productList.length ? item.checked = true : ''
// 如果店铺选中状态改为true,选中店铺数量先+1,再与店铺数量比较,如果相等就更改全选选中状态为true
// // 当商店全选状态,每全选一个商店,被选中商店数加一,数值等于所有商店数,全选状态为true
if (item.checked) {
if (++this.allShops === this.cartInfoList.length) {
this.isCheckAll = true
} else {
this.isCheckAll = false
}
} else {
return ''
}
// item.checked ? ++this.allShops === this.cartInfoList.length ? this.isCheckAll = true : this.isCheckAll = false : ''
},
// 修改单个商品的 false
_checkFalse (item, pro) {
pro.isChecked = false // 将商品选中状态改为false
--item.checkedCount // 被选中的商品数减一
if (item.checked) {
// 如果店铺是被选中的,更改店铺选中状态
item.checked = false // 当商店状态为选中时改变false
--this.allShops // 商店数减一
}
this.isCheckAll = false // 全选状态为false
},
// 选择整个商店的商品
checkShop (item) {
!item.checked ? this._shopTrue(item) : this._shopFalse(item)
},
// 遍历商店每个商品,状态为false的改变为true,又在_checkTrue()方法中将商店状态改为true
_shopTrue (item) {
item.productList.forEach(pro => {
if (pro.isChecked === false) {
this._checkTrue(item, pro)
} else {
return ''
}
// pro.isChecked === false ? this._checkTrue(item, pro) : ''
})
},
_shopFalse (item) {
item.productList.forEach(pro => {
// 同上
if (pro.isChecked === true) {
this._checkFalse(item, pro)
} else {
return ''
}
// pro.isChecked === true ? this._checkFalse(item, pro) : ''
})
},
// 选择全部商店的商品,已经计算总价和总数量的函数
checkAll () {
// 方法内调用方法
this.isCheckAll = !this.isCheckAll
this.isCheckAll
? this.cartInfoList.forEach(item => {
this._shopTrue(item)
})
: this.cartInfoList.forEach(item => {
this._shopFalse(item)
})
},
_totalPeice () {
// 每次调用此方法,将初始值为0,遍历价格并累加
this.allPrice = 0
this.cartInfoList.forEach(item => {
let products = item.productList
products.forEach(pros => {
if (pros.isChecked) {
this.allPrice += pros.price * pros.count
}
})
})
},
_totalCount () {
// 同上
this.allCount = 0
this.cartInfoList.forEach(item => {
this.allCount += item.checkedCount
})
},
onSubmit () {}
},
watch: {
// 深度监听所有数据,每次改变重新计算总价和总数
cartInfoList: {
deep: true,
handler (val, oldval) {
this._totalPeice()
this._totalCount()
}
}
}
}
</script>
<style lang="less" scoped>
@import "../assets/less/views/cart.less";
</style>less文件
@spacing-size: .29rem;

.cart-main {
 .st-item-header {
 padding: @spacing-size;
 justify-content: flex-start;
 .theme-checkbox {
  margin-right: @spacing-size;
 }
 }
 .item-list {
 padding-left: .77rem;
 position: relative;
 .theme-checkbox {
  margin-top: -.24rem;
  position: absolute;
  left: 0;
  top: 50%;
 }
 }
}关于在vue项目中使用vant实现一个购物车功能就分享到这里了,希望以上内容可以对大家有一定的帮助,可以学到更多知识。如果觉得文章不错,可以把它分享出去让更多的人看到。
亿速云「云服务器」,即开即用、新一代英特尔至强铂金CPU、三副本存储NVMe SSD云盘,价格低至29元/月。点击查看>>
免责声明:本站发布的内容(图片、视频和文字)以原创、转载和分享为主,文章观点不代表本网站立场,如果涉及侵权请联系站长邮箱:is@yisu.com进行举报,并提供相关证据,一经查实,将立刻删除涉嫌侵权内容。