怎么在Asp.Net Core中使用NLog实现请求监控?很多新手对此不是很清楚,为了帮助大家解决这个难题,下面小编将为大家详细讲解,有这方面需求的人可以来学习下,希望你能有所收获。
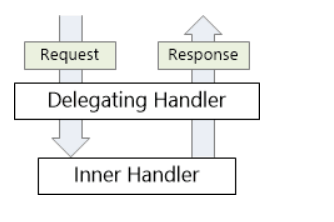
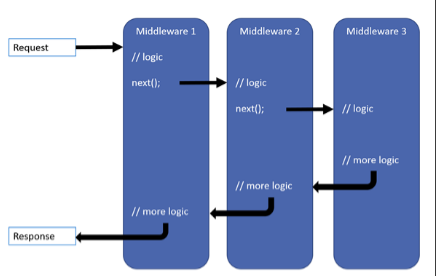
一:比较 asp.net web api 和 asp.net core 的请求管道


观察这两张图,可以发现他们非常的相似,都是管道式的设计,在 asp.net web api 中,我们可以注册一系列的 DelegatingHandler 来处理请求上下文 HttpRequestMessage,在 asp.net core 中,我们可以注册一系列中间件来处理请求上下文,他们两者从功能和意义上是非常相似的,我这里这里不会详细介绍各自的管道是如何的(这样的文章非常多,博客园随处可见),他们都完成了类似中间件的功能,只是在代码设计上有一点区别。
我们先看一段代码,新建一个 asp.net web api 项目,添加几个 DelegatinHandler
然后在 Global 中注册
public class DelegatingHandler1 : DelegatingHandler
  {
    protected override async Task<HttpResponseMessage> SendAsync(HttpRequestMessage request, CancellationToken cancellationToken)
    {
      Trace.WriteLine("DelegatingHandler1 HashCode: " + this.GetHashCode());
      Trace.WriteLine("DelegatingHandler1 base InnerHandler HashCode: " + base.InnerHandler.GetHashCode());
      Trace.WriteLine("DelegatingHandler1 start");
      var response = await base.SendAsync(request, cancellationToken);
      Trace.WriteLine("DelegatingHandler1 end");
      return response;
    }
  }
  public class DelegatingHandler2 : DelegatingHandler
  {
    protected override async Task<HttpResponseMessage> SendAsync(HttpRequestMessage request, CancellationToken cancellationToken)
    {
      Trace.WriteLine("DelegatingHandler2 HashCode: " + this.GetHashCode());
      Trace.WriteLine("DelegatingHandler2 base InnerHandler HashCode: " + base.InnerHandler.GetHashCode());
      Trace.WriteLine("DelegatingHandler2 start");
      var response = await base.SendAsync(request, cancellationToken);
      Trace.WriteLine("DelegatingHandler2 end");
      return response;
    }
  }
  public class DelegatingHandler3 : DelegatingHandler
  {
    protected override async Task<HttpResponseMessage> SendAsync(HttpRequestMessage request, CancellationToken cancellationToken)
    {
      Trace.WriteLine("DelegatingHandler3 HashCode: " + this.GetHashCode());
      Trace.WriteLine("DelegatingHandler3 base InnerHandler HashCode: " + base.InnerHandler.GetHashCode());
      Trace.WriteLine("DelegatingHandler3 start");
      var response = await base.SendAsync(request, cancellationToken);
      Trace.WriteLine("DelegatingHandler3 end");
      return response;
    }
}修改一下 ValuesController
public class WebApiApplication : System.Web.HttpApplication
  {
    protected void Application_Start()
    {
      AreaRegistration.RegisterAllAreas();
      GlobalConfiguration.Configure(WebApiConfig.Register);
      FilterConfig.RegisterGlobalFilters(GlobalFilters.Filters);
      RouteConfig.RegisterRoutes(RouteTable.Routes);
      BundleConfig.RegisterBundles(BundleTable.Bundles);

      GlobalConfiguration.Configuration.MessageHandlers.Add(new DelegatingHandler1());
      GlobalConfiguration.Configuration.MessageHandlers.Add(new DelegatingHandler2());
      GlobalConfiguration.Configuration.MessageHandlers.Add(new DelegatingHandler3());
    }
}启动后输入路径 /api/values,我们可以在VS 的输出栏看到下面这些内容
public class ValuesController : ApiController
  {
    // GET api/values
    public IEnumerable<string> Get()
    {
      Trace.WriteLine("/api/values");
      var handlers = this.RequestContext.Configuration.MessageHandlers;
      return new string[] { "value1", "value2" };
    }
}启动后输入路径 /api/values,我们可以在VS 的输出栏看到下面这些内容
DelegatingHandler1 HashCode: 58154627
DelegatingHandler1 base InnerHandler HashCode: 35529478
DelegatingHandler1 start
DelegatingHandler2 HashCode: 35529478
DelegatingHandler2 base InnerHandler HashCode: 47422476
DelegatingHandler2 start
DelegatingHandler3 HashCode: 47422476
DelegatingHandler3 base InnerHandler HashCode: 65273341
DelegatingHandler3 start
/api/values
DelegatingHandler3 end
DelegatingHandler2 end
DelegatingHandler1 end
输出中我们可以看到 DelegatingHandler1 的 InnerHandler 是 DelegatingHandler2,以此类推,在 DelegatingHandler3 的 InnerHandler 处理请求的时候就转发到了相关控制器,这里和 .net core 中的中间件非常相似,在.net core 中间件顺序是 RequestServicesContainerMiddleware(给请求上下文绑定容器)-> AuthenticationMiddleware(认证)-> RouterMiddleware (路由以及MVC)
如果我们在 ValuesController 中观察表达式 this.RequestContext.Configuration.MessageHandlers 还可以看到最终处理请求的是一个 HttpRoutingDispatcher,最也是是分配到路由以及控制器来处理的,按照如此方式我们可以很容易在 asp.net web api 中对请求统计。这里是比较简陋的,对此我们可以记录客户端和服务器更详细的信息,包括 IP 地址,http状态码,是否是认证用户等等,但是这篇主要是以 asp.net core 为主的,所以这里就不详细写下去了。
public class ApplicationInsight : DelegatingHandler
  {
    protected override async Task<HttpResponseMessage> SendAsync(HttpRequestMessage request, CancellationToken cancellationToken)
    {
      var stopWatch = new Stopwatch();
      stopWatch.Start();

      var response = await base.SendAsync(request, cancellationToken);

      stopWatch.Stop();
      //停止计时器,并记录
    }
  }
  public partial class Startup
  {
    public void Configuration(IAppBuilder app)
    {
      GlobalConfiguration.Configuration.MessageHandlers.Add(new ApplicationInsight());
    }
}二:asp.net core 中间件 + NLog 实现请求监控
先看统计结果,start 开始时间,time 是请求消耗时间(毫秒),authenicate 是认证通过的 schema,使用 NLog 自定义字段也是非常方便的

先说一说遇到的问题
(1)NLog 记录一张以上的表如何实现,应为首先会有一个一般性的日志表(称他为 log),并且这些统计不对写到 log 表
(2)使用 NLog 自定义字段 LayoutRenderer 没有类似 .net framework 中的 System.Web.Current
(3)使用 UseMiddleware 无法在让我们的中间件成为第一个中间件
(4)实现忽略记录的方法,肯定有一些接口是不希望记录的,所以这个也要实现
NLog 配置
这里只列出了部分内容,github 地址在最后,数据库是 mysql ,apiinsight 表示请求统计,log 是一般性的日志,debughelper 可以加快我们调试时日志的检索速度
<targets>
  <!--黑洞 忽略的日志-->
  <target xsi:type="Null"
      name="blackhole" />
  <!--文件日志-->
  <target xsi:type="File"
    name="debughelper"
    fileName="${var:root}\Logs\debug_helper.log"
    layout="${longdate}|${event-properties:item=EventId.Id}|${logger}|${uppercase:${level}}|${message} ${exception}" />
  <!--apiinsight api 统计-->
  <target name="apiinsight" xsi:type="Database"
       dbProvider="MySql.Data.MySqlClient.MySqlConnection, MySql.Data"
       connectionString="${var:connectionString}"
       >
  </target>
  <!--日志-->
  <target name="log" xsi:type="Database"
     dbProvider="MySql.Data.MySqlClient.MySqlConnection, MySql.Data"
     connectionString="${var:connectionString}"
       >
  </target>
</targets>在 Startup 中
public void Configure(IApplicationBuilder app, IHostingEnvironment env)
{
  //省略了其他配置

  //全局的 HttpContext
  app.UseGlobalHttpContext();

  //省略了其他配置

  LogManager.Configuration = new XmlLoggingConfiguration(Path.Combine(env.ContentRootPath, "nlog.config"));
  LogManager.Configuration.Variables["root"] = env.ContentRootPath;
  LogManager.Configuration.Variables["connectionString"] = Configuration.GetConnectionString("DefaultConnection");
}自定义字段都是通过 LayoutRenderer 实现,由于自定义字段有很多,这里只列出了一个开始时间是如何查询的,这个时间是在我们注册的第一个中间件执行 Invoke 方法的时候写进 HttpContext.Items 的
[LayoutRenderer("apiinsight-start")]
  public class StartApiInsightRenderer : LayoutRenderer
  {
    protected override void Append(StringBuilder builder, LogEventInfo logEvent)
    {
      var httpContext = HttpContextProvider.Current;
      if (httpContext == null)
      {
        return;
      }
      var _apiInsightsKeys = httpContext.RequestServices.GetService<IApiInsightsKeys>();

      if (httpContext != null)
      {
        if (httpContext.Items.TryGetValue(_apiInsightsKeys.StartTimeName, out var start) == true)
        {
          builder.Append(start.ToString());
        }
      }
    }
}NLog 规则,很容易理解日志统计只记录 Cheers 命名空间下的日志
<rules>
  <!--需要记录的日志-->
  <logger name="Cheers.*" minlevel="Trace" writeTo="apiinsight" />
  <logger name="WebApp.*" minlevel="Info" writeTo="log" />
  <logger name="*" minlevel="Trace" maxlevel="Debug" writeTo="debughelper" />

  <!--忽略的日志-->
  <logger name="Microsoft.*" minlevel="Trace" writeTo="blackhole" final="true" />
</rules>核心 ApiInsightMiddleware 中间件
public class ApiInsightMiddleware
  {
    private readonly RequestDelegate _next;
    private readonly IServiceProvider _serverProvider;
    private readonly IApiInsightsKeys _apiInsightsKeys;
    private readonly ILogger<ApiInsightMiddleware> _logger;
    private HttpContext _httpContext;

    public ApiInsightMiddleware(RequestDelegate next, IServiceProvider serviceProvider, ILogger<ApiInsightMiddleware> logger)
    {
      _next = next;
      _serverProvider = serviceProvider;
      _apiInsightsKeys = _serverProvider.GetService<IApiInsightsKeys>();
      _logger = logger;
    }

    public async Task Invoke(HttpContext httpContext)
    {
      _httpContext = httpContext;
      var flag = SetValues();

      await _next(httpContext);

      if (flag == true)
      {
        ApiInsight();
      }
    }
    //省略了其他的代码
}很好理解,在执行下一个中间件之前调用 SetValues 开始计时,下一个中间件执行成功开始统计并写入日志(或者忽略不写)。现在他是 asp.net core mvc 的第一个中间件了,好处就是更符合这个中间件本身的所做的事情了,但是带来的问题就是 httpContext.RequestService 是 null ,因为 RequestService 是在 RequestServicesContainerMiddleware 这个中间件写进去的,在者其实很多地方我们都需要 HttpContext ,并且目前微软还没有给我们定义一个静态的 HttpContext。
静态的 HttpContext
HttpContext 是通过单例 IHttpContextAccessor 提供的,当 HttpContext 创建的时候就会赋值给他,当请求到达中间件这个管道的时候,HttpContext 就已经存在于 IHttpContextAccessor 了,并且和 Invoke 参数列表中的 HttpContext 是一致的(同一个请求中),问题在于 RequestServicesContainerMiddleware 这个中间件没有执行就没有容器,并且很多时候我们都要用到容器,所以就模仿源码在这里都加进去了。
public static class HttpContextProvider
  {
    private static IHttpContextAccessor _accessor;
    private static IServiceScopeFactory _serviceScopeFactory;

    public static Microsoft.AspNetCore.Http.HttpContext Current
    {
      get
      {
        var context = _accessor?.HttpContext;

        if (context != null)
        {
          var replacementFeature = new RequestServicesFeature(_serviceScopeFactory);
          context.Features.Set<IServiceProvidersFeature>(replacementFeature);

          return context;
        }

        return null;
      }
    }

    internal static void ConfigureAccessor(IHttpContextAccessor accessor, IServiceScopeFactory serviceScopeFactory)
    {
      _accessor = accessor;
      _serviceScopeFactory = serviceScopeFactory;
    }
  }
  public static class HttpContextExtenstion
  {
    public static void AddHttpContextAccessor(this IServiceCollection services)
    {
      services.AddSingleton<IHttpContextAccessor, HttpContextAccessor>();
    }

    public static IApplicationBuilder UseGlobalHttpContext(this IApplicationBuilder app)
    {
      var httpContextAccessor = app.ApplicationServices.GetRequiredService<IHttpContextAccessor>();
      var serviceScopeFactory = app.ApplicationServices.GetRequiredService<IServiceScopeFactory>();
      HttpContextProvider.ConfigureAccessor(httpContextAccessor, serviceScopeFactory);
      return app;
    }
}我们只需要在 Startup 中使用 app.UseGlobalHttpContext(); 就可以在程序的任何地方得到 HttpContext 和容器了,肯定会有人说为什么不通过构造函数来获取我们想要的注入呢,因为有些第三方框架或这某些地方我们不能使用容器获取服务,比如这里 NLog 的自定义字段使用的 LayoutRenderer 就无法通过构造器得到我们想要的服务。
第一个中间件
在 Startup 的 Configure 方法中目前还没发现如何注册第一个中间件,因为 Configure 方法始终是在 IStartupFilter 这个接口之后执行的,这也提供了我们让自己的中间件成为第一个中间件的可能。可能这样做并不是特别有必要,甚至是没有意义的,但是实现的过程确实很有意思的。这里在 Startup 中的 方法 ConfigureService 注册我们的中间件。
  public void ConfigureServices(IServiceCollection services)
  {
    services.AddApiInsights();
    services.AddMvc();
}具体的
public static class ApiInsightsServiceCollectionExtensions
  {
    static readonly string stopWatchName = "__stopwatch__";
    static readonly string startTimeName = "__start__";

    /// <summary>
    ///   注册和 API 监控相关的服务,中间件
    /// </summary>
    /// <param name="services"></param>
    public static void AddApiInsights(this IServiceCollection services)
    {
      services.AddSingleton<IApiInsightsKeys>(
          new ApiInsightsKeys(stopWatchName, startTimeName)
        );
      services.FirstRegister<IStartupFilter, RequestApiInsightBeginStartupFilter>(ServiceCollectionServiceExtensions.AddTransient<IStartupFilter, RequestApiInsightBeginStartupFilter>);
      services.AddSingleton<IRequestIsAuthenticate, DefaultRequestIsAuthenticate>();
    }
}这里注册了三个服务
IApiInsightsKeys
定义了存储在 HttpContext.Item 中的键值对的名称
  public interface IApiInsightsKeys
  {
    string StopWatchName { get; }
    string StartTimeName { get; }
}IRequestIsAuthenticate
/// <summary>
  ///   验证请求用户是否已经认证
  /// </summary>
  public interface IRequestIsAuthenticate
  {
    /// <summary>
    ///   返回已经认证的 scheme
    /// </summary>
    /// <returns></returns>
    Task<string> IsAuthenticateAsync();
    /// <summary>
    ///   返回已经认证的 用户名
    /// </summary>
    /// <returns></returns>
    Task<string> AuthenticatedUserName();
}就验证而言可能不同的开发者使用的是不一样的验证方式,可能是基于 Asp.Net Core Authentication 中间件的认证方式,也可能是其他的比如自定义的 token,或者有一个单点登录的服务器,又或者是 session,其实 Asp.Net Core 的 Authentication 中间件也可以帮我们实现基于 restful 的token 认证。所以就把它定义出来了,并且默认的实现就是基于 Authentication 这个中间件的。
IStartupFilter
看到他是一个非常特殊的方式来注册的,自定义的 FirstRegister 这个方法,实际上 Asp.Net Core 内置有多个 IStartup 这样的服务,并且都是在 Startup 的 Configure 之前执行的,所以这里一定要用这个服务来让我们的中间件成为第一个中间件。FirstRegister 代码也很容易理解,由于在宿主启动之前,内部注册了多个 IStartup,并且最后会按先后顺序配置 IApplicationBuilder,所以我们只能让第一个 StartupFilter 的 IApplicationBuilder 就注册我们的中间件,通过改动 ServiceCollection 中服务的顺序可以实现。虽然不是很有必要,但是可以从中观察的 Startup 的 Configure方法 以及 接口StartupFilter (还有 IHostingStartup )的执行顺序。
public class RequestApiInsightBeginStartupFilter : IStartupFilter
  {
    public Action<IApplicationBuilder> Configure(Action<IApplicationBuilder> next)
    {
      return builder =>
      {
        builder.UseMiddleware<RequestApiInsightBeginMiddleware>();
        next(builder);
      };
    }
}忽略的方法
  [AttributeUsage(AttributeTargets.Method, AllowMultiple = false, Inherited = true)]
  public class NoInsightAttribute : Attribute
  {
}在 ApiInsight 方法中会调用 IsIgnore 检测该方法是否打了标签 NoInsightAttribute,如果是那就忽略该方法,这里建议使用特性路由,原因有两点,第一特性路由不需要使用 IActionSelector 接口重新查找匹配的方法,第二,在 restful api 中,结合特性路由和 HttpMethodAttribute 标签可以使方法更简洁,相同的接口名称通过不同的请求方式达到不同的目的
private bool IsIgnore()
  {
    var actionDescriptor = GetSelectedActionDescriptor() as ControllerActionDescriptor;
    if (actionDescriptor == null)
    {
      return false;
    }
    else
    {
      var noInsight = actionDescriptor.MethodInfo.GetCustomAttribute<NoInsightAttribute>();
      return noInsight != null;
    }
}看完上述内容是否对您有帮助呢?如果还想对相关知识有进一步的了解或阅读更多相关文章,请关注亿速云行业资讯频道,感谢您对亿速云的支持。
亿速云「云服务器」,即开即用、新一代英特尔至强铂金CPU、三副本存储NVMe SSD云盘,价格低至29元/月。点击查看>>
免责声明:本站发布的内容(图片、视频和文字)以原创、转载和分享为主,文章观点不代表本网站立场,如果涉及侵权请联系站长邮箱:is@yisu.com进行举报,并提供相关证据,一经查实,将立刻删除涉嫌侵权内容。