这篇文章主要介绍了yii2实现使用qq邮箱发送文件的方法,具有一定借鉴价值,感兴趣的朋友可以参考下,希望大家阅读完这篇文章之后大有收获,下面让小编带着大家一起了解一下。
具体方法如下所示:
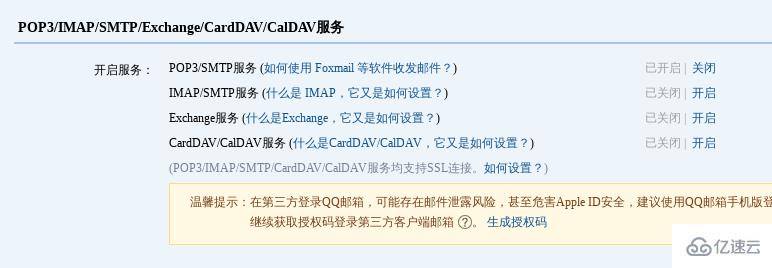
1、首先在qq邮箱的设置中开启POP3/SMTP服务
保存下授权码
在Yii2配置文件中(common/config/main.php中components)添加邮箱组件
'mailer' => [
            'class' => 'yii\swiftmailer\Mailer',
            'viewPath' => '@common/mail',
            // send all mails to a file by default. You have to set
            // 'useFileTransport' to false and configure a transport
            // for the mailer to send real emails.
            'useFileTransport' => false,
            'transport' => [
                //这里如果你是qq的邮箱,可以参考qq客户端设置后再进行配置 http://service.mail.qq.com/cgi-bin/help?subtype=1&&id=28&&no=1001256
                'class' => 'Swift_SmtpTransport',
                'host' => 'smtp.qq.com',
                // qq邮箱
                'username' => '114***6@qq.com',
                //授权码, 什么是授权码, http://service.mail.qq.com/cgi-bin/help?subtype=1&&id=28&&no=1001256
                'password' => '***',
                'port' => '465',
                'encryption' => 'ssl',
             ],
            'messageConfig'=>[
                'charset'=>'UTF-8',
                'from'=>['114***@qq.com'=>'developer']
            ],
],调用邮箱接口发送邮件
public function actionSendmail()
    {
        $mail = \YII::$app->mailer->compose();
        $mail->setTo("***@qq.com");
        $mail->setSubject("邮件测试");
        $mail->setTextBody("textbody 25 ok?");//发布纯文字文本
        //$mail->setHtmlBody("htmlbody");//发布可以带html标签的文本
        if($mail->send()){
            echo "success";
        }else{
            echo "failure";
        }
}感谢你能够认真阅读完这篇文章,希望小编分享的“yii2实现使用qq邮箱发送文件的方法”这篇文章对大家有帮助,同时也希望大家多多支持亿速云,关注亿速云行业资讯频道,更多相关知识等着你来学习!
亿速云「云服务器」,即开即用、新一代英特尔至强铂金CPU、三副本存储NVMe SSD云盘,价格低至29元/月。点击查看>>
免责声明:本站发布的内容(图片、视频和文字)以原创、转载和分享为主,文章观点不代表本网站立场,如果涉及侵权请联系站长邮箱:is@yisu.com进行举报,并提供相关证据,一经查实,将立刻删除涉嫌侵权内容。


 计算
计算 安全
安全 数据库
数据库 网络和加速
网络和加速 企业服务
企业服务


