今天就跟大家聊聊有关怎么在c#中使用WinForm制作一个图片编辑工具,可能很多人都不太了解,为了让大家更加了解,小编给大家总结了以下内容,希望大家根据这篇文章可以有所收获。
1 功能介绍
程序主界面
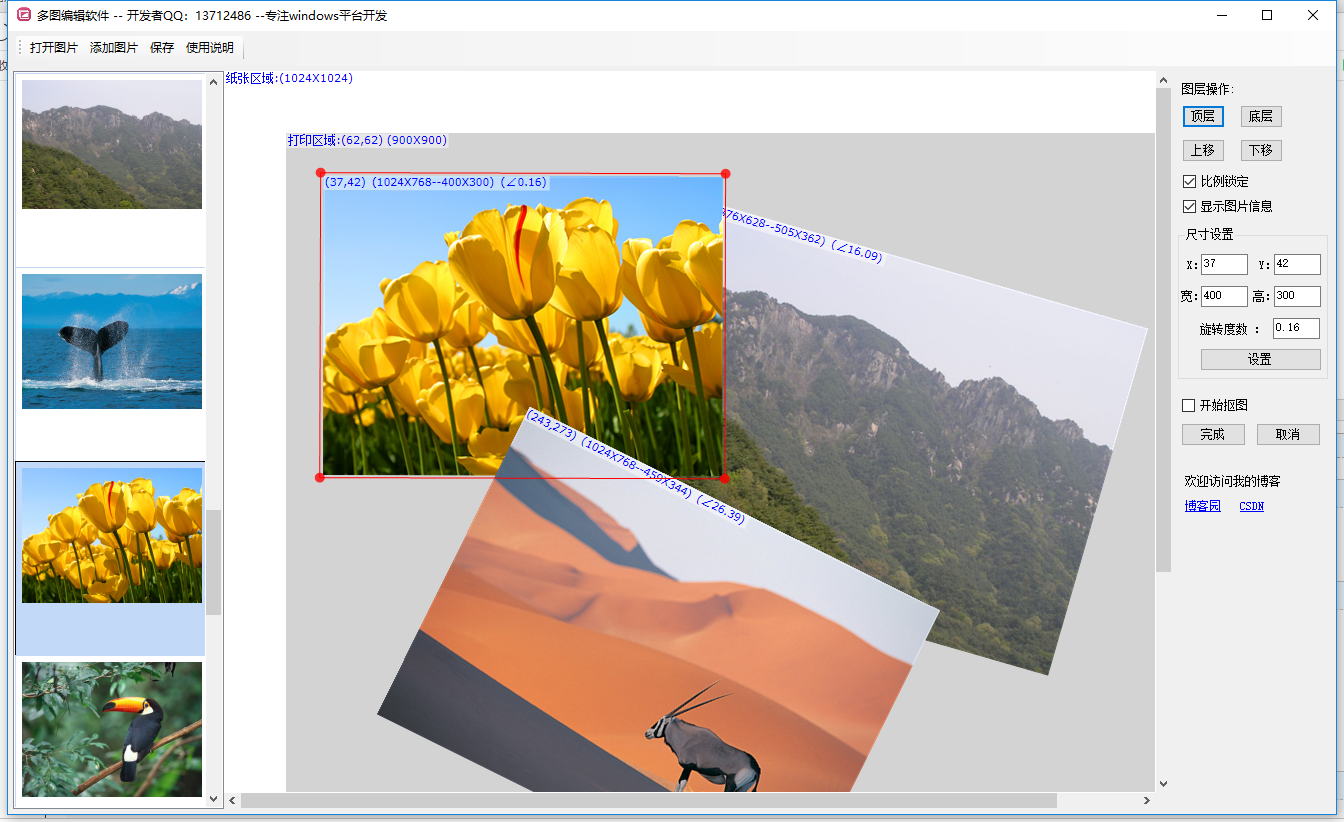
点击打开图片,可选择多个图片文件。图片缩略图左侧显示,双击左侧图片,添加到编辑区。
图片编辑区分为:纸张区域和打印区域。图片只能在打印区编辑。当选中这两个区,可调整各个区的大小。
主要功能点:
1 拖动:选中图片后,可以任意拖动图片。
2 缩放:可对图片左右上下实现缩放。可以锁定显示比例缩放。
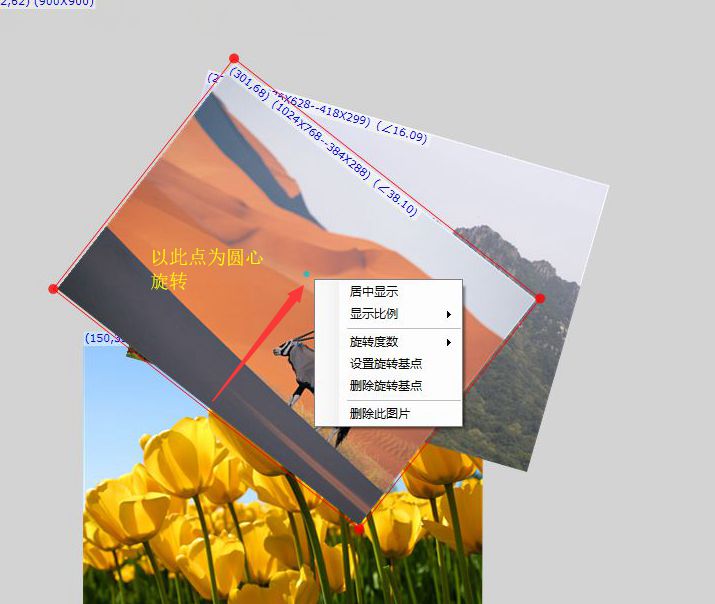
3 旋转,可以选择旋转基点再旋转。如果不选择旋转基点,以对角为基点旋转。
4 抠图
5 其他一些操作
当有多个图片相互覆盖时,可以调整图层。
选中一个图片后,可以对图片的位置、大小、旋转角度调整。
选择保存,会将编辑的图片保存为文件。
图片编辑信息 每个图像都有对应的变量记录该图像的详细,比如位置、尺寸、旋转角度、剪切区域。见下面代码:
public class ImageProperty
 {
 public string Name { get; set; }
 public Image EditImage { get; set; } //原始图片

 public int ActualWidth => EditImage.Width; //实际尺寸
 public int ActualHeight => EditImage.Height;

 public bool ShowImageTip { get; set; } = true;

 public bool LockSizeRate { get; set; } //比例是否锁定
 public Size DrawSize { get; set; } //显示尺寸
 public object Tag { get; set; }
 }

 public class ImageEditInfo
 {
 public ImageProperty ImageProperty { get; set; }

 public Point Location { get; set; } = new Point(0, 0); //相对于打印区的位置
 public Point LocationTopRight => new Point(Location.X + Width, Location.Y);
 public Point LocationBottomRight => new Point(Location.X + Width, Location.Y + Height);
 public Point LocationBottomLeft => new Point(Location.X, Location.Y + Height);

 public int RightX => Location.X + Width;
 public int ButtomY => Location.Y + Height;

 public Size DrawSize
 {
 get { return ImageProperty.DrawSize; }
 set { ImageProperty.DrawSize = value; }
 }

 public Image Image => ImageProperty.EditImage;

 public float RotateAngle { get; set; } = 0; //旋转角度

 public bool IsSelect { get; set; }

 public bool LockSizeRate //显示比例是否锁定
 {
 get
 {
 return ImageProperty.LockSizeRate;
 }
 set
 {
 ImageProperty.LockSizeRate = value;
 }
 }

 public int Width
 {
 get
 {
 return DrawSize.Width;
 }
 set
 {
 ImageProperty.DrawSize = new Size(value, DrawSize.Height);
 }
 }

 public int Height
 {
 get
 {
 return DrawSize.Height;
 }
 set
 {
 ImageProperty.DrawSize = new Size(DrawSize.Width, value);
 }
 }

 public bool ShowImageTip
 {
 get { return ImageProperty.ShowImageTip; }
 set { ImageProperty.ShowImageTip = value; }
 }

 public Point? RotatioBasePoint { get; set; } //旋转基点

 public Point RotatioBasePointValue => RotatioBasePoint.Value;

 public bool HasRotatioBasePoint => (RotatioBasePoint != null && RotatioBasePoint.HasValue);
}对正常的图片移动、缩放并不难。只要调整图像的长宽、位置就行,基本就是加法减法计算。如果图片有旋转,计算起来就麻烦。比如判断鼠标是否点击了图片、鼠标缩放等,实现这些操作都麻烦。
比如判断鼠标是否点击了图片,如果一个图片是斜的(旋转后的),如何处理?我的思路是旋转:将图片和鼠标所在的点都反向旋转;此后,判断逻辑就和常规方法一样了。旋转函数如下:
/// <summary>
 /// pointMove相对于removeAt,以一定角度旋转
 /// </summary>
 /// <param name="pointMove"></param>
 /// <param name="removeAt"></param>
 /// <param name="rotateAngle"></param>
 /// <param name="clockwise"></param>
 /// <returns></returns>
 public static Point RotationAt(Point pointMove, Point removeAt, double rotateAngle, bool clockwise)
 {
 if (rotateAngle == 0)
 return pointMove;

 lock (matrix)
 {
 matrix.Reset();
 matrix.Rotate((float)(clockwise ? rotateAngle : -rotateAngle));

 Point pt2 = new Point(pointMove.X - removeAt.X, pointMove.Y - removeAt.Y);
 Point[] pts = new Point[] { new Point(pt2.X, pt2.Y) };
 matrix.TransformPoints(pts);

 Point result = new Point(pts[0].X + removeAt.X, pts[0].Y + removeAt.Y);
 return result;
 }
 }

 internal EN_LinePart MouseMove_HitTest(Point pt)
 {
 //鼠标位置 反向旋转,
 pt = DrawHelper.RotationAt(pt, Location, RotateAngle, false);

 //下面就是 和正常判断逻辑一样
 EN_LinePart result = MouseMove_HitTest_Corner(pt);
 if (result != EN_LinePart.无)
 return result;
}对图片相关参数修改后,需要调用refresh,强制重画。调用GDI+。根据图片在列表的顺序调用(也就是根据图层)。调用时,根据设定显示区域,旋转角度等,做变换后再画。
void DrawWithRotation(Graphics g, bool saveToFile)
 {
 //设置质量
 ImageHelper.SetHighQuality(g);

 //置背景色
 if (!saveToFile)
 g.Clear(BackgroundColor);

 ImageEditInfo selectImage = null;
 foreach (ImageEditInfo imageInfo in ImageGroup.ListImageToDraw)
 {
 //画图片
 if (imageInfo.IsSelect)
 {
  Debug.Assert(selectImage == null);
  selectImage = imageInfo;
 }

 g.TranslateTransform(imageInfo.Location.X, imageInfo.Location.Y);
 g.RotateTransform(imageInfo.RotateAngle);

 //是否需要画 抠图
 Image imageToDraw = imageInfo.Image;
 if (imageInfo.CutStat == ImageCutStat.have_cut
  && imageInfo.CutPoints.Count > 2)
 {
  Bitmap bitmap = imageToDraw as Bitmap;
  System.Windows.Point[] points = imageInfo.CutPoints.Select(o => new System.Windows.Point(o.X,o.Y)).ToArray();
  Bitmap cutBitmap = ImageCutout.GetImage(bitmap, points);
  imageToDraw = cutBitmap;
 }

 g.DrawImage(imageToDraw,
  new Rectangle(0, 0, imageInfo.DrawSize.Width, imageInfo.DrawSize.Height),
  new Rectangle(0, 0, imageInfo.Image.Width, imageInfo.Image.Height),
  GraphicsUnit.Pixel);

 //画旋转基点
 if (!saveToFile && imageInfo.HasRotatioBasePoint)
 {
  Point pt = imageInfo.RotatioBasePointValue;
  g.FillEllipse(RotatioBaseBrush, pt.X - RotatioBaseRadius, pt.Y - RotatioBaseRadius, RotatioBaseRadius * 2, RotatioBaseRadius * 2);
 }

 //显示信息
 if (!saveToFile && imageInfo.ShowImageTip)
 {
  ImageProperty ImageProperty = imageInfo.ImageProperty;
  string info = string.Format($"({imageInfo.Location.X},{imageInfo.Location.Y}) ({ImageProperty.ActualWidth}X{ImageProperty.ActualHeight}--{imageInfo.DrawSize.Width}X{imageInfo.DrawSize.Height}) (∠{imageInfo.RotateAngle.ToString("0.00")})");

  SizeF sizeF = g.MeasureString(info, _drawProperty.TxtFont);
  g.FillRectangle(_drawProperty.TxtBackgroundBrush,
  new RectangleF(new Point(), sizeF));

  g.DrawString(info, _drawProperty.TxtFont, _drawProperty.TxtBrush, new Point());
 }

 //画抠图线
 if(!saveToFile
  && imageInfo.CutStat == ImageCutStat.in_cuting
  && imageInfo.CutPoints.Count>1)
 {
  for(int i=1;i< imageInfo.CutPoints.Count;i++ )
  {
  g.DrawLine(SelectBorderPen, imageInfo.ToDestImage(imageInfo.CutPoints[i-1]),
  imageInfo.ToDestImage(imageInfo.CutPoints[i]));
  }

  if(imageInfo.CutPoints.Count > 2)
  {
  g.DrawLine(SelectBorderPen, imageInfo.ToDestImage(imageInfo.CutPoints.First()),
  imageInfo.ToDestImage(imageInfo.CutPoints.Last()));
  }
 }

 g.ResetTransform();
 }

 //画选中状态
 if (!saveToFile && selectImage != null)
 {
 DrawSelectImageWithRotation(g, selectImage);
 }
 }
看完上述内容,你们对怎么在c#中使用WinForm制作一个图片编辑工具有进一步的了解吗?如果还想了解更多知识或者相关内容,请关注亿速云行业资讯频道,感谢大家的支持。
免责声明:本站发布的内容(图片、视频和文字)以原创、转载和分享为主,文章观点不代表本网站立场,如果涉及侵权请联系站长邮箱:is@yisu.com进行举报,并提供相关证据,一经查实,将立刻删除涉嫌侵权内容。


