这篇文章主要介绍了html+css+javascript实现跟随鼠标移动显示选中效果 的方法,具有一定借鉴价值,感兴趣的朋友可以参考下,希望大家阅读完这篇文章之后大有收获,下面让小编带着大家一起了解一下。
1,显示效果:
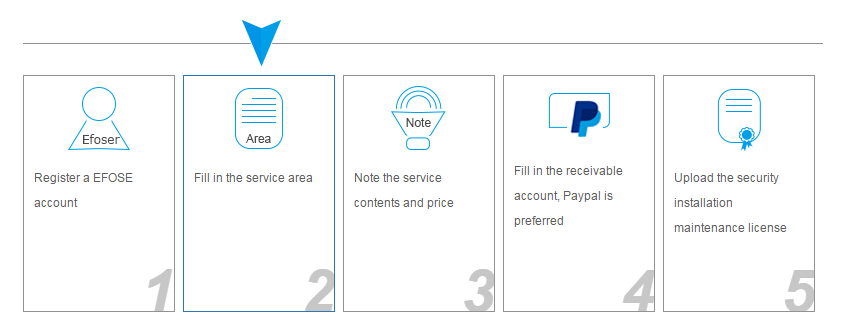
2,html结构
<div class="process_list-lpu">
                <div class="process_line"></div>
                <div class="content_list">
                    <ul>
                        <li><a href="javascipt:;">End customer get product<b>1</b></a> </li>
                        <li><a href="javascipt:;">Log in EFOSE website and present installation or maintenance requirements <b>2</b></a></li>
                        <li><a href="javascipt:;">EFOSE prefer contact service point<b>3</b></a> </li>
                        <li style="margin-left:115px;"><a href="javascipt:;">Customer contact service point to get service<b>4</b></a> </li>
                        <li><a href="javascipt:;">Customer pays the bill directly or EFOSE pays the maintenance cost<b>5</b></a> </li>
                    </ul>
                    <div class="clear"></div>
                </div>

</div>3,主要的css样式
.line-lpu{ height:55px; position:relative; width:100%; overflow:hidden;}
    .line-lpu span{ width:43px; height:46px; background:url('https://www.efose.com/images/banners/lpu_03.png') no-repeat; position:absolute;top:0;}
    .border-lpu{border-bottom:1px  solid #959595; height:23px; }
     .join-lpu li{ width:19%; float:left; margin-right:8px;background:none; padding:0; }
    .join-lpu li a{ display:block; color:#606060; text-decoration:none; border:1px solid #959595; min-height:215px; padding:10px;position:relative; overflow:hidden;}
    .join-lpu li a:hover{border:1px solid #337ab7;}
    .join-lpu li b{ font-size:60px; position:absolute; bottom:7px; right:-1px; font-style:italic; color:#c7c7c7;}
    .clear{clear:both;}
    .step-lpu span{ background:url('https://www.efose.com/images/banners/icon-lpu.png') no-repeat; display:block; width:75px; height:65px; margin-left:28px;}
    .step-lpu .icon0{ background-position:0 0;}
    .step-lpu .icon1{ background-position:0 -70px;}
    .step-lpu .icon2{ background-position:0 -140px;}
    .step-lpu .icon3{ background-position:0 -204px; height:58px; margin-bottom:7px;}
.step-lpu .icon4{ background-position:0 -260px;}4,JavaScript的编写
<script type="text/javascript">
        //实例化animationHover对象
        window.onload = function(){
            var ah = new animationHover();
            ah.init();
        };
        //初始化标签对象
        function animationHover(){
            this.step = document.getElementById('step');
            this.stepLi = this.step.getElementsByTagName('li');
            this.line = document.getElementById('line');
            this.attr = null;
            this.timer = null;
            this.target = null;

            }
        //初始化事件
        animationHover.prototype.init=function(){
            This =this;
            for(var i=0;i<this.stepLi.length;i++){
                this.stepLi[i].index=i;
                //给li标签绑定事件
                this.stepLi[i].onmouseover=function(e){
                    var myIndex=this.index;
                    This.onOver(This.line,(myIndex*162+55));
                    };
                this.stepLi[i].onmouseout=function(){
                   This.line.style.left=myIndex*162+55+'px';
                    };

                }
            };
        //定义鼠标经过的处理函数
        animationHover.prototype.onOver=function(obj,target){
            This=this;
            clearInterval(this.timer);
            This.target=target;
            timer=setInterval(function(){
                var target=This.target; //停止的目标点
                var attrValue=parseInt(This.getStyle(obj,'left'));
                var dx=target-attrValue; //距目标点的"路程"
                var speed=1/10*dx;
                speed=speed>0?Math.ceil(speed):Math.floor(speed);
                            //防止取整引起的抖动
                if(target==attrValue) clearInterval(timer);
                            //如果到达目标点,关闭定时器
                else{
                    obj.style.left=attrValue+speed+'px';
                }
                },100);

            };
        //获取当前标签对象的css属性值
        animationHover.prototype.getStyle =function(obj,attr){
            if(obj.currentStyle){
                return obj.currentStyle[attr];
            }else{
                return getComputedStyle(obj,false)[attr];
            }
            };
</script>感谢你能够认真阅读完这篇文章,希望小编分享的“html+css+javascript实现跟随鼠标移动显示选中效果 的方法”这篇文章对大家有帮助,同时也希望大家多多支持亿速云,关注亿速云行业资讯频道,更多相关知识等着你来学习!
亿速云「云服务器」,即开即用、新一代英特尔至强铂金CPU、三副本存储NVMe SSD云盘,价格低至29元/月。点击查看>>
免责声明:本站发布的内容(图片、视频和文字)以原创、转载和分享为主,文章观点不代表本网站立场,如果涉及侵权请联系站长邮箱:is@yisu.com进行举报,并提供相关证据,一经查实,将立刻删除涉嫌侵权内容。
原文链接:https://www.jb51.net/css/672310.html


 计算
计算 安全
安全 数据库
数据库 网络和加速
网络和加速 企业服务
企业服务


