本篇内容介绍了“R语言中Legend 函数的参数怎么用”的有关知识,在实际案例的操作过程中,不少人都会遇到这样的困境,接下来就让小编带领大家学习一下如何处理这些情况吧!希望大家仔细阅读,能够学有所成!
legend(x, y = NULL, legend, fill = NULL, col = par("col"),
border = "black", lty, lwd, pch,
angle = 45, density = NULL, bty = "o", bg = par("bg"),
box.lwd = par("lwd"), box.lty = par("lty"), box.col = par("fg"),
pt.bg = NA, cex = 1, pt.cex = cex, pt.lwd = lwd,
xjust = 0, yjust = 1, x.intersp = 1, y.intersp = 1,
adj = c(0, 0.5), text.width = NULL, text.col = par("col"),
text.font = NULL, merge = do.lines && has.pch, trace = FALSE,
plot = TRUE, ncol = 1, horiz = FALSE, title = NULL,
inset = 0, xpd, title.col = text.col, title.adj = 0.5,
seg.len = 2)
x, y | X,y用于定位图例,也可用单键词"bottomright", "bottom", "bottomleft", "left", "topleft", "top", "topright", "right" and "center" |
legend | 字符或表达式向量 |
fill | 用特定的颜色进行填充 |
col | 图例中出现的点或线的颜色 |
border | 当fill = 参数存在的情况下,填充色的边框 |
lty, lwd | 图例中线的类型与宽度 |
pch | 点的类型 |
angle | 阴影的角度 |
density | 阴影线的密度 |
bty | 图例框是否画出,o为画出,默认为n不画出 |
bg | bty != "n"时,图例的背景色 |
box.lty, box.lwd, box.col | bty = "o"时,图例框的类型,box.lty决定是否为虚线,box.lwd决定粗线,box.col决定颜色 |
pt.bg | 点的背景色 |
cex | 字符大小 |
pt.cex | 点的大小 |
pt.lwd | 点的边缘的线宽 |
x.intersp | 图例中文字离图片的水平距离 |
y.intersp | 图例中文字离图片的垂直距离 |
adj | 图例中字体的相对位置 |
text.width | 图例字体所占的宽度 |
text.col | 图例字体的颜色 |
text.font | 图例字体 |
merge | logical, if TRUE,合并点与线,但不填充图例框,默认为TRUE |
trace | logical; if TRUE显示图例信息. |
plot | logical. If FALSE不画出图例 |
ncol | 图例中分类的列数 |
horiz | logical; if TRUE,水平放置图例 |
title | 给图例加标题 |
inset | 当图例用关键词设置位置后,inset = 分数,可以设置其相对位置 |
xpd | xpd=FALSE,即不允许在作图区域外作图,改为TRUE即可,与par()参数配合使用。 |
title.col | 标题颜色 |
title.adj | 图例标题的相对位置,0.5为默认,在中间。0最左,1为最右。 |
seg.len | lty 与lwd的线长,长度单位为字符宽度 |
补充:R语言_legend()函数用法
Usage
legend(x, y = NULL, legend, fill = NULL, col = par("col"),
    border = "black", lty, lwd, pch,
    angle = 45, density = NULL, bty = "o", bg = par("bg"),
    box.lwd = par("lwd"), box.lty = par("lty"), box.col = par("fg"),
    pt.bg = NA, cex = 1, pt.cex = cex, pt.lwd = lwd,
    xjust = 0, yjust = 1, x.intersp = 1, y.intersp = 1,
    adj = c(0, 0.5), text.width = NULL, text.col = par("col"),
    text.font = NULL, merge = do.lines && has.pch, trace = FALSE,
    plot = TRUE, ncol = 1, horiz = FALSE, title = NULL,
    inset = 0, xpd, title.col = text.col, title.adj = 0.5,
seg.len = 2)x, y:用于定位图例,也可用单键词"bottomright", "bottom", "bottomleft", "left", "topleft", "top", "topright", "right" and "center"
legend:字符或表达式向量
fill:用特定的颜色进行填充
col:图例中出现的点或线的颜色
border:当fill = 参数存在的情况下,填充色的边框
lty, lwd:图例中线的类型与宽度
pch:点的类型
angle:阴影的角度
density:阴影线的密度
bty:图例框是否画出,o为画出,默认为n不画出
bg:bty != "n"时,图例的背景色
box.lty, box.lwd, box.col
bty = "o"时,图例框的类型,box.lty决定是否为虚线,box.lwd决定粗线,box.col :决定颜色
pt.bg:点的背景色
cex:字符大小
pt.cex:点的大小
pt.lwd:点的边缘的线宽
x.intersp:图例中文字离图片的水平距离
y.intersp:图例中文字离图片的垂直距离
adj:图例中字体的相对位置
text.width:图例字体所占的宽度
text.col:图例字体的颜色
text.font:图例字体
merge:logical, if TRUE,合并点与线,但不填充图例框,默认为TRUE
trace:logical; if TRUE显示图例信息.
plot:logical. If FALSE不画出图例
ncol:图例中分类的列数
horiz:logical; if TRUE,水平放置图例
title:给图例加标题
inset:当图例用关键词设置位置后,inset = 分数,可以设置其相对位置
xpd:xpd=FALSE,即不允许在作图区域外作图,改为TRUE即可,与par()参数配合使用。
title.col:标题颜色
title.adj:图例标题的相对位置,0.5为默认,在中间。0最左,1为最右。
seg.len:lty 与lwd的线长,长度单位为字符宽度
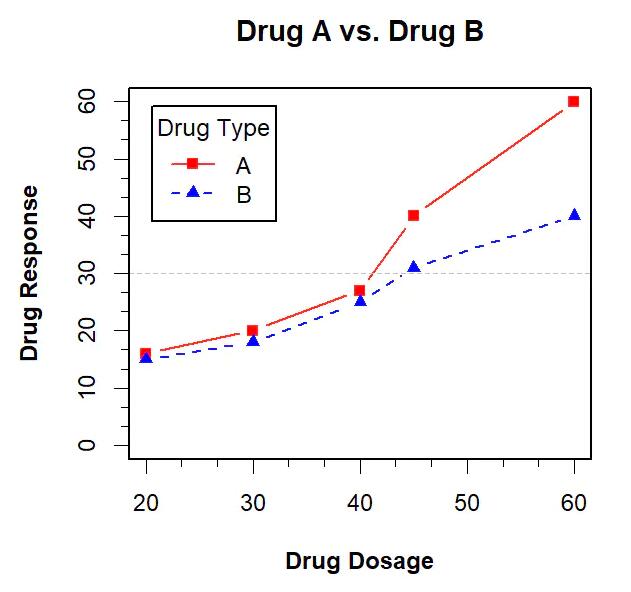
> legend("topleft", inset=.05, title="Drug Type", c("A","B"),
+    lty=c(1, 2), pch=c(15, 17), col=c("red", "blue"))
“R语言中Legend 函数的参数怎么用”的内容就介绍到这里了,感谢大家的阅读。如果想了解更多行业相关的知识可以关注亿速云网站,小编将为大家输出更多高质量的实用文章!
免责声明:本站发布的内容(图片、视频和文字)以原创、转载和分享为主,文章观点不代表本网站立场,如果涉及侵权请联系站长邮箱:is@yisu.com进行举报,并提供相关证据,一经查实,将立刻删除涉嫌侵权内容。