本篇文章给大家分享的是有关使用PyTorch怎么读取数据,小编觉得挺实用的,因此分享给大家学习,希望大家阅读完这篇文章后可以有所收获,话不多说,跟着小编一起来看看吧。
pandas 用于方便操作含有字符串的表文件,如csv
zipfile python内置的文件解压包
cv2 用于图片处理的模块,读入的图片模块为BGR,N H W C
torchvision.transforms 用于图片的操作库,比如随机裁剪、缩放、模糊等等,可用于数据的增广,但也不仅限于内置的图片操作,也可以自行进行图片数据的操作,这章也会讲解
torch.utils.data.Dataset torch内置的对象类型
torch.utils.data.DataLoader 和Dataset配合使用可以实现数据的加速读取和随机读取等等功能
import zipfile # 解压
import pandas as pd # 操作数据
import os # 操作文件或文件夹
import cv2 # 图像操作库
import matplotlib.pyplot as plt # 图像展示库
from torch.utils.data import Dataset # PyTorch内置对象
from torchvision import transforms # 图像增广转换库 PyTorch内置
import torch
数据下载到此处
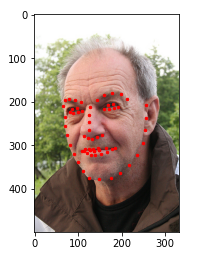
我们先初步编写一个脚本来实现图片的展示
# 解压文件到指定目录
def unzip_file(root_path, filename):
  full_path = os.path.join(root_path, filename)
  file = zipfile.ZipFile(full_path)
  file.extractall(root_path)
unzip_file(root_path, zip_filename)

# 读入csv文件
face_landmarks = pd.read_csv(os.path.join(extract_path, csv_filename))

# pandas读出的数据如想要操作索引 使用iloc
image_name = face_landmarks.iloc[:,0]
landmarks = face_landmarks.iloc[:,1:]

# 展示
def show_face(extract_path, image_file, face_landmark):
  plt.imshow(plt.imread(os.path.join(extract_path, image_file)), cmap='gray')
  point_x = face_landmark.to_numpy()[0::2]
  point_y = face_landmark.to_numpy()[1::2]
  plt.scatter(point_x, point_y, c='r', s=6)

show_face(extract_path, image_name.iloc[1], landmarks.iloc[1])
实现MyDataset
使用内置库是我们的代码更加的规范,并且可读性也大大增加
继承Dataset,需要我们实现的有两个地方:
实现__len__返回数据的长度,实例化调用len()时返回
__getitem__给定数据的索引返回对应索引的数据如:a[0]
transform 数据的额外操作时调用
class FaceDataset(Dataset):
  def __init__(self, extract_path, csv_filename, transform=None):
    super(FaceDataset, self).__init__()
    self.extract_path = extract_path
    self.csv_filename = csv_filename
    self.transform = transform
    self.face_landmarks = pd.read_csv(os.path.join(extract_path, csv_filename))
  def __len__(self):
    return len(self.face_landmarks)
  def __getitem__(self, idx):
    image_name = self.face_landmarks.iloc[idx,0]
    landmarks = self.face_landmarks.iloc[idx,1:].astype('float32')
    point_x = landmarks.to_numpy()[0::2]
    point_y = landmarks.to_numpy()[1::2]
    image = plt.imread(os.path.join(self.extract_path, image_name))
    sample = {'image':image, 'point_x':point_x, 'point_y':point_y}
    if self.transform is not None:
      sample = self.transform(sample)
    return sample
测试功能是否正常
face_dataset = FaceDataset(extract_path, csv_filename)
sample = face_dataset[0]
plt.imshow(sample['image'], cmap='gray')
plt.scatter(sample['point_x'], sample['point_y'], c='r', s=2)
plt.title('face')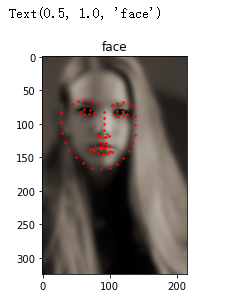
内置的在torchvision.transforms模块下,由于我们的数据结构不能满足内置模块的要求,我们就必须自己实现
图片的缩放,由于缩放后人脸的标注位置也应该发生对应的变化,所以要自己实现对应的变化
class Rescale(object):
  def __init__(self, out_size):
    assert isinstance(out_size,tuple) or isinstance(out_size,int), 'out size isinstance int or tuple'
    self.out_size = out_size
  def __call__(self, sample):
    image, point_x, point_y = sample['image'], sample['point_x'], sample['point_y']
    new_h, new_w = self.out_size if isinstance(self.out_size,tuple) else (self.out_size, self.out_size)
    new_image = cv2.resize(image,(new_w, new_h))
    h, w = image.shape[0:2]
    new_y = new_h / h * point_y
    new_x = new_w / w * point_x
return {'image':new_image, 'point_x':new_x, 'point_y':new_y}将数据转换为torch认识的数据格式因此,就必须转换为tensor注意: cv2和matplotlib读出的图片默认的shape为N H W C,而torch默认接受的是N C H W因此使用tanspose转换维度,torch转换多维度使用permute
class ToTensor(object):
  def __call__(self, sample):
    image, point_x, point_y = sample['image'], sample['point_x'], sample['point_y']
    new_image = image.transpose((2,0,1))
    return {'image':torch.from_numpy(new_image), 'point_x':torch.from_numpy(point_x), 'point_y':torch.from_numpy(point_y)}
测试
transform = transforms.Compose([Rescale((1024, 512)), ToTensor()])
face_dataset = FaceDataset(extract_path, csv_filename, transform=transform)
sample = face_dataset[0]
plt.imshow(sample['image'].permute((1,2,0)), cmap='gray')
plt.scatter(sample['point_x'], sample['point_y'], c='r', s=2)
plt.title('face')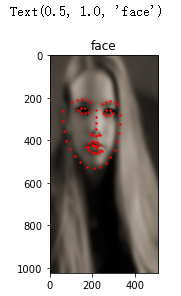
data_loader = DataLoader(face_dataset, batch_size=4, shuffle=True, num_workers=0)
for i in data_loader:
  print(i['image'].shape)
  break
torch.Size([4, 3, 1024, 512])
注意: windows环境尽量不使用num_workers会发生报错
以上就是使用PyTorch怎么读取数据,小编相信有部分知识点可能是我们日常工作会见到或用到的。希望你能通过这篇文章学到更多知识。更多详情敬请关注亿速云行业资讯频道。
免责声明:本站发布的内容(图片、视频和文字)以原创、转载和分享为主,文章观点不代表本网站立场,如果涉及侵权请联系站长邮箱:is@yisu.com进行举报,并提供相关证据,一经查实,将立刻删除涉嫌侵权内容。


